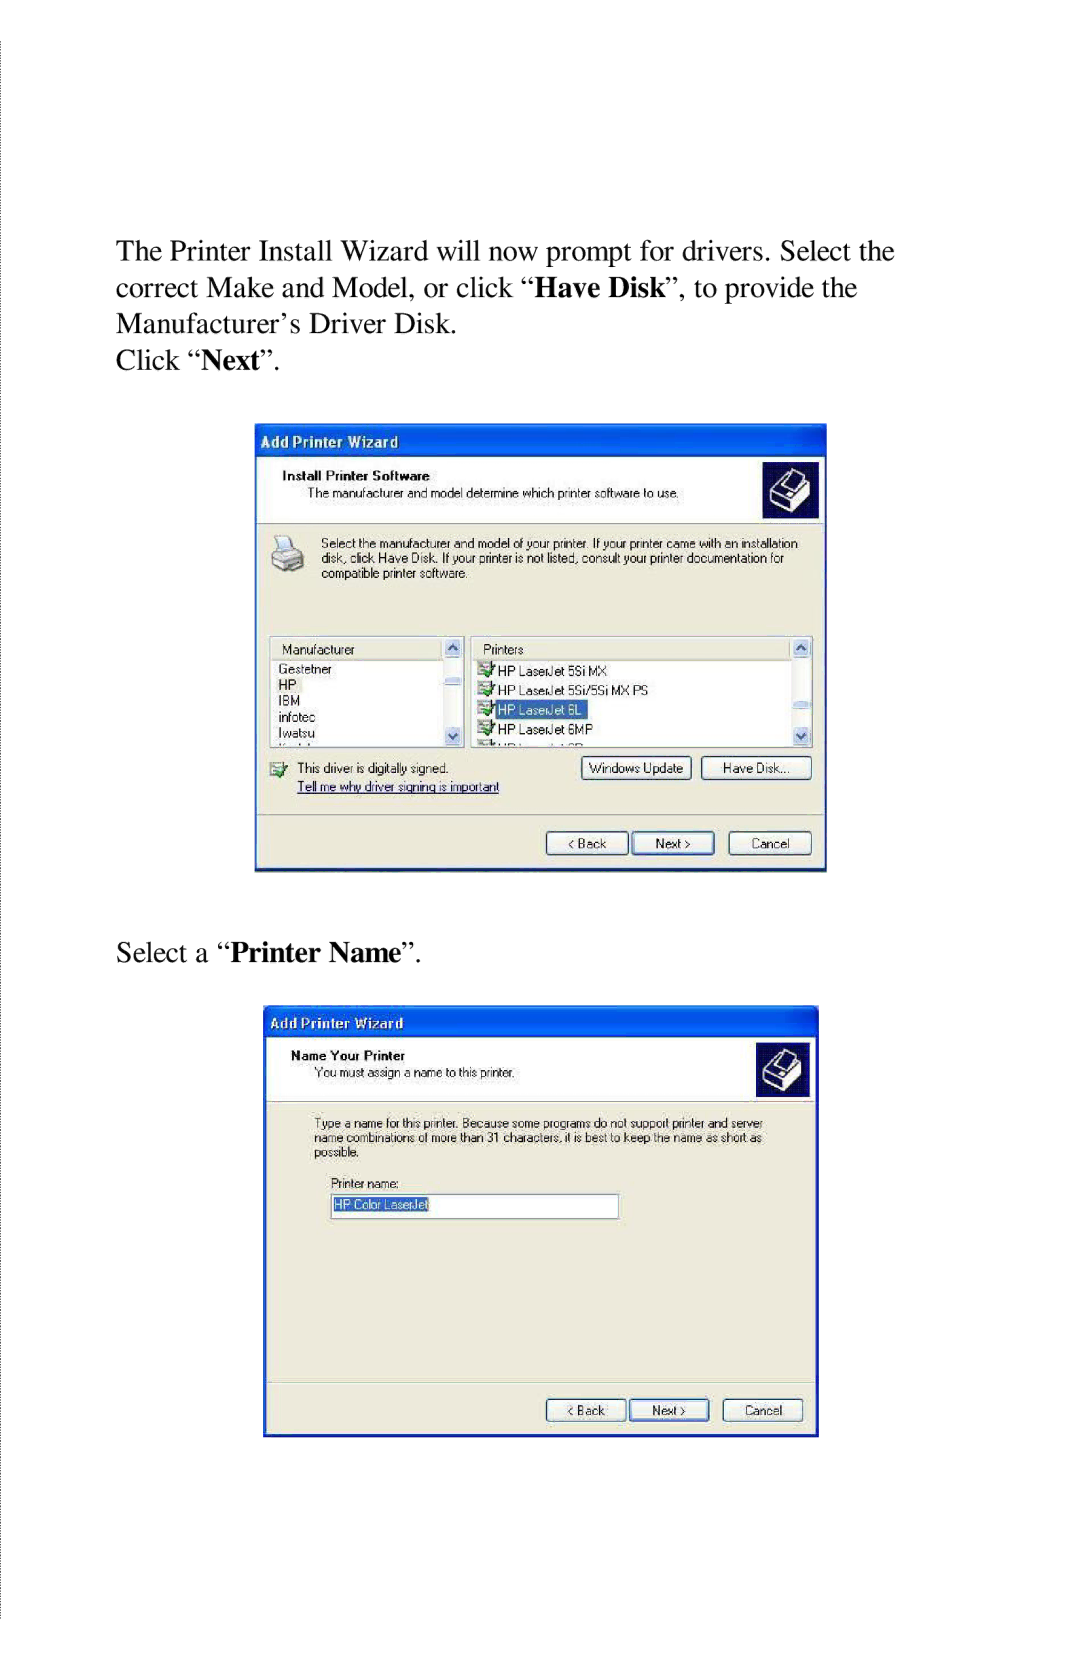
Page
TABLE OF CONTENTS
HARDWARE INSTALLATION
USING THE UTILITIES
Installing PS-Utility
INSTALLING THE LPR FOR TCP/IP PRINTING CLIENT
LIMITED WARRANTY
PRINTING IN WINDOWS 7/VISTA/XP/2000
PRINTING IN MAC OS
ABOUT THIS GUIDE
Page
INTRODUCTION
Package Contents
System Requirements
General Features
Product View
Power Connector - plug the AC Power Adapter to this jack
LAN Connector - plug your LAN cable to this connector
Front View
There are three green LED indicators on the rear panel
Power
LEDs
Description
HARDWARE INSTALLATION
Networking Application
The following diagram explains the application of your print server
Network Print Server Solution
Installing the Print Server
USING THE UTILITIES
Auto-Run Installation
∙ Product Registration- click to register your product on-line
∙ Exit - click to close the Auto-Run program
Installing PS-Utility
PS-Utility
1. Insert CD-ROM into CD-ROM drive. Click Install Utility PS
Utility
Using PS-Utility
Start\Programs\TRENDnet
Component Features
Device List Display the connected print server within the network
Your print server
Control Buttons
PS Wizard
Windows 7/Vista/2003 Server/2000
Page
Page
4 Click Next
5 Click Print Test Page
6 Click OK
Windows 98SE/ME
Next
3. Select the printer port in the Print Server List, and click Next
Choose one connected printer within the network
4. The configuration is completed, click Finish
5. Click OK to reboot the computer
Choose one connected printer port
Your print server name Your printer port name
Page
WEB CONFIGURATION
Web Configuration Utility
Home
The Management Screen of the Configuration Utility
Setup Wizard
System
IP Address
Microsoft Network
Second HTTP Port
Save to Print Server
The Setup Wizard has been completed
Change IP Address
Printer Information
Factory Reset
Please click Yes to restore the factory default setting
Firmware Upgrade
About
This screen displays the information of the print server
98SE/ME
PRINTING IN WINDOWS
Installing the LPR for TCP/IP Printing Client
8. Select the LPR for TCP/IP Printing client and click OK
Adding LPR Printer Ports
6. Click OK to leave the LPR for TCP/IP Printing Properties window
Printing from Windows 98SE/ME
Page
Press OK when you have located the proper printer port
Click Next to continue to the next step
Setting TCP/IP Printing Settings
The parameters are as follows
Setting Up Windows 7/Vista TCP/IP Printing
7/VISTA/XP/2000
PRINTING IN WINDOWS
Click Start Control Panel Printers
Page
Page
Select “Custom”, and click “Settings”
Click “Next”
A Test Page can be printed to confirm proper configuration
Select a “Printer Name”
Setting Up Windows XP TCP/IP Printing
Once a test page has been sent to your printer, click Close
Click Finish
Click Start Printer and Faxes
Double Click “Add a Printer” Click “Next”
Select “Local Printer” Create a new “Standard TCP/IP Port”
Click “Next”
Select “Custom”, and click “Settings”
Click “Next” Click “Finish”
Click “Next” Select a “Printer Name”
A Test Page can be printed to confirm proper configuration
Setting Up Windows 2000 TCP/IP Printing
Click Start Settings Printers
Double Click “Add Printer”
Select “Local Printer”
Create a new “Standard TCP/IP Port”
Click “Next”
Select “Custom”, and click “Settings”
Click “Next”
Click “Finish”
Click “Next” Select a “Printer Name”
Sharing can be enabled here
Also, a Test Page can be printed to confirm proper configuration
Page
PRINTING IN MAC OS
MAC 10.6 SNOW LEOPARD USER
Page
Adding a Printer
Bonjour-enabled Printers
Click the Add button to exit the window and implement the new setting
Adding an IP Printer
To add an Internet Printing Protocol enabled, Line Printer Daemon
Socket are basically the same. Please find the example below
For set up LPD Printing
For set up IPP Printing
“ second port”
For set up Socket Printing
Page
MAC 10.5 LEOPARD USER
Page
Adding a Printer
The following screen will appear
Click the add button “+” to add a new printer
Mac OS X Leopard 10.5 supports five printing protocols 1. AppleTalk
AppleTalk-enabled or Bonjour-enabled Printers
Click the Add button to exit the window and implement the new setting
To add an Internet Printing Protocol enabled, Line Printer Daemon
enabled or HP Jet Direct - Socket enabled printer, click the button
Adding an IP Printer
Select the desired printing protocol from the Protocol drop-down menu
For set up LPD Printing
For set up IPP Printing
“ second port”
For set up Socket Printing
Page
MAC OS 10.4 TIGER USER
Page
Adding a Printer
Use the Go menu at the top tool bar and select Applications option and find the Utilities folder or open the Utilities folder directly in Go menu
Mac OS X Tiger 10.4 supports five printing protocols 1. AppleTalk
2. Bonjour 3. Internet Printing Protocol IPP
4. Line Printer Daemon LPD 5. HP Jet Direct - Socket
AppleTalk-enabled or Bonjour-enabled Printers
Page
The setup procedures for these three printing protocols Internet
Adding an IP Printer
For set up LPD Printing
For set up IPP Printing
For set up Socket Printing
Page
Page
MAC OS 10.3 PANTHER USER
Adding a Printer
Printer List window
AppleTalk-enabled or Rendezvous-enabled Printers
Page
The printer that has just been added will show up in the Printer List menu, it might take a few seconds depending on network conditions. When the printer appears listed it is ready for use
Adding an IP Printer
Set up LPD Printing
Rendezvous Uses in MAC OS
4. To implement the setting, click Add button
drop-down menu if the model is not listed
2. Select Rendezvous from the pop-up menu
5. The printer is installed into the system successfully
LIMITED WARRANTY
AC/DC Power Adapter, Cooling Fan, and Power Supply carry 1 year
warranty
OTHER WARRANTIES, EXPRESSED OR IMPLIED, EITHER IN FACT OR BY OPERATION OF LAW, STATUTORY OR OTHERWISE, INCLUDING WARRANTIES OF MERCHANTABILITY AND FITNESS FOR A PARTICULAR PURPOSE. TRENDNET NEITHER ASSUMES NOR AUTHORIZES ANY OTHER PERSON TO ASSUME FOR IT ANY OTHER LIABILITY IN CONNECTION WITH THE SALE, INSTALLATION MAINTENANCE OR USE OF TRENDNET’S PRODUCTS