• F2 Scan:
Pressing [F2] initiates the Quick View Scan Mode, in which the OSD cycles through all the ports that have been selected for Quick View Scanning (see F4, below), and displays each one for the amount of time set with the Set Scan Duration function (see F6, below). When you want to stop at a particular location, press any key to stop scanning.
Note: (1) If the scanning stops on an empty port, or one where the computer is attached but is powered Off, the monitor screen will be blank, and the mouse and keyboard will have no effect. To recover, key in the Hot Key sequence (see Hot Key Selection, above), for any Port ID that has an active PC attached.
(2)As the OSD cycles through the selected ports, an S appears in front of the Port ID display as each computer is accessed to indicate that the computer is being accessed under Quick View Scan Mode.
•F3 List:
Pressing [F3] brings up a submenu that lets you control the ports which the OSD lists:
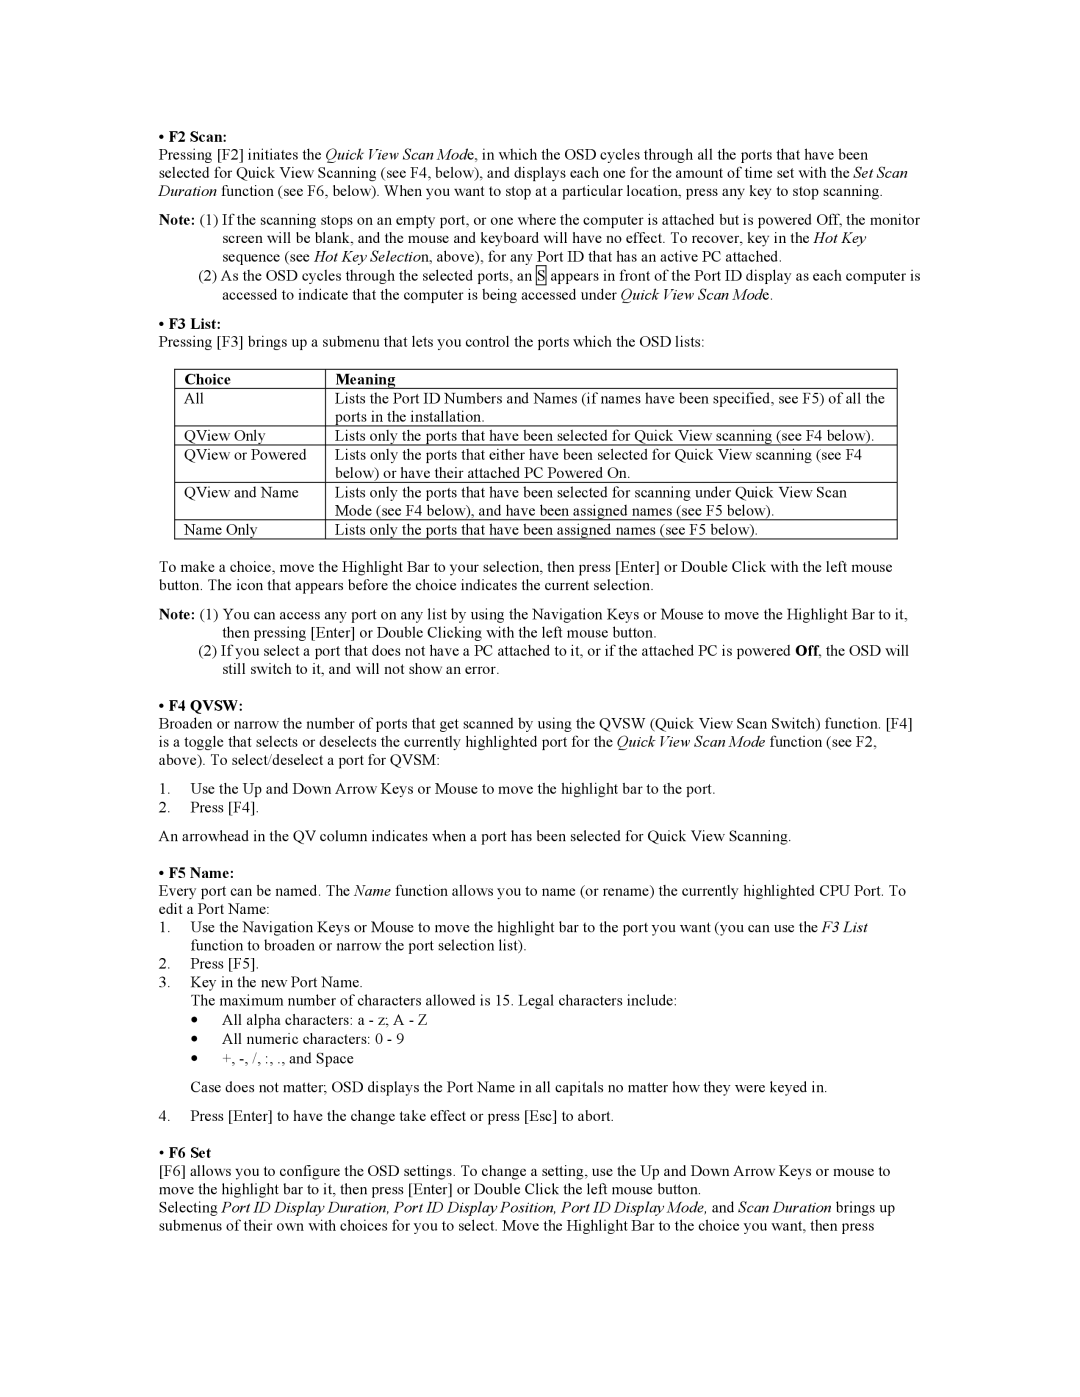
Choice | Meaning |
All | Lists the Port ID Numbers and Names (if names have been specified, see F5) of all the |
| ports in the installation. |
QView Only | Lists only the ports that have been selected for Quick View scanning (see F4 below). |
QView or Powered | Lists only the ports that either have been selected for Quick View scanning (see F4 |
| below) or have their attached PC Powered On. |
QView and Name | Lists only the ports that have been selected for scanning under Quick View Scan |
| Mode (see F4 below), and have been assigned names (see F5 below). |
Name Only | Lists only the ports that have been assigned names (see F5 below). |
To make a choice, move the Highlight Bar to your selection, then press [Enter] or Double Click with the left mouse button. The icon that appears before the choice indicates the current selection.
Note: (1) You can access any port on any list by using the Navigation Keys or Mouse to move the Highlight Bar to it, then pressing [Enter] or Double Clicking with the left mouse button.
(2)If you select a port that does not have a PC attached to it, or if the attached PC is powered Off, the OSD will still switch to it, and will not show an error.
•F4 QVSW:
Broaden or narrow the number of ports that get scanned by using the QVSW (Quick View Scan Switch) function. [F4] is a toggle that selects or deselects the currently highlighted port for the Quick View Scan Mode function (see F2, above). To select/deselect a port for QVSM:
1.Use the Up and Down Arrow Keys or Mouse to move the highlight bar to the port.
2.Press [F4].
An arrowhead in the QV column indicates when a port has been selected for Quick View Scanning.
• F5 Name:
Every port can be named. The Name function allows you to name (or rename) the currently highlighted CPU Port. To edit a Port Name:
1.Use the Navigation Keys or Mouse to move the highlight bar to the port you want (you can use the F3 List function to broaden or narrow the port selection list).
2.Press [F5].
3.Key in the new Port Name.
The maximum number of characters allowed is 15. Legal characters include:
•All alpha characters: a - z; A - Z
•All numeric characters: 0 - 9
•+,
Case does not matter; OSD displays the Port Name in all capitals no matter how they were keyed in.
4.Press [Enter] to have the change take effect or press [Esc] to abort.
•F6 Set
[F6] allows you to configure the OSD settings. To change a setting, use the Up and Down Arrow Keys or mouse to move the highlight bar to it, then press [Enter] or Double Click the left mouse button.
Selecting Port ID Display Duration, Port ID Display Position, Port ID Display Mode, and Scan Duration brings up submenus of their own with choices for you to select. Move the Highlight Bar to the choice you want, then press