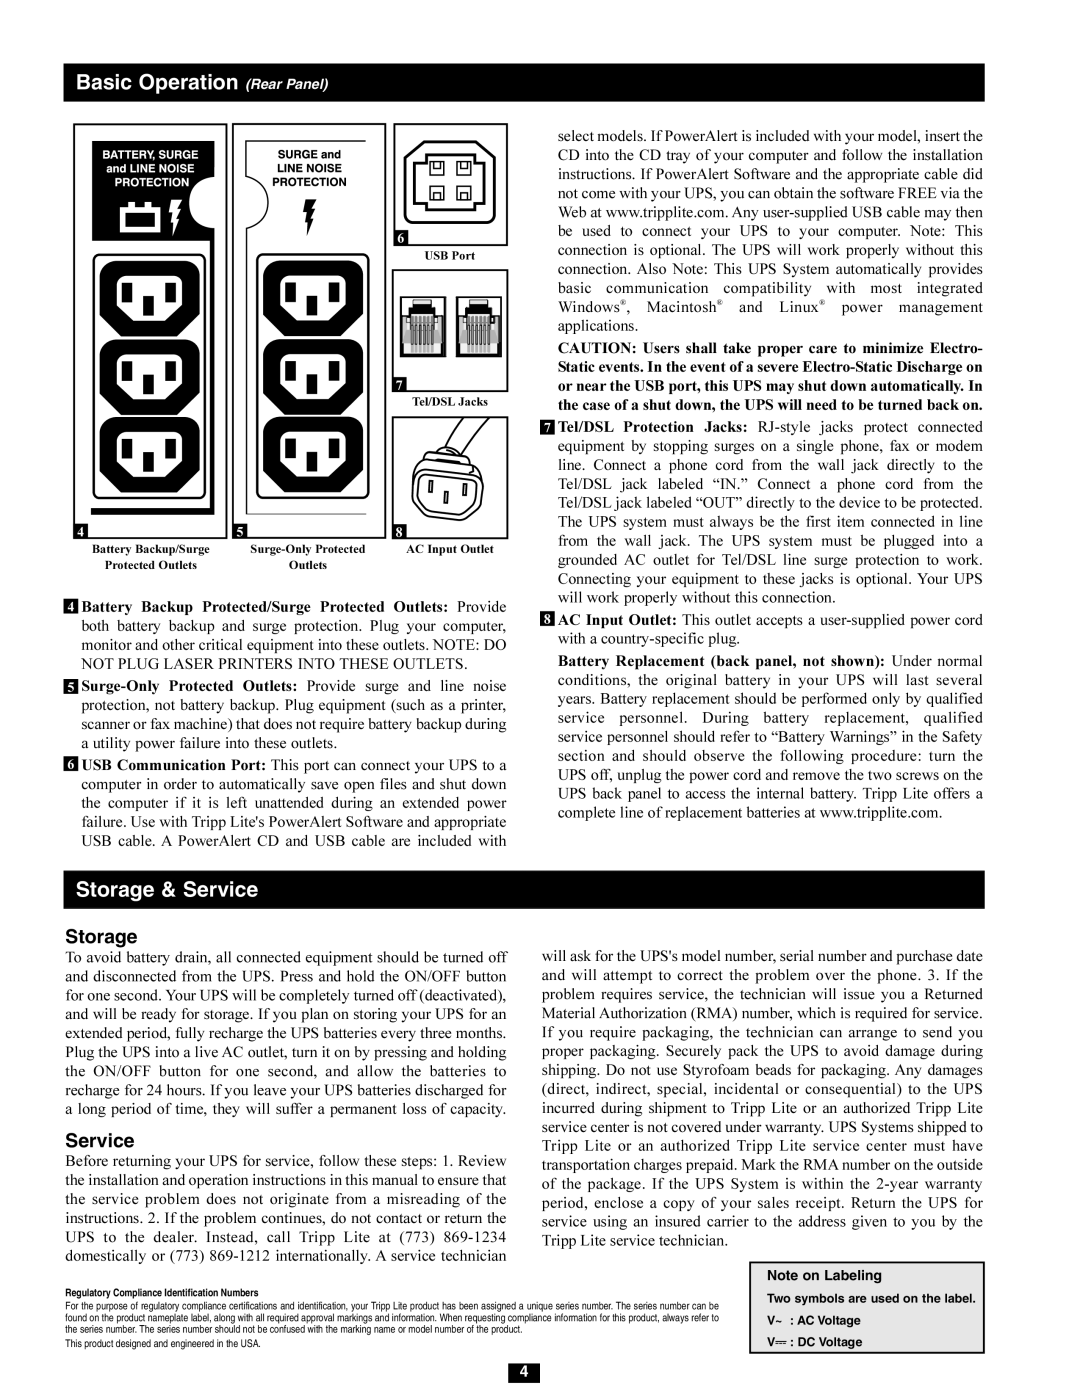
Basic Operation (Rear Panel)
4
Battery Backup/Surge
Protected Outlets
5
Outlets
6 |
USB Port
7
Tel/DSL Jacks
8 |
AC Input Outlet
select models. If PowerAlert is included with your model, insert the CD into the CD tray of your computer and follow the installation instructions. If PowerAlert Software and the appropriate cable did not come with your UPS, you can obtain the software FREE via the Web at www.tripplite.com. Any
CAUTION: Users shall take proper care to minimize Electro- Static events. In the event of a severe
7 Tel/DSL Protection Jacks:
4 Battery Backup Protected/Surge Protected Outlets: Provide both battery backup and surge protection. Plug your computer, monitor and other critical equipment into these outlets. NOTE: DO NOT PLUG LASER PRINTERS INTO THESE OUTLETS.
5
6USB Communication Port: This port can connect your UPS to a computer in order to automatically save open files and shut down the computer if it is left unattended during an extended power failure. Use with Tripp Lite's PowerAlert Software and appropriate USB cable. A PowerAlert CD and USB cable are included with
8AC Input Outlet: This outlet accepts a
Battery Replacement (back panel, not shown): Under normal conditions, the original battery in your UPS will last several years. Battery replacement should be performed only by qualified service personnel. During battery replacement, qualified service personnel should refer to “Battery Warnings” in the Safety section and should observe the following procedure: turn the UPS off, unplug the power cord and remove the two screws on the UPS back panel to access the internal battery. Tripp Lite offers a complete line of replacement batteries at www.tripplite.com.
Storage & Service
Storage
To avoid battery drain, all connected equipment should be turned off and disconnected from the UPS. Press and hold the ON/OFF button for one second. Your UPS will be completely turned off (deactivated), and will be ready for storage. If you plan on storing your UPS for an extended period, fully recharge the UPS batteries every three months. Plug the UPS into a live AC outlet, turn it on by pressing and holding the ON/OFF button for one second, and allow the batteries to recharge for 24 hours. If you leave your UPS batteries discharged for a long period of time, they will suffer a permanent loss of capacity.
Service
Before returning your UPS for service, follow these steps: 1. Review the installation and operation instructions in this manual to ensure that the service problem does not originate from a misreading of the instructions. 2. If the problem continues, do not contact or return the UPS to the dealer. Instead, call Tripp Lite at (773)
will ask for the UPS's model number, serial number and purchase date and will attempt to correct the problem over the phone. 3. If the problem requires service, the technician will issue you a Returned Material Authorization (RMA) number, which is required for service. If you require packaging, the technician can arrange to send you proper packaging. Securely pack the UPS to avoid damage during shipping. Do not use Styrofoam beads for packaging. Any damages (direct, indirect, special, incidental or consequential) to the UPS incurred during shipment to Tripp Lite or an authorized Tripp Lite service center is not covered under warranty. UPS Systems shipped to Tripp Lite or an authorized Tripp Lite service center must have transportation charges prepaid. Mark the RMA number on the outside of the package. If the UPS System is within the
Regulatory Compliance Identification Numbers
For the purpose of regulatory compliance certifications and identification, your Tripp Lite product has been assigned a unique series number. The series number can be found on the product nameplate label, along with all required approval markings and information. When requesting compliance information for this product, always refer to the series number. The series number should not be confused with the marking name or model number of the product.
This product designed and engineered in the USA.
Note on Labeling
Two symbols are used on the label.
V~ : AC Voltage
V![]() : DC Voltage
: DC Voltage
4
