Section 5: Maintenance
WARNING Before inspecting, cleaning or servicing the unit, shut off engine, wait for all parts to come to a complete stop, disconnect spark plug wire and move wire away from spark plug. Remove ignition key on elec- tric start models. Failure to follow these instructions can result in serious personal injury or property damage.
6.Disconnect the reverse cable wire from the
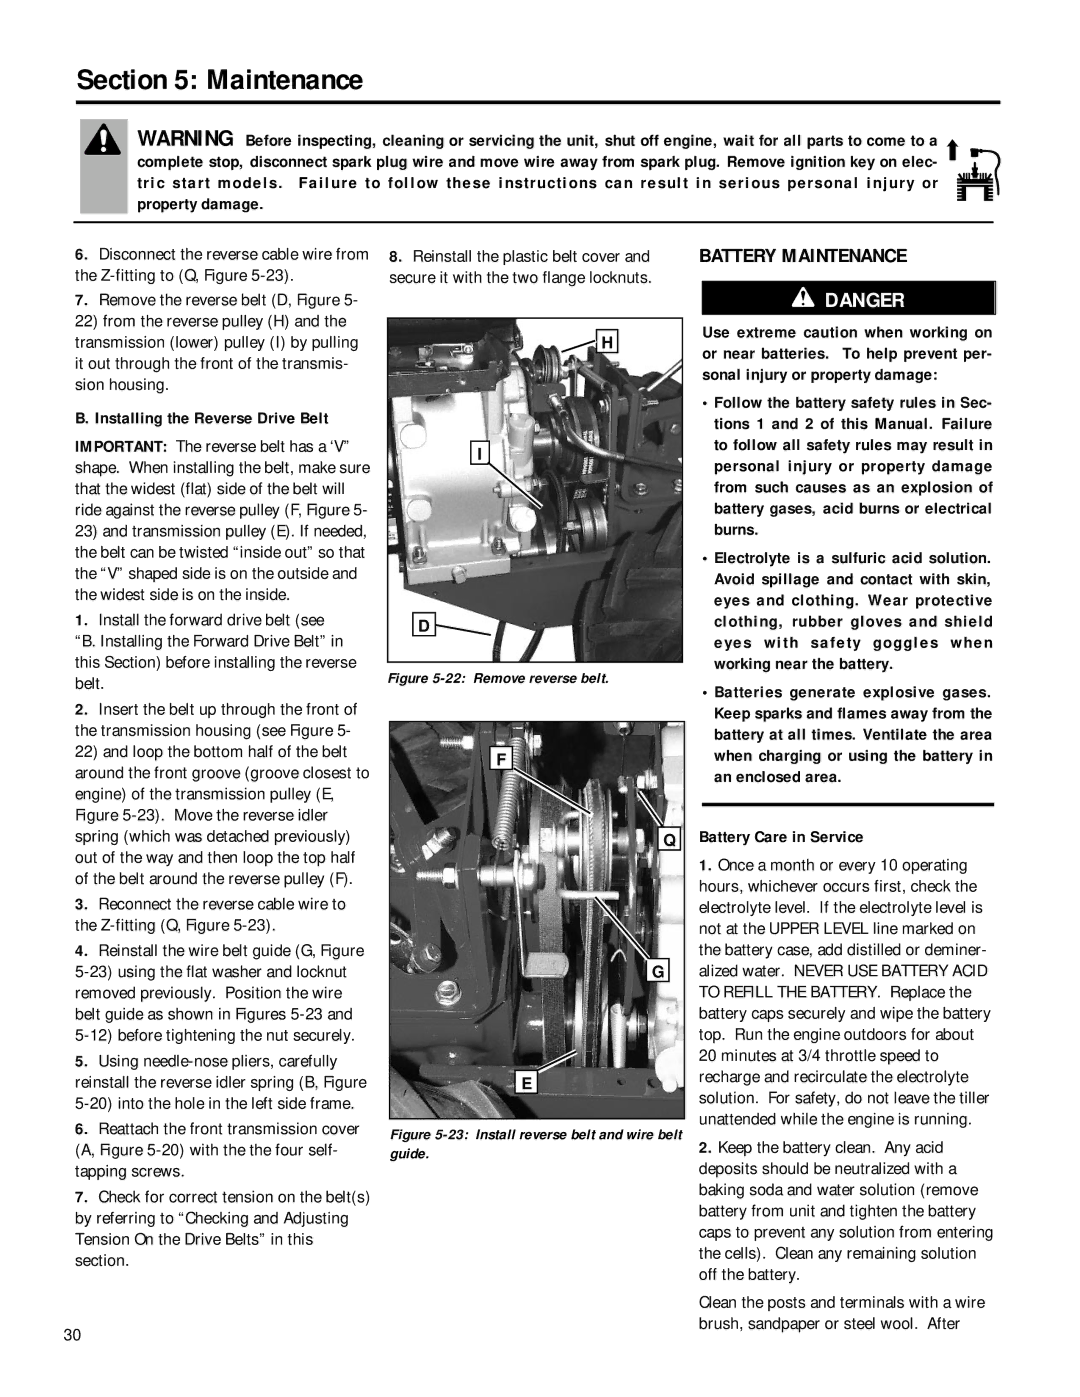
7.Remove the reverse belt (D, Figure 5- 22) from the reverse pulley (H) and the transmission (lower) pulley (I) by pulling it out through the front of the transmis- sion housing.
B. Installing the Reverse Drive Belt
IMPORTANT: The reverse belt has a ‘V” shape. When installing the belt, make sure that the widest (flat) side of the belt will ride against the reverse pulley (F, Figure 5-
23)and transmission pulley (E). If needed, the belt can be twisted “inside out” so that the “V” shaped side is on the outside and the widest side is on the inside.
1.Install the forward drive belt (see
“B. Installing the Forward Drive Belt” in this Section) before installing the reverse belt.
2.Insert the belt up through the front of the transmission housing (see Figure 5- 22) and loop the bottom half of the belt around the front groove (groove closest to engine) of the transmission pulley (E, Figure
3.Reconnect the reverse cable wire to the Z-fitting (Q, Figure 5-23).
4.Reinstall the wire belt guide (G, Figure
5-12) before tightening the nut securely.
5.Using
6.Reattach the front transmission cover (A, Figure
7.Check for correct tension on the belt(s) by referring to “Checking and Adjusting Tension On the Drive Belts” in this section.
8.Reinstall the plastic belt cover and secure it with the two flange locknuts.
H
I
D
Figure 5-22: Remove reverse belt.
F
Q
G
E
Figure 5-23: Install reverse belt and wire belt guide.
BATTERY MAINTENANCE
DANGER
Use extreme caution when working on or near batteries. To help prevent per- sonal injury or property damage:
•Follow the battery safety rules in Sec- tions 1 and 2 of this Manual. Failure to follow all safety rules may result in personal injury or property damage from such causes as an explosion of battery gases, acid burns or electrical burns.
•Electrolyte is a sulfuric acid solution. Avoid spillage and contact with skin, eyes and clothing. Wear protective clothing, rubber gloves and shield eyes with safety goggles when working near the battery.
•Batteries generate explosive gases. Keep sparks and flames away from the battery at all times. Ventilate the area when charging or using the battery in an enclosed area.
Battery Care in Service
1.Once a month or every 10 operating hours, whichever occurs first, check the electrolyte level. If the electrolyte level is not at the UPPER LEVEL line marked on the battery case, add distilled or deminer- alized water. NEVER USE BATTERY ACID TO REFILL THE BATTERY. Replace the battery caps securely and wipe the battery top. Run the engine outdoors for about
20minutes at 3/4 throttle speed to recharge and recirculate the electrolyte solution. For safety, do not leave the tiller unattended while the engine is running.
2.Keep the battery clean. Any acid deposits should be neutralized with a baking soda and water solution (remove battery from unit and tighten the battery caps to prevent any solution from entering the cells). Clean any remaining solution off the battery.
30
Clean the posts and terminals with a wire brush, sandpaper or steel wool. After