Wait until the fire is out and the stove has cooled. Be sure to follow the standard safety procedure for working with dusty materials: Wear safety goggles and a dust mask.

The procedure for replacing the gaskets is the same, regardless of the gasket location.

1.Remove the existing gasket by grasping an end and pulling firmly.

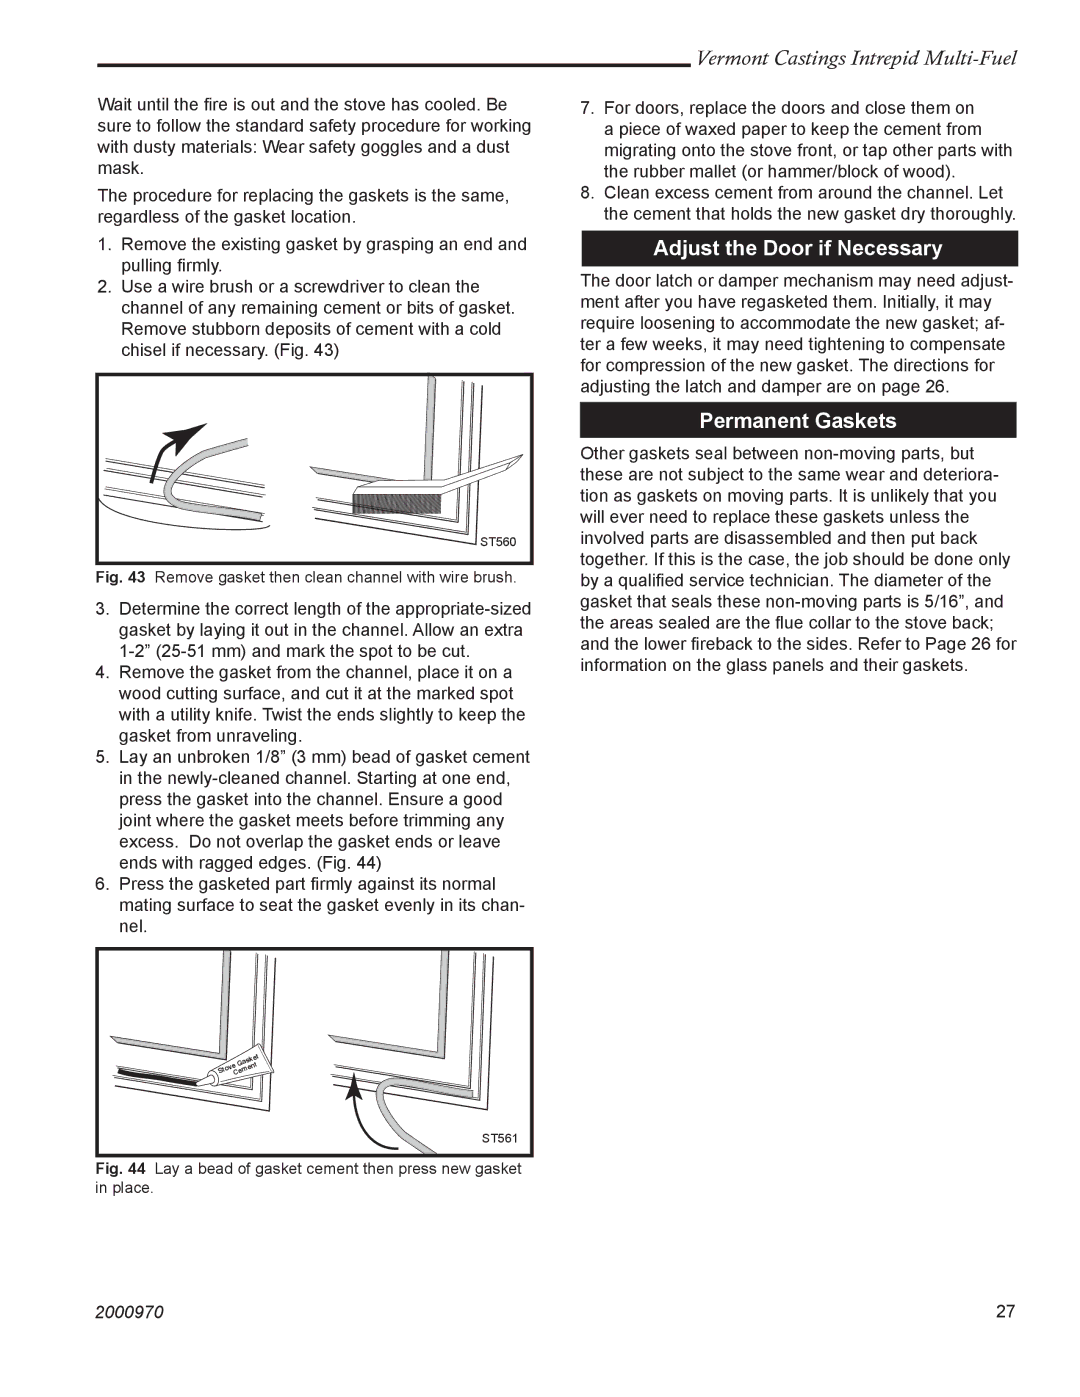
2.Use a wire brush or a screwdriver to clean the channel of any remaining cement or bits of gasket. Remove stubborn deposits of cement with a cold chisel if necessary. (Fig. 43)


ST560

Fig. 43

Remove gasket then clean channel with wire brush.

3.Determine the correct length of the appropriate-sized gasket by laying it out in the channel. Allow an extra 1-2” (25-51 mm) and mark the spot to be cut.

4.Remove the gasket from the channel, place it on a wood cutting surface, and cut it at the marked spot with a utility knife. Twist the ends slightly to keep the gasket from unraveling.

5.Lay an unbroken 1/8” (3 mm) bead of gasket cement in the newly-cleaned channel. Starting at one end, press the gasket into the channel. Ensure a good joint where the gasket meets before trimming any excess. Do not overlap the gasket ends or leave ends with ragged edges. (Fig. 44)

6.Press the gasketed part firmly against its normal mating surface to seat the gasket evenly in its chan- nel.


Gasket


ve


Sto Cement


ST561

Fig. 44

Lay a bead of gasket cement then press new gasket

in place.

Vermont Castings Intrepid Multi-Fuel

7.For doors, replace the doors and close them on a piece of waxed paper to keep the cement from migrating onto the stove front, or tap other parts with the rubber mallet (or hammer/block of wood).

8.Clean excess cement from around the channel. Let the cement that holds the new gasket dry thoroughly.

Adjust the Door if Necessary

The door latch or damper mechanism may need adjust- ment after you have regasketed them. Initially, it may require loosening to accommodate the new gasket; af- ter a few weeks, it may need tightening to compensate for compression of the new gasket. The directions for adjusting the latch and damper are on page 26.

Permanent Gaskets

Other gaskets seal between non-moving parts, but these are not subject to the same wear and deteriora- tion as gaskets on moving parts. It is unlikely that you will ever need to replace these gaskets unless the involved parts are disassembled and then put back together. If this is the case, the job should be done only by a qualified service technician. The diameter of the gasket that seals these non-moving parts is 5/16”, and the areas sealed are the flue collar to the stove back; and the lower fireback to the sides. Refer to Page 26 for information on the glass panels and their gaskets.

2000970

27

Page 27
Image 27
Vermont Casting 1695 installation instructions Adjust the Door if Necessary, Permanent Gaskets

1695 specifications

The Vermont Castings 1695 is a stellar model in the realm of wood stoves, noted for its blend of traditional craftsmanship and modern efficiency. This timeless piece not only serves as a functional heating solution but also as a stylish addition to home décor, making it a popular choice for homeowners seeking both utility and aesthetics.

One of the standout features of the Vermont Castings 1695 is its impressive heating capacity. With the ability to heat areas up to 2,000 square feet, this stove is ideal for larger living spaces or for providing supplementary heat in smaller homes. Its robust construction, crafted from heavy-duty cast iron, ensures that heat is evenly distributed throughout the room, creating a cozy atmosphere.

The 1695’s primary innovation lies in its advanced combustion technology. With a patented secondary combustion process, this wood stove maximizes efficiency by re-burning gases and particulates that would typically escape through the flue. This not only results in cleaner emissions, which is beneficial for the environment, but also means longer burn times and less frequent reloading of wood, allowing users to enjoy their fire without constant maintenance.

Moreover, the Vermont Castings 1695 features a smooth-operating air control system. This system enables users to easily adjust the burn rate, which helps to manage heat output and fuel consumption. This level of control ensures that the stove operates at peak efficiency, reducing waste and optimizing performance.

In terms of design, the Vermont Castings 1695 boasts an elegant look with a classic cast-iron façade and an attractive firebox window. The large viewing window allows users to enjoy the mesmerizing flames while providing a source of warmth. The design is not just visually appealing; the cast iron surface also retains heat well, radiating warmth long after the fire has died down.

Durability is another hallmark of the Vermont Castings brand, and the 1695 model is no exception. Built to last, it withstands the rigors of regular use, making it a wise investment for homeowners. Additionally, the stove is available in various finishes, allowing for customization to fit different home styles.

In summary, the Vermont Castings 1695 is a well-rounded wood stove that combines traditional aesthetics with modern technologies. Its efficiency, effective heating capability, and attractive design make it a favored choice among wood stove enthusiasts and environmentally conscious consumers alike. Whether used as a primary heating source or a supplemental one, this stove delivers warmth, comfort, and style.