Vermont Casting LHECDV20 Installation & Operating Instructions, with Zero Clearance Kit, 10004894

Models: LHECDV20 LHERDV30 LHECDV30 LHERDV20

1 32
Download 32 pages 7.47 Kb
Page 3
Image 3
Installation & Operating Instructions

LHEDV Series Direct Vent Insert

Installation & Operating Instructions

This gas appliance should be installed by a qualified installer in accordance with local building codes and with current CSA- B149.1 Installation codes for Gas Burning Appliances and Equipment. FOR U.S. Installations follow local codes and/or the current National Fuel Gas Code ANSI Z223.1/NFPA 54.

In the Commonwealth of Massachusetts, all gas fittings and installation of this heater shall only be done by a licensed gas fitter or licensed plumber.

FOR SAFE INSTALLATION AND OPERATION OF YOUR GAS FIREPLACE PLEASE NOTE THE FOLLOWING:

1.This appliance gives off high temperatures and should be located out of high traffic areas and away from furniture and draperies.

2.Children and adults should be alerted to the hazards of the high surface temperatures of this appliance and should stay away to avoid burns or ignition of clothing.

3.Children should be carefully supervised when they are in the same room as your appliance.

4.Under no circumstances should this appliance be modified. Parts removed for servicing should be replaced prior to operating this appliance again.

5.Installation and any repairs to this appliance should be car- ried out by a qualified service person. A professional service person should be contacted to inspect this appliance an- nually. Make it a practice to have all of your gas appliances checked annually. More frequent cleaning may be required due to excess lint and dust from carpeting, bedding material, etc.

6.Control compartments, burners and air passages in this ap- pliance should be kept clean and free of dust and lint. Make sure that the gas valve and pilot light are turned off before you attempt to clean this unit.

7.The venting system (chimney) of this appliance should be checked at least once a year and if needed your venting system should be cleaned.

8.Keep the area around your appliance clear of combustible materials, gasoline and other flammable vapor and liquids. This appliance should not be used as a drying rack for cloth- ing, nor should Christmas stockings or decorations be hung in the area of it.

9.Under no circumstances should any solid fuels (wood, coal, paper or cardboard etc.) be used in this appliance.

10.Whether the zero clearance kit is installed directly on carpet- ing, vinyl tile or any combustible material other than wood, this heater must be installed on a metal or wood panel extending the full width and depth of the heater. The insert can not be installed directly onto or into combustibles.

This appliance may be installed in an aftermarket per- manently located, manufactured (mobile) home, where not prohibited by local codes.

This appliance is only for use with the type of gas indi- cated on the rating plate.

Proposition 65 Warning: Fuels used in gas, wood- burning or oil fired appliances, and the products of combustion of such fuels, contain chemicals known to the State of California to cause cancer, birth defects and other reproductive harm.

California Health & Safety Code Sec. 25249.6

WARNING: Check with your electronics manufacturer before installing a television or other electronic de- vice above this fireplace.

IMPORTANT:

PLEASE READ THE FOLLOWING CAREFULLY

It is normal for fireplaces fabricated of steel to give off some expansion and/or contraction noises during the start up or cool down cycle. Similar noises are found with your furnace heat exchanger or car engine.

It is not unusual for your gas fireplace to give off some odor the first time it is burned. This is due to the curing of the paint and any undetected oil from the manufacturing process.

Please ensure that your room is well ventilated - open

all windows.

It is recommended that you burn your fireplace for at least ten

(10)hours the first time you use it. If optional fan kit has been installed, place fan in the "OFF" position during this time.

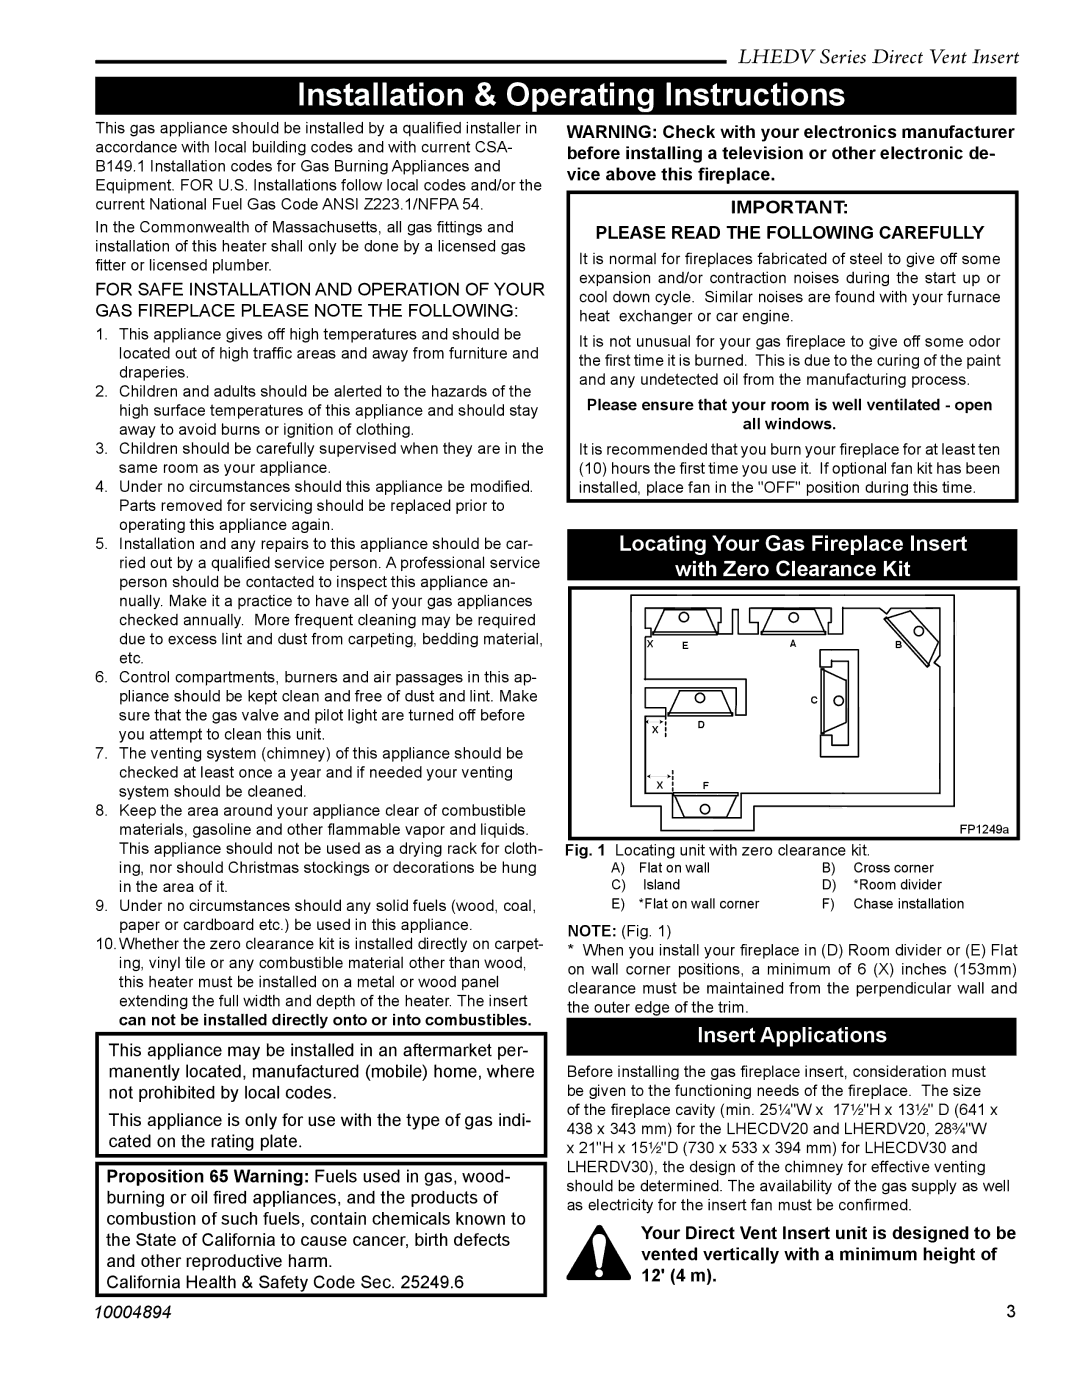
Locating Your Gas Fireplace Insert

with Zero Clearance Kit

X EAB

C

Locating Your Gas Fireplace Insert Xwith Zero Clearance KitInsert Applications D

X Manual background F

FP1249a

Fig. 1 Locating unit with zero clearance kit.

A)

Flat on wall

B)

Cross corner

C)

Island

D)

*Room divider

E)

*Flat on wall corner

F)

Chase installation

NOTE: (Fig. 1)

*When you install your fireplace in (D) Room divider or (E) Flat on wall corner positions, a minimum of 6 (X) inches (153mm) clearance must be maintained from the perpendicular wall and the outer edge of the trim.

Insert Applications

Before installing the gas fireplace insert, consideration must be given to the functioning needs of the fireplace. The size of the fireplace cavity (min. 25¹⁄"W x 17¹⁄"H x 13¹⁄" D (641 x 438 x 343 mm) for the LHECDV20 and LHERDV20, 28³⁄"W x 21"H x 15¹⁄"D (730 x 533 x 394 mm) for LHECDV30 and LHERDV30), the design of the chimney for effective venting should be determined. The availability of the gas supply as well as electricity for the insert fan must be confirmed.

Your Direct Vent Insert unit is designed to be vented vertically with a minimum height of 12' (4 m).

10004894

3

Page 3
Image 3
Vermont Casting LHECDV20 Installation & Operating Instructions, Locating Your Gas Fireplace Insert, Insert Applications