6.Install the ceiling support cathedral ceiling support box assembly, as appropriate.

7.Determine the distance from the appliance outlet to a point just above [approximately 12” (305 mm) to 24” (610 mm)] either the cathedral ceiling support box or the ceiling support plate and assemble lengths of pipe to satisfy this distance. Do not attach assembly to appli- ance.

8.Loosely position the support collar around the as- sembled lengths (flared end down).

9.From above, lower the assembled pipe sections down through the cathedral ceiling box or ceiling sup- port plate and attach it to the appliance adapter. The support collar should then be adjusted so that when the assembled lengths of pipe are attached to the ap- pliance, it rests on the bottom of the cathedral ceiling support box on top of the ceiling support plate.

10.Tighten the tabs of the collar. Secure the sup-

port collar by inserting three (3) #8 x 1/4” sheet metal screws through the support collar and the outer wall of the pipe.

NOTE: If the cathedral ceiling support box assembly is being used, it may be necessary to temporarily connect the assembled pipe to the appliance. Determine and mark the location of where the support collar will be at- tached to the pipe. Disconnect and remove assembled pipe. Attach the support collar per Step 10 (where marked) and reinstall assembly. This is due to limited space within the cathedral ceiling support box. Install any required offset supports.

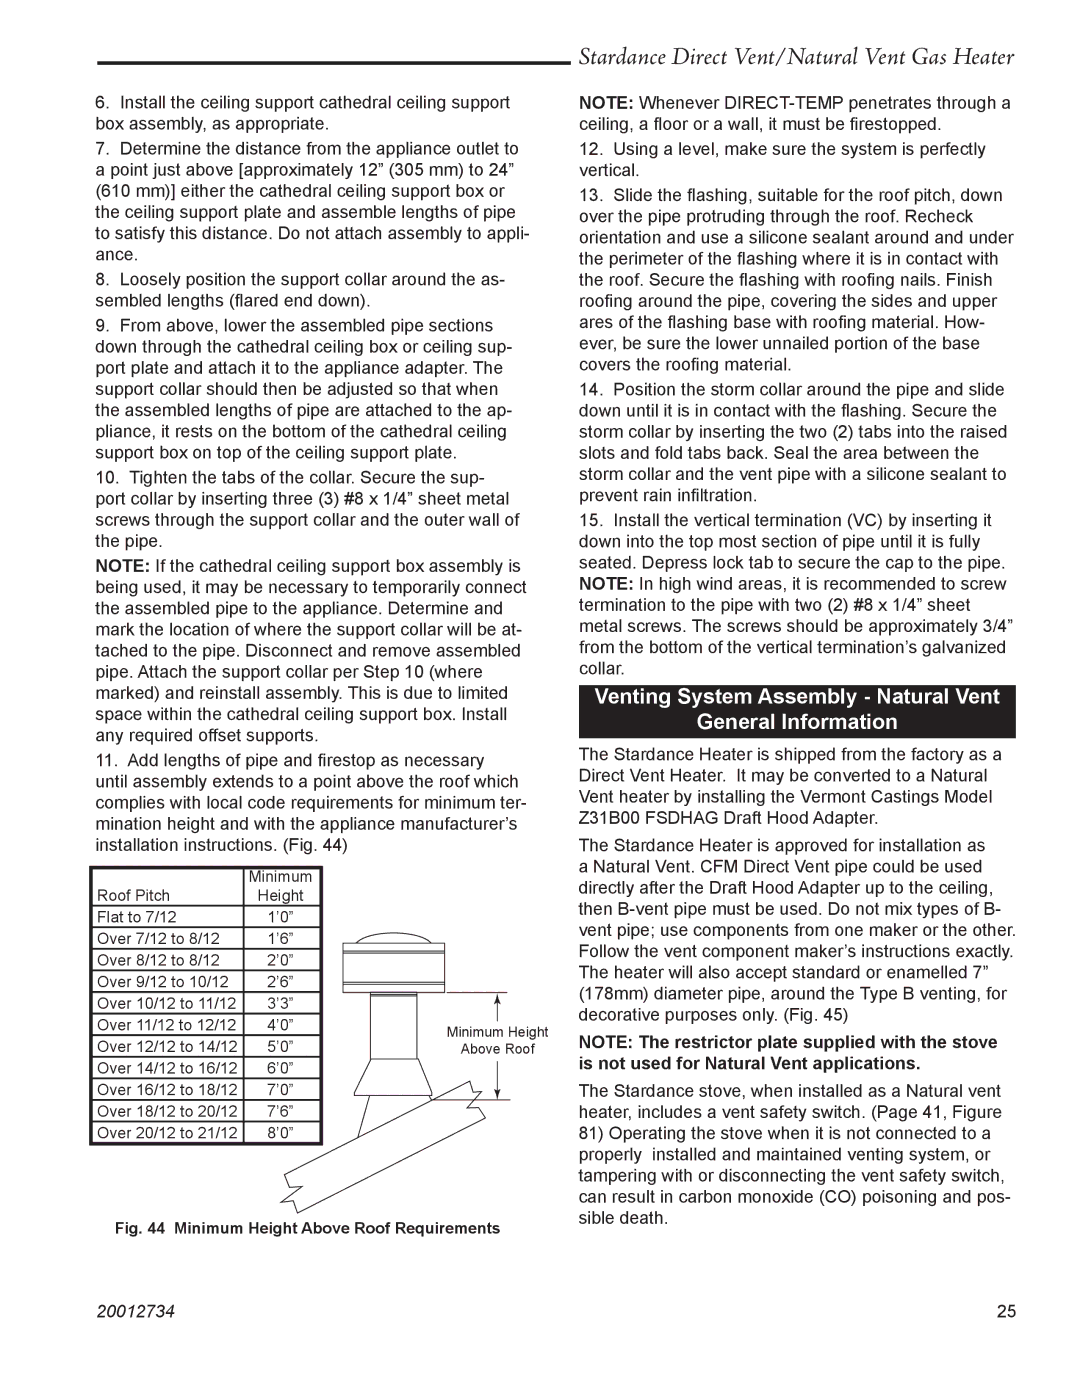
11.Add lengths of pipe and firestop as necessary until assembly extends to a point above the roof which complies with local code requirements for minimum ter- mination height and with the appliance manufacturer’s installation instructions. (Fig. 44)

Stardance Direct Vent/Natural Vent Gas Heater

NOTE: Whenever DIRECT-TEMP penetrates through a ceiling, a floor or a wall, it must be firestopped.

12.Using a level, make sure the system is perfectly vertical.

13.Slide the flashing, suitable for the roof pitch, down over the pipe protruding through the roof. Recheck orientation and use a silicone sealant around and under the perimeter of the flashing where it is in contact with the roof. Secure the flashing with roofing nails. Finish roofing around the pipe, covering the sides and upper ares of the flashing base with roofing material. How- ever, be sure the lower unnailed portion of the base covers the roofing material.

14.Position the storm collar around the pipe and slide down until it is in contact with the flashing. Secure the storm collar by inserting the two (2) tabs into the raised slots and fold tabs back. Seal the area between the storm collar and the vent pipe with a silicone sealant to prevent rain infiltration.

15.Install the vertical termination (VC) by inserting it down into the top most section of pipe until it is fully seated. Depress lock tab to secure the cap to the pipe. NOTE: In high wind areas, it is recommended to screw termination to the pipe with two (2) #8 x 1/4” sheet metal screws. The screws should be approximately 3/4” from the bottom of the vertical termination’s galvanized collar.

Venting System Assembly - Natural Vent

General Information

The Stardance Heater is shipped from the factory as a Direct Vent Heater. It may be converted to a Natural Vent heater by installing the Vermont Castings Model Z31B00 FSDHAG Draft Hood Adapter.

The Stardance Heater is approved for installation as a Natural Vent. CFM Direct Vent pipe could be used


Minimum

Roof Pitch

Height

Flat to 7/12

1’0”

Over 7/12 to 8/12

1’6”

Over 8/12 to 8/12

2’0”

Over 9/12 to 10/12

2’6”

Over 10/12 to 11/12

3’3”

Over 11/12 to 12/12

4’0”

Over 12/12 to 14/12

5’0”

Over 14/12 to 16/12

6’0”

Over 16/12 to 18/12

7’0”

Over 18/12 to 20/12

7’6”

Over 20/12 to 21/12

8’0”

Minimum Height

Above Roof

directly after the Draft Hood Adapter up to the ceiling, then B-vent pipe must be used. Do not mix types of B- vent pipe; use components from one maker or the other. Follow the vent component maker’s instructions exactly. The heater will also accept standard or enamelled 7” (178mm) diameter pipe, around the Type B venting, for decorative purposes only. (Fig. 45)

NOTE: The restrictor plate supplied with the stove is not used for Natural Vent applications.

The Stardance stove, when installed as a Natural vent heater, includes a vent safety switch. (Page 41, Figure

81) Operating the stove when it is not connected to a

properly installed and maintained venting system, or

tampering with or disconnecting the vent safety switch,

can result in carbon monoxide (CO) poisoning and pos-

sible death.

Fig. 44 Minimum Height Above Roof Requirements

20012734

25

Page 25
Image 25
Vermont Casting SDDVT Venting System Assembly Natural Vent General Information, Minimum Height Above Roof Requirements

SDDVT specifications

Vermont Casting's SDDVT, or the Signature Series Direct Vent Technology, represents a remarkable blend of design, efficiency, and functionality in the world of high-performance heating appliances. Known for its commitment to craftsmanship, Vermont Casting has long been synonymous with quality, and the SDDVT is no exception.

One of the standout features of the SDDVT is its advanced direct venting capability. This system allows for efficient venting of combustion gases directly outside, minimizing the risk of backdrafting and ensuring optimal indoor air quality. It draws air from the outside for combustion, creating a more controlled environment that enhances both efficiency and safety. Homeowners can rest easy knowing that the SDDVT provides a reliable heating solution while protecting indoor air quality.

Another significant aspect of the SDDVT is its high-efficiency performance. With an impressive Annual Fuel Utilization Efficiency (AFUE) rating, the SDDVT maximizes heat output while minimizing fuel consumption. This efficiency translates to lower energy bills and a reduced carbon footprint, making it an environmentally friendly choice for heating. The unit is designed to operate effectively even in extremely cold temperatures, ensuring comfort throughout the winter months.

The SDDVT also boasts an array of customizable options that appeal to a wide range of aesthetic preferences. Available in various finishes and styles, including traditional cast iron and sleek modern designs, homeowners can select a model that complements their decor. The unit features a large viewing glass that provides an unobstructed view of the flames, creating a cozy ambiance that enhances the living space.

Incorporating cutting-edge technology, the SDDVT includes electronic ignition and advanced control systems, allowing users to easily manage their heating preferences. The integration of smart technology enables compatibility with home automation systems, giving users added convenience and control.

Overall, Vermont Casting's SDDVT is an exemplary heating solution characterized by its innovative direct venting technology, high efficiency, and customizable design options. With a focus on quality and performance, this unit exemplifies the brand's dedication to providing sustainable and effective heating solutions tailored to modern living. Whether for new construction or retrofitting existing spaces, the SDDVT stands as a premier choice for comfort and style.