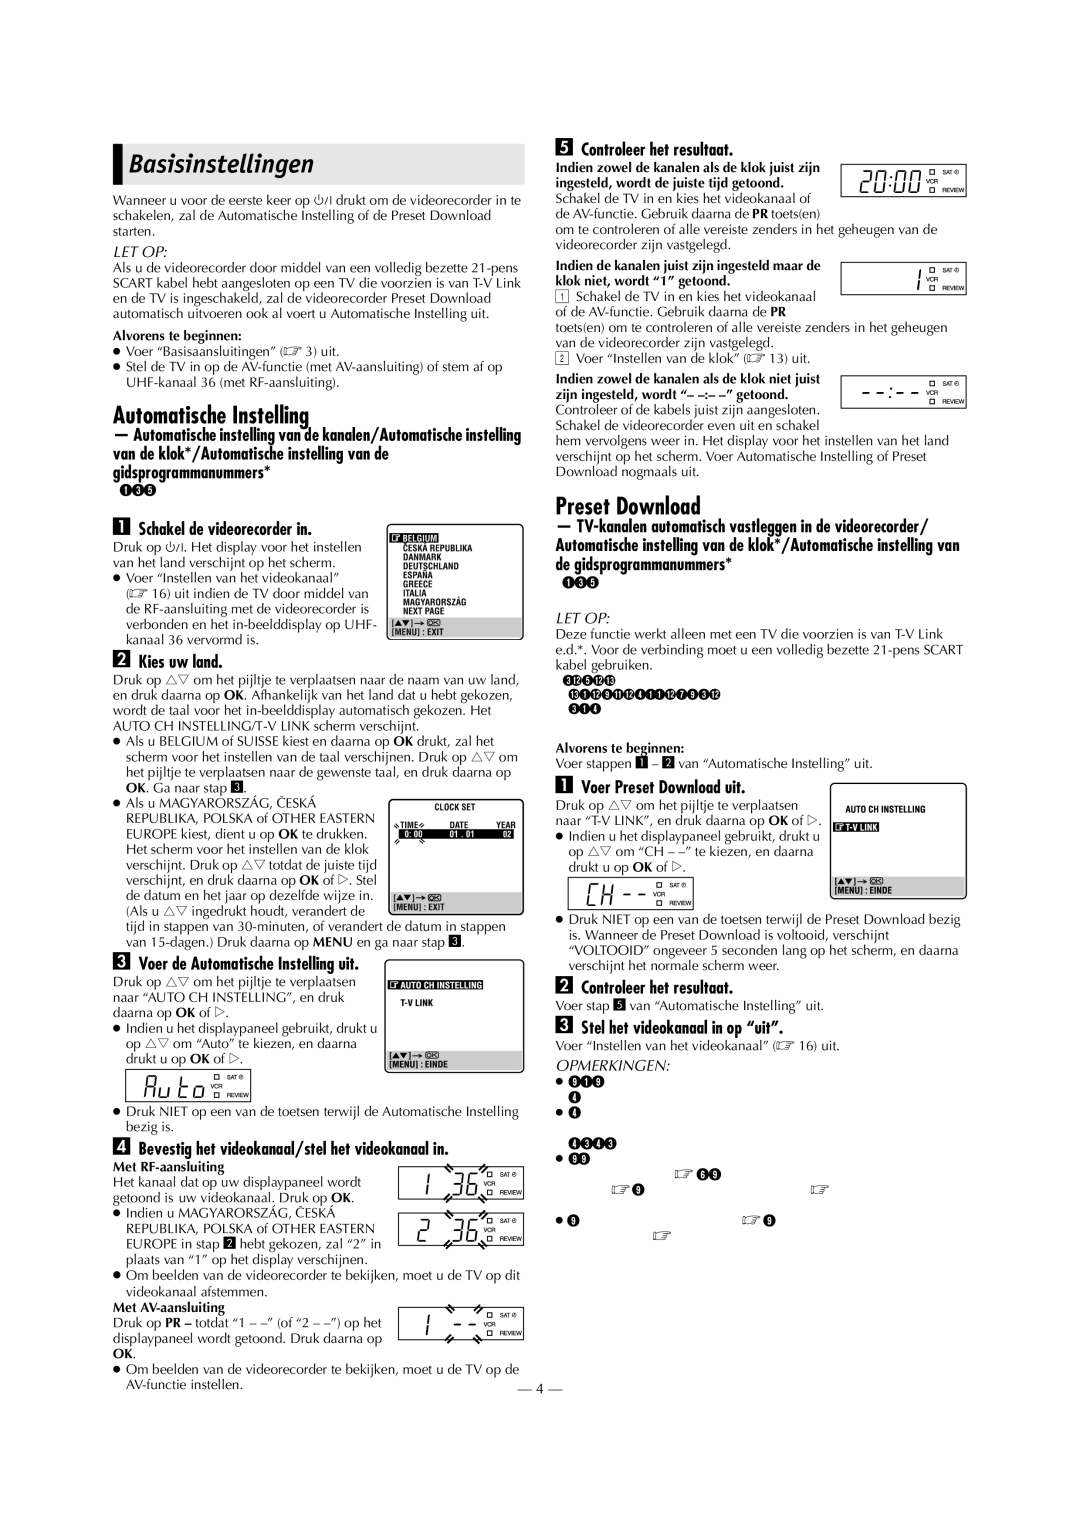
Basisinstellingen

Wanneer u voor de eerste keer op 1 drukt om de videorecorder in te schakelen, zal de Automatische Instelling of de Preset Download starten.

LET OP:

Als u de videorecorder door middel van een volledig bezette 21-pens SCART kabel hebt aangesloten op een TV die voorzien is van T-V Link en de TV is ingeschakeld, zal de videorecorder Preset Download automatisch uitvoeren ook al voert u Automatische Instelling uit.

Alvorens te beginnen:

Voer “Basisaansluitingen” ( 3) uit.

Stel de TV in op de AV-functie (met AV-aansluiting) of stem af op UHF-kanaal 36 (met RF-aansluiting).

Automatische Instelling

Automatische instelling van de kanalen/Automatische instelling van de klok*/Automatische instelling van de gidsprogrammanummers*

*Als u een land in Centraal- of Oost-Europa kiest, moet u de klok en de gidsprogrammanummers handmatig instellen.

ASchakel de videorecorder in.

Druk op 1. Het display voor het instellen van het land verschijnt op het scherm.

Voer “Instellen van het videokanaal” ( 16) uit indien de TV door middel van de RF-aansluiting met de videorecorder is verbonden en het in-beelddisplay op UHF- kanaal 36 vervormd is.

BKies uw land.

Druk op rt om het pijltje te verplaatsen naar de naam van uw land, en druk daarna op OK. Afhankelijk van het land dat u hebt gekozen, wordt de taal voor het in-beelddisplay automatisch gekozen. Het AUTO CH INSTELLING/T-V LINK scherm verschijnt.

Als u BELGIUM of SUISSE kiest en daarna op OK drukt, zal het scherm voor het instellen van de taal verschijnen. Druk op rt om het pijltje te verplaatsen naar de gewenste taal, en druk daarna op

OK. Ga naar stap 3.

Als u MAGYARORSZÁG, CESKÁ REPUBLIKA, POLSKA of OTHER EASTERN

EUROPE kiest, dient u op OK te drukken. Het scherm voor het instellen van de klok

verschijnt. Druk op rt totdat de juiste tijd verschijnt, en druk daarna op OK of e. Stel

de datum en het jaar op dezelfde wijze in. (Als u rt ingedrukt houdt, verandert de

tijd in stappen van 30-minuten, of verandert de datum in stappen van 15-dagen.) Druk daarna op MENU en ga naar stap 3.

CVoer de Automatische Instelling uit.

Druk op rt om het pijltje te verplaatsen naar “AUTO CH INSTELLING”, en druk daarna op OK of e.

Indien u het displaypaneel gebruikt, drukt u

op rt om “Auto” te kiezen, en daarna drukt u op OK of e.

EControleer het resultaat.

Indien zowel de kanalen als de klok juist zijn ingesteld, wordt de juiste tijd getoond. Schakel de TV in en kies het videokanaal of

de AV-functie. Gebruik daarna de PR toets(en)

om te controleren of alle vereiste zenders in het geheugen van de videorecorder zijn vastgelegd.

Indien de kanalen juist zijn ingesteld maar de klok niet, wordt “1” getoond.

ASchakel de TV in en kies het videokanaal of de AV-functie. Gebruik daarna de PR

toets(en) om te controleren of alle vereiste zenders in het geheugen van de videorecorder zijn vastgelegd.

BVoer “Instellen van de klok” ( 13) uit.

Indien zowel de kanalen als de klok niet juist zijn ingesteld, wordt “– –:– –” getoond. Controleer of de kabels juist zijn aangesloten.

Schakel de videorecorder even uit en schakel

hem vervolgens weer in. Het display voor het instellen van het land verschijnt op het scherm. Voer Automatische Instelling of Preset Download nogmaals uit.

Preset Download

TV-kanalen automatisch vastleggen in de videorecorder/ Automatische instelling van de klok*/Automatische instelling van de gidsprogrammanummers*

*Als u een land in Centraal- of Oost-Europa kiest, moet u de klok en de gidsprogrammanummers handmatig instellen.

LET OP:

Deze functie werkt alleen met een TV die voorzien is van T-V Link e.d.*. Voor de verbinding moet u een volledig bezette 21-pens SCART kabel gebruiken.

*Compatibel met TV’s die voorzien zijn van T-V Link, EasyLink, Megalogic, SMARTLINK, Q-Link, DATA LOGIC of NexTView Link via een volledig bezette 21-pens SCART kabel. De compatibiliteit en de beschikbare functies kunnen verschillend zijn afhankelijk van het systeem.

Alvorens te beginnen:

Voer stappen 1 2 van “Automatische Instelling” uit.

AVoer Preset Download uit.

Druk op rt om het pijltje te verplaatsen naar “T-V LINK”, en druk daarna op OK of e.

Indien u het displaypaneel gebruikt, drukt u op rt om “CH – –” te kiezen, en daarna drukt u op OK of e.

Druk NIET op een van de toetsen terwijl de Preset Download bezig is. Wanneer de Preset Download is voltooid, verschijnt “VOLTOOID” ongeveer 5 seconden lang op het scherm, en daarna verschijnt het normale scherm weer.

BControleer het resultaat.

Voer stap 5 van “Automatische Instelling” uit.

CStel het videokanaal in op “uit”.

Voer “Instellen van het videokanaal” ( 16) uit.

OPMERKINGEN:


In sommige gebieden kan de videorecorder Automatische Instelling


of Preset Download niet juist uitvoeren.

Druk NIET op een van de toetsen terwijl de Automatische Instelling

De klok en gidsprogrammanummers kunnen niet automatisch


bezig is.

worden ingesteld in gebieden waar er geen TV-zender is die een

D Bevestig het videokanaal/stel het videokanaal in.

PDC (Programme Delivery Control) signaal uitzendt.

Met RF-aansluiting


Indien u naar een ander gebied bent verhuisd, moet u “Instellen van


het videokanaal” ( 16) (met RF-aansluiting), “Instellen van de

Het kanaal dat op uw displaypaneel wordt


tuner” ( 14) en “Instellen van de klok” ( 13) opnieuw uitvoeren

getoond is uw videokanaal. Druk op OK.


zoals vereist.

Indien u MAGYARORSZÁG, CESKÁ


Voer “Instellen van de tuner” ( 14) en desnoods “Instellen van het


REPUBLIKA, POLSKA of OTHER EASTERN


videokanaal” ( 16) opnieuw uit indien een nieuwe zender in uw


EUROPE in stap 2 hebt gekozen, zal “2” in


gebied begint uit te zenden.


plaats van “1” op het display verschijnen.


Om beelden van de videorecorder te bekijken, moet u de TV op dit

videokanaal afstemmen.

Met AV-aansluiting

Druk op PR – totdat “1 – –” (of “2 – –”) op het displaypaneel wordt getoond. Druk daarna op OK.

Om beelden van de videorecorder te bekijken, moet u de TV op de

AV-functie instellen.

— 4 —

Page 4
Image 4
Victor HR-J691EU, HR-J690EU, HR-J693EU, HR-J694EU manual Basisinstellingen, Automatische Instelling, Preset Download

HR-J693EU, HR-J690EU, HR-J691EU, HR-J694EU specifications

The Victor HR-J694EU, HR-J691EU, HR-J690EU, and HR-J693EU models are a series of advanced cassette decks that exemplify cutting-edge audio technology and design, catering to audiophiles and music enthusiasts alike.

All four models boast an impressive build quality, featuring a sleek design that seamlessly integrates into any audio setup. The chassis is robust yet aesthetically pleasing, equipped with high-quality components that minimize vibration and enhance sound clarity.

One of the standout features across these models is the inclusion of a high-performance Dolby Noise Reduction system. This technology reduces tape hiss and enhances the overall listening experience, allowing users to enjoy their favorite cassettes with crystal-clear sound quality. The HR-J694EU model takes this a step further with Dolby S, which provides even greater noise reduction, ensuring that every nuance of the recording is preserved.

The HR-J694EU and HR-J691EU also feature dual-capstan technology, which ensures more consistent tape movement and reduces wow and flutter, resulting in superior audio playback. This technology allows for better tracking and minimizes distortion, making them ideal for recording and playback of both music and voice.

All models come equipped with user-friendly controls, including an intuitive LCD display that provides easy access to playback functions and settings. The ergonomically designed controls enable effortless operation, whether it’s fast-forwarding, rewinding, or creating custom playlists.

Their playback capabilities are versatile, supporting various cassette formats, including standard and chrome tapes. Additionally, the HR-J693EU model supports 3-head technology, allowing users to monitor recordings accurately while ensuring the highest fidelity.

Connectivity options are comprehensive, featuring RCA line outputs for seamless integration with home audio systems. The presence of headphone jacks on the models allows for private listening, while built-in auto-reverse functionality ensures smooth playback in both directions without the need for manual intervention.

Power efficiency is also a notable characteristic, with these models designed to minimize energy consumption without compromising performance. This makes them environmentally friendly while still delivering high-end audio quality.

In conclusion, the Victor HR-J694EU, HR-J691EU, HR-J690EU, and HR-J693EU models stand out in the realm of cassette decks with their combination of advanced technologies, exceptional build quality, and user-friendly features, making them a perfect choice for those who appreciate quality audio.