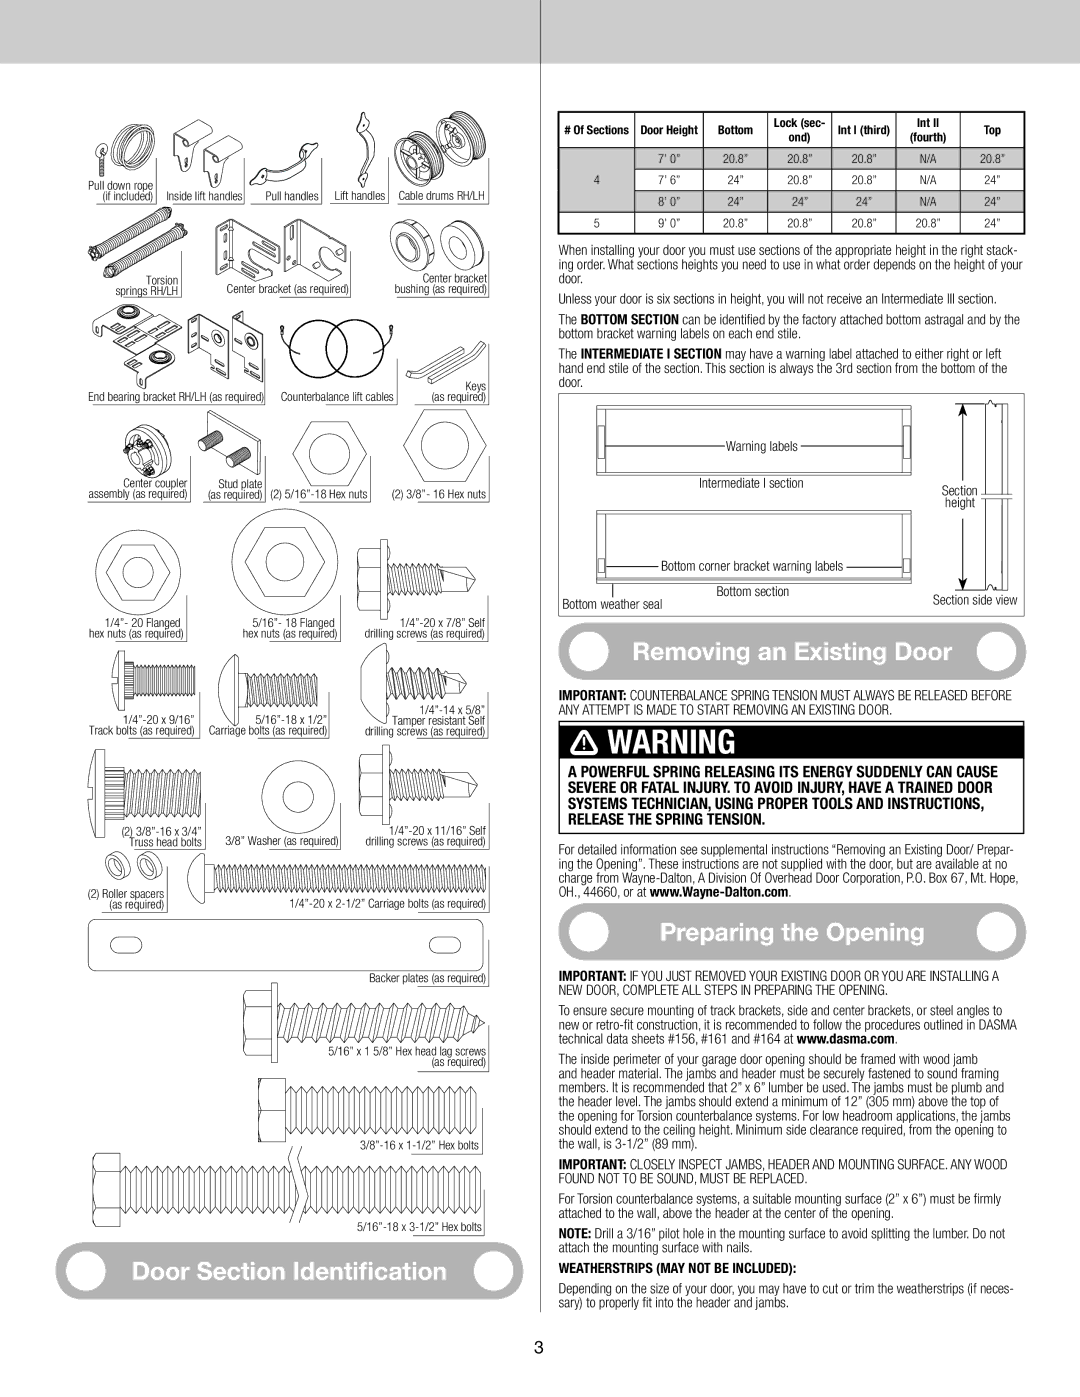
Wayne-Dalton 6600 Removing an Existing Door, Door Section Identification, Preparing the Opening

Models: 6600

1 22
Download 22 pages 62.1 Kb
Page 3
Image 3

Pull down rope

Inside lift handles

Pull handles

Lift handles

Cable drums RH/LH

(if included)

Torsion

Center bracket (as required)

Center bracket

springs RH/LH

bushing (as required)

End bearing bracket RH/LH (as required)

Counterbalance lift cables

Keys

(as required)

Center coupler

Stud plate

(2) 5/16”-18 Hex nuts

(2) 3/8”- 16 Hex nuts

assembly (as required)

(as required)

# Of Sections

Door Height

Bottom

Lock (sec-

Int I (third)

Int II

Top

ond)

(fourth)


7’ 0”

20.8”

20.8”

20.8”

N/A

20.8”


4

7’ 6”

24”

20.8”

20.8”

N/A

24”


8’ 0”

24”

24”

24”

N/A

24”


5

9’ 0”

20.8”

20.8”

20.8”

20.8”

24”


When installing your door you must use sections of the appropriate height in the right stack- ing order. What sections heights you need to use in what order depends on the height of your door.

Unless your door is six sections in height, you will not receive an Intermediate III section.

The bottom section can be identified by the factory attached bottom astragal and by the bottom bracket warning labels on each end stile.

The intermediate I section may have a warning label attached to either right or left hand end stile of the section. This section is always the 3rd section from the bottom of the door.

Warning labels


Intermediate I section

Section


height

Bottom corner bracket warning labels


Bottom section


1/4”- 20 Flanged

hex nuts (as required)

1/4”-20 x 9/16”

Track bolts (as required)

5/16”- 18 Flanged hex nuts (as required)

5/16”-18 x 1/2”

Carriage bolts (as required)

1/4”-20 x 7/8” Self drilling screws (as required)

1/4”-14 x 5/8” Tamper resistant Self drilling screws (as required)

Bottom weather seal

Section side view


Removing an Existing Door

Important: Counterbalance spring tension must always be released before any attempt is made to start removing an existing door.

WarningARNING

(2) 3/8”-16 x 3/4”

3/8” Washer (as required)

1/4”-20 x 11/16” Self

Truss head bolts

drilling screws (as required)

(2) Roller spacers

1/4”-20 x 2-1/2” Carriage bolts (as required)

(as required)

Backer plates (as required)

5/16” x 1 5/8” Hex head lag screws

(as required)

3/8”-16 x 1-1/2” Hex bolts

5/16”-18 x 3-1/2” Hex bolts

Door Section Identification

A powerful spring releasing its energy suddenly can cause severe or fatal injury. To avoid injury, have a trained door systems technician, using proper tools and instructions, release the spring tension.

For detailed information see supplemental instructions “Removing an Existing Door/ Prepar- ing the Opening”. These instructions are not supplied with the door, but are available at no charge from Wayne-Dalton, A Division Of Overhead Door Corporation, P.O. Box 67, Mt. Hope, OH., 44660, or at www.Wayne-Dalton.com.

Preparing the Opening

IMPORTANT: If you just removed your existing door or you are installing a new door, complete all steps in preparing the opening.

To ensure secure mounting of track brackets, side and center brackets, or steel angles to new or retro-fit construction, it is recommended to follow the procedures outlined in DASMA technical data sheets #156, #161 and #164 at www.dasma.com.

The inside perimeter of your garage door opening should be framed with wood jamb and header material. The jambs and header must be securely fastened to sound framing members. It is recommended that 2” x 6” lumber be used. The jambs must be plumb and the header level. The jambs should extend a minimum of 12” (305 mm) above the top of the opening for Torsion counterbalance systems. For low headroom applications, the jambs should extend to the ceiling height. Minimum side clearance required, from the opening to the wall, is 3-1/2” (89 mm).

Important: Closely inspect jambs, header and mounting surface. Any wood found not to be sound, must be replaced.

For Torsion counterbalance systems, a suitable mounting surface (2” x 6”) must be firmly attached to the wall, above the header at the center of the opening.

NOTE: Drill a 3/16” pilot hole in the mounting surface to avoid splitting the lumber. Do not attach the mounting surface with nails.

Weatherstrips (may not be included):

Depending on the size of your door, you may have to cut or trim the weatherstrips (if neces- sary) to properly fit into the header and jambs.

3

Page 3
Image 3
Wayne-Dalton 6600 Removing an Existing Door, Door Section Identification, Preparing the Opening, Bottom section

6600 specifications

The Wayne-Dalton 6600 is a versatile and robust fiberglass garage door designed to meet the needs of residential homeowners who prioritize both aesthetics and durability. This innovative door stands out for its unique blend of features, technologies, and characteristics that cater to various styles and preferences.

One of the standout features of the Wayne-Dalton 6600 is its superior insulation properties. The door is constructed with a high R-value, ensuring excellent thermal efficiency. This is particularly beneficial in regions with extreme temperatures, as it helps maintain a comfortable garage environment while potentially lowering energy costs for heating and cooling.

The Wayne-Dalton 6600 also boasts a lightweight design, making it easier to operate without compromising strength and durability. Unlike traditional steel doors, the fiberglass construction is resistant to rust and corrosion, ensuring longevity even in harsh weather conditions. Homeowners can enjoy peace of mind knowing that their investment is protected against the elements.

Aesthetically, the garage door is available in a variety of colors and finishes, allowing homeowners to customize their door to complement the overall design of their home. The realistic wood grain textures available add a touch of elegance and warmth, providing the classic look of wood without the maintenance associated with natural materials.

In terms of technology, the Wayne-Dalton 6600 incorporates a unique, high-quality pully and track system that ensures smooth operation. This system is designed to minimize wear and tear over time, enhancing the door's lifespan and performance. Additionally, the door is compatible with a range of smart home technologies, giving homeowners the convenience of remote access and control, enhancing security and ease of use.

Safety is a top priority for Wayne-Dalton, and the 6600 reflects this commitment with features such as pinch-resistant edges and an automatic reversal system that prevents accidents and injuries. The door is built to provide peace of mind for families, ensuring that the garage remains a safe space for both people and pets.

In conclusion, the Wayne-Dalton 6600 is an exemplary product for homeowners seeking a blend of functionality, style, and safety. With its innovative materials, customizability, and advanced technology, it offers a reliable and attractive solution for any home’s garage door needs. Homeowners who invest in the Wayne-Dalton 6600 can expect unmatched performance and enduring beauty for years to come.