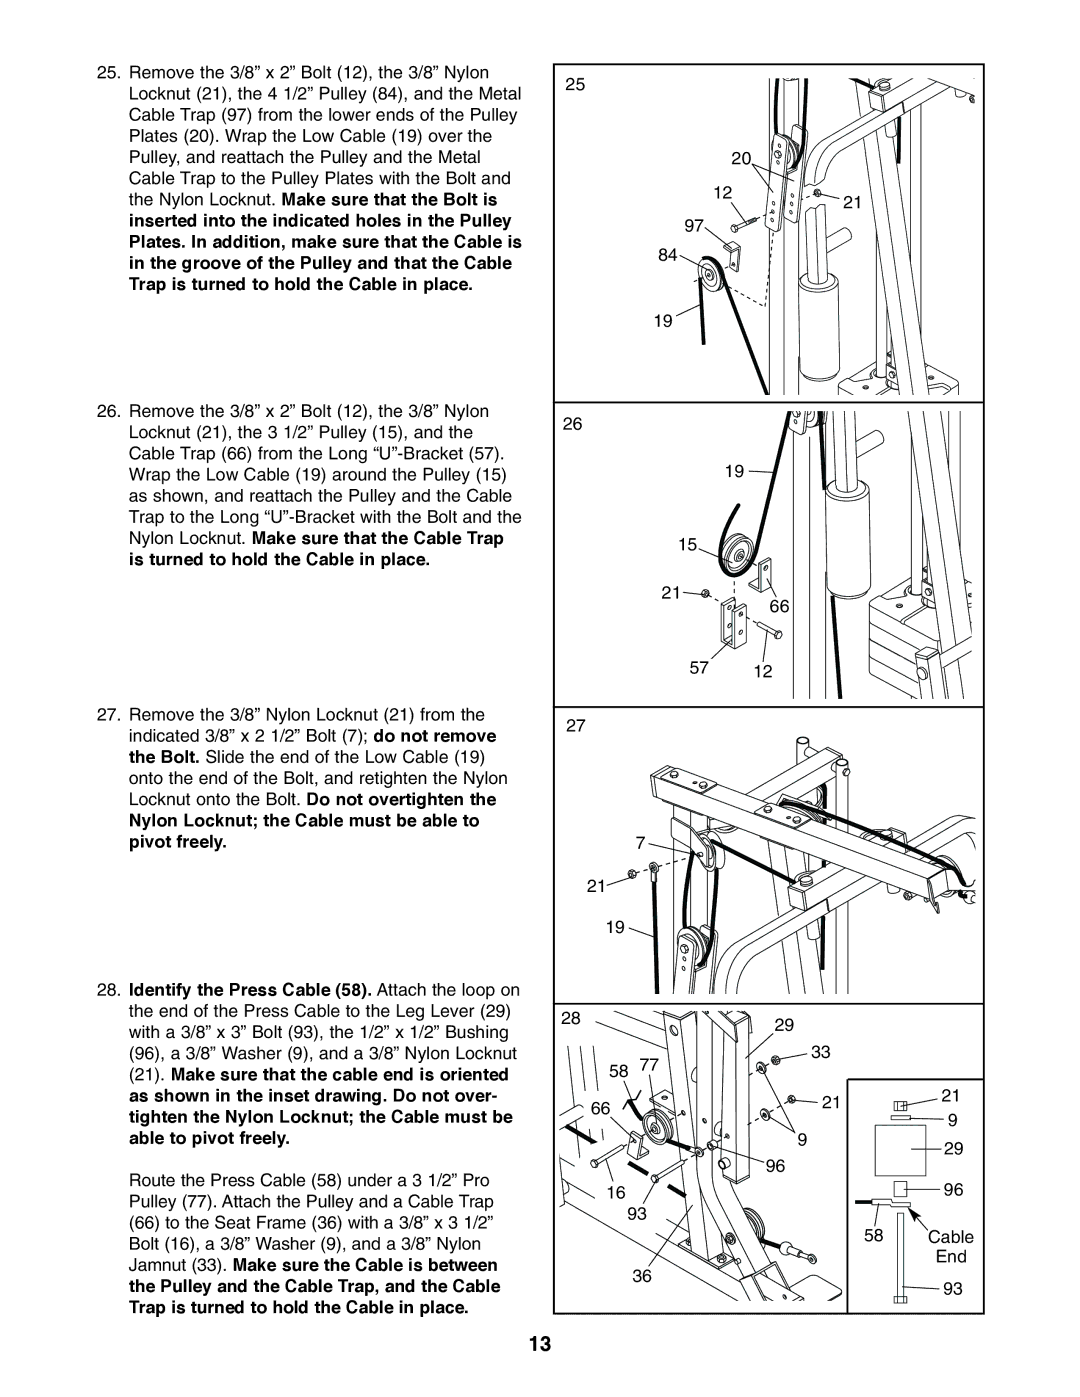
25. Remove the 3/8” x 2” Bolt (12), the 3/8” Nylon

25


Locknut (21), the 4 1/2” Pulley (84), and the Metal


Cable Trap (97) from the lower ends of the Pulley


Plates (20). Wrap the Low Cable (19) over the


Pulley, and reattach the Pulley and the Metal


20


Cable Trap to the Pulley Plates with the Bolt and


12


the Nylon Locknut. Make sure that the Bolt is


21


inserted into the indicated holes in the Pulley


97


Plates. In addition, make sure that the Cable is


84


in the groove of the Pulley and that the Cable


Trap is turned to hold the Cable in place.


19


26. Remove the 3/8” x 2” Bolt (12), the 3/8” Nylon

26


Locknut (21), the 3 1/2” Pulley (15), and the


Cable Trap (66) from the Long “U”-Bracket (57).


19


Wrap the Low Cable (19) around the Pulley (15)


as shown, and reattach the Pulley and the Cable


Trap to the Long “U”-Bracket with the Bolt and the


Nylon Locknut. Make sure that the Cable Trap


15


is turned to hold the Cable in place.


21


66


57


12


27. Remove the 3/8” Nylon Locknut (21) from the

27


indicated 3/8” x 2 1/2” Bolt (7); do not remove


the Bolt. Slide the end of the Low Cable (19)


onto the end of the Bolt, and retighten the Nylon


Locknut onto the Bolt. Do not overtighten the


Nylon Locknut; the Cable must be able to


pivot freely.


7


21


19


28. Identify the Press Cable (58). Attach the loop on


the end of the Press Cable to the Leg Lever (29)

28


29


with a 3/8” x 3” Bolt (93), the 1/2” x 1/2” Bushing


(96), a 3/8” Washer (9), and a 3/8” Nylon Locknut

58

77


33


(21). Make sure that the cable end is oriented


as shown in the inset drawing. Do not over-

66


21

21

tighten the Nylon Locknut; the Cable must be


9


able to pivot freely.


9

29


96

Route the Press Cable (58) under a 3 1/2” Pro


16


96

Pulley (77). Attach the Pulley and a Cable Trap


93


(66) to the Seat Frame (36) with a 3/8” x 3 1/2”


58

Cable

Bolt (16), a 3/8” Washer (9), and a 3/8” Nylon


End

Jamnut (33). Make sure the Cable is between


36


the Pulley and the Cable Trap, and the Cable


93


Trap is turned to hold the Cable in place.


13


Page 13
Image 13
Weider WESY19610 user manual

WESY19610 specifications

The Weider WESY19610 is a versatile home gym system designed to cater to a wide range of fitness enthusiasts, from beginners to more experienced users looking for an effective way to build strength and improve overall fitness in the comfort of home. Packed with features that promote a comprehensive workout experience, the WESY19610 stands out in the competitive market of home gym equipment.

One of the main features of the Weider WESY19610 is its multi-functionality. It offers an array of exercises targeting various muscle groups, allowing users to perform chest presses, leg extensions, seated rows, and tricep pushdowns, among others. This versatility is essential for those who want to engage in a full-body workout without the need for multiple pieces of equipment. The adjustable seat and leg extension options accommodate users of different heights, ensuring comfort and effectiveness during workouts.

The WESY19610 utilizes a combination of resistance training with adjustable weight stacks, which provide a smooth and consistent strength training experience. Users can easily modify the resistance levels to suit their individual fitness goals, whether they aim to build muscle or increase endurance. The weight stacks are designed to be user-friendly, featuring a straightforward adjustment mechanism that allows quick changes between exercises.

In addition to its functional design, the Weider WESY19610 is built with durability in mind. The sturdy steel frame ensures stability during intense workouts, which is crucial for safety and performance. The equipment is also designed to be space-efficient, making it suitable for home gyms where space may be limited.

Another notable characteristic of the WESY19610 is its ease of assembly and user-friendly interface. Clear instructions guide users through the setup process, allowing them to start their fitness journey without the need for professional help. Furthermore, the simplistic layout of the gym system makes it intuitive for users to transition between exercises, promoting a seamless workout experience.

Overall, the Weider WESY19610 is a well-rounded home gym solution that combines functionality, durability, and user-friendly features. With its emphasis on versatility and safety, it provides an excellent option for those looking to meet their fitness goals without leaving their homes. Whether you're aiming to build strength, tone muscles, or improve cardiovascular health, this home gym is equipped to support a comprehensive workout regimen.