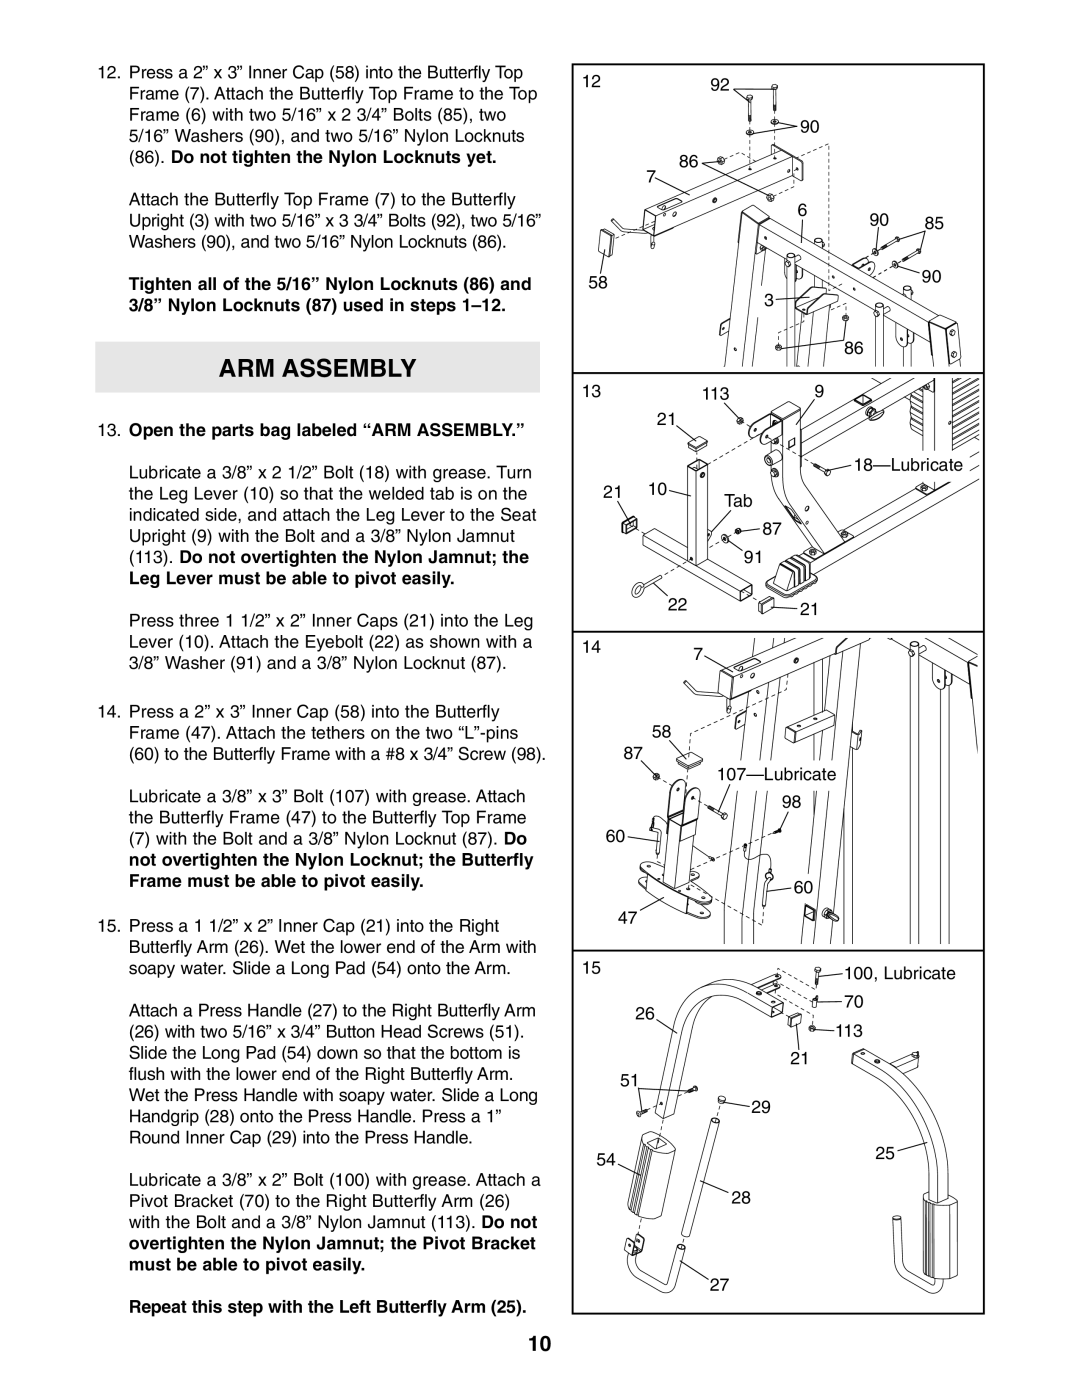
12.Press a 2” x 3” Inner Cap (58) into the Butterfly Top Frame (7). Attach the Butterfly Top Frame to the Top Frame (6) with two 5/16” x 2 3/4” Bolts (85), two 5/16” Washers (90), and two 5/16” Nylon Locknuts (86). Do not tighten the Nylon Locknuts yet.
Attach the Butterfly Top Frame (7) to the Butterfly Upright (3) with two 5/16” x 3 3/4” Bolts (92), two 5/16” Washers (90), and two 5/16” Nylon Locknuts (86).
Tighten all of the 5/16” Nylon Locknuts (86) and 3/8” Nylon Locknuts (87) used in steps
ARM ASSEMBLY
13.Open the parts bag labeled “ARM ASSEMBLY.”
Lubricate a 3/8” x 2 1/2” Bolt (18) with grease. Turn the Leg Lever (10) so that the welded tab is on the indicated side, and attach the Leg Lever to the Seat Upright (9) with the Bolt and a 3/8” Nylon Jamnut
(113).Do not overtighten the Nylon Jamnut; the Leg Lever must be able to pivot easily.
Press three 1 1/2” x 2” Inner Caps (21) into the Leg Lever (10). Attach the Eyebolt (22) as shown with a 3/8” Washer (91) and a 3/8” Nylon Locknut (87).
14.Press a 2” x 3” Inner Cap (58) into the Butterfly Frame (47). Attach the tethers on the two
(60)to the Butterfly Frame with a #8 x 3/4” Screw (98).
Lubricate a 3/8” x 3” Bolt (107) with grease. Attach the Butterfly Frame (47) to the Butterfly Top Frame
(7)with the Bolt and a 3/8” Nylon Locknut (87). Do not overtighten the Nylon Locknut; the Butterfly Frame must be able to pivot easily.
15.Press a 1 1/2” x 2” Inner Cap (21) into the Right Butterfly Arm (26). Wet the lower end of the Arm with soapy water. Slide a Long Pad (54) onto the Arm.
Attach a Press Handle (27) to the Right Butterfly Arm
(26)with two 5/16” x 3/4” Button Head Screws (51). Slide the Long Pad (54) down so that the bottom is flush with the lower end of the Right Butterfly Arm.
Wet the Press Handle with soapy water. Slide a Long Handgrip (28) onto the Press Handle. Press a 1” Round Inner Cap (29) into the Press Handle.
Lubricate a 3/8” x 2” Bolt (100) with grease. Attach a Pivot Bracket (70) to the Right Butterfly Arm (26) with the Bolt and a 3/8” Nylon Jamnut (113). Do not overtighten the Nylon Jamnut; the Pivot Bracket must be able to pivot easily.
Repeat this step with the Left Butterfly Arm (25).
10
12 |
| 92 |
|
|
|
|
|
| 90 |
|
|
| 86 |
|
|
| |
| 7 |
|
|
|
|
|
|
| 6 | 90 | 85 |
|
|
|
| ||
58 |
|
|
|
| 90 |
|
| 3 |
|
| |
|
|
|
|
| |
|
|
|
| 86 |
|
13 |
| 113 | 9 |
|
|
| 21 |
|
|
|
|
|
|
|
| ||
21 | 10 | Tab |
|
| |
|
|
|
| ||
|
|
| 87 |
|
|
|
|
| 91 |
|
|
| 22 |
| 21 |
|
|
14 |
| 7 |
|
|
|
|
|
|
|
| |
| 58 |
|
|
|
|
87 |
|
|
|
|
|
|
|
| |||
|
|
| 98 |
|
|
60 |
|
|
|
|
|
|
|
| 60 |
|
|
47 |
|
|
|
|
|
15 |
|
|
| 100, Lubricate | |
|
|
|
| ||
26 |
|
| 70 |
| |
|
| 113 |
| ||
|
|
|
|
| |
|
|
| 21 |
|
|
51 |
|
|
|
|
|
|
|
| 29 |
|
|
54 |
|
|
| 25 |
|
|
|
|
|
| |
|
|
| 28 |
|
|
|
| 27 |
|
|
|
