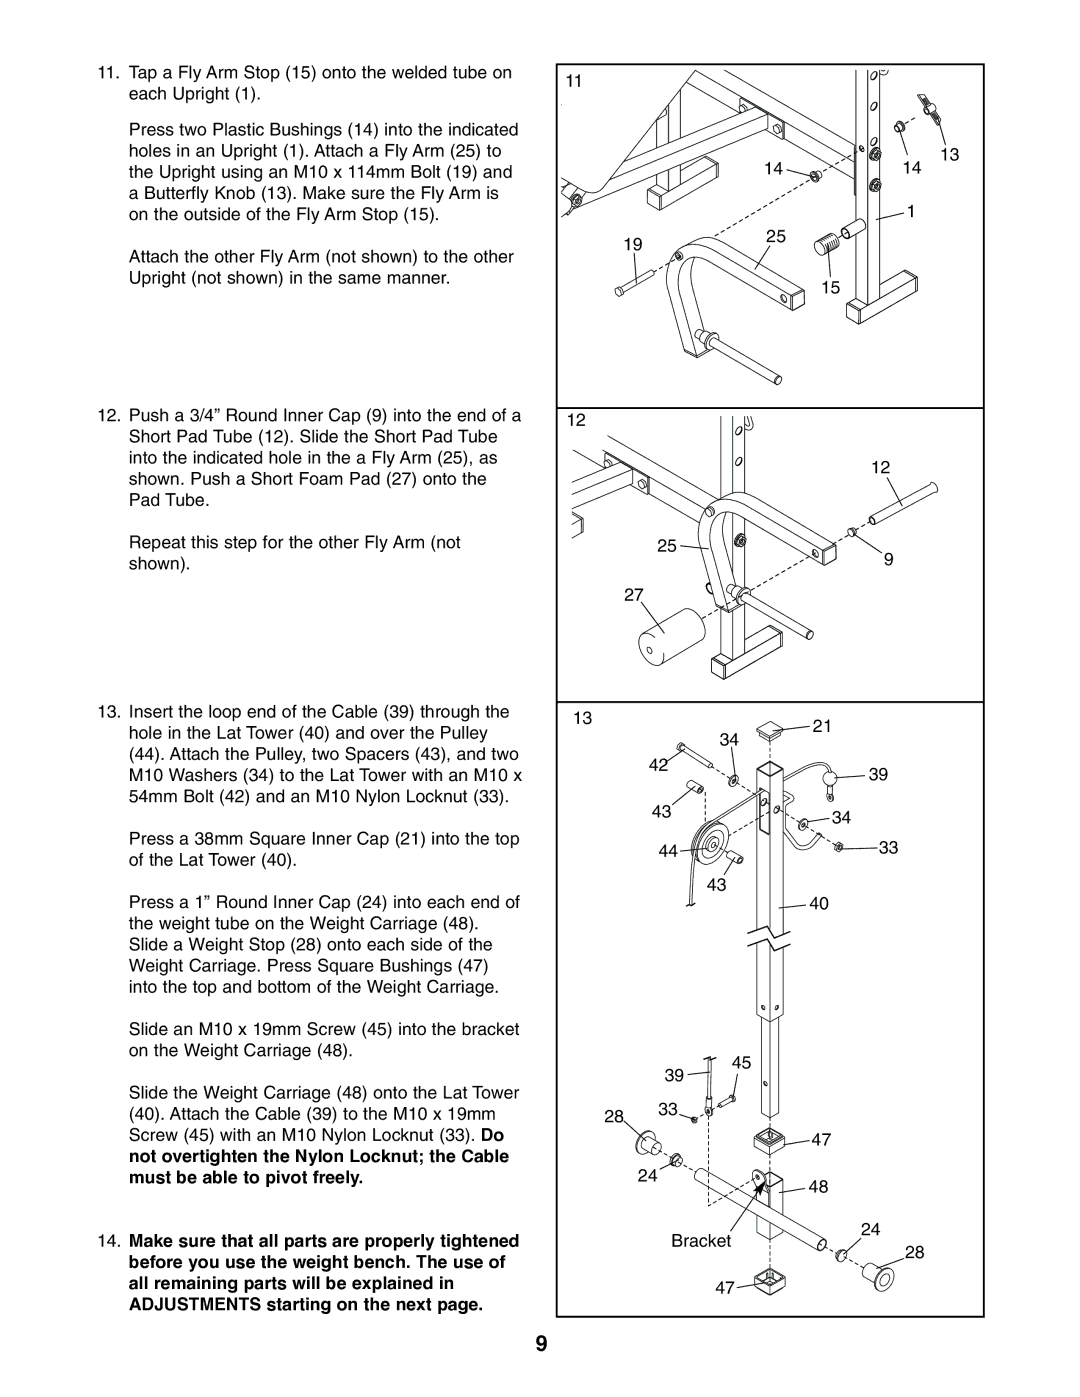
11. | Tap a Fly Arm Stop (15) onto the welded tube on | 11 |
|
|
|
| each Upright (1). |
|
|
| |
|
|
|
|
| |
| Press two Plastic Bushings (14) into the indicated |
|
|
|
|
| holes in an Upright (1). Attach a Fly Arm (25) to |
|
|
| 13 |
| the Upright using an M10 x 114mm Bolt (19) and |
|
| 14 | 14 |
| a Butterfly Knob (13). Make sure the Fly Arm is |
|
|
| 1 |
| on the outside of the Fly Arm Stop (15). |
|
|
| |
|
| 19 | 25 |
| |
| Attach the other Fly Arm (not shown) to the other |
|
| ||
|
|
|
|
| |
| Upright (not shown) in the same manner. |
|
|
| 15 |
|
|
|
|
| |
12. | Push a 3/4” Round Inner Cap (9) into the end of a | 12 |
|
|
|
| Short Pad Tube (12). Slide the Short Pad Tube |
|
|
|
|
| into the indicated hole in the a Fly Arm (25), as |
|
|
| 12 |
| shown. Push a Short Foam Pad (27) onto the |
|
|
| |
|
|
|
|
| |
| Pad Tube. |
|
|
|
|
| Repeat this step for the other Fly Arm (not |
| 25 |
| 9 |
| shown). |
|
|
| |
|
|
| 27 |
|
|
13. | Insert the loop end of the Cable (39) through the | 13 |
|
| 21 |
| hole in the Lat Tower (40) and over the Pulley |
|
| ||
|
| 34 |
| ||
|
|
|
| ||
| (44). Attach the Pulley, two Spacers (43), and two |
|
|
| |
|
| 42 |
|
| |
| M10 Washers (34) to the Lat Tower with an M10 x |
|
| 39 | |
|
|
|
| ||
| 54mm Bolt (42) and an M10 Nylon Locknut (33). |
| 43 |
|
|
|
|
|
| 34 | |
|
|
|
|
| |
| Press a 38mm Square Inner Cap (21) into the top |
| 44 |
| 33 |
| of the Lat Tower (40). |
|
| ||
|
|
|
|
| |
| Press a 1” Round Inner Cap (24) into each end of |
| 43 |
| 40 |
|
|
|
| ||
| the weight tube on the Weight Carriage (48). |
|
|
|
|
| Slide a Weight Stop (28) onto each side of the |
|
|
|
|
| Weight Carriage. Press Square Bushings (47) |
|
|
|
|
| into the top and bottom of the Weight Carriage. |
|
|
|
|
| Slide an M10 x 19mm Screw (45) into the bracket |
|
|
|
|
| on the Weight Carriage (48). |
| 45 |
|
|
|
|
|
|
| |
| Slide the Weight Carriage (48) onto the Lat Tower |
| 39 |
|
|
|
| 33 |
|
| |
| (40). Attach the Cable (39) to the M10 x 19mm | 28 |
|
| |
| Screw (45) with an M10 Nylon Locknut (33). Do |
|
|
| 47 |
| not overtighten the Nylon Locknut; the Cable |
| 24 |
|
|
| must be able to pivot freely. |
|
| 48 | |
|
|
|
|
| |
14. | Make sure that all parts are properly tightened |
| Bracket |
| 24 |
|
| 28 | |||
| before you use the weight bench. The use of |
|
|
| |
|
|
|
|
| |
| all remaining parts will be explained in |
| 47 |
|
|
| ADJUSTMENTS starting on the next page. |
|
|
|
|
|
| 9 |
|
|
|