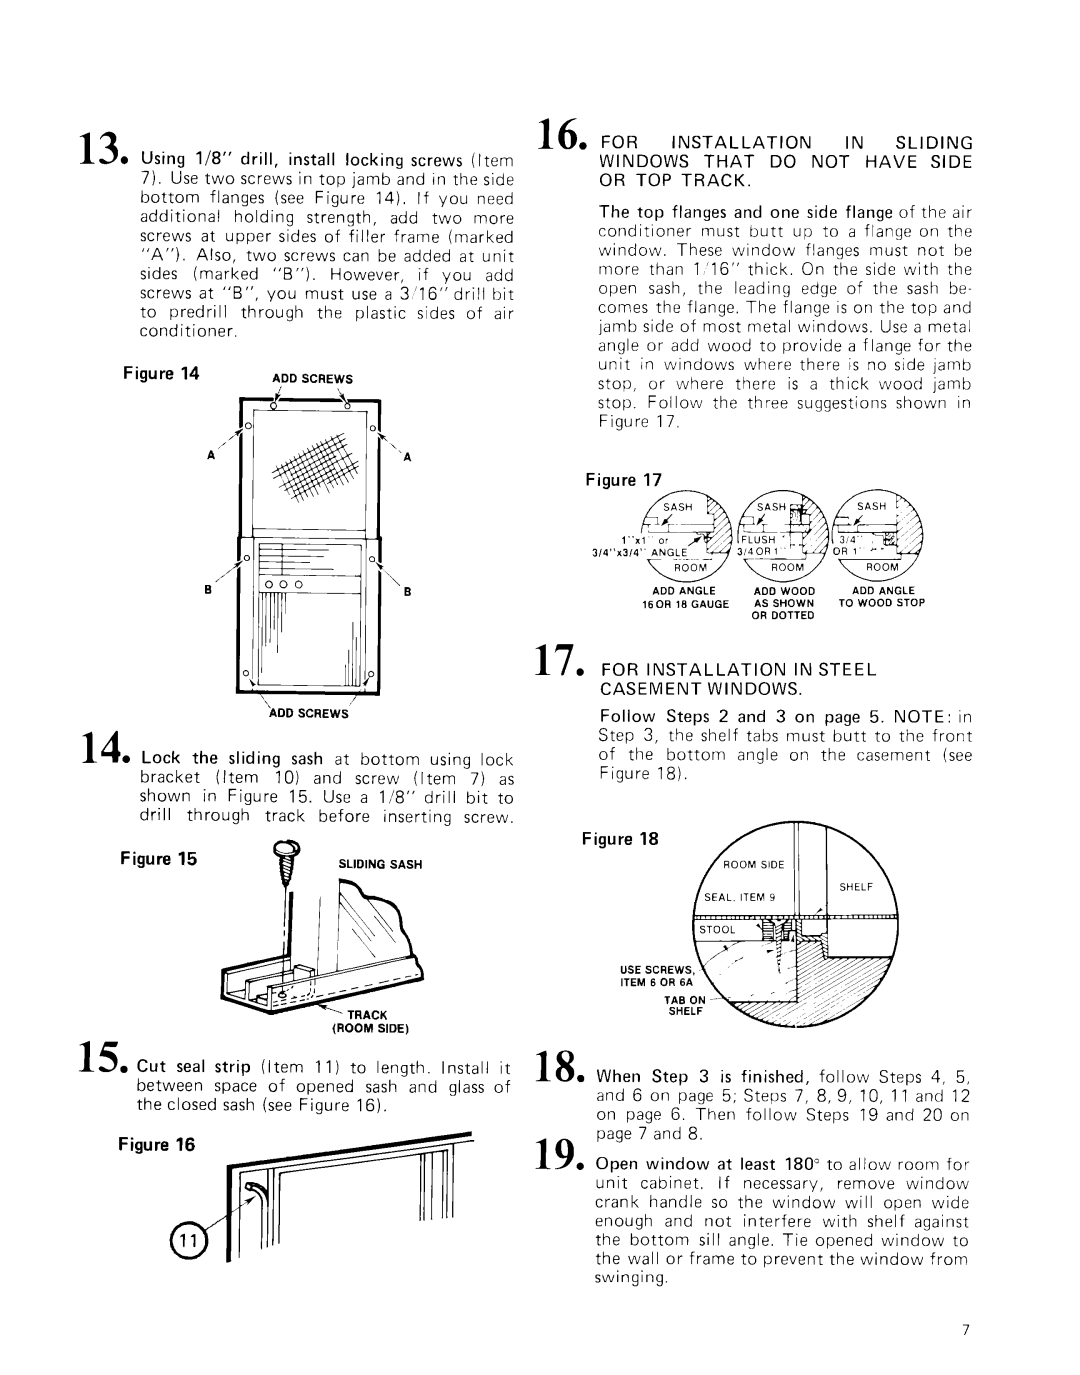
13l Using


16.

FOR


INSTALLATION


IN


SLIDING

l/8”

drill,

install

locking

screws

(Item

WINDOWS


THAT

DO

NOT

HAVE

SIDE

7).

Use two screws

in top

jamb and in the side

OR

TOP

TRACK.


bottom flanges (see Figure 14). If you need

The

top flanges and one side

flange

of

the

air

additional

holding

strength,

add two

more

screws

at

upper

sides

of

filler

frame

(marked

conditioner


must

butt

up to

a flange

on

the

“A”). Also, two screws

can

be

added

at

unit

window.

These

window

flanges

must

not

be

sides

(marked

“B”).

However,

if

you

add

more

than


1’16”


thick.

On the

side

with

the

screws

at

“B”, you

must

use

a 3 ‘16”

drill

bit

open

sash,

the

leading

edge

of the sash be-

to

predrill

through


the

plastic

sides

of

air

comes

the

flange.


The

flange

is on the top

and

conditioner


jamb

side

of

most

metal

windows.

Use a metal


angle or add wood to provide a flange for the

Figure

14


ADD

SCREWS


unit in windows where there is no side jamb


stop, or where there is a thick wood jamb


01


stop. Follow the three suggestions shown in


Figure

17.


\‘A


Figure

17


3/4”x3/4”

ANGLE


\

B


ADD

ANGLE


ADD

WOOD

ADD ANGLE


160R 18 GAUGE


AS

SHOWN

TO WOOD

STOP


OR

DOTTED


‘\

ADD SCREWS”

14l Lock the sliding sash at bottom using lock bracket (Item 10) and screw (Item 7) as shown in Figure 15. Use a l/8” drill bit to drill through track before inserting screw.

Figure 15

SLIDING SASH

17l FOR INSTALLATION IN STEEL CASEMENT WINDOWS.

Follow Steps 2 and 3 on page 5. NOTE: in Step 3, the shelf tabs must butt to the front of the bottom angle on the casement (see Figure 18).

Jre 18

ROOM SIDE

/

e

(ROOM SIDE)

13 . Cut seal strip (Item 11) to length. Install it between space of opened sash and glass of the closed sash (see Figure 16).

18l When Step 3 is finished, follow Steps 4, 5, and 6 on page 5; Steps 7, 8, 9, 10, 11 and 12 on page 6. Then follow Steps 19 and 20 on page 7 and 8.

19l Open window at least 180” to allow room for unit cabinet. If necessary, remove window crank handle so the window will open wide enough and not interfere with shelf against the bottom sill angle. Tie opened window to the wall or frame to prevent the window from swinging.

7

Page 7
Image 7
Whirlpool ACC602XP0 manual ‘A

ACC602XP0 specifications

The Whirlpool ACC602XP0 is a state-of-the-art kitchen appliance designed to enhance cooking experiences while providing exceptional performance and convenience. A perfect addition for any modern kitchen, this versatile appliance combines innovative features with a stylish design.

One of the standout features of the ACC602XP0 is its user-friendly interface. The appliance comes equipped with a large touchscreen display that simplifies navigation between various cooking modes and settings. This means that whether you're a culinary novice or an experienced chef, you can easily select the desired function without any hassle.

The ACC602XP0 boasts multiple cooking functions, including baking, broiling, roasting, and warming. This versatility allows users to handle a variety of cooking tasks effortlessly. Additionally, it incorporates convection cooking technology, which circulates hot air evenly throughout the oven cavity for faster and more consistent cooking results. This feature is particularly valuable for those looking to achieve perfectly baked goods or evenly roasted meats.

Another important characteristic of the Whirlpool ACC602XP0 is its smart technology integration. With Wi-Fi connectivity, this appliance can be controlled and monitored remotely through a dedicated smartphone app. Users can preheat the oven, set timers, and receive notifications when their food is ready, adding a level of convenience that modern home cooks appreciate.

In terms of design, the ACC602XP0 is sleek and stylish, featuring a stainless steel exterior that complements contemporary kitchen aesthetics. The appliance is built with easy-to-clean surfaces and removable components, making maintenance straightforward and hassle-free.

Safety is also a priority with this model, as it includes features such as an automatic shut-off function, ensuring that the appliance turns off after a set period of inactivity. Additionally, the cool-to-the-touch exterior reduces the risk of burns during operation.

In summary, the Whirlpool ACC602XP0 is a highly functional oven that brings together advanced technology, user convenience, and safety features. With its multiple cooking functions, intuitive controls, and chic design, it is an excellent choice for anyone looking to elevate their cooking experience in the kitchen while enjoying the benefits of modern innovation.