6.Turn on water supply to refrigerator and check for leaks. Correct any leaks.

Style 2

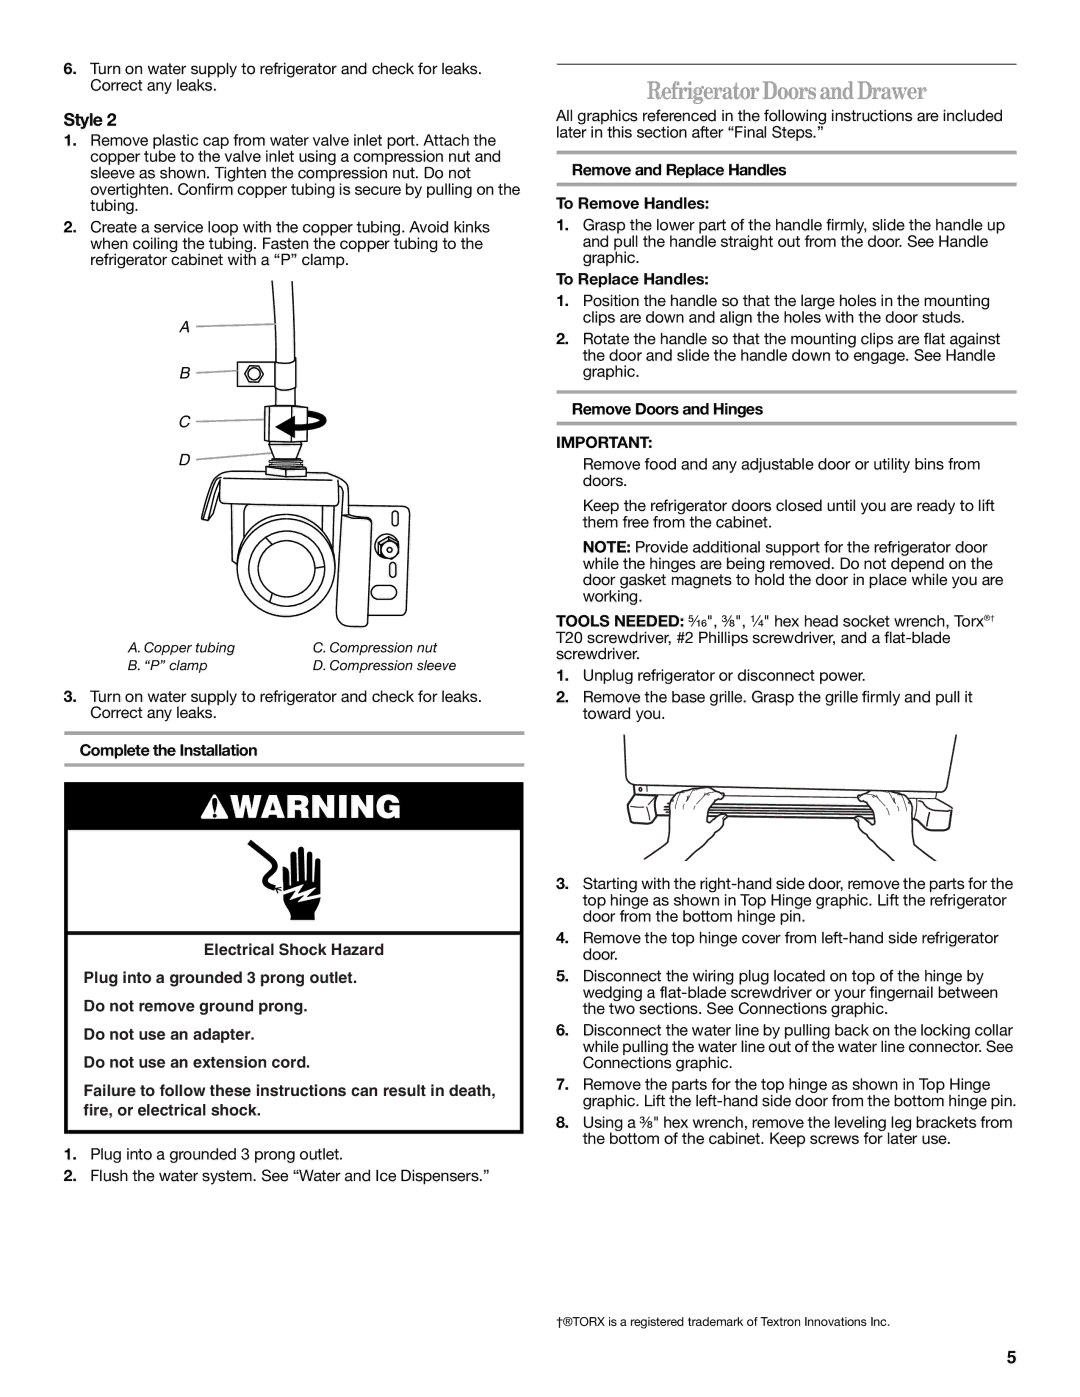
1.Remove plastic cap from water valve inlet port. Attach the copper tube to the valve inlet using a compression nut and sleeve as shown. Tighten the compression nut. Do not overtighten. Confirm copper tubing is secure by pulling on the tubing.

2.Create a service loop with the copper tubing. Avoid kinks when coiling the tubing. Fasten the copper tubing to the refrigerator cabinet with a “P” clamp.

A

B

C

D

A. Copper tubing

C. Compression nut

B. “P” clamp

D. Compression sleeve

3.Turn on water supply to refrigerator and check for leaks. Correct any leaks.

Complete the Installation

WARNING

Electrical Shock Hazard

Plug into a grounded 3 prong outlet.

Do not remove ground prong.

Do not use an adapter.

Do not use an extension cord.

Failure to follow these instructions can result in death, fire, or electrical shock.

1.Plug into a grounded 3 prong outlet.

2.Flush the water system. See “Water and Ice Dispensers.”

Refrigerator Doors and Drawer

All graphics referenced in the following instructions are included later in this section after “Final Steps.”

Remove and Replace Handles

To Remove Handles:

1.Grasp the lower part of the handle firmly, slide the handle up and pull the handle straight out from the door. See Handle graphic.

To Replace Handles:

1.Position the handle so that the large holes in the mounting clips are down and align the holes with the door studs.

2.Rotate the handle so that the mounting clips are flat against the door and slide the handle down to engage. See Handle graphic.

Remove Doors and Hinges

IMPORTANT:

Remove food and any adjustable door or utility bins from doors.

Keep the refrigerator doors closed until you are ready to lift them free from the cabinet.

NOTE: Provide additional support for the refrigerator door while the hinges are being removed. Do not depend on the door gasket magnets to hold the door in place while you are working.

TOOLS NEEDED: ⁵⁄₁₆", ³⁄₈", ¹⁄₄" hex head socket wrench, Torx®† T20 screwdriver, #2 Phillips screwdriver, and a flat-blade screwdriver.

1.Unplug refrigerator or disconnect power.

2.Remove the base grille. Grasp the grille firmly and pull it toward you.

3.Starting with the right-hand side door, remove the parts for the top hinge as shown in Top Hinge graphic. Lift the refrigerator door from the bottom hinge pin.

4.Remove the top hinge cover from left-hand side refrigerator door.

5.Disconnect the wiring plug located on top of the hinge by wedging a flat-blade screwdriver or your fingernail between the two sections. See Connections graphic.

6.Disconnect the water line by pulling back on the locking collar while pulling the water line out of the water line connector. See Connections graphic.

7.Remove the parts for the top hinge as shown in Top Hinge graphic. Lift the left-hand side door from the bottom hinge pin.

8.Using a ³⁄₈" hex wrench, remove the leveling leg brackets from the bottom of the cabinet. Keep screws for later use.

†®TORX is a registered trademark of Textron Innovations Inc.

5

Page 5
Image 5
Whirlpool GI0FSAXVY Refrigerator Doors and Drawer, Remove and Replace Handles To Remove Handles, To Replace Handles

WRX735SDBM, W10422737A, GI0FSAXVY, GZ25FSRXYY specifications

Whirlpool has consistently delivered innovative and reliable appliances, and their range of refrigerators is no exception. Among the notable models are the Whirlpool GZ25FSRXYY, GI0FSAXVY, W10422737A, and WRX735SDBM. Each of these refrigerators combines style, functionality, and advanced technology to meet the diverse needs of modern households.

The Whirlpool GZ25FSRXYY features a spacious side-by-side design with a large capacity that makes organizing food easy. Its exterior water and ice dispenser provide convenience, allowing users to enjoy chilled beverages without opening the refrigerator. This model is equipped with Adaptive Defrost technology, which optimizes the defrosting process, ensuring that food stays fresh longer.

Meanwhile, the GI0FSAXVY is designed with a French door layout, offering a stylish and efficient approach to food storage. Its humidity-controlled crisper drawers are perfect for keeping fruits and vegetables fresh, while the adjustable door bins allow for customized storage solutions. The unit boasts a sleek stainless steel finish that adds an elegant touch to any kitchen decor.

The W10422737A model stands out with its modern features and user-friendly interface. It includes the industry-leading Accu-Chill Temperature Management System, ensuring optimal cooling performance. Smart sensors monitor and adjust the internal temperature, helping maintain food quality and energy efficiency. With its spacious layout, this refrigerator provides ample room for various food items, making it an ideal choice for families.

Finally, the WRX735SDBM combines the best aspects of both modern design and advanced technology. Its counter-depth appearance provides a built-in look, while the Ice and Water dispenser on the door adds convenience. This model also features the unique Flexi-Slide bin, which can be adjusted to create more space for taller items. Furthermore, its energy-efficient design ensures reduced electricity bills without compromising performance.

In summary, whether you're looking for a side-by-side, French door, or a sleek counter-depth model, Whirlpool's GZ25FSRXYY, GI0FSAXVY, W10422737A, and WRX735SDBM offer a range of features and technologies that prioritize efficiency, style, and convenience for the modern kitchen. Each model reflects Whirlpool's commitment to quality and innovation, making them a valuable addition to any home.