NAT. GAS
CAP
FIG. B
Replace the cap in the body of the regulator, over the washer and spring, and tighten cap. See Figure D for the correct position of the washer and spring.
SCREW CAP ONTO REGULATOR AS SHOWN, FOR LP SERVICE
/
CAP, |
|
|
|
|
| FOR | NAT. | GAS | SERVICE, |
| TURN | CAP | OVER AND | |
SPRING | SCREW ONTO | REGULATOR | ||
COVER | (YOU | SHOULD | BE ABLE TO | |
Remove the cap with the screwdriver slot and replace upside down. This plug will then have the marking “LPGIO.” Be sure not to disturb or remove the spring beneath this plug. See Figure B for correct positioning of plug.
Remove the cap, with the screwdriver slot. Remove the black insert, marked “NAT.“,from the cap. (This is a tight fit in the cap). Reverse this insert and carefully push it firmly into the hole in the cap. The marking “LP” will now be showing on the insert. Be sure the insert is pressed into the shoulder. Also, be sure not to disturb the spring in the body of the regulator.
NAT. GAS | LP GAS |
| READ ‘NAT.’ WHEN |
SPRING- |
|
9 | \REGULATOR |
FIG. E
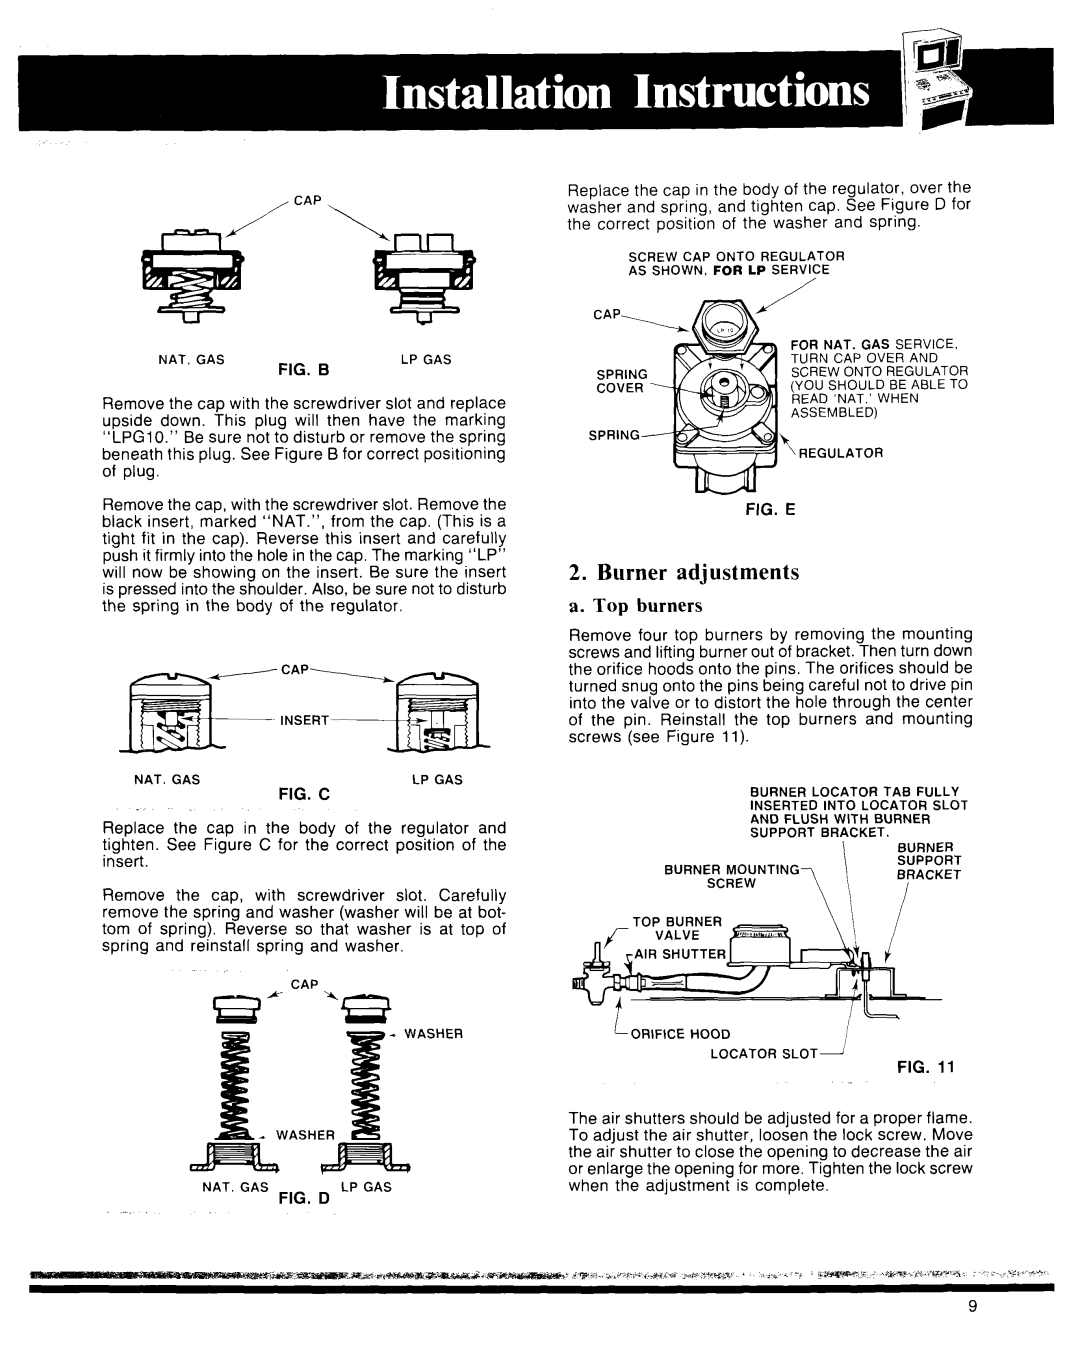
2. Burner adjustments
a. Top burners
Remove four top burners by removing the mounting screws and lifting burner out of bracket. Then turn down the orifice hoods onto the pins. The orifices should be turned snug onto the pins being careful not to drive pin into the valve or to distort the hole through the center of the pin. Reinstall the top burners and mounting screws (see Figure 11).
_,
FIG. C
BURNER LOCATOR TAB FULLY INSERTED INTO LOCATOR SLOT AND FLUSH WITH BURNER
Replace the cap in the body of the regulator and tighten. See Figure C for the correct position of the insert.
Remove the cap, with screwdriver slot. Carefully remove the spring and washer (washer will be at bot- tom of spring). Reverse so that washer is at top of spring and reinstall spring and washer.
~CAP
‘4
E?
NAT. GAS FIG. D LP GAS
SUPPORT BRACKET.
BURNER
SUPPORT
BURNER MOUNTINGBRACKET
SCREW
TOP BURNER
i ORIFICE HOOD | i |
LOCATOR | SLOT I |
FIG. 11
The air shutters should be adjusted for a proper flame. To adjust the air shutter, loosen the lock screw. Move the air shutter to close the opening to decrease the air or enlarge the opening for more. Tighten the lock screw when the adjustment is complete.
9