Manuals
/
Whirlpool
/
Kitchen Appliance
/
Refrigerator
Whirlpool
REFRIGERATOR USE & CARE GUIDE
warranty
IceMakerandStorageBin, To Dispense Ice, Remember
Models:
REFRIGERATOR USE & CARE GUIDE
1
6
40
40
Download
40 pages
27.07 Kb
3
4
5
6
7
8
9
10
Troubleshooting
Product Data Sheets
Door Alarm
Warranty
Solución De Problemas
Accessoires
Utilisationdescommandes
Adjusting Controls
Cleaning
Default
Page 6
Image 6
Page 5
Page 7
Page 6
Image 6
Page 5
Page 7
Contents
Accessories
Table of Contents/ Índice/Tabledes matières
Assistance orService
MANUALDE USO Y CUIDADO DEL REFRIGERADOR
IMPORTANT SAFETY INSTRUCTIONS
REFRIGERATOR SAFETY
Your safety and the safety of others are very important
DANGER
ADJUSTMENT
UsingtheControls
Adjusting Controls
REFRIGERATOR USE
Convertible DrawerTemperature Control
Door Alarm
Additional Control Panel Features
CrisperHumidityControl
To Dispense Water Standard
Default
Pre-set Volumes
To Dispense Water Measured Fill
To Dispense Ice
Cut Hazard Use a sturdy glass when dispensing ice
IceMakerandStorageBin
REMEMBER
Non-indicator Water Filter on some models
Cleaning
To Clean Your Refrigerator
Explosion Hazard Use nonflammable cleaner
The refrigerator will not operate
TROUBLESHOOTING
RefrigeratorOperation
The motor seems to run too much
Temperature is too warm Check the following
TemperatureandMoisture
IceandWater
There is interior moisture buildup
Water is leaking from the dispenser Check the following
WATER FILTER CERTIFICATIONS
The water dispenser will not operate properly Check the following
The dispenser water is not cool enough
Model T2WG2L/T2RFWG2 Capacity 200 Gallons 758 Liters
PRODUCT DATA SHEETS
Base Grille Water Filtration System
Model T2WG2/T2RFWG2 Capacity 200 Gallons 758 Liters
Model T1WG2L/T2RFWG2 Capacity 200 Gallons 758 Liters
Model T1WG2/T2RFWG2 Capacity 200 Gallons 758 Liters
DISCLAIMER OF IMPLIED WARRANTIES LIMITATION OF REMEDIES
ONE YEAR LIMITED WARRANTY
ITEMS WHIRLPOOL WILL NOT PAY FOR
call
Ayudaoservicio técnico
SEGURIDAD DEL REFRIGERADOR
PELIGRO ADVERTENCIA
Accesorios
Cómodeshacerseadecuadamentedesu refrigerador viejo
USO DE SU REFRIGERADOR
ADVERTENCIA
Usode loscontroles
Sistema IceMagic
Modo de temperatura
Frío rápido
IMPORTANTE
Despachadores de agua yhielo
Alarma de la puerta
Controldelfríodelapuerta
Control de temperaturaparaelcajónconvertible
Unidades
Para despachar agua Llenado medido
MODO CUSTOM A medida
Prefijado
Peligro de Cortaduras
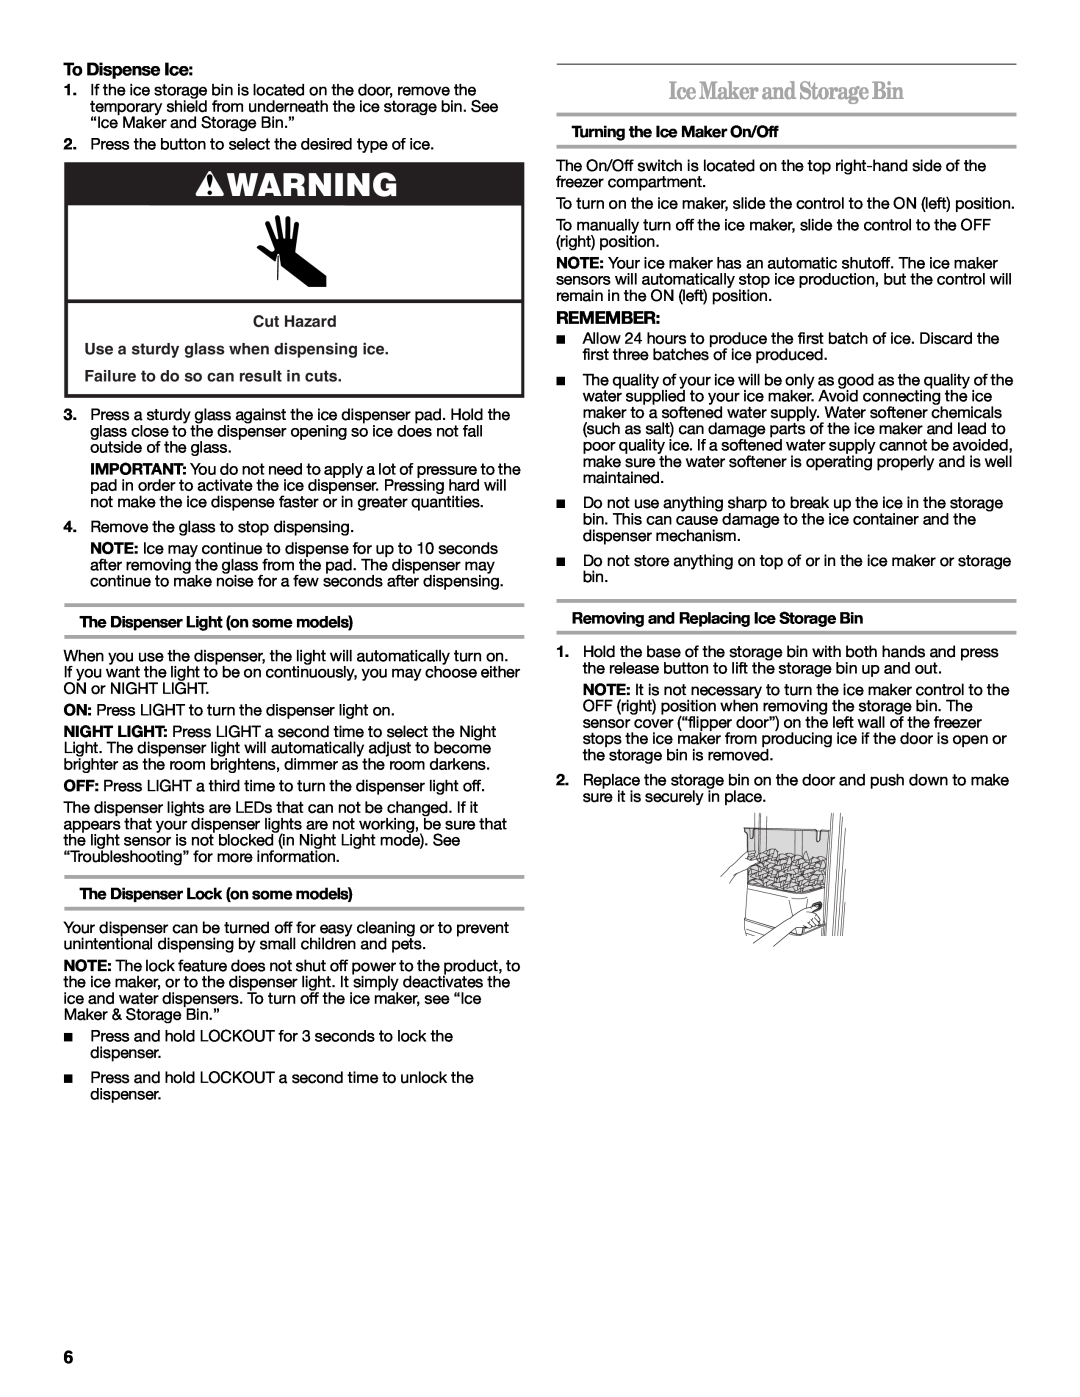
Fábricadehieloydepósito
Para despachar hielo
Use un vaso resistente para recibir hielo del despachador
Limpieza
CUIDADO DE SU REFRIGERADOR
Sistemadefiltracióndeagua
Cómocambiarlosfocos
El refrigerador no funciona
SOLUCIÓN DE PROBLEMAS
Funcionamientodelrefrigerador
Parece que el motor funciona excesivamente
La temperatura está demasiado caliente Verifique lo siguiente
Temperaturayhumedad
Hieloyagua
Hay acumulación de humedad en el interior
El despachador de agua no funciona debidamente Verifique lo siguiente
El despachador de hielo no funciona debidamente
¿Se ha agregado hielo incorrecto en el depósito? Use
Hay fugas de agua del despachador Verifique lo siguiente
Modelo T2WG2L/T2RFWG2 Capacidad de 200 galones 758 litros
HOJA DE DATOS DEL PRODUCTO
Sistema de filtración de agua de la rejilla de la base
Modelo T2WG2/T2RFWG2 Capacidad de 200 galones 758 litros
Modelo T1WG2L/T2RFWG2 Capacidad de 200 galones 758 litros
Modelo T1WG2/T2RFWG2 Capacidad de 200 galones 758 litros
GARANTÍA LIMITADA DE UN AÑO
WHIRLPOOL CORPORATION
GARANTÍA DE LOS ELECTRODOMÉSTICOS PRINCIPALES DE
WHIRLPOOL NO PAGARÁ POR LOS SIGUIENTES ARTÍCULOS
SÉCURITÉ DU RÉFRIGÉRATEUR
Assistance ou service
Accessoires
DANGER AVERTISSEMENT
AVERTISSEMENT
Utilisationdescommandes
UTILISATION DU RÉFRIGÉRATEUR
Miseau rebutdevotrevieuxréfrigérateur
Mode température
Ajustement des réglages de commande
Autres caractéristiques du tableau de commande
Quick cool refroidissement rapide
Distributeurs deauetdeglaçons
Commande du compartimentfraîcheur
Réglage de lhumiditédans lebacà légumes
Réglagedela températuredu tiroirconvertible
MODE CUSTOM personnalisé
Volumes pré-réglés
Distribution deau remplissage mesuré
Unités
Distribution de glace
Pour retirer et réinstaller le bac à glaçons
Machineà glaçonsetbacdentreposage
Risque de coupure Utiliser un verre robuste pour prendre des glaçons
ENTRETIEN DU RÉFRIGÉRATEUR
Remplacement des ampoules d’éclairage
Remplacement du filtre à eau
Systèmedefiltrationdeleau
Le réfrigérateur ne fonctionne pas
DÉPANNAGE
Fonctionnementdu réfrigérateur
Un fusible est-il grillé ou un disjoncteur sest-il
La température est trop élevée Vérifier ce qui suit
Températureet humidité
Glaçons eteau
De lhumidité s’accumule à l’intérieur
De leau suinte du distributeur Vérifier ce qui suit
Le distributeur de glaçons ne fonctionne pas correctement
Le distributeur deau ne fonctionne pas correctement
Leau du distributeur nest pas assez froide
Modèle T2WG2L/T2RFWG2 Capacité 200 gallons 758 litres
FEUILLES DE DONNÉES SUR LE PRODUIT
Système de filtration deau de la grille de la base
Modèle T2WG2/T2RFWG2 Capacité 200 gallons 758 litres
Modèle T1WG2L/T2RFWG2 Capacité 200 gallons 758 litres
Modèle T1WG2/T2RFWG2 Capacité 200 gallons 758 litres
GARANTIE DES GROS APPAREILS MÉNAGERS WHIRLPOOL CORPORATION
GARANTIE LIMITÉE DE UN AN
WHIRLPOOL NE PRENDRA PAS EN CHARGE
2/06
2318508
2006 Whirlpool Corporation
All rights reserved
Top
Page
Image
Contents