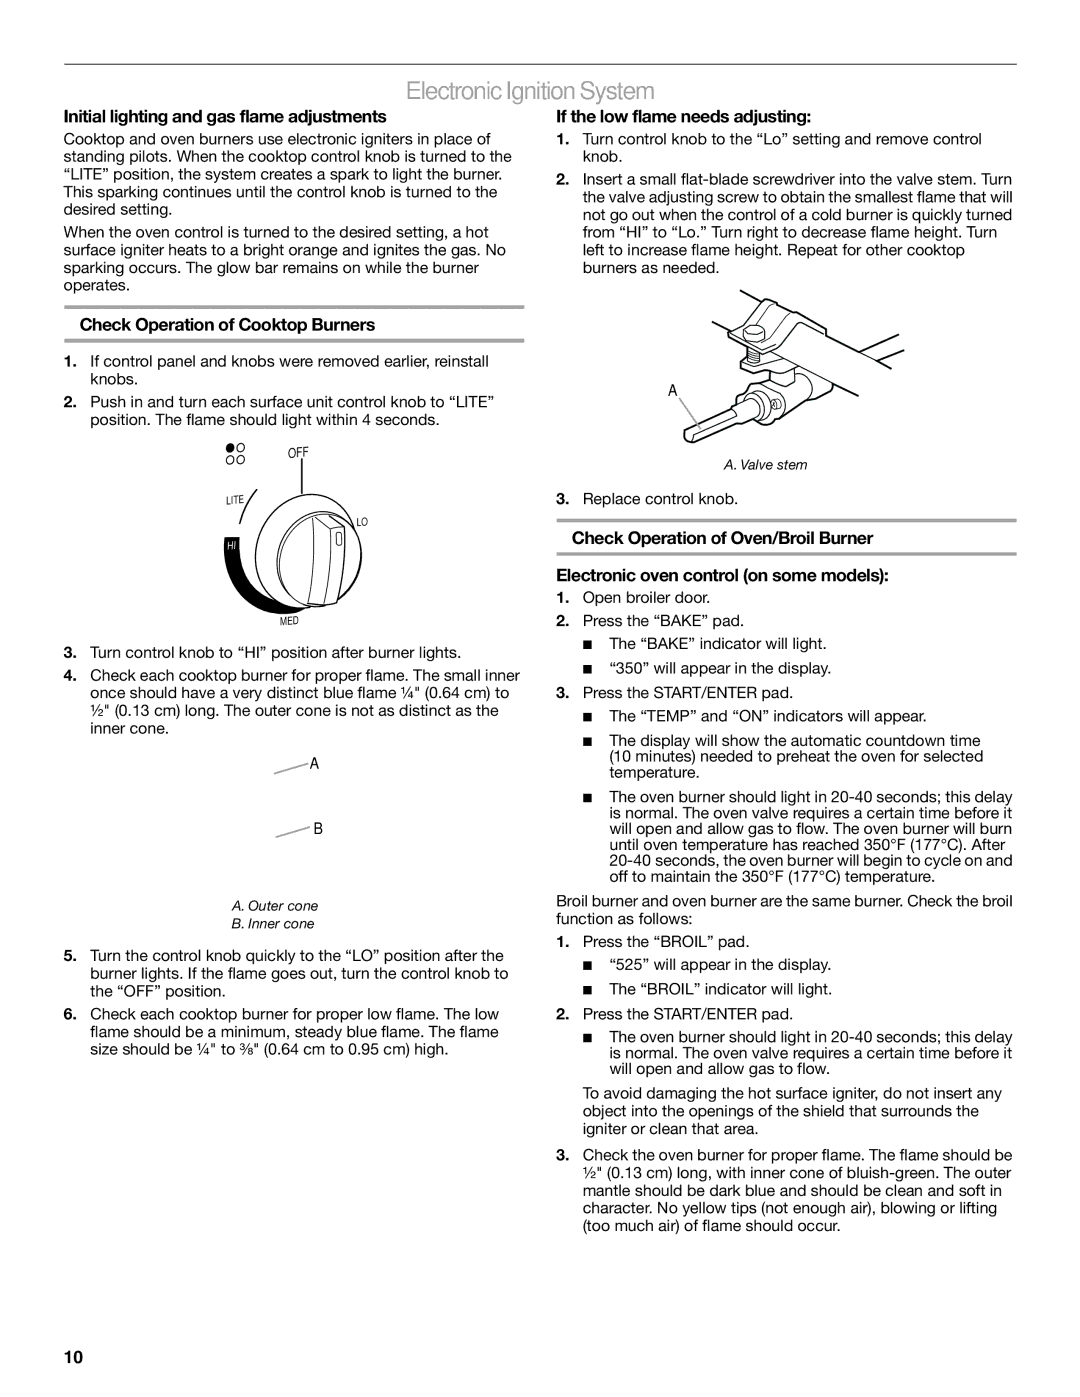
Electronic Ignition System

Initial lighting and gas flame adjustments

Cooktop and oven burners use electronic igniters in place of standing pilots. When the cooktop control knob is turned to the “LITE” position, the system creates a spark to light the burner. This sparking continues until the control knob is turned to the desired setting.

When the oven control is turned to the desired setting, a hot surface igniter heats to a bright orange and ignites the gas. No sparking occurs. The glow bar remains on while the burner operates.

Check Operation of Cooktop Burners

1.If control panel and knobs were removed earlier, reinstall knobs.

2.Push in and turn each surface unit control knob to “LITE” position. The flame should light within 4 seconds.

OFF

LITE

LO

HI

MED

3.Turn control knob to “HI” position after burner lights.

4.Check each cooktop burner for proper flame. The small inner once should have a very distinct blue flame ¼" (0.64 cm) to ½" (0.13 cm) long. The outer cone is not as distinct as the inner cone.

A

B

A. Outer cone

B. Inner cone

5.Turn the control knob quickly to the “LO” position after the burner lights. If the flame goes out, turn the control knob to the “OFF” position.

6.Check each cooktop burner for proper low flame. The low flame should be a minimum, steady blue flame. The flame size should be ¼" to ³⁄₈" (0.64 cm to 0.95 cm) high.

If the low flame needs adjusting:

1.Turn control knob to the “Lo” setting and remove control knob.

2.Insert a small flat-blade screwdriver into the valve stem. Turn the valve adjusting screw to obtain the smallest flame that will not go out when the control of a cold burner is quickly turned from “HI” to “Lo.” Turn right to decrease flame height. Turn left to increase flame height. Repeat for other cooktop burners as needed.

A

A. Valve stem

3.Replace control knob.

Check Operation of Oven/Broil Burner

Electronic oven control (on some models):

1.Open broiler door.

2.Press the “BAKE” pad.

The “BAKE” indicator will light.

“350” will appear in the display.

3.Press the START/ENTER pad.

The “TEMP” and “ON” indicators will appear.

The display will show the automatic countdown time

(10 minutes) needed to preheat the oven for selected temperature.

The oven burner should light in 20-40 seconds; this delay is normal. The oven valve requires a certain time before it will open and allow gas to flow. The oven burner will burn until oven temperature has reached 350°F (177°C). After 20-40 seconds, the oven burner will begin to cycle on and off to maintain the 350°F (177°C) temperature.

Broil burner and oven burner are the same burner. Check the broil function as follows:

1.Press the “BROIL” pad.

“525” will appear in the display.

The “BROIL” indicator will light.

2.Press the START/ENTER pad.

The oven burner should light in 20-40 seconds; this delay is normal. The oven valve requires a certain time before it will open and allow gas to flow.

To avoid damaging the hot surface igniter, do not insert any object into the openings of the shield that surrounds the igniter or clean that area.

3.Check the oven burner for proper flame. The flame should be ½" (0.13 cm) long, with inner cone of bluish-green. The outer mantle should be dark blue and should be clean and soft in character. No yellow tips (not enough air), blowing or lifting (too much air) of flame should occur.

10

Page 10
Image 10
Whirlpool W10200946A installation instructions Electronic Ignition System, Initial lighting and gas flame adjustments

W10200946A specifications

The Whirlpool W10200946A is an innovative and versatile kitchen appliance that stands out for its impressive array of features and technologies designed to enhance culinary experiences. This dishwasher offers a perfect blend of convenience, efficiency, and performance, making it an essential addition to any modern kitchen.

One of the main features of the W10200946A is its advanced cleaning technology. This model utilizes a powerful wash system that ensures dishes come out sparkling clean every time. With multiple wash cycles available, users can select the perfect setting for any load, from heavily soiled pots and pans to delicate glassware. The Sensor Cycle option automatically detects the level of soil on the dishes and adjusts the wash and rinse settings accordingly, optimizing water and energy usage while providing a thorough cleaning.

In terms of capacity, the W10200946A does not disappoint. It boasts a spacious interior that can accommodate up to 13 place settings, making it ideal for families or those who frequently entertain guests. The model features adjustable upper racks, allowing users to customize the interior space to fit taller items and bulky cookware.

Energy efficiency is another hallmark of this dishwasher. It is designed to operate on low water consumption, making it an eco-friendly choice that can help reduce utility bills. The ENERGY STAR certification reflects its commitment to environmental sustainability without sacrificing performance.

Moreover, the W10200946A incorporates a Quiet Wash sound insulation system, ensuring that the dishwasher operates at an exceptionally low noise level. This feature is particularly beneficial for open-concept living spaces where peace and quiet are essential.

Ease of use is prioritized with the user-friendly control panel, which is intuitive and straightforward. The delayed start option allows users to set the machine to run at a more convenient time, while the time remaining display provides at-a-glance updates on cycle progress.

In conclusion, the Whirlpool W10200946A is an exemplary dishwasher that combines cutting-edge technology with practical features. Its powerful cleaning capabilities, spacious design, energy efficiency, and quiet operation make it a valuable addition to any household. Whether you are looking to upgrade your current dishwasher or install a new one, the W10200946A stands out as a reliable and efficient choice.