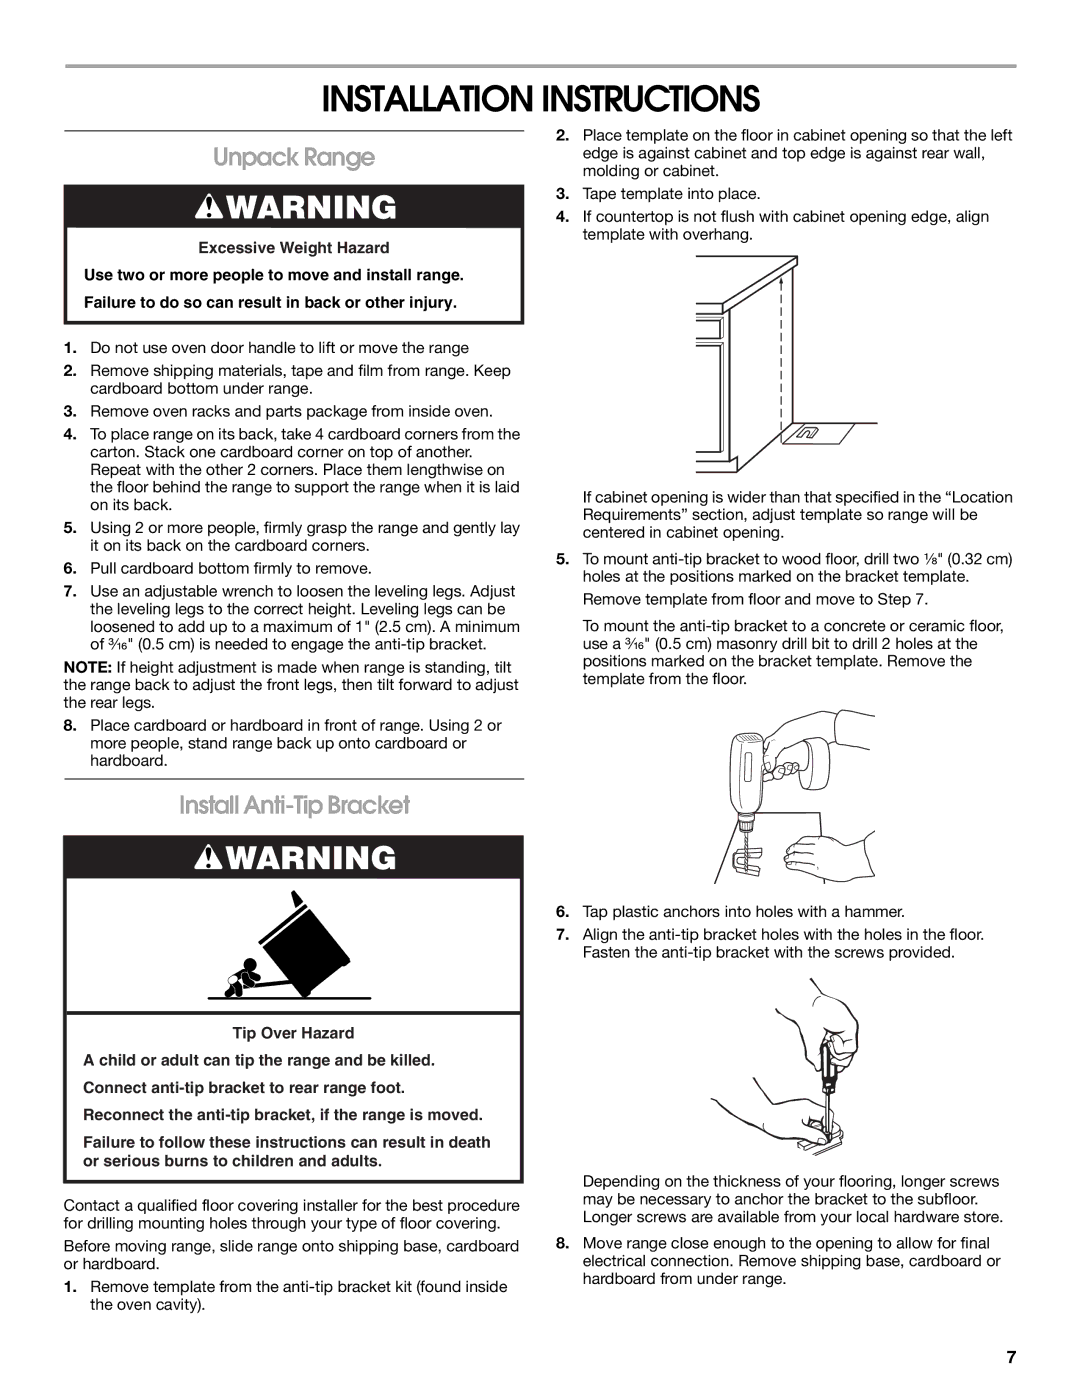
INSTALLATION INSTRUCTIONS

Unpack Range

WARNING

Excessive Weight Hazard

Use two or more people to move and install range. Failure to do so can result in back or other injury.

1.Do not use oven door handle to lift or move the range

2.Remove shipping materials, tape and film from range. Keep cardboard bottom under range.

3.Remove oven racks and parts package from inside oven.

4.To place range on its back, take 4 cardboard corners from the carton. Stack one cardboard corner on top of another. Repeat with the other 2 corners. Place them lengthwise on the floor behind the range to support the range when it is laid on its back.

5.Using 2 or more people, firmly grasp the range and gently lay it on its back on the cardboard corners.

6.Pull cardboard bottom firmly to remove.

7.Use an adjustable wrench to loosen the leveling legs. Adjust the leveling legs to the correct height. Leveling legs can be loosened to add up to a maximum of 1" (2.5 cm). A minimum of ³⁄₁₆" (0.5 cm) is needed to engage the anti-tip bracket.

NOTE: If height adjustment is made when range is standing, tilt the range back to adjust the front legs, then tilt forward to adjust the rear legs.

8.Place cardboard or hardboard in front of range. Using 2 or more people, stand range back up onto cardboard or hardboard.

Install Anti-Tip Bracket

WARNING

Tip Over Hazard

A child or adult can tip the range and be killed.

Connect anti-tip bracket to rear range foot.

Reconnect the anti-tip bracket, if the range is moved.

Failure to follow these instructions can result in death or serious burns to children and adults.

Contact a qualified floor covering installer for the best procedure for drilling mounting holes through your type of floor covering.

Before moving range, slide range onto shipping base, cardboard or hardboard.

1.Remove template from the anti-tip bracket kit (found inside the oven cavity).

2.Place template on the floor in cabinet opening so that the left edge is against cabinet and top edge is against rear wall, molding or cabinet.

3.Tape template into place.

4.If countertop is not flush with cabinet opening edge, align template with overhang.

If cabinet opening is wider than that specified in the “Location Requirements” section, adjust template so range will be centered in cabinet opening.

5.To mount anti-tip bracket to wood floor, drill two ¹⁄₈" (0.32 cm) holes at the positions marked on the bracket template.

Remove template from floor and move to Step 7.

To mount the anti-tip bracket to a concrete or ceramic floor, use a ³⁄₁₆" (0.5 cm) masonry drill bit to drill 2 holes at the positions marked on the bracket template. Remove the template from the floor.

6.Tap plastic anchors into holes with a hammer.

7.Align the anti-tip bracket holes with the holes in the floor. Fasten the anti-tip bracket with the screws provided.

Depending on the thickness of your flooring, longer screws may be necessary to anchor the bracket to the subfloor. Longer screws are available from your local hardware store.

8.Move range close enough to the opening to allow for final electrical connection. Remove shipping base, cardboard or hardboard from under range.

7

Page 7
Image 7
Whirlpool W10200946A installation instructions Installation Instructions, Unpack Range, Install Anti-Tip Bracket

W10200946A specifications

The Whirlpool W10200946A is an innovative and versatile kitchen appliance that stands out for its impressive array of features and technologies designed to enhance culinary experiences. This dishwasher offers a perfect blend of convenience, efficiency, and performance, making it an essential addition to any modern kitchen.

One of the main features of the W10200946A is its advanced cleaning technology. This model utilizes a powerful wash system that ensures dishes come out sparkling clean every time. With multiple wash cycles available, users can select the perfect setting for any load, from heavily soiled pots and pans to delicate glassware. The Sensor Cycle option automatically detects the level of soil on the dishes and adjusts the wash and rinse settings accordingly, optimizing water and energy usage while providing a thorough cleaning.

In terms of capacity, the W10200946A does not disappoint. It boasts a spacious interior that can accommodate up to 13 place settings, making it ideal for families or those who frequently entertain guests. The model features adjustable upper racks, allowing users to customize the interior space to fit taller items and bulky cookware.

Energy efficiency is another hallmark of this dishwasher. It is designed to operate on low water consumption, making it an eco-friendly choice that can help reduce utility bills. The ENERGY STAR certification reflects its commitment to environmental sustainability without sacrificing performance.

Moreover, the W10200946A incorporates a Quiet Wash sound insulation system, ensuring that the dishwasher operates at an exceptionally low noise level. This feature is particularly beneficial for open-concept living spaces where peace and quiet are essential.

Ease of use is prioritized with the user-friendly control panel, which is intuitive and straightforward. The delayed start option allows users to set the machine to run at a more convenient time, while the time remaining display provides at-a-glance updates on cycle progress.

In conclusion, the Whirlpool W10200946A is an exemplary dishwasher that combines cutting-edge technology with practical features. Its powerful cleaning capabilities, spacious design, energy efficiency, and quiet operation make it a valuable addition to any household. Whether you are looking to upgrade your current dishwasher or install a new one, the W10200946A stands out as a reliable and efficient choice.