GAZ Encastrables DE 30 76,2 CM
Instructions Pour L’INSTALLATION DES Cuisinières
Your safety and the safety of others are very important
Range Safety
Anti-Tip Bracket Range Foot
Location Requirements
Installation Requirements
Tools and Parts
Model KSGB900
Mobile Home Additional Installation Requirements
Product Dimensions
Mobile Home Installations Require
¹¹⁄₁₆ 9.4 cm plus measurement of N L 30.5 cm
Cabinet Dimensions
Slide-In Cutout Freestanding Cutout
Gas Supply Line
Electrical Requirements
Gas Supply Requirements
Type of Gas
Burner Input Requirements
Gas Supply Pressure Testing
Gas Pressure Regulator
12½ 31.8 cm B. Bracket V-notch
Installation Instructions
Install Anti-Tip Bracket
Unpack Range
Rear position Front position
Adjust Leveling Legs
Floor Mounting
Wall Mounting
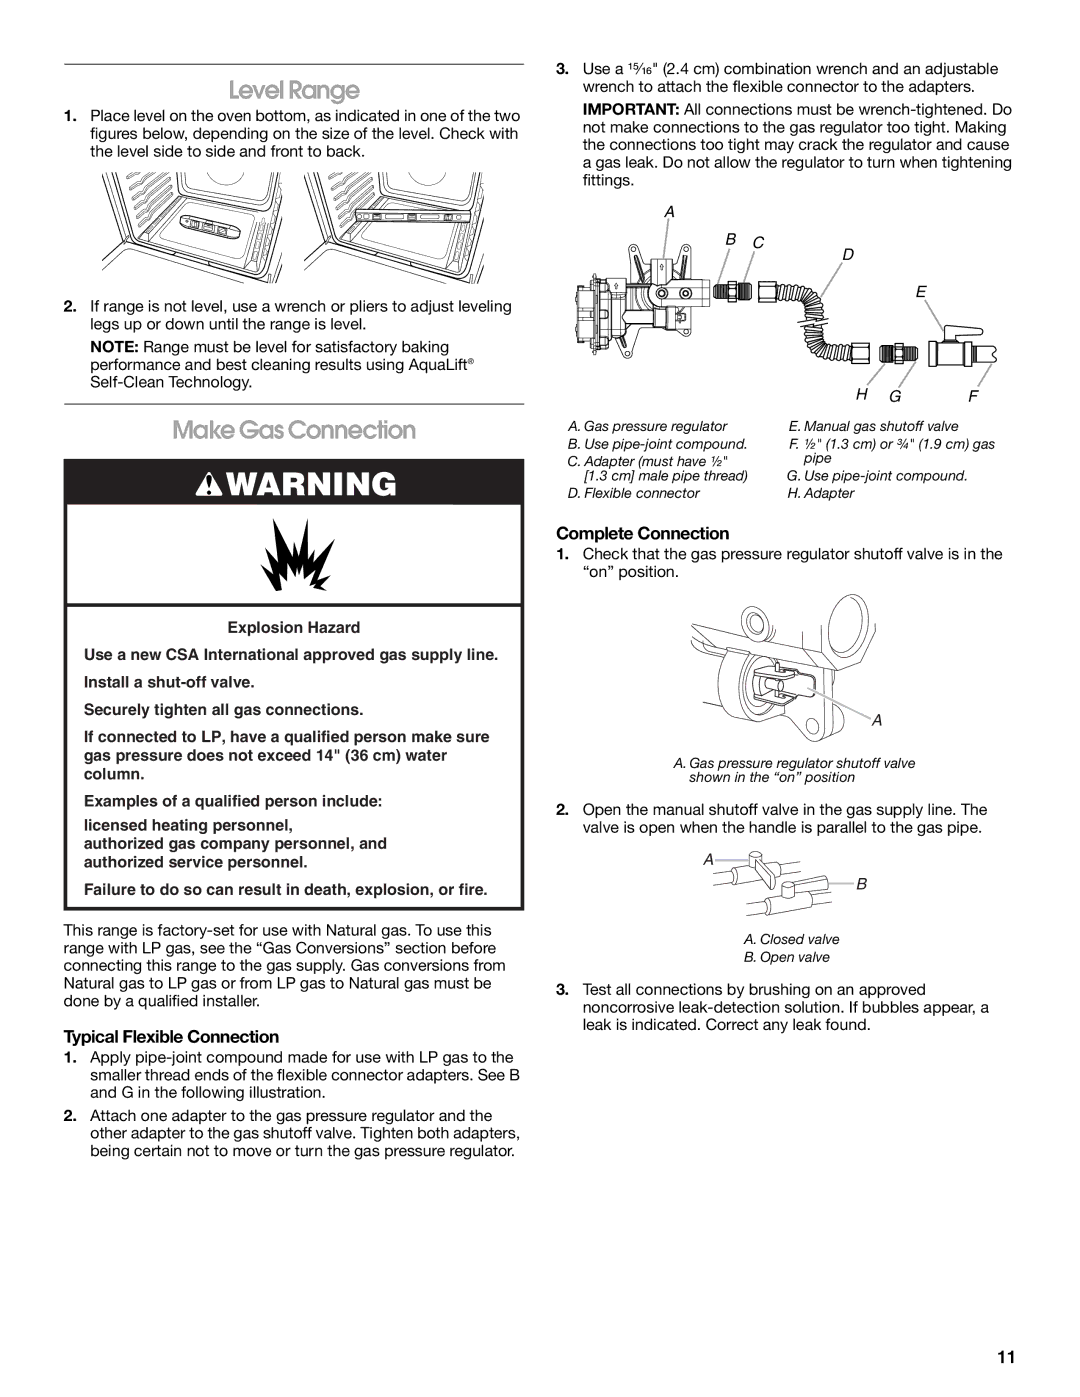
Complete Connection
Level Range
Make Gas Connection
Typical Flexible Connection
For Model JGS1450D
For Models MGS8880D, WEG730H0D, and WEG760H0D
For Models KSGG700E and KSGB900E
Electronic Ignition System
Verify Anti-Tip Bracket Is Installed Engaged
To Remove
Remove/Replace Drawer
Oven Door
Check Operation of Oven Broil Burner
Hinge notch
Complete Installation
If You Need Assistance or Service
If Range Does Not Operate, Check the Following
Gas pressure regulator
GAS Conversions
LP Gas Conversion
To Convert Gas Pressure Regulator Natural Gas to LP Gas
To Convert Oven Bake Burner Natural Gas to LP Gas
To Convert Surface Burners Natural Gas to LP Gas
Broil burner Flame spreader Screws Orifice hood
To Convert Oven Broil Burner Natural Gas to LP Gas
Bake burner Screws Oven orifice
To Convert Gas Pressure Regulator LP Gas to Natural Gas
Complete Installation Natural Gas to LP Gas
Natural Gas Conversion
Igniter electrode Orifice spud Screws Orifice spud holder
To Convert Surface Burners LP Gas to Natural Gas
To Convert Oven Bake Burner LP Gas to Natural Gas
Stamped number
To Convert Oven Broil Burner LP Gas to Natural Gas
Adjust Surface Burner Flame
Adjust Flame Height
Complete Installation LP Gas to Natural Gas
Locking screw Air shutter
Adjust Oven Bake Burner Flame If Needed
Adjust Oven Broil Burner Flame If Needed
If Flame Needs to be Adjusted
Votre sécurité et celle des autres est très importante
Sécurité DE LA Cuisinière
Pied de La cuisinière
Outillage et pièces
Exigences D’INSTALLATION
Exigences demplacement
29⁷⁄₈ 75,9 cm
Dimensions du produit
Modèle KSGB900
¹¹⁄₁₆ 9,4 cm plus la mesure de N L 30,5 cm
Dimensions du placard
Gaz naturel
Spécifications électriques
Spécifications de l’alimentation en gaz
Type de gaz
Tests de pressurisation de la canalisation de gaz
Canalisation dalimentation en gaz
Détendeur
Débit thermique des brûleurs
12½ 31,8 cm Encoche en V de la bride
Instructions D’INSTALLATION
Installation de la bride antibasculement
Déballage de la cuisinière
Position arrière Position avant
Réglage des pieds de nivellement
Montage au plancher
Montage mural
Achever le raccordement
Réglage de l’aplomb de la cuisinière
Raccordement au gaz
Raccordement typique par raccord flexible
Pour le modèle JGS1450D
Pour les modèles MGS8880D, WEG730H0D et WEG760H0D
Pour les modèles KSGG700E et KSGB900E
Avertissement
Système d’allumage électronique
Porte du four
Dépose et réinstallation du tiroir
Si la cuisinière ne fonctionne pas, contrôler ce qui suit
Achever l’installation
Pour obtenir de l’assistance ou une visite de service
Conversion pour l’alimentation au propane
Conversions Pour Changement DE GAZ
Rainure pour gaz propane
Détendeur
Électrode d’allumage Gicleur Support du gicleur Vis
Vis Partie inférieure du four
Gaz propane
Conversion du brûleur de cuisson au four de gaz naturel
Brûleur de cuisson au four Vis Orifice du four
Achever l’installation de gaz naturel à propane
Rondelle Capuchon du détendeur
Conversion pour l’alimentation au gaz naturel
Capuchon en plastique
Chiffre gravé
Brûleur de cuisson au four Vis
Réglage des brûleurs standards
Achever l’installation gaz propane à gaz naturel
Réglage de la taille des flammes
Réglage de la flamme des brûleurs de surface
Vis de blocage Virole de réglage de l’admission d’air
’il est nécessaire de régler la taille des flammes
W10665256D