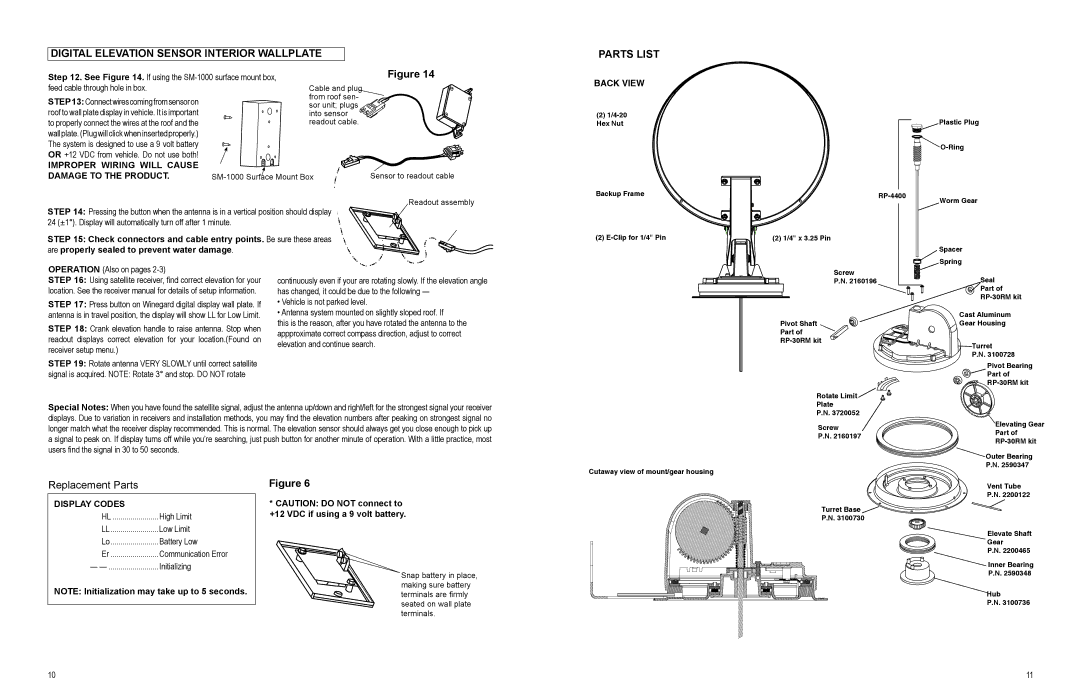
DIGITAL ELEVATION SENSOR INTERIOR WALLPLATE
Step 12. See Figure 14. If using the |
| Figure 14 | |
feed cable through hole in box. |
| Cable and plug |
|
STEP13: Connect wires coming from sensor on |
| from roof sen- |
|
| sor unit; plugs |
| |
roof to wall plate display in vehicle. It is important |
| into sensor |
|
to properly connect the wires at the roof and the |
| readout cable. |
|
wall plate. (Plug will click when inserted properly.) |
|
|
|
The system is designed to use a 9 volt battery |
|
|
|
OR +12 VDC from vehicle. Do not use both! |
|
|
|
Improper wiring will cause |
|
|
|
damage to the product. | Sensor to readout cable | ||
Readout assembly
STEP 14: Pressing the button when the antenna is in a vertical position should display 24 (±1°). Display will automatically turn off after 1 minute.
STEP 15: Check connectors and cable entry points. Be sure these areas are properly sealed to prevent water damage.
PARTS LIST
BACK VIEW
(2)
Backup Frame
(2)
Plastic Plug
![]() O-Ring
O-Ring
Worm Gear | |
|
(2) 1/4" x 3.25 Pin
Spacer
OPERATION (Also on pages
STEP 16: Using satellite receiver, find correct elevation for your location. See the receiver manual for details of setup information.
STEP 17: Press button on Winegard digital display wall plate. If antenna is in travel position, the display will show LL for Low Limit.
STEP 18: Crank elevation handle to raise antenna. Stop when readout displays correct elevation for your location.(Found on receiver setup menu.)
STEP 19: Rotate antenna VERY SLOWLY until correct satellite
signal is acquired. NOTE: Rotate 3° and stop. DO NOT rotate
continuously even if your are rotating slowly. If the elevation angle has changed, it could be due to the following —
•Vehicle is not parked level.
•Antenna system mounted on slightly sloped roof. If
this is the reason, after you have rotated the antenna to the appproximate correct compass direction, adjust to correct elevation and continue search.
Screw
P.N. 2160196
Pivot Shaft
Part of
Spring
Seal
![]() Part of
Part of
Cast Aluminum
Gear Housing
Turret
P.N. 3100728
Pivot Bearing
![]()
![]() Part of
Part of
Special Notes: When you have found the satellite signal, adjust the antenna up/down and right/left for the strongest signal your receiver displays. Due to variation in receivers and installation methods, you may find the elevation numbers after peaking on strongest signal no longer match what the receiver display recommended. This is normal. The elevation sensor should always get you close enough to pick up a signal to peak on. If display turns off while you’re searching, just push button for another minute of operation. With a little practice, most users find the signal in 30 to 50 seconds.
Cutaway view of mount/gear housing
Rotate Limit ![]()
Plate
P.N. 3720052
Screw
P.N. 2160197
![]() Elevating Gear Part of
Elevating Gear Part of
![]() Outer Bearing
Outer Bearing
P.N. 2590347
Replacement Parts
DISPLAY CODES |
|
HL | High Limit |
LL | Low Limit |
Lo | Battery Low |
Er | Communication Error |
— | Initializing |
NOTE: Initialization may take up to 5 seconds.
Figure 6
*CAUTION: DO NOT connect to +12 VDC if using a 9 volt battery.
Snap battery in place, making sure battery terminals are firmly seated on wall plate terminals.
Turret Base ![]() P.N. 3100730
P.N. 3100730
Vent Tube P.N. 2200122
Elevate Shaft
Gear
P.N. 2200465
Inner Bearing P.N. 2590348
Hub
P.N. 3100736
10 | 11 |
