Woods Equipment TS1680Q manual Horizontal Shaft Seal Repair Figure, Disassemble Gearbox

Models: TS1680 TS1680Q

1 82
Download 82 pages 45.16 Kb
Page 30
Image 30

Vertical seal should be recessed in housing. Horizontal seal (3) should be pressed flush with outside of housing.

NOTE: Distortion to seal cage or damage to seal lip will cause seal to leak.

5.Fill gearbox with SAE 80W or 90W gear lube until it runs out the level plug.

6.Remove and replace any seal damaged in installation.

Horizontal Shaft Seal Repair (Figure 14)

1.Disconnect and remove the rear driveline from the gearbox.

2.Remove vent plug (22) and siphon gear lube from housing through this opening.

3.If the leak occurred at either end of horizontal shaft, remove oil cap (16) and/or oil seal (3). Replace with new one (refer to Seal Installation, page 29).

4.Fill gearbox with SAE 80W or 90W gear lube until it runs out the level plug.

SIDE GEARBOX REPAIR (Figure 14)

NOTE: Replacing gears, shafts, bearings, and seals may not be cost effective. Purchasing a complete gearbox may be more economical.

Remove Gearbox from Cutter

1.Disconnect and remove flex side driveline from the gearbox.

2.Remove cotter pin and nut from vertical shaft and remove crossbar (see Crossbar, page 34).

3.Remove breather level plug (22) and siphon gear lube from housing through this opening.

4.Remove the six bolts that attach gearbox to cutter and remove gearbox.

Disassemble Gearbox

1.Remove plug from side of gearbox and pour out gear oil.

2.Remove oil cap (16) (to be replaced).

3.Remove snap ring (5) and shim (6) from input shaft

(4).

4.Support gearbox in hand press and push on input shaft (4) to remove bearing (2).

5.Remove six cap screws (21) and top cover (20) from housing. Remove gear (1a or 1b) from inside housing.

6.Remove oil seal (3) from front of housing (to be replaced).

7.Remove snap ring (5) and shim (6) from front of housing.

8.Remove input bearing (2) by using a punch and hammer from outside of housing.

9.Support housing in vise in a horizontal position.

10.The castle nut (23), cotter pin (24), and hub are already removed with the stump jumper/crossbar. Remove the protective seal (11), and oil seal (12).

11.Remove cotter pin (15), castle nut (8), and washer (19) from output shaft (14).

12.Remove output shaft (14) by using a punch and hammer and tap on top to drive down. Remove gear (1a or 17) and shim (9) from inside housing.

13.Remove bottom bearing (13) by using a punch and hammer from the top, outside the housing.

14.Support housing upside down (top cover surface) and remove top bearing (10) by using a punch and hammer from the bottom side of the housing.

15.Inspect gears for broken teeth and wear. Some wear is normal and will show on loaded side. Forged gear surfaces are rough when new. Check that wear pattern is smooth.

16.Inspect vertical and horizontal shafts for grooves, nicks, or bumps in the areas where the seals seat. Resurface any damage with emery cloth.

17.Inspect housing and caps for cracks or other damage.

Assemble Gearbox

1.Clean housing, paying specific attention to areas where gaskets will be installed.

2.Wash housing and all components thoroughly. Select a clean area for gearbox assembly. Replace all seals, bearings, and gaskets. All parts must be clean and lightly oiled before reassembling.

3.Insert both output bearings (10 & 13) in the housing, using a round tube of the correct diameter and a hand press.

4.Slide output shaft (14) through both bearings (10 &

13)until it rests against top bearing (10).

5.Slide shim (9) over output shaft (14).

6.Press gear (1a or 17) onto output shaft (14) and secure with washer (19), castle nut (8), and cotter pin (15).

7.Apply grease to lower seal lips (12) and press seal (12) over output shaft (14), using a tube of the correct diameter. Be sure not to damage seal lip.

8.Press in housing so that seal is recessed. Press protective seal (11) until seated flush with housing. Verify that the seal (11) is seated correctly.

9.Press bearing (2) into the housing, using a round tube of the correct diameter and a hand press. Secure with shim (6) and snap ring (5).

30 Dealer Service

MAN0577 (6/29/2007)


Page 30
Image 30
Woods Equipment TS1680Q manual Horizontal Shaft Seal Repair Figure, Side Gearbox Repair Figure Remove Gearbox from Cutter

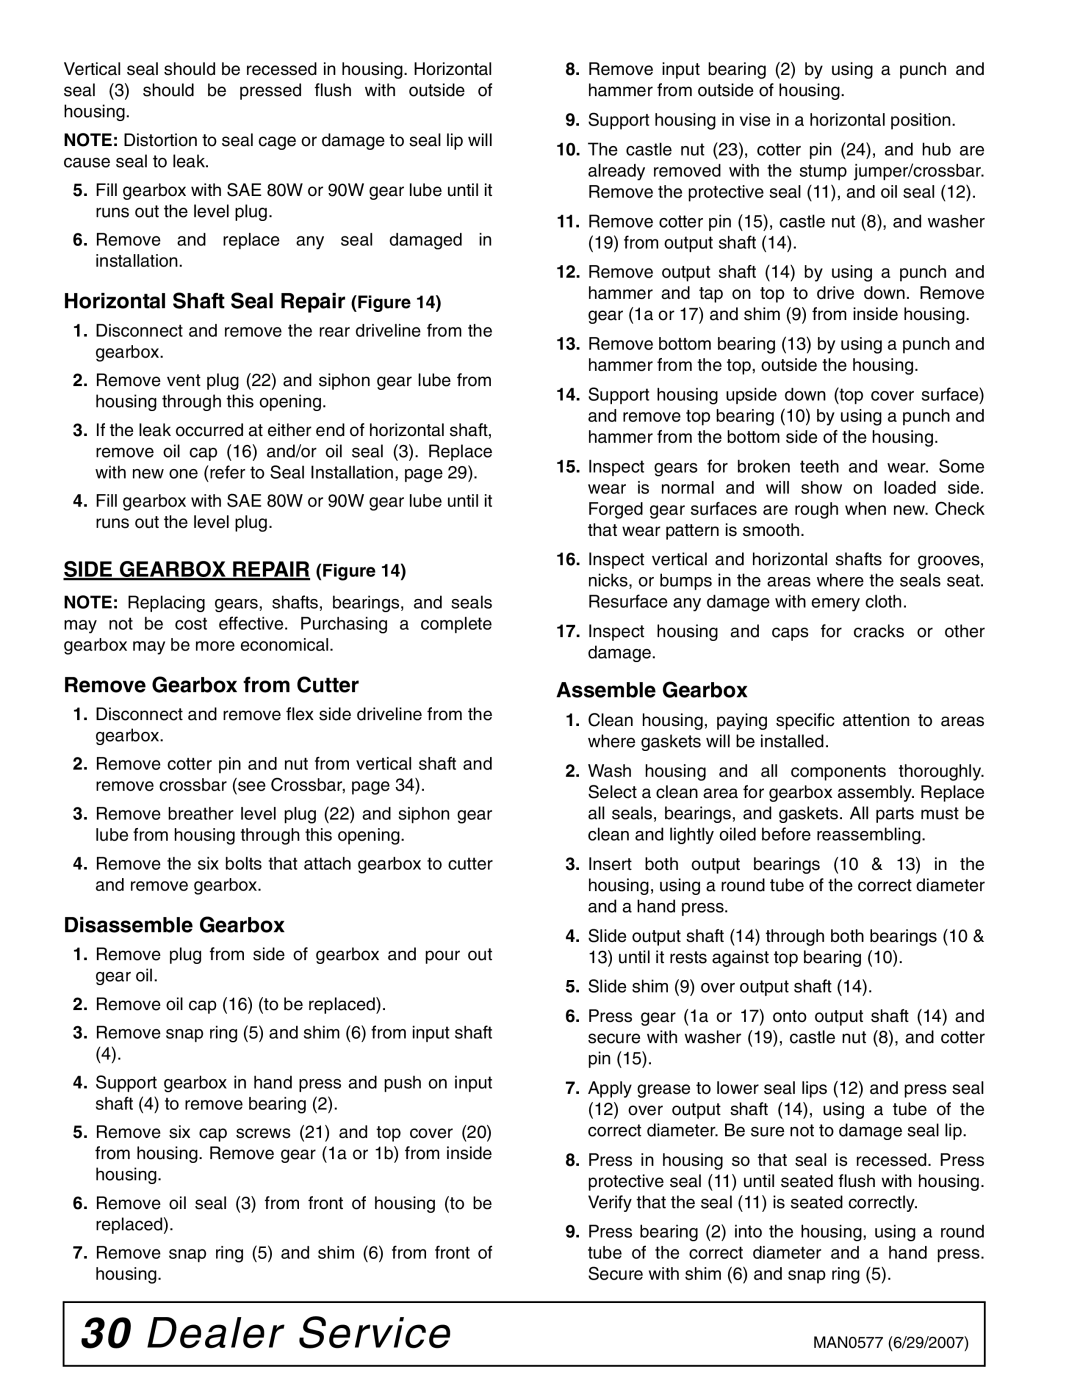
TS1680, TS1680Q specifications

Woods Equipment has long been a prominent name in the agricultural and landscaping sectors, and its TS1680Q and TS1680 models further cement this reputation. Designed for versatility and reliability, both models shine in various applications, ranging from mowing to maintaining landscapes.

One of the standout features of the Woods TS1680Q and TS1680 is their robust build quality. Crafted with heavy-duty materials, these models are engineered to withstand the rigors of tough terrain and demanding workloads. The TS1680Q, being the quieter variant, employs advanced sound-dampening technologies, ensuring that operators can work without the disruptive noise typical of many competitors.

With a cutting width of 68 inches, both models are designed for efficiency. The wide cutting deck not only allows operators to cover more ground quickly but also ensures a clean and even cut on various grass types. The TS1680Q further enhances mowing precision with its unique floating deck design. This feature enables the cutting deck to follow ground contours, reducing scalping on uneven surfaces.

Another notable characteristic is the versatility of attachment options. Both models come equipped with a category 1 three-point hitch which allows for easy attachment of numerous implements. This adaptability means operators can use the TS1680Q and TS1680 for other tasks, such as tilling or hauling, making it a multi-functional powerhouse for any farm or landscape project.

The hydraulic system on these models is engineered for high performance. With user-friendly controls and responsive feedback, operators can adjust settings with ease. Combined with a powerful engine, the TS1680Q and TS1680 offer reliable performance and energy efficiency, contributing to reduced fuel expenditure in the long run.

Safety features are also a priority, with shields and guards designed to protect operators during use. The controls are ergonomically situated to minimize potential hazards. Additionally, the low center of gravity design ensures stable operation, reducing the risk of tipping especially while working on inclines.

In conclusion, the Woods Equipment TS1680Q and TS1680 models are designed with the modern user in mind. Their blend of durability, innovative technology, and operational versatility makes them a top choice for both agricultural use and landscaping projects. Whether you're a farmer looking for reliable mowing solutions or a landscaper in need of a versatile implement, these models deliver exceptional performance and value.