Quick start guide


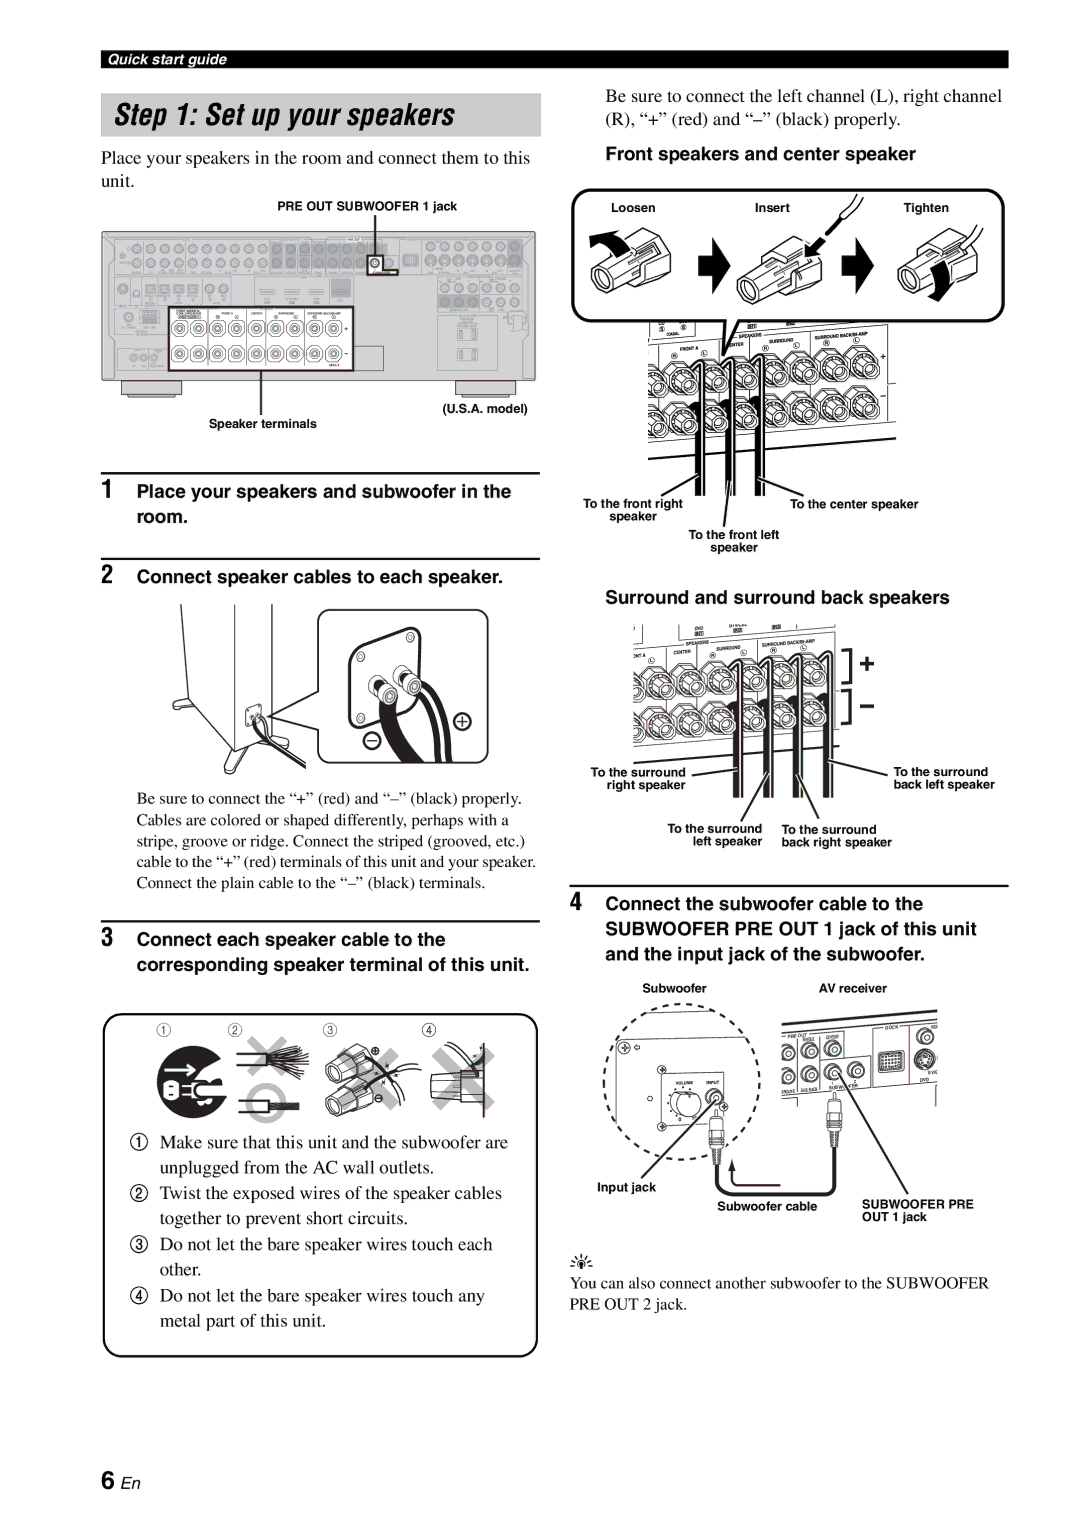
Be sure to connect the left channel (L), right channel

Step 1: Set up your speakers

(R), “+” (red) and “–” (black) properly.


Place your speakers in the room and connect them to this

Front speakers and center speaker

unit.


PRE OUT SUBWOOFER 1 jack

Loosen

Insert

Tighten


AUDIO


MULTI CH INPUT


PRE OUT

CENTER


FRONT (8CH)


CENTER


SINGLE


L


GND R


PHONO

CD

IN

MD/

OUT

DVD

DTV/CBL

IN

OUT

IN

OUT

SB (8CH)

SURROUND

SUB

ZONE 2

FRONT

SURROUND

SUR. BACK

1

2


(PLAY) CD-R (REC)


DVR

VCR


WOOFER

SUBWOOFER


HDMI

OUT


MD/CD-R

MD/CD-R

DVD

DTV/CBL

CD

DVD


1


2

3

4

5


6


DVD


DTV/CBL


DVR

OUT


SIRIUS

XM

DIGITAL


OPTICAL


COAXIAL


IN1


IN2


IN3


OUTPUT


DIGITAL INPUT


SPEAKERS


FRONT B/ZONE B/


FRONT A

CENTER

SURROUND

SURROUND BACK/BI-AMP


ZONE 2/PRESENCE


R EXTRA SP L


R

L


R

L


R

L


FM


GND AM


75UNBAL.


HD Radio


ANTENNA


REMOTE TRIGGER

OUT


+12V

SINGLE

IN

OUT 15mA MAX.

DOCK

VIDEO


VIDEO


S VIDEO


IN

OUT


IN

OUT

MONITOR

DVD

DTV/CBL


DVR


VCR

OUT


A

DVD

COMPONENT VIDEO

DTV/CBL


PR

PB

Y

PR

B

PB

Y

MONITOR OUT

C

DVR

AC OUTLETS


SWITCHED


120V 80Hz


100W MAX. TOTAL


0.8A MAX. TOTAL


(U.S.A. model)

Speaker terminals

1Place your speakers and subwoofer in the room.

To the front right

To the center speaker

speaker


To the front left

speaker

2Connect speaker cables to each speaker.

Surround and surround back speakers

Be sure to connect the “+” (red) and “–” (black) properly. Cables are colored or shaped differently, perhaps with a stripe, groove or ridge. Connect the striped (grooved, etc.) cable to the “+” (red) terminals of this unit and your speaker. Connect the plain cable to the “–” (black) terminals.

3Connect each speaker cable to the corresponding speaker terminal of this unit.

1 2 3 4

1Make sure that this unit and the subwoofer are unplugged from the AC wall outlets.

2Twist the exposed wires of the speaker cables together to prevent short circuits.

3Do not let the bare speaker wires touch each other.

4Do not let the bare speaker wires touch any metal part of this unit.

To the surround

To the surround

right speaker

back left speaker

To the surround

To the surround

left speaker

back right speaker

4Connect the subwoofer cable to the SUBWOOFER PRE OUT 1 jack of this unit and the input jack of the subwoofer.

Subwoofer


AV receiver


DOCK

VIDE

PRE OUT


CENTER


SINGLE


S VID


1

2

DVD

RROUND SUR.

BACK

SUBW

OOFER


Input jack

Subwoofer cable

SUBWOOFER PRE


OUT 1 jack

y

You can also connect another subwoofer to the SUBWOOFER PRE OUT 2 jack.

6 En

Page 10
Image 10
Yamaha RX-V863 owner manual Front speakers and center speaker, Place your speakers and subwoofer in the room

RX-V863 specifications

The Yamaha RX-V863 is a versatile and powerful AV receiver designed for home theater enthusiasts who want to enjoy an immersive audio-visual experience. This model is part of Yamaha's RX series, known for its robust performance and user-friendly features.

One of the standout features of the RX-V863 is its support for high-definition audio formats. It is equipped with advanced digital signal processing (DSP) technology that delivers exceptional sound quality. The receiver supports Dolby TrueHD and DTS-HD Master Audio, providing a cinematic audio experience that captures every detail in movies and music.

The RX-V863 also offers 7.1-channel surround sound, which adds depth and dimension to audio playback. With 110 watts per channel, it can drive a variety of speaker setups effectively, filling a room with rich sound. Its YPAO (Yamaha Parametric Room Acoustic Optimizer) technology analyzes the room's acoustics and automatically calibrates the audio settings for optimal performance. This ensures that listeners enjoy the best sound possible, regardless of their room's layout.

Connectivity options are ample on the RX-V863, featuring multiple HDMI inputs that support 1080p video pass-through, enabling seamless connectivity with high-definition sources. This makes it an ideal choice for users with various devices like Blu-ray players, gaming consoles, and streaming devices. The receiver also includes component and composite video inputs, as well as optical and coaxial digital audio inputs, ensuring compatibility with a wide range of equipment.

Furthermore, the RX-V863 boasts superior video processing capabilities, able to upscale standard-definition video to 1080p. This enhances the picture quality of older sources, making them look more impressive on modern HDTVs. Additionally, its Zone 2 functionality allows for multi-room audio distribution, letting users enjoy music in different spaces.

To enhance usability, the receiver comes with a well-designed remote control and an on-screen display. Yamaha's intuitive interface makes it easy to navigate settings and options.

In summary, the Yamaha RX-V863 is a robust AV receiver that combines high-quality audio performance, extensive connectivity, and user-friendly features. Whether you are watching movies, listening to music, or gaming, the RX-V863 ensures an enhanced entertainment experience that caters to audiophiles and casual users alike.