I G N I T O R E L E C T R I C A L C O N N E C T I O N

035-18265-001-A-0202

2.Check for correct manifold gas pressures. See “Checking Gas Input”.

3.Check the supply gas pressure. It must be within the limits shown on rating nameplate. Supply pressure should be checked with all gas appliances in the building at full fire. At no time should the standby gas line pressure exceed 10.5", nor the operating pressure drop below 4.5" for natural gas units. If gas pressure is outside these limits, contact the lo- cal gas utility for corrective action.

MANIFOLD GAS PRESSURE ADJUSTMENT

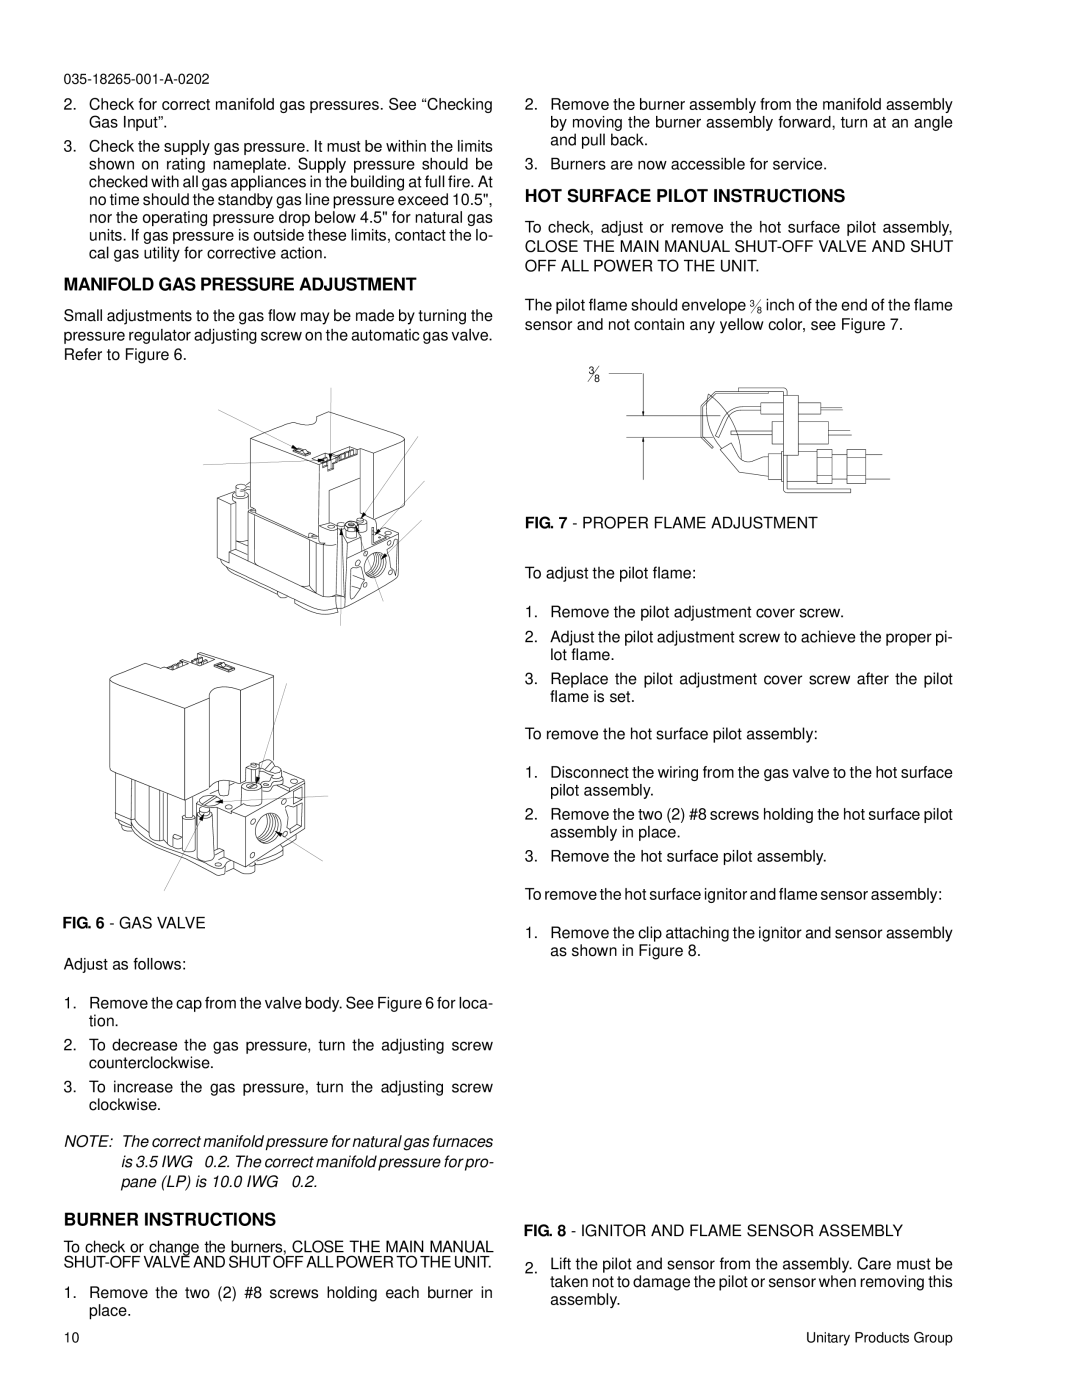
Small adjustments to the gas flow may be made by turning the pressure regulator adjusting screw on the automatic gas valve. Refer to Figure 6.

M A N U A L

G A S

S W I T C H


( S H O W N

I N " O F F

P O S I T I O N )

M A N I F O L D

P R E S S U R E

T A P

C O N T R O L

E L E C T R I C A L

C O N N E C T I O NG R O U N D

T E R M I N A L

2. Remove the burner assembly from the manifold assembly by moving the burner assembly forward, turn at an angle and pull back.

3. Burners are now accessible for service.

HOT SURFACE38 PILOT INSTRUCTIONS

To check, adjust or remove the hot surface pilot assembly,

CLOSE THE MAIN MANUAL SHUT-OFF VALVE AND SHUT OFF ALL POWER TO THE UNIT.

The pilot flame should envelope 38 inch of the end of the flame sensor and not contain any yellow color, see Figure 7.

3 / 8

1 / 2 - 1 4 N P T

( O U T L E T ) FIG. 7 - PROPER FLAME ADJUSTMENT

To adjust the pilot flame:

P I L O T G A S

C O N N E C T I O N

P I L O T

A D J U S T M E N T

1.Remove the pilot adjustment cover screw.

2.Adjust the pilot adjustment screw to achieve the proper pi- lot flame.

L I N E P R E S S U R E

T A P 3.

Replace the pilot adjustment cover screw after the pilot


flame is set.


To remove the hot surface pilot assembly:


1.

Disconnect the wiring from the gas valve to the hot surface

M A N I F O L D P R E S S U RpilotE assembly.

A D J U S T M E N T


2.

Remove the two (2) #8 screws holding the hot surface pilot

( R E M O V E C A P )


assembly in place.

1 / 2 - 1 4 N P T


3.

Remove the hot surface pilot assembly.

( I N L E T )


V E N T P R E S S U R E L I M I T E R


To remove the hot surface ignitor and flame sensor assembly:

FIG. 6 - GAS VALVE


1.

Remove the clip attaching the ignitor and sensor assembly


as shown in Figure 8.

Adjust as follows:

1.Remove the cap from the valve body. See Figure 6 for loca- tion.

2.To decrease the gas pressure, turn the adjusting screw counterclockwise.

3.To increase the gas pressure, turn the adjusting screw clockwise.

NOTE: The correct manifold pressure for natural gas furnaces is 3.5 IWG ￿0.2. The correct manifold pressure for pro- pane (LP) is 10.0 IWG ￿0.2.

BURNER INSTRUCTIONS

To check or change the burners, CLOSE THE MAIN MANUAL SHUT-OFF VALVE AND SHUT OFF ALLPOWER TO THE UNIT.

1.Remove the two (2) #8 screws holding each burner in place.

FIG. 8 - IGNITOR AND FLAME SENSOR ASSEMBLY

2.Lift the pilot and sensor from the assembly. Care must be taken not to damage the pilot or sensor when removing this assembly.

10

Unitary Products Group

Page 10
Image 10
York D2NA060, D1NA018 Manifold GAS Pressure Adjustment, Burner Instructions, T L E T Proper Flame Adjustment

D1NA018, D2NA060 specifications

The York D1NA018 and D2NA060 are advanced rooftop air conditioning units that combine efficiency, reliability, and innovative technologies to provide optimal climate control for commercial buildings. These units are designed to deliver robust performance while ensuring ease of installation and maintenance.

The D1NA018 is a compact model with a nominal cooling capacity of 1.5 tons, making it an ideal choice for smaller commercial spaces or applications where space is limited. In contrast, the D2NA060 offers a higher cooling capacity of 5 tons, catering to larger areas or environments that require more substantial cooling solutions. Both units are built with high-quality materials that enhance their durability and extend their operational life.

One of the key features of both models is their energy efficiency. They utilize advanced scroll compressor technology that ensures a quieter operation while optimizing energy consumption. The units are designed to achieve high Seasonal Energy Efficiency Ratios (SEER), which makes them compliant with modern energy regulations. This not only reduces operational costs but also minimizes the environmental impact.

Additionally, the York D1NA018 and D2NA060 come equipped with enhanced airflow technologies. They feature multi-speed blowers that can adapt to varying load conditions, ensuring consistent temperature control throughout the indoor space. The airflow systems are designed to provide even distribution, enhancing comfort for occupants.

These units are also equipped with user-friendly control options. The integrated digital controls allow for precise temperature management and programming, further increasing efficiency. Building managers can easily monitor and control the units, leading to improved operational convenience.

Another standout characteristic is their ease of installation. The compact design and lightweight construction of the D1NA018 simplify rooftop installations. The D2NA060, while larger, maintains a straightforward installation process, ensuring minimal disruption to building operations.

In terms of maintenance, the York D1NA018 and D2NA060 incorporate features that facilitate routine service and upkeep. Access panels are strategically placed, allowing technicians to reach components quickly and perform necessary maintenance checks with ease.

Overall, the York D1NA018 and D2NA060 represent a blend of efficiency, innovation, and practicality, making them suitable choices for a wide range of commercial applications. Their advanced technologies provide reliable climate control while reducing energy consumption, making them a preferred option for businesses seeking sustainable solutions.