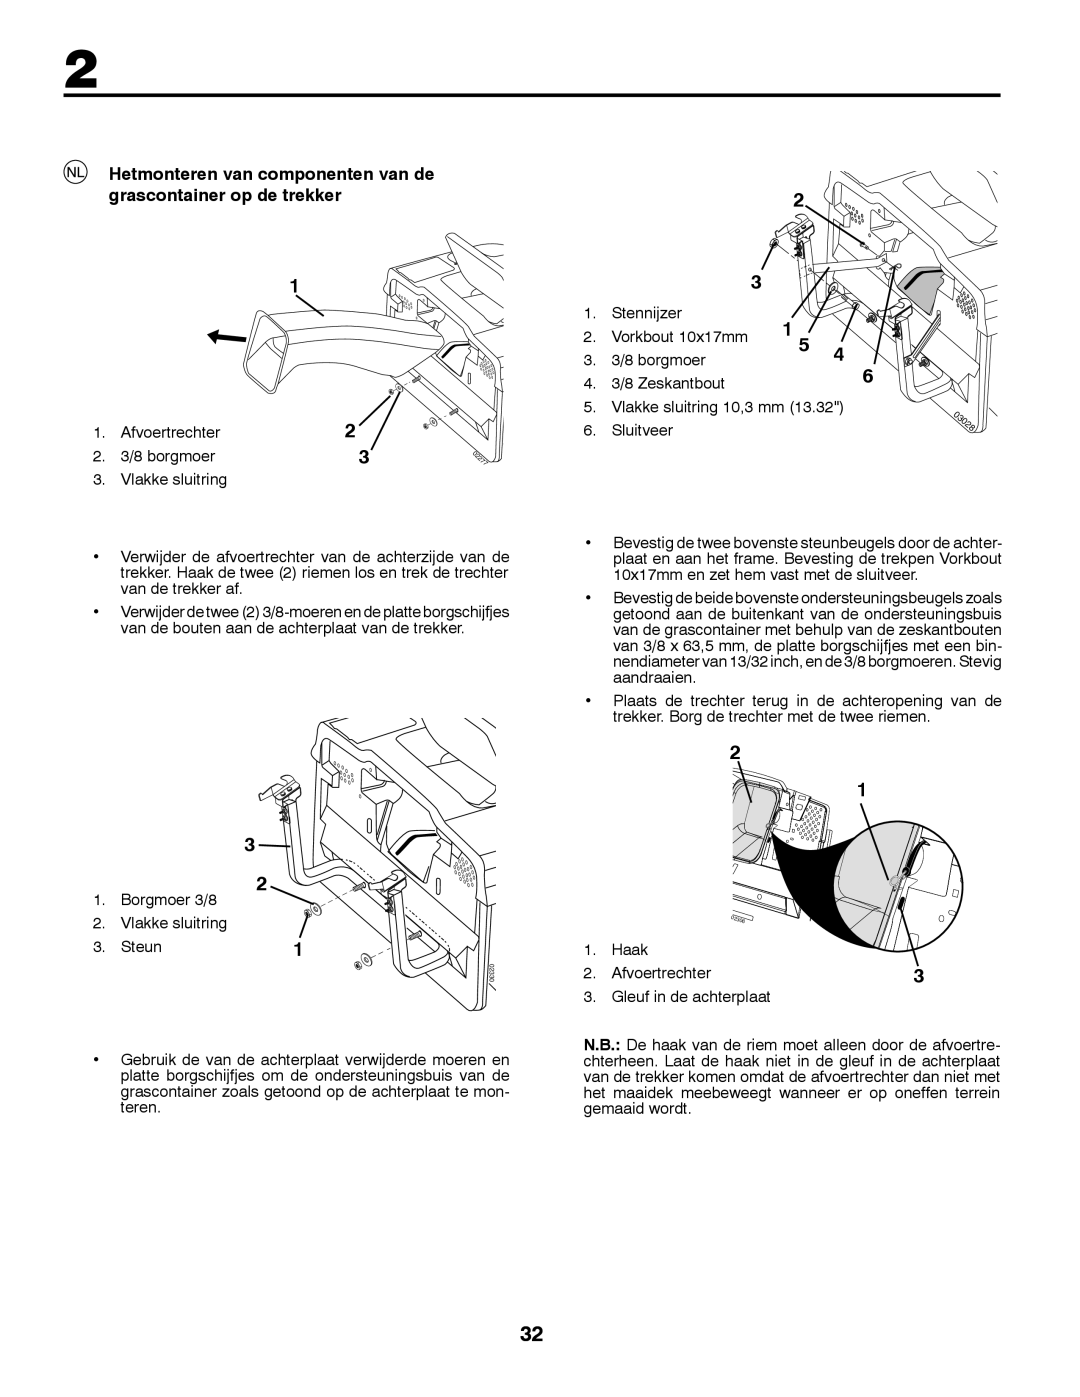
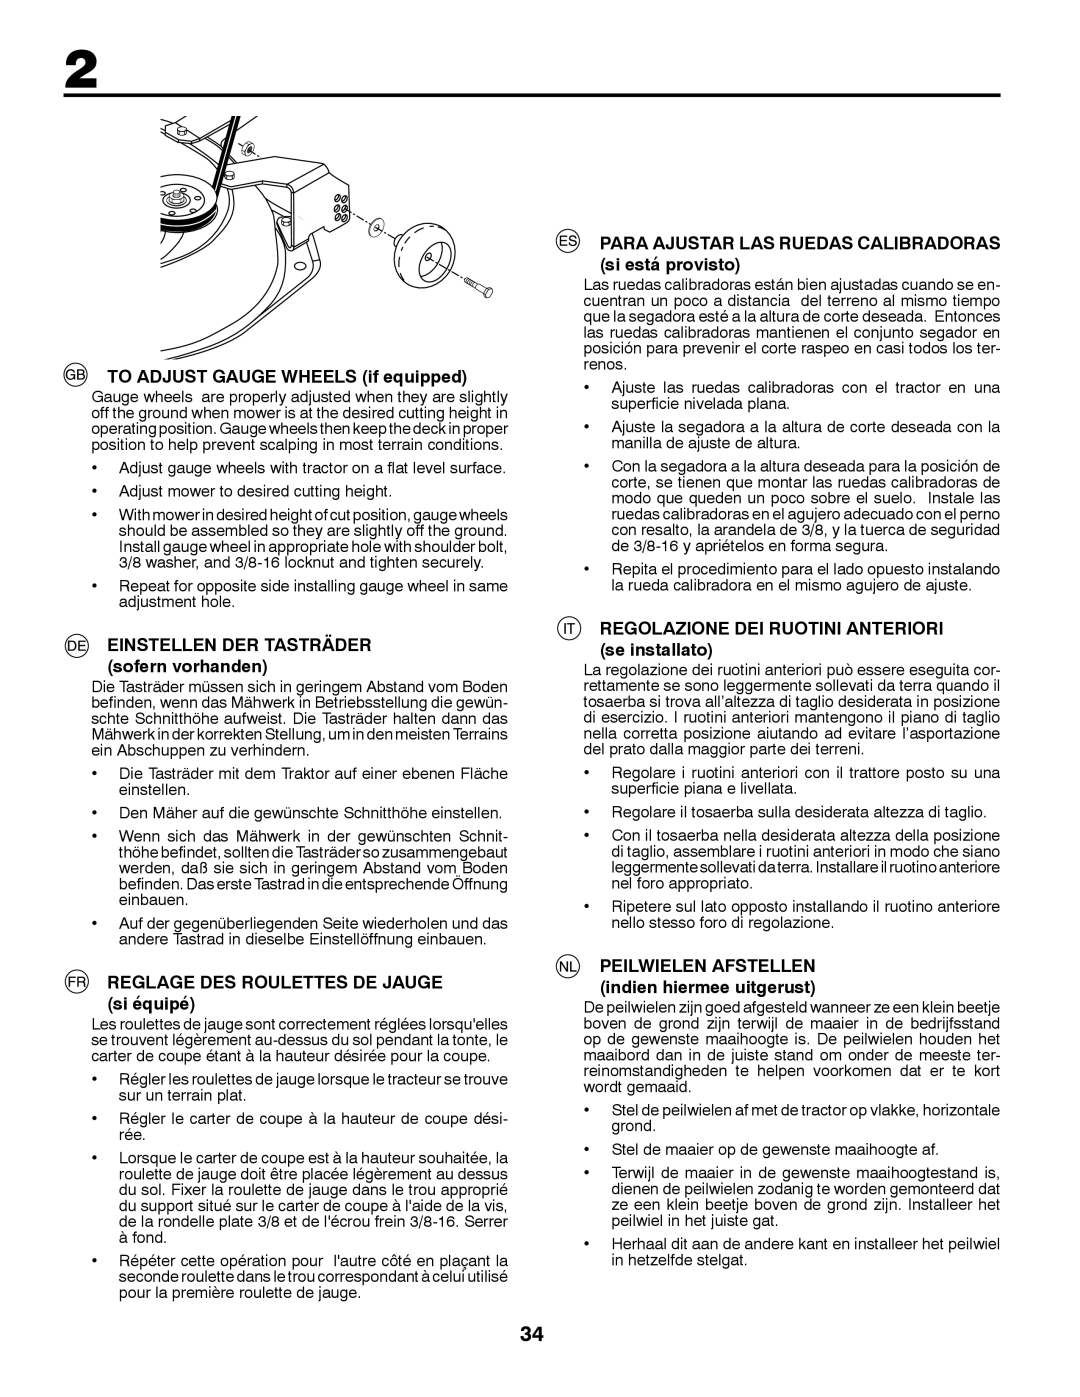
Partner Tech P200107HRB To Assemble Bagger, Bagger adjustment, Horizontal adjustment

Page 23

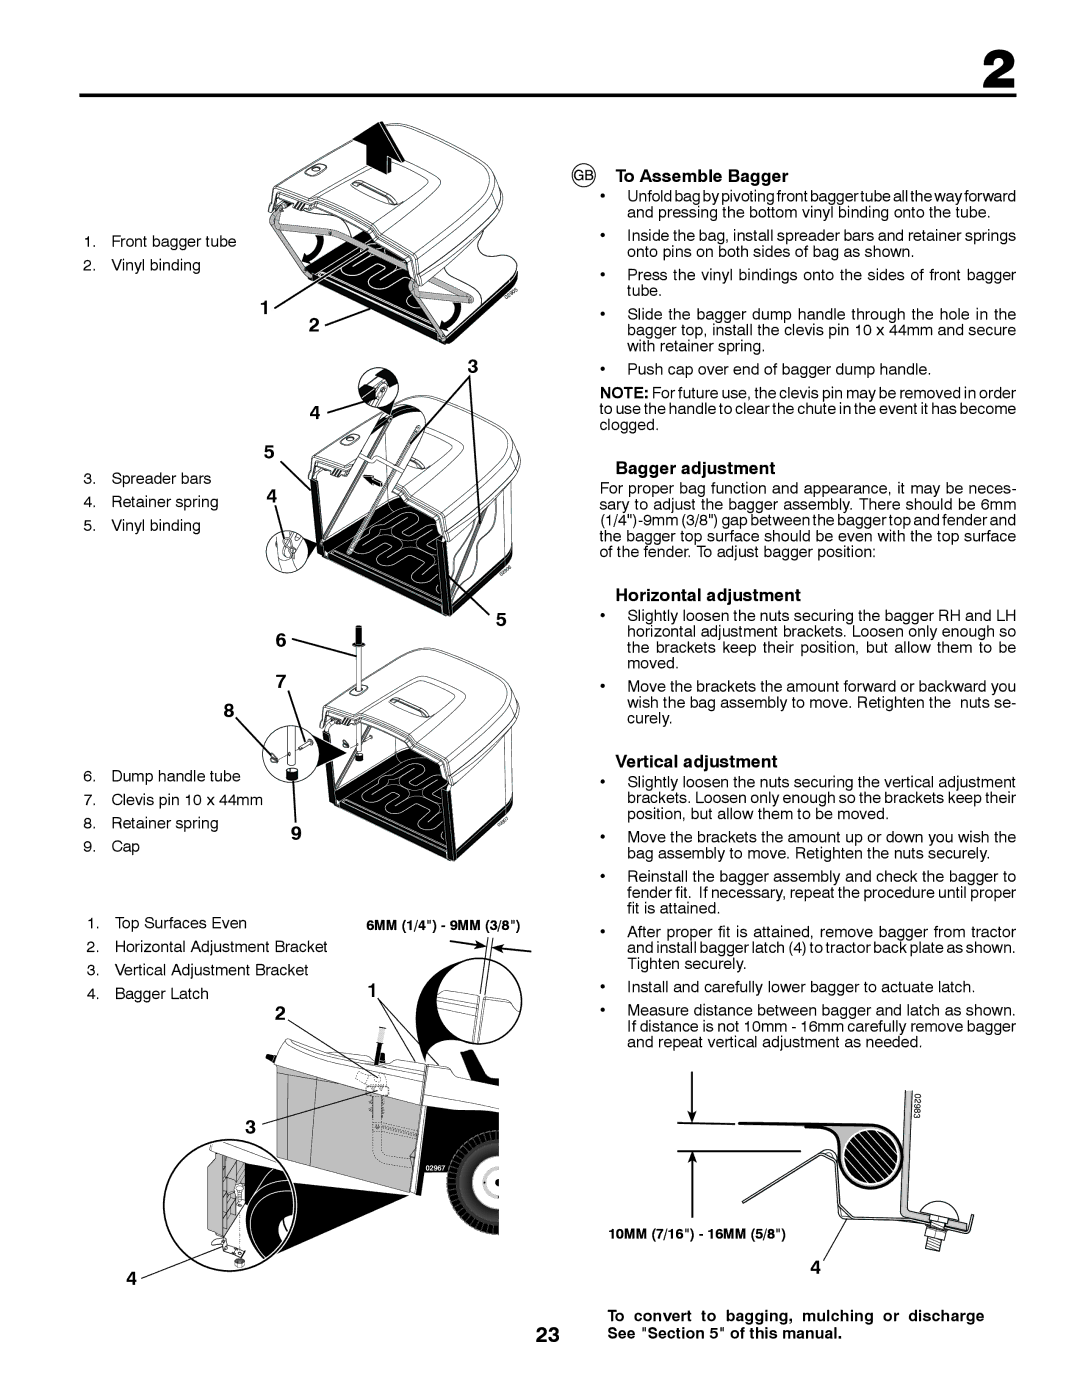
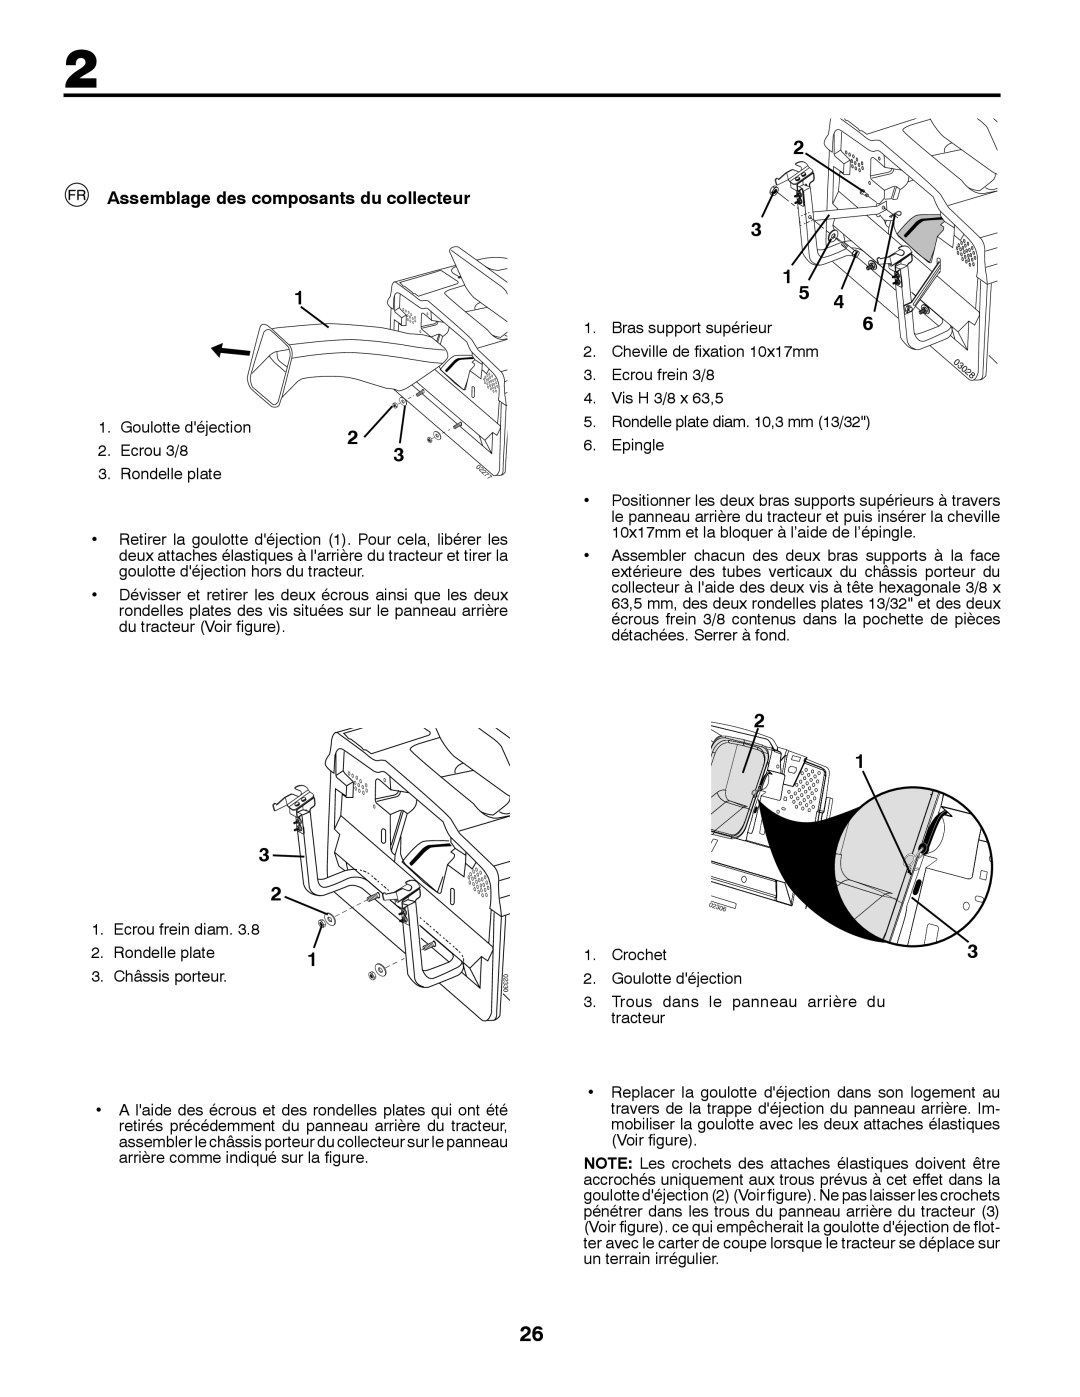
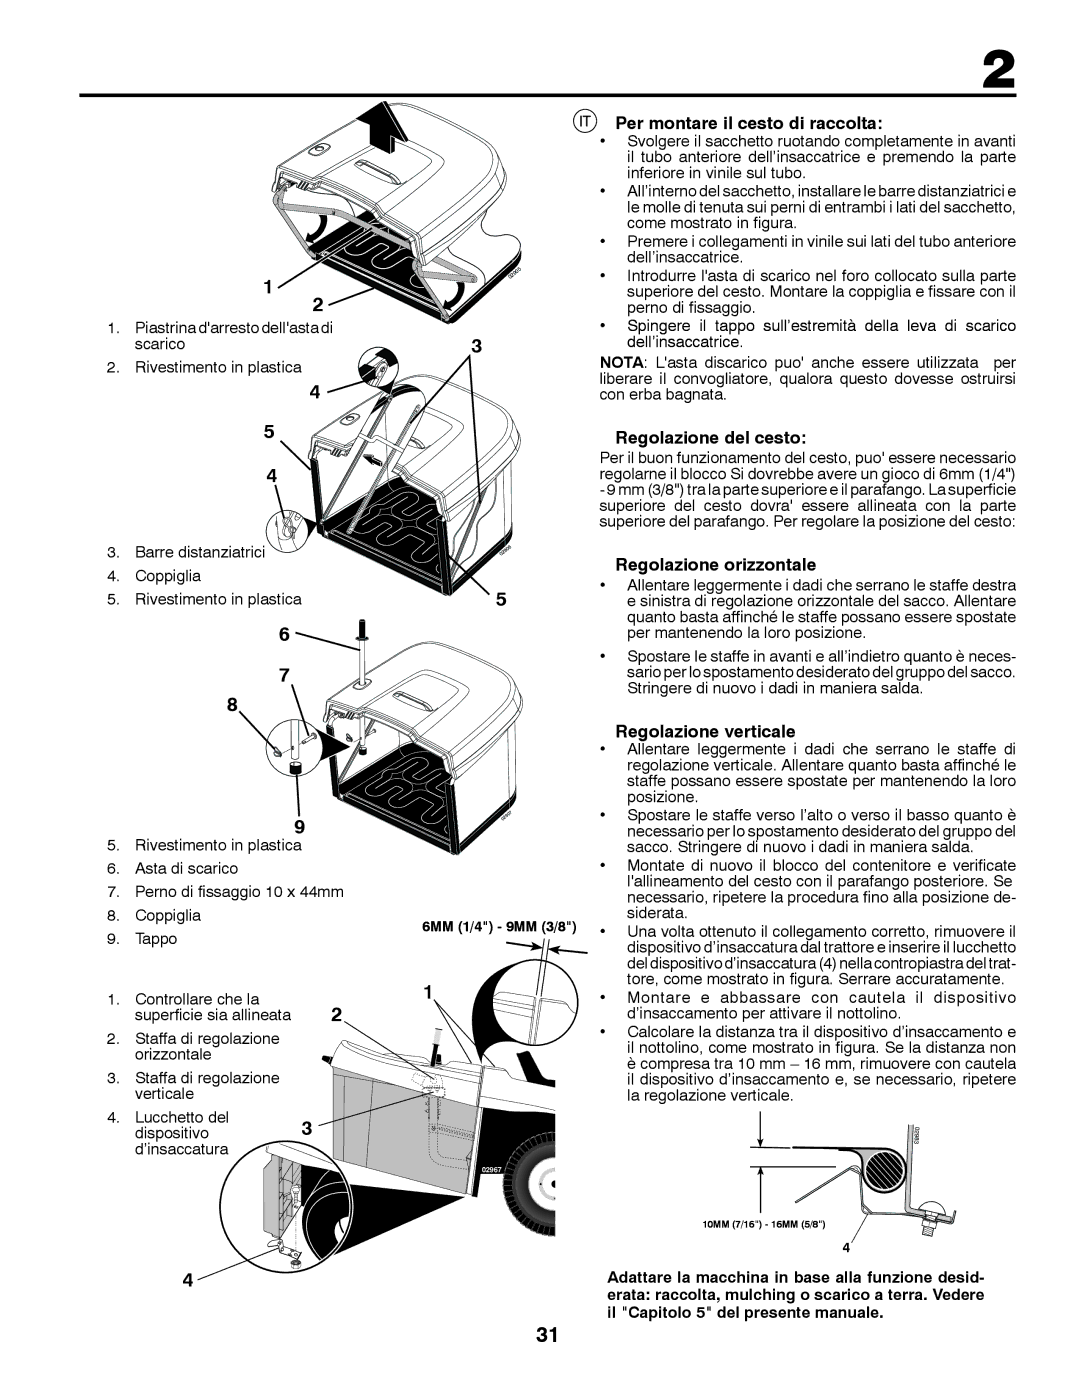
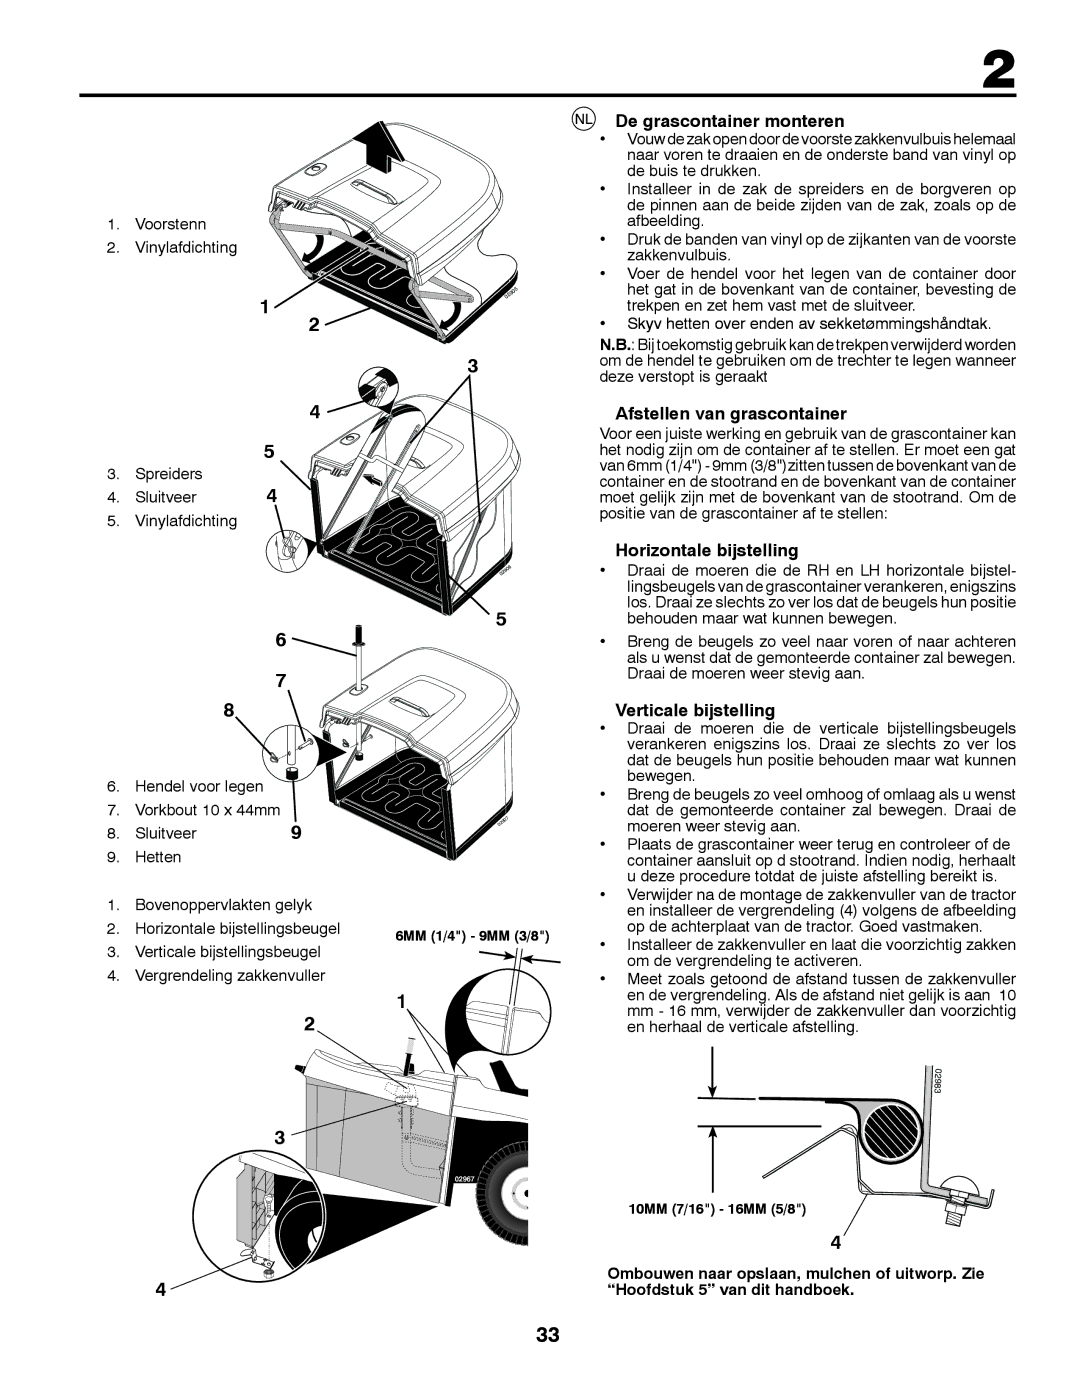
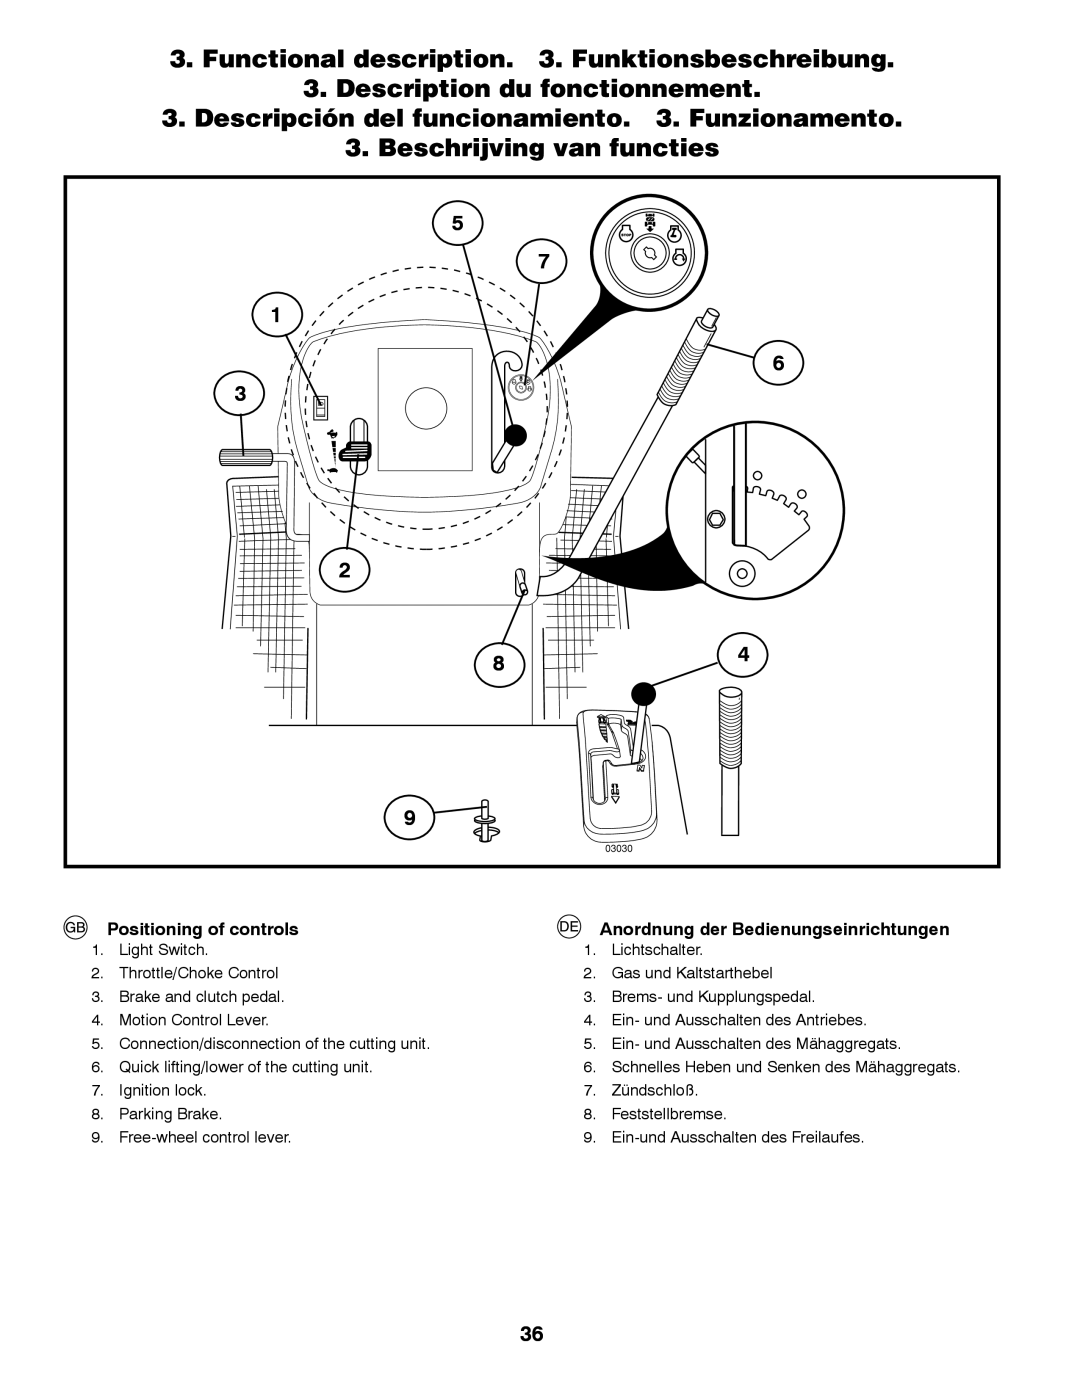
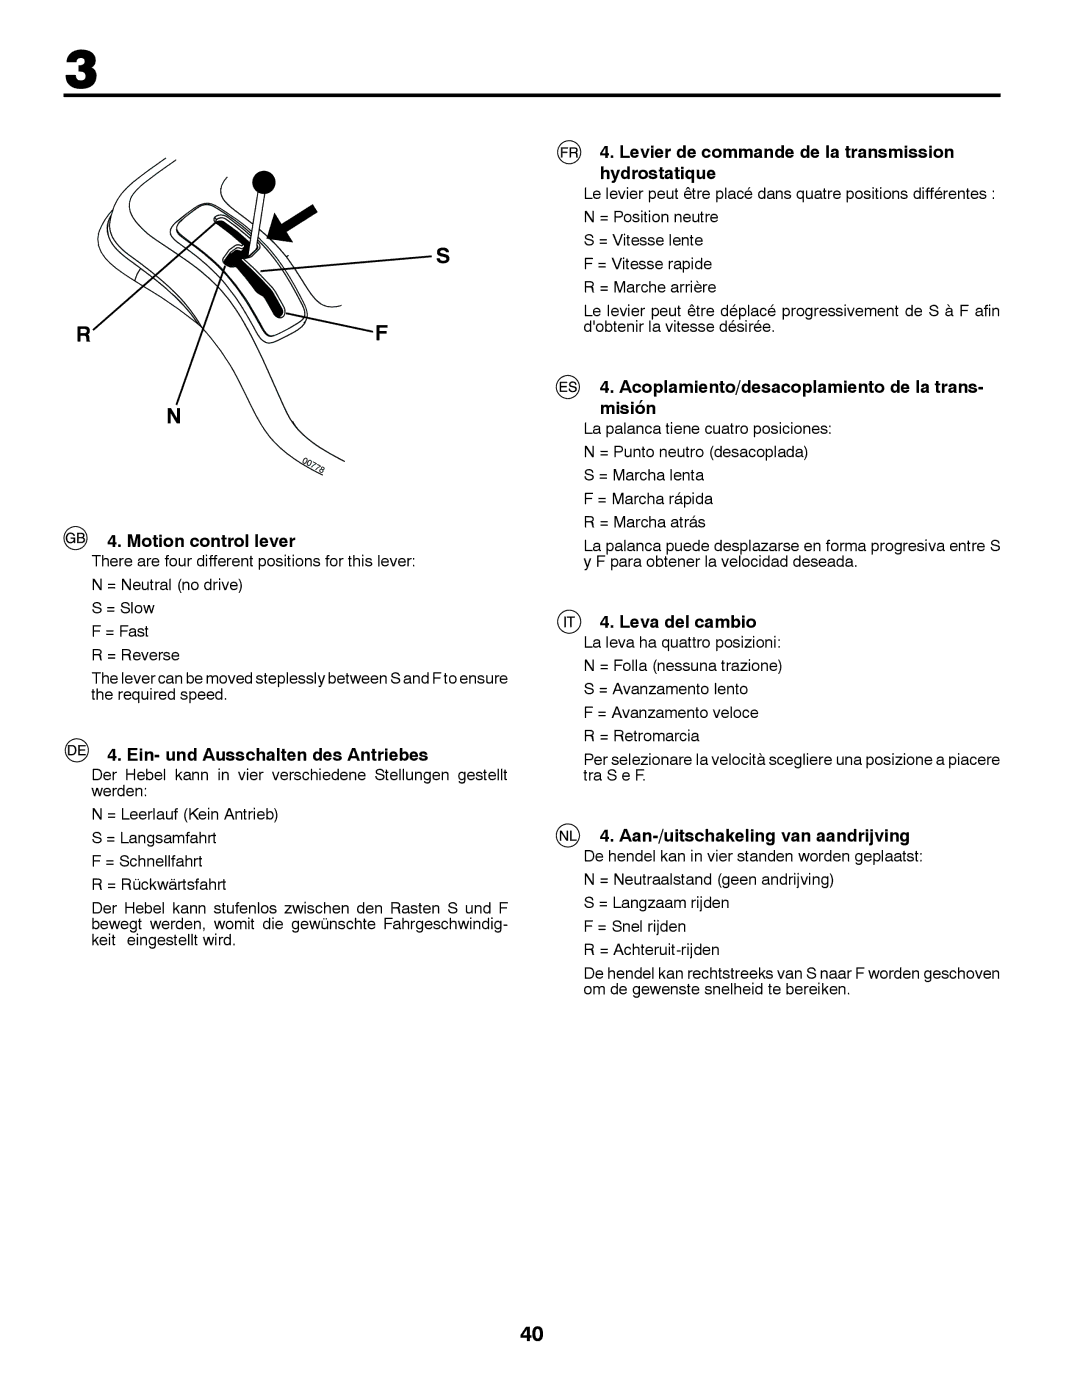
1.Front bagger tube

2.Vinyl binding

1

2

3

4

02905

2

To Assemble Bagger

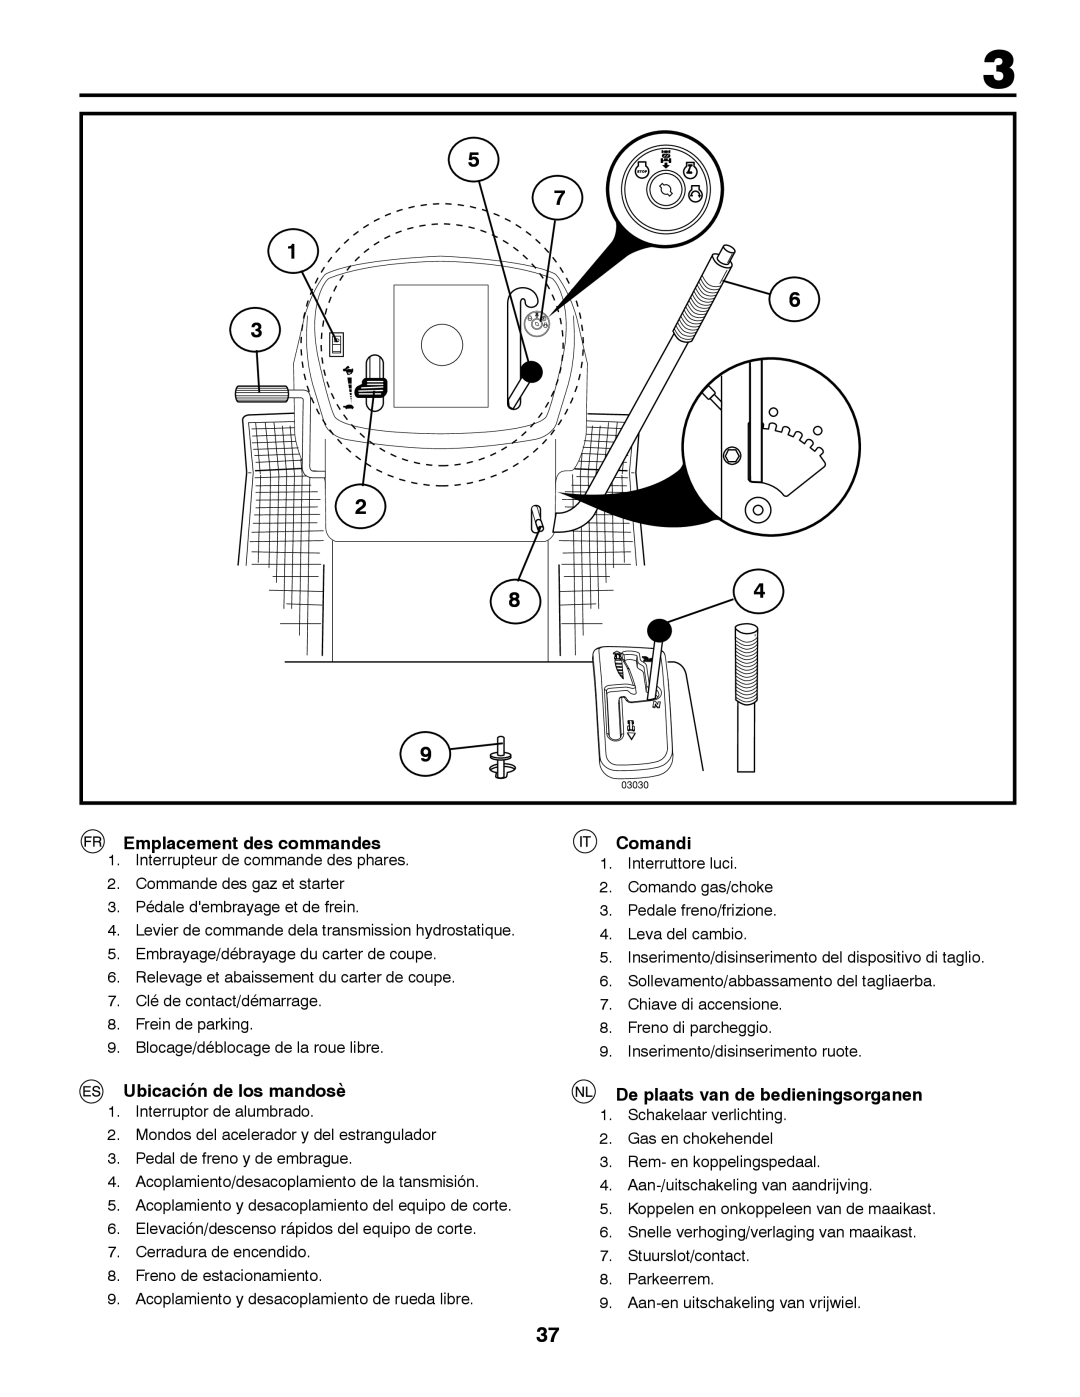
Unfold bag by pivoting front bagger tube all the way forward and pressing the bottom vinyl binding onto the tube.

Inside the bag, install spreader bars and retainer springs onto pins on both sides of bag as shown.

Press the vinyl bindings onto the sides of front bagger tube.

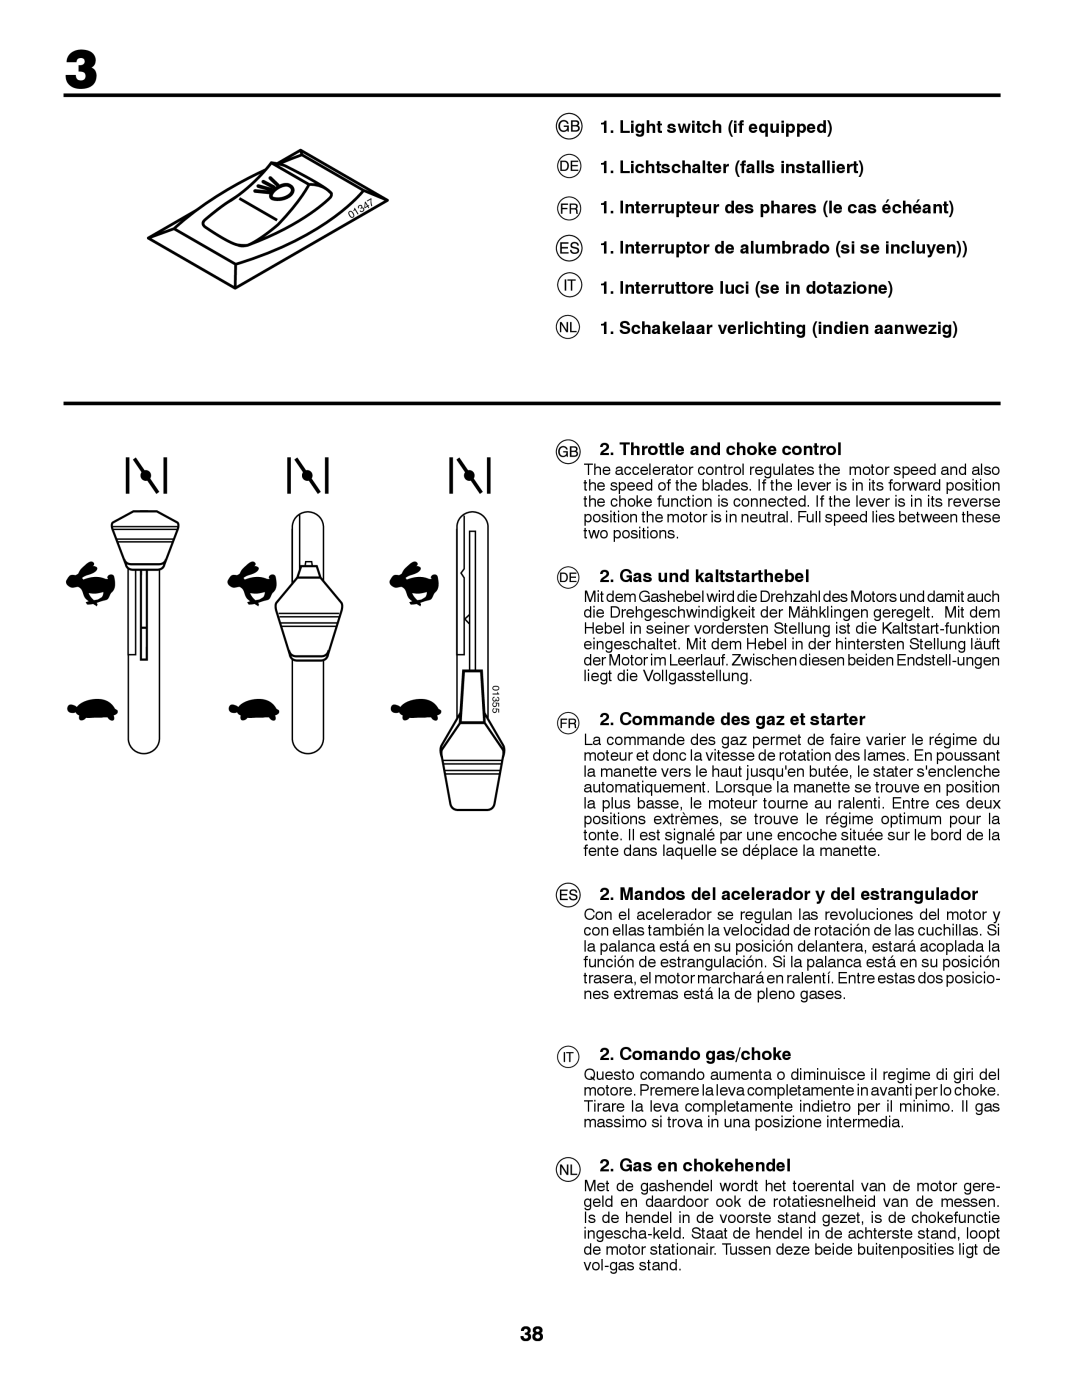
Slide the bagger dump handle through the hole in the bagger top, install the clevis pin 10 x 44mm and secure with retainer spring.

Push cap over end of bagger dump handle.

NOTE: For future use, the clevis pin may be removed in order to use the handle to clear the chute in the event it has become


5

3.

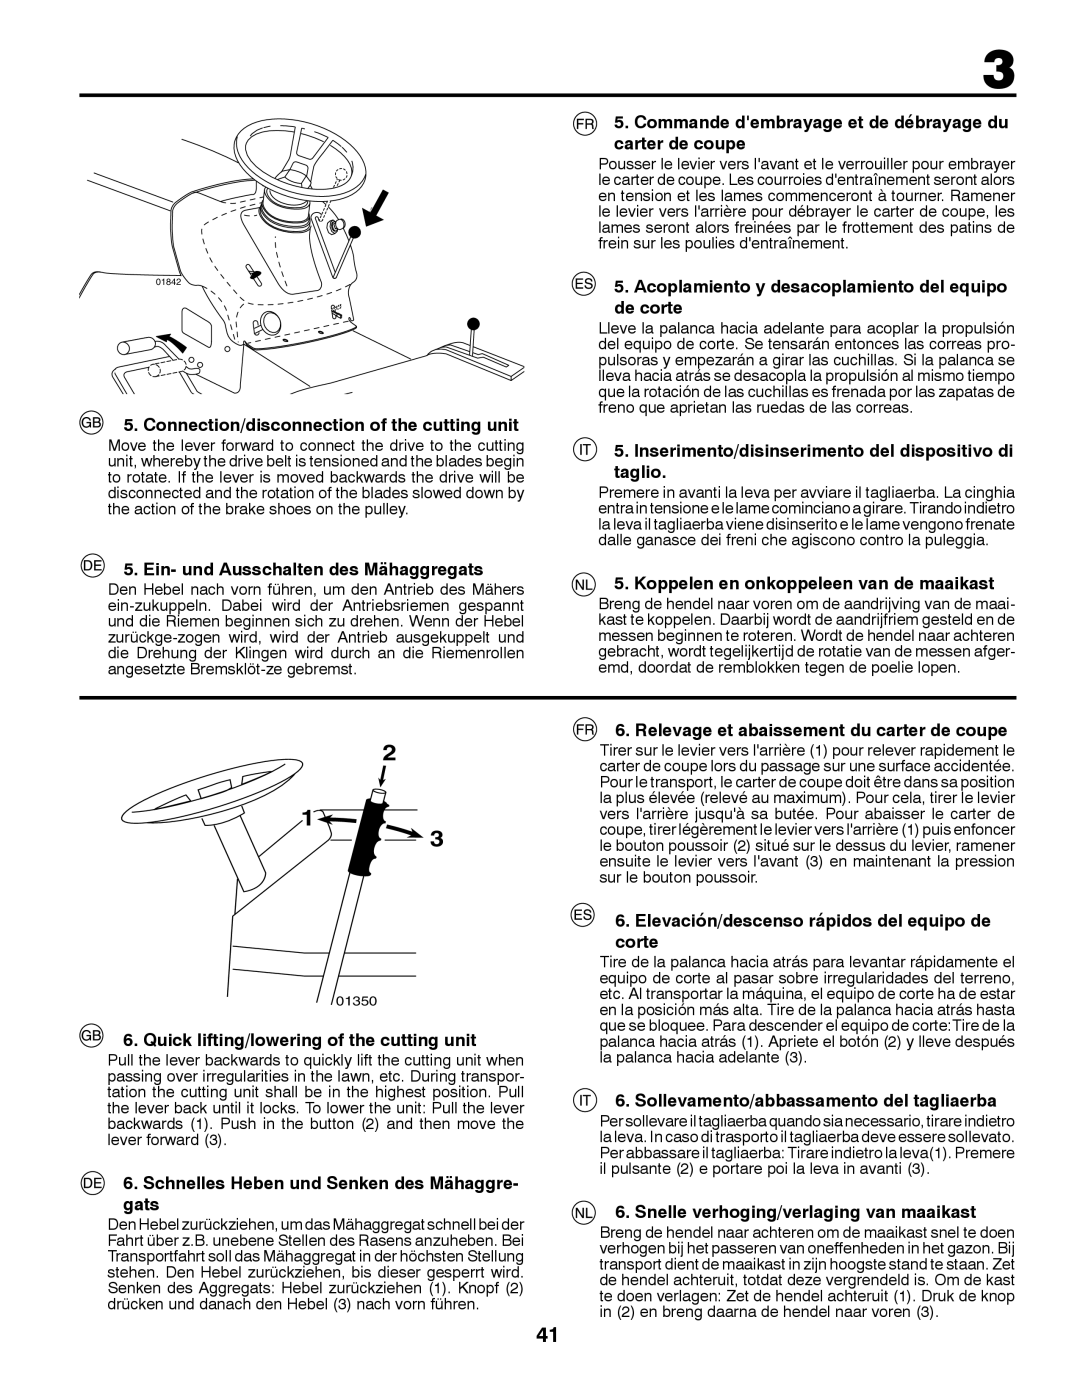
Spreader bars

4

4.

Retainer spring

5.

Vinyl binding


906 02

5

6

7

8

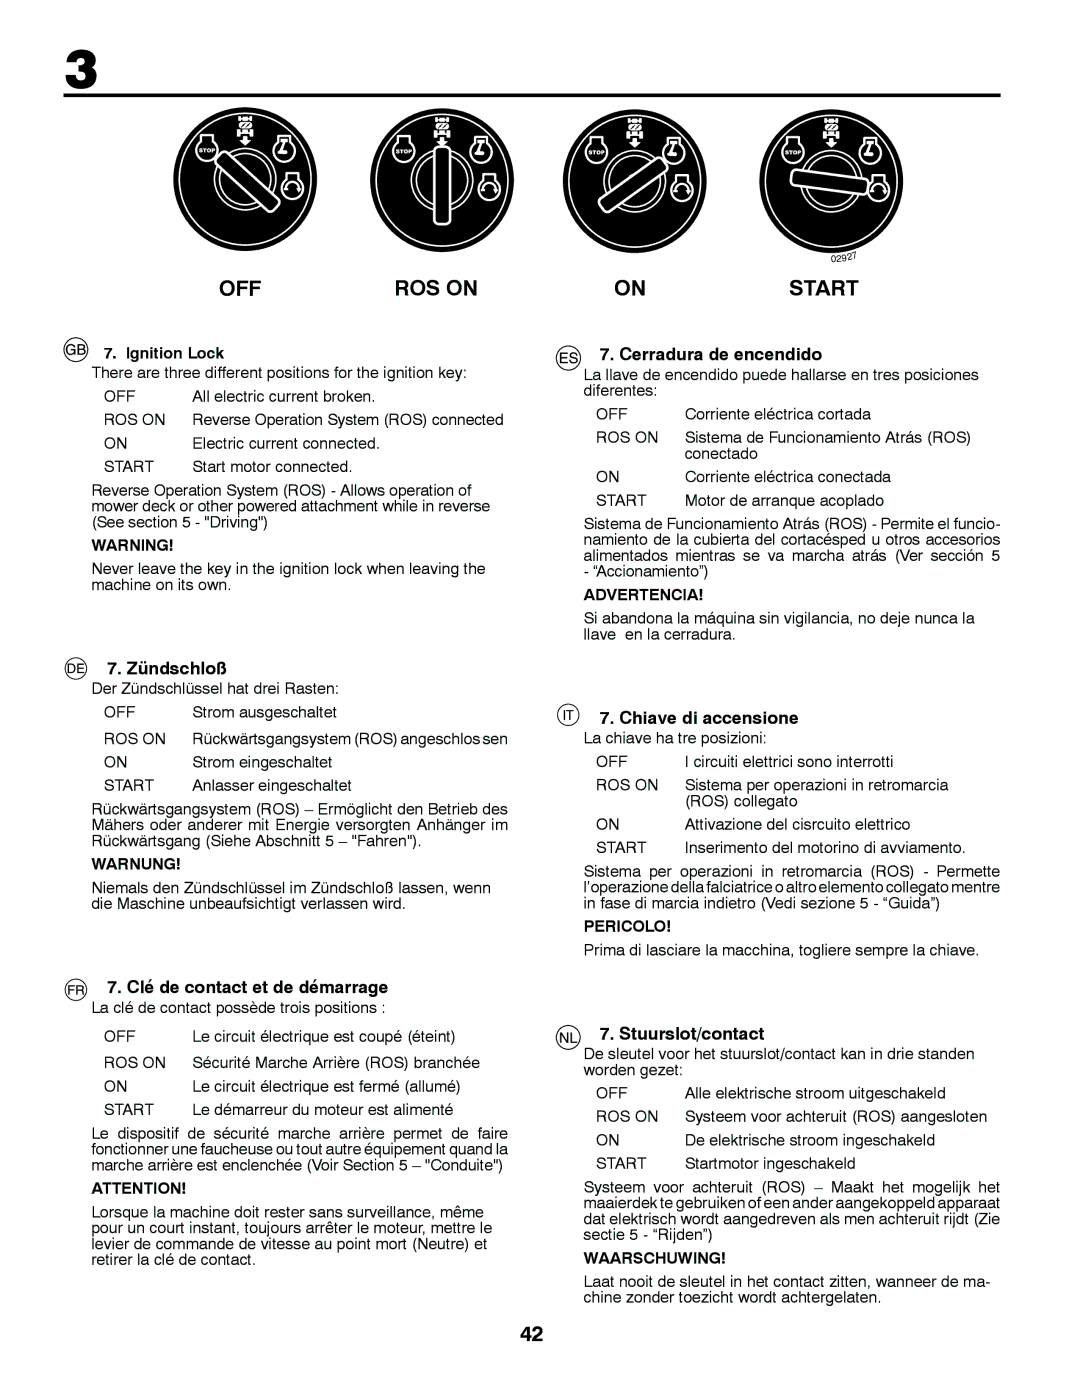
6.Dump handle tube

7.Clevis pin 10 x 44mm

8.

Retainer spring

9

02907

9.

Cap


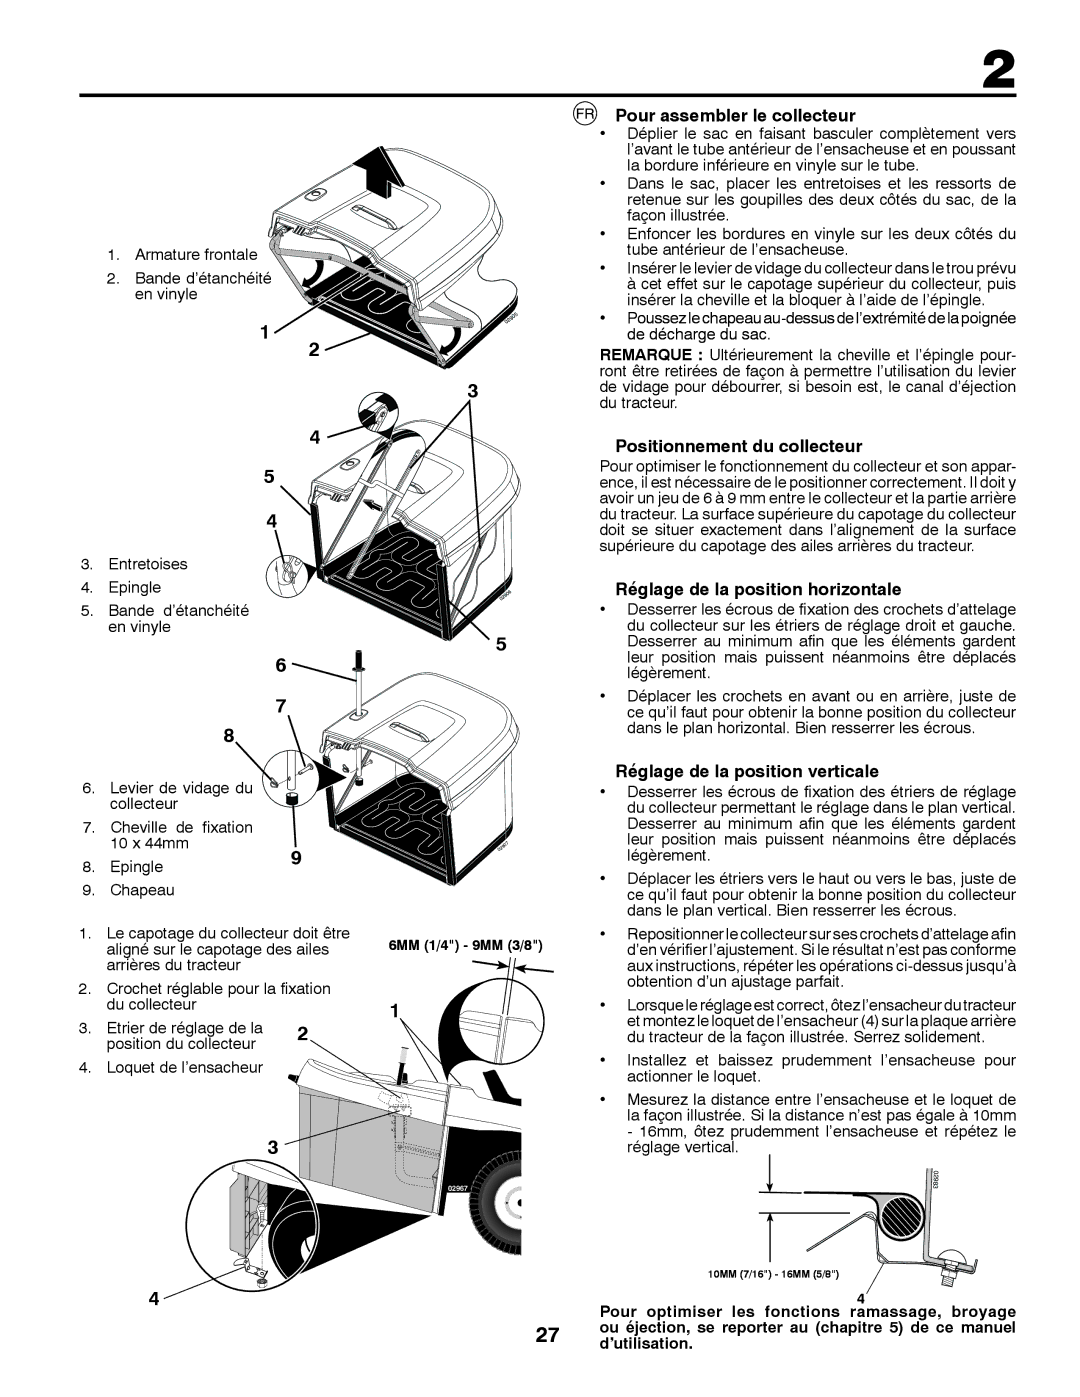
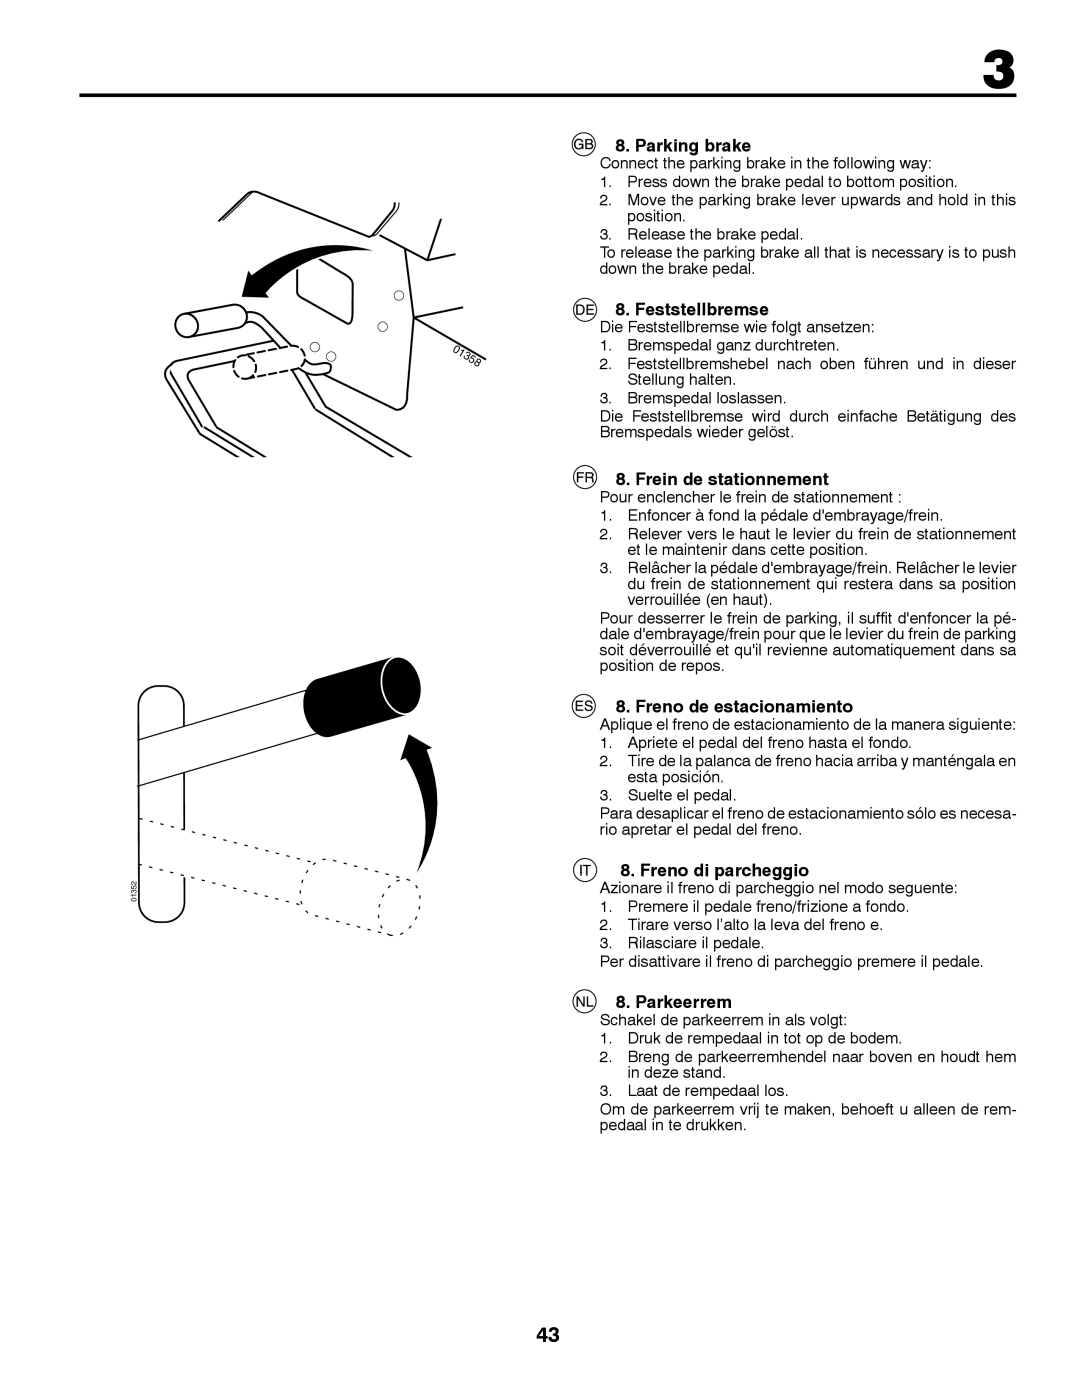
1.

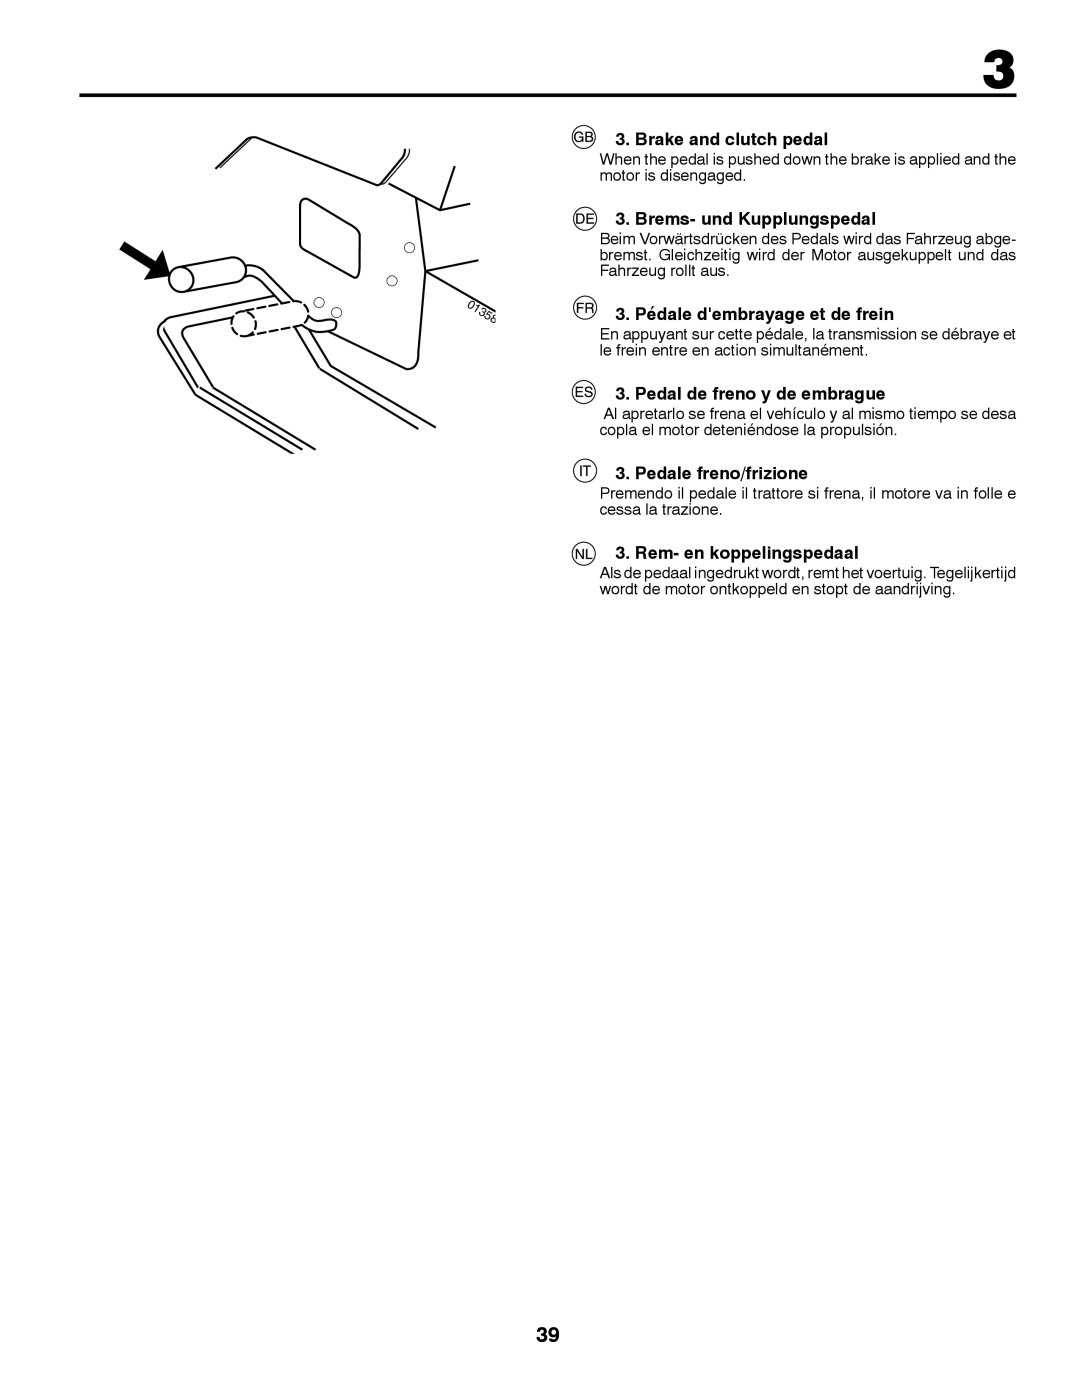
Top Surfaces Even


6MM (1/4") - 9MM (3/8")

2.Horizontal Adjustment Bracket

3.Vertical Adjustment Bracket

4. Bagger Latch

1

2

3

02967

4

clogged.

Bagger adjustment

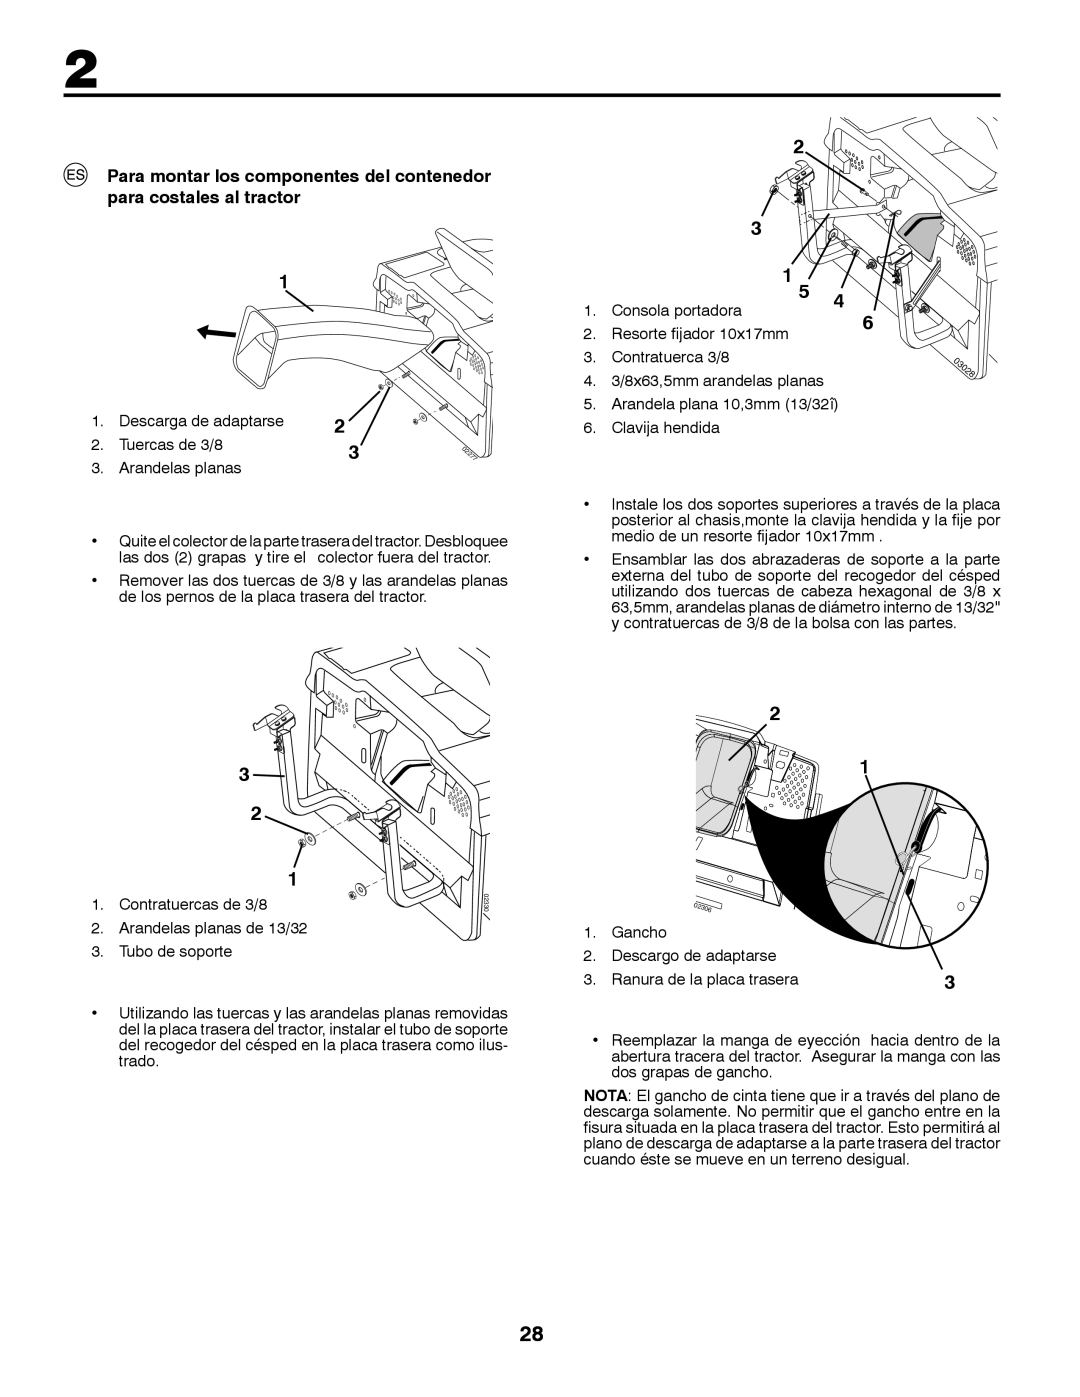
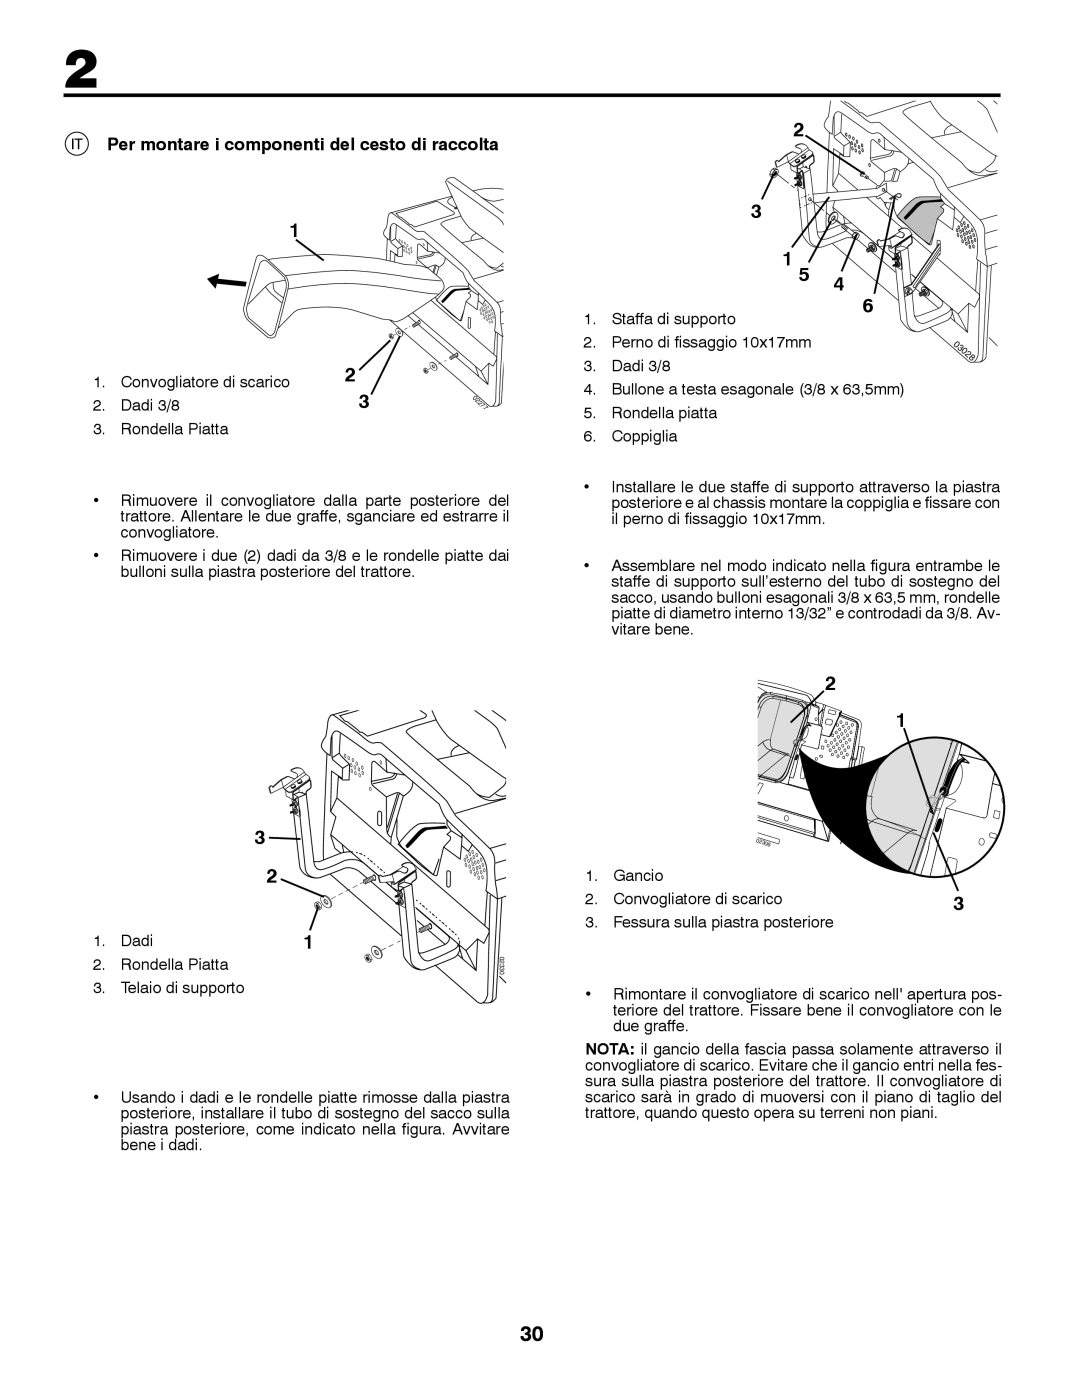
For proper bag function and appearance, it may be neces- sary to adjust the bagger assembly. There should be 6mm (1/4")-9mm (3/8") gap between the bagger top and fender and the bagger top surface should be even with the top surface of the fender. To adjust bagger position:

Horizontal adjustment

Slightly loosen the nuts securing the bagger RH and LH horizontal adjustment brackets. Loosen only enough so the brackets keep their position, but allow them to be moved.

Move the brackets the amount forward or backward you wish the bag assembly to move. Retighten the nuts se- curely.

Vertical adjustment

Slightly loosen the nuts securing the vertical adjustment brackets. Loosen only enough so the brackets keep their position, but allow them to be moved.

Move the brackets the amount up or down you wish the bag assembly to move. Retighten the nuts securely.

Reinstall the bagger assembly and check the bagger to fender fit. If necessary, repeat the procedure until proper fit is attained.

After proper fit is attained, remove bagger from tractor and install bagger latch (4) to tractor back plate as shown. Tighten securely.

Install and carefully lower bagger to actuate latch.

Measure distance between bagger and latch as shown. If distance is not 10mm - 16mm carefully remove bagger and repeat vertical adjustment as needed.

02983

10MM (7/16") - 16MM (5/8")

4

To convert to bagging, mulching or discharge

23See "Section 5" of this manual.
Image 23
Contents Manuale di istruzioni AnleitungshandbuchManuel d’instructions Manual de las instruccionesPage III. Operation Safety RulesTraining II. PreparationIV. Maintenance and Storage III. Betrieb SicherheitsvorschriftenSchulung II. VorbereitungIV. Wartung UND Lagerung III. Utilisation Règles de SécuritéPrécautions D’UTILISATION II. PréparationIV. Entretien ET Entreposage III. Operación Reglas De SeguridadInstrucción II. PreparaciónIV. Mantenimiento Y Almacenamiento III. Funzionamento Norme AntinfortunisticheAddestramento ALL’USO II. PreparazioneIV. Manutenzione E Periodi DI INATTIVITA’ III. Bediening VeiligheidsregelsII. Voorbereiding IV. Onderhoud EN Opslag Reverse Mehr ALS 15 Steigung Betreiben Explosieve GasEN Lenkrad Volant DE DirectionVolante DE Dirección Steering WheelNota HinweisRemarque Einbau der Batterie Install batteryInstallazione della batteria Accu installerenPage Discharge Chute Nut Flat Washer To install bagger components to tractorTo Assemble Bagger Bagger adjustmentHorizontal adjustment Vertical adjustmentInstallation der Aufhängung der Grasfangbox des Traktors Höhenjustierung Montage der GrasfangboxJustieren der Grasfangbox SeitenjustierungEcrou frein 3/8 Assemblage des composants du collecteurGoulotte déjection Ecrou 3/8 Rondelle plate Réglage de la position verticale Pour assembler le collecteurPositionnement du collecteur Réglage de la position horizontaleContratuercas de 3/8 Descarga de adaptarse Tuercas de 3/8 Arandelas planasAjuste vertical Para montar el contenedorRegulacion del contenedor Ajuste horizontalTelaio di supporto Per montare i componenti del cesto di raccoltaConvogliatore di scarico Dadi 3/8 Rondella Piatta Dadi Rondella PiattaRegolazione verticale Per montare il cesto di raccoltaRegolazione del cesto Regolazione orizzontaleBorgmoer Zeskantbout Vlakke sluitring 10,3 mm Afvoertrechter BorgmoerVlakke sluitring Borgmoer 3/8 Vlakke sluitring SteunVerticale bijstelling De grascontainer monterenAfstellen van grascontainer Horizontale bijstellingReglage DES Roulettes DE Jauge si équipé To Adjust Gauge Wheels if equippedRegolazione DEI Ruotini Anteriori se installato Einstellen DER Tasträder sofern vorhandenPara ensamblar y montar la tapa mulching si está provisto To assemble and install mulcher plug if equippedPer Iinstallazione del Kit Mulching se instal- lato Pour assembler linsert broyeur si équipéAnordnung der Bedienungseinrichtungen Positioning of controlsDe plaats van de bedieningsorganen Emplacement des commandesComandi Ubicación de los mandosèComando gas/choke Commande des gaz et starterGas und kaltstarthebel Mandos del acelerador y del estranguladorPedal de freno y de embrague Brake and clutch pedalBrems- und Kupplungspedal Pédale dembrayage et de freinAcoplamiento/desacoplamiento de la trans- misión Levier de commande de la transmission hydrostatiqueMotion control lever Ein- und Ausschalten des AntriebesAcoplamiento y desacoplamiento del equipo de corte Commande dembrayage et de débrayage du carter de coupeConnection/disconnection of the cutting unit Ein- und Ausschalten des MähaggregatsChiave di accensione ZündschloßClé de contact et de démarrage Cerradura de encendidoFreno de estacionamiento Parking brakeFeststellbremse Frein de stationnementAcoplamiento y desacoplamiento de rueda libre Free-wheel Control LeverEin-und Ausschalten des Freilaufes Blocage et déblocage de la roue librePlein de carburant Filling upReposición de combustible TankenLivello dell’olio Oil levelÖlstand Nivel de aceiteDriving . Betrieb . Conduite . Conducción Guida . Rijden Zündschlüssel auf Start drehen Turn the ignition key to Start positionEntlüften DES Getriebes Purge TransmissionTransmissie Ontluchten Purge DE LA TransmissionPurgar LA Transmisión Spurgo Della TrasmissioneConducción DrivingBetrieb ConduiteSistema de Funcionamiento Atrás ROS Reverse Operation System ROSRückwärtsgangsystem ROS Sécurité Marche Arrière ROSRatschläge zum Rasenmähen Sistema Per Operazioni In Retromarcia ROSSysteem Voor Achteruit ROS Cutting tipsMaaitips Conseils pour la tonteConsejos para el corte Consigli per il taglio dell’erbaPara vaciar la cargadora To Dump BaggerEntleeren der Grasfangbox Pour vider le bacPour broyer To convert mowerPour passer dune fonction à une autre De Maaier Ombouwen Para cambiar el ajuste de la segadoraRegolazione della funzione di taglio Waarschuwing WarnungAdvertencia PericoloApagar el motor Switching off the engineAbschalten des Motors Extinction du moteurAdvertencia Cubierta del motor Engine hoodMotorhaube Capot moteurMantenimiento MaintenanceWartung EntretienPara Cambiar EL Aceite To Change OILÖlwechsel Durchführen Pour Changer L’HUILEClean battery and terminals Check muffler Fill in dates as you complete regular service EveryCheck brake operation Clean air screen Clean engine cooling finsFiltre à air Sans filtre à huileVérification des freins Nettoyage de la grille daération Pré-filtrePulizia raffreddamento motore Vul telkens u service uitvoert, de datum Indien Om de Nodig50 ore Controllo freni Pulizia schermo ariaFahrer-Anwesenheitssystem und Rückwärts- gangsystem ROS Operator Presence System and Reverse Opera- tion System ROSControl Sistema Presencia Operador Cuchillas BladesMesserbalken LamesMesserbalkenbohrung mit sechseckiger Auss- parung Star pattern bladeMesserbalkenbohrung mit fünfeckige Ausspar- ung Lame avec orifice de fixation central étoil à cinq branchesCuchilla de orificio-estrella de seis puntas Cuchilla de orificio-estrella de cinco puntasLama con for stellare a 5 punte Mes met 5-hoekige sterBlade Removal Controlar El Freno To Check BrakeÜberprüfen Der Bremse Pour Vérifier Le FreinDepose du Carter de Coupe Assembly of the cutting unitDismantling of the cutting unit Demontage des MähdecksSostituzione della cinghia di movimento lame Replacement of drive belt for cutting unitAuswechsein des Treibriemens für das Mähag- gregat Cambio de la correa propulsora del equipo de corteAjuste de la unidad de corte Adjustment of the cutting unitEinstellung des Mähaggregats Réglage du carter de coupeReglage Transversal SIDE-TO-SIDE AdjustmentAdjuste DE Lado a Lado Seitliche EinstellungSostituzione della cinghia di trazione Replacement of drive beltRemplacement de la courroie dentraînement Cambio de correa propulsoraEinstellung DES Steuerknüppels DES Schaltgetriebes Transaxle Motion Control Lever AdjustmentReglage DU Levier DE LA Commande D’AVANCEMENT Page Enfriamiento DEL Transeje Transaxle CoolingTRANSACHSEN-KÜHLUNG Refroidissement DE LA TransmissionTroubleshooting . Störungssuche Recherche des pannes . Búsqueda de averías Ricerca guasti . Het localiseren van fouten Servicio ServiceStorage . Aufbewahrung . Remisage . Conservación Entretien et réparationsServizio Rismessaggio . StallenPage 09.24.10 TH