Zenoah BCX2600S manual MA10 MA11 MA12 MA13 Change the oil as follow, Valve to Rocker ARM Clearance

Page 23

9. Maintenance

MA10

MA11

MA12

MA13

Change the oil as follow:

1.Remove the oil fill plug/dipstick.

2.Pour the oil into a container by tipping the unit to a vertical position. Be sure to allow ample time for complete drainage. (MA10)

3.Wipe up any oil residue on the unit and clean up any oil that may have spilled. Dispose of the oil according to Federal, State and local regulations.

4.Refill the crankcase with 3.4 fluid oz (100ml) of SAE30, SH oil.

5.Reinstall the oil fill plug/dipstick.

NOTE

Make sure the O-ring is in place on the oil fill plug/dipstick when checking and changing the oil. (MA9)

VALVE TO ROCKER ARM CLEARANCE

After the first 20 hours and every 50 hours of operation, inspect the valve to rocker arm clearance using a flat feeler gauge.

NOTE

This requires some disassembly of the engine. If you feel unsure or unqualified to perform this, take the unit to an authorized service center.

NOTE

The engine must be cold when checking or adjusting the valve clearance.

This task should be performed inside, in a clean, dust free area.

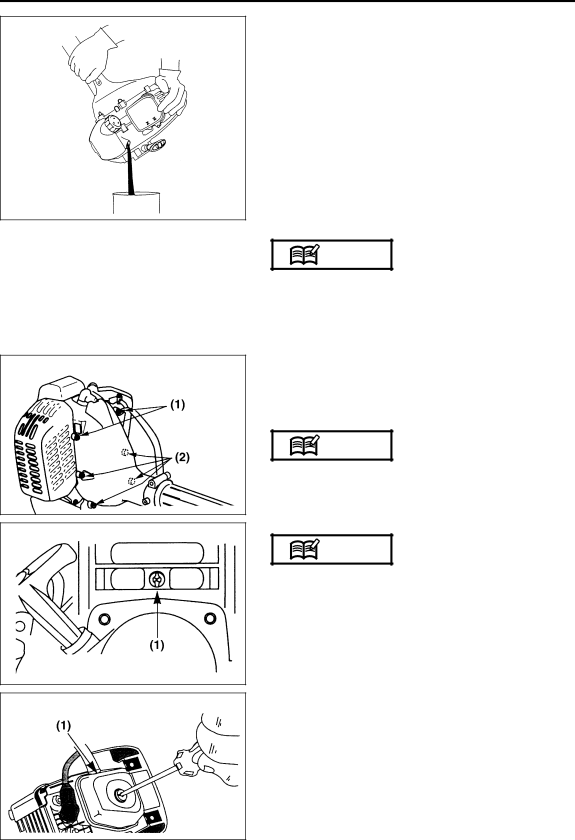
1.Loosen the four screws shown in (MA11 (2)).

2.Remove the three screws that secure the engine cover. (MA11 (1), MA12 (1))

3.Disconnect the spark plug wire.

4.Remove the spark plug and then remove the engine cover.

5.Remove the rocker arm cover and gasket. (MA13)

(1) Rocker arm cover

23

Image 23
Contents T3032-93110 BCX2600SPage Safety First Parts location Avertissement Position Symbols on the machineEmplacement Working Circumstance For safe operationWorking Condition Working Plan Starting the Engine Before Starting the EngineUsing the Product Handling Fuel MaintenanceIf Someone Comes Transportation Set up Balance Unit SE5 SE6 Installing Cutting Head SE5Section Oil / FuelRecommended OIL Type Adding OIL to CRANKCASE-INITIAL USEUSE of Fuel Additives Definition of Blended FuelsUSE of Blended Fuels OP1 OP2 OP3 Starting Engine OperationOP5 Adjusting Idling Speed OP4Adjusting the Wire Play OP5 OP4Trimming Grass and Weeds Adjusting the Line LengthOP6 Cutting Work Line Head Usage MA1 MA2 MA3 MA4 MaintenanceMaintenance Chart For safety reasons, do not use metalreinforced lineAIR Filter MA5 MA6 MA7Changing the OIL Wear gloves to prevent injury when handing the unitMA8 MA9 OIL Level Oil Fill Plug/Dipstick 2 O-Ring Top of DipstickRocker arm cover MA10 MA11 MA12 MA13 Change the oil as followValve to Rocker ARM Clearance Fuel filter Feeler gauge 2 Rocker arm Adjusting nut 4 GasketMA14 MA15 Fuel FilterTightening Torque Muffler MA16Spark Plug Specified plug is Champion RDZ19HGear Case MA18 MA17 MA18Spark Arrester Spark arresterCylinder Intake air cooling vent back MA19 MA20Storage Cleaning and storageCleaning Optional blade usage Cutting Method OPT4 OPT5 OPT6Bracket Handle What causes kick out OPT7 OPT8 OperationControlling Blade Bounce How you can maintain the best control How you can reduce the chance of kick outTransporting the Unit OPT9 Maintenance BladeProblem Cause Action Troubleshooting guideParts list 36  37  38  39  Manufacturer’s warranty coverage RedMax TRIMMER/BRUSHCUTTER Model BCX2600S Year Limited WarrantyLimites de la garantie