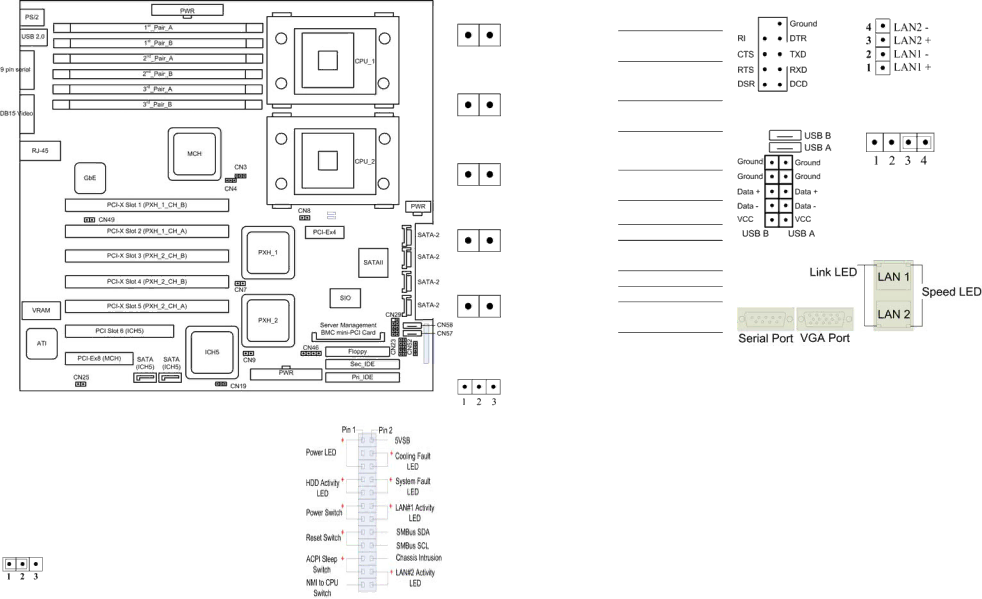
1.2.1 Quick Installation Guide
CN8 | Speed Select Jumpe |
| r | CN29 COM2 Header | CN52 | LED Board | |
Open | Short |
|
|
|
|
|
|
133 MHz Enabled | 100 MHz Enabled |
|
|
|
|
|
|
(default) |
|
|
|
|
|
| |
|
|
|
|
|
|
| |
CN7 |
|
|
|
| |||
Open | Short |
|
| CN23 CN57 CN58 |
|
|
|
133 MHz Enabled | 100 MHz Enabled |
|
| CN46 | System | ||
(default) |
|
| USB Connectors | Speaker Connector | |||
|
|
| |||||
CN9 |
|
|
|
| |||
|
|
|
|
|
| ||
133 MHz Enabled |
|
|
|
|
|
|
|
100 MHz Enabled |
|
|
|
| Pin 1 | PC Speaker | |
(default) |
|
|
|
| |||
|
|
|
|
| Pin 2 | N/C | |
|
|
|
|
|
| ||
CN49 |
|
| Pin 3 | Int. Buzzer | |||
| Short |
|
|
|
| Pin 4 | Ground |
Open |
|
|
| ||||
|
|
|
| ||||
LAN Enabled | LAN Disabled |
|
| LAN Connector Indicator Light |
| ||
(default) |
|
|
| ||||
|
|
|
|
|
|
| |
CN25 |
|
|
|
|
|
| |
Open | Short |
|
|
|
|
|
|
VGA Enabled | VGA Disabled |
|
|
|
|
|
|
(default) |
|
|
|
|
|
| |
|
|
|
|
|
|
| |
Remark: | CN42 Front Panel |
Connectors | |
| |
1. PXH_2 |
|
2. |
|
CN19 Clear CMOS Jumper
Open | ||
Normal | Use BMC to | Clear CMOS |
(default) | clear CMOS |
State of Link | Link LED | Speed LED |
| (Green) | (Green / |
|
| Yellow) |
No Link | OFF | OFF |
Link @ 10Mbps | ON | OFF |
Link @ 100Mbps | ON | Green |
Link @ 1000Mbps | ON | Yellow |
Activity | BLINK |
|
3. CN9 |
CN3 CN4 Memory Frequency Select Jumper
FSB | Memory | CN3 | CN4 |
Any (Default) | Auto | ||
533MHz | DDR266 | Open | |
533MHz | DDR333 | ||
667MHz | DDR266 | Open | Open |
667MHz | DDR333 | Open | |
800MHz | DDR266 | Open | Open |
800MHz | DDR333 |
Recommended Memory Configurations
Memory Configuration | 3rd_Pair | 2nd_Pair | 1st_Pair |
1 pair of single rank |
|
| single rank |
1 pair of dual rank |
|
| dual rank |
2 pairs of single rank |
| single rank | single rank |
1 pair of single rank and 1 pair of dual rank |
| dual rank | single rank |
2 pairs of dual rank |
| dual rank | dual rank |
3 pairs of single rank | single rank | single rank | single rank |
2 pairs of single rank and 1 pair of dual rank | dual rank | single rank | single rank |
*1 pair of single rank and 2 pairs of dual rank | dual rank | dual rank | single rank |
*3 pairs of dual rank | dual rank | dual rank | dual rank |
*These configurations using DDR 333 are not recommended by Intel®.
8