Proxima ASA Multimedia LCD Projectors manual Correcting Keystoning

Page 39

Chapter 2 • Detailed Setup

Correcting Keystoning

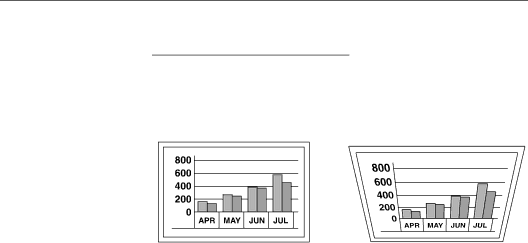
The normal projected image will have a rectangular shape. Keystoning is when the projected image becomes trapezoidal.

Normal Image

Keystoned Image

Figure 2-19

Normal vs. keystoned images

Keystoning occurs when the front of the Desktop Projector is not perpendicular to the projection screen (the vertical plane) or when it’s not placed parallel to the floor (the horizontal plane). Key- stoning also occurs when the projector is tilted sideways.

To correct keystoning, always make sure that the projector is at a right angle to the screen in the horizontal plane. The projector is properly aligned if the top and bottom of the projected image are equal in length and parallel to the floor.

2–24 • User’s Guide

Image 39 Contents
Multimedia LCD Projectors Halogen Models Page Contents RGB Controls RED, Green & Blue Switching Lamps JUN JUL Chapter Introducing Proxima Desktop ProjectorCyclops Interactive Pointer System What’s in the Box? Items included with the Desktop Projector Connect video and audio sources to the projector Computer Control Panel Levels Menu Press the MENU/ key a second time to display the Setup Menu Remote Control Getting Help Chapter Detailed Setup Getting Started Opening the Projector Opening the cover assembly Detailed Setup Using an AV Tripod Closing the Projector Transporting the Projector Connecting Computer Monitor Special Configurations Video VHS Computer Audio Connecting a Microphone Audio OUT External Stereo System Amplifier Receiver Stereo Detailed Setup Allow for proper air flow Turning On/Off the Lamp 128/325.1 cm Focusing Correcting Keystoning Projection Screen Panel Chapter Using Desktop ProjectorBrightness Keys Sync Keys Volume Keys Press the Menu key once to display the Levels Menu. From Volume Source Image Projection Language Overtemp Warning Light Replace Lamp Alert Light Mute Key Text Key Chapter Maintenance General Switching Lamps Maintenance Follow these steps to remove the lamp and install a new one Opening the lamp chamber Changing Air Filters Front Air Intake Filter Assemblies Remove the foam air filters Remove the foam air filter Replace the cover on the battery compartment Temperature Extremes Replace Lamp Chapter TroubleshootingContrast VHS A. and Canada Carroll Park Drive San Diego, CA Proxima Desktop Projector Appendix a SpecificationsAudio in may be used as Appendix B Accessories Replacement Parts Outside U.S.A. and Canada 619 Audio OUT IndexFrequency VHS