Dell E6500 manual Troubleshooting Tools, Diagnostic Lights, Hardware Troubleshooter

Page 56

Back to Contents Page

Troubleshooting

Dell™ Latitude™ E6500 Service Manual

Troubleshooting Tools

Solving Problems

Dell Technical Update Service

Troubleshooting Tools

Diagnostic Lights

Before working inside your computer, read the safety information that shipped with your computer. For additional safety best practices information, see the Regulatory Compliance Homepage at: www.dell.com/regulatory_compliance.

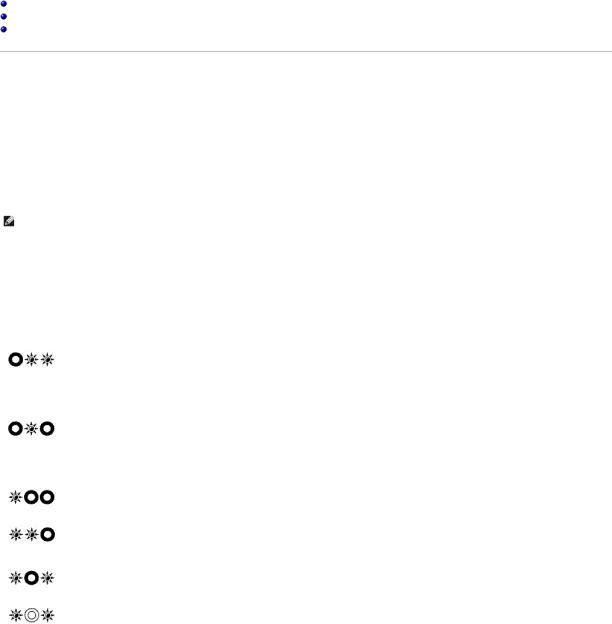
Your computer has three keyboard status lights located above the keyboard. During normal operation, the keyboard status lights display the current status (on or off) of the Num Lock, Caps Lock, and Scroll Lock features. If the computer starts without error, the lights flash, and then turn off. If the computer malfunctions, however, you can use the status of the lights to help identify the problem.

NOTE: After the computer completes POST, the Num Lock light may remain on, depending on your BIOS settings. For more information on using the system setup program, see the Dell™ Technology Guide on your computer or on the Dell Support website at support.dell.com.

Diagnostic Light Codes During POST

To troubleshoot a problem with your computer, read the sequence of the keyboard status lights in order from left to right (Num Lock, Caps Lock, and then

Scroll Lock). If the computer malfunctions the individual lights display a status of either On , Off , or Flashing .

Light Pattern

Problem Description

Suggested Resolution


No memory modules are

If two or more memory modules are installed, remove the modules (see Removing a Memory Module),


detected.

then reinstall one module (see Replacing a Memory Module) and restart the computer. If the computer


starts normally, continue to install additional memory modules (one at a time) until you have identified a


faulty module or reinstalled all modules without error.


If available, install working memory of the same type into your computer (see Memory).


If the problem persists, contact Dell Technical Support.


Memory modules are

If two or more memory modules are installed, remove the modules (see Removing a Memory Module),


detected, but a memory

then reinstall one module (see Replacing a Memory Module) and restart the computer. If the computer


failure has occurred.

starts normally, continue to install additional memory modules (one at a time) until you have identified a


faulty module or reinstalled all modules without error.


If available, install working memory of the same type into your computer (see Memory).


If the problem persists, contact Dell Technical Support.


A possible processor

Reseat the processor (see Removing the Processor Module).


failure has occurred.

If the problem persists, contact Dell Technical Support.


A possible graphics

Reseat any installed graphics cards.


card/video failure has

If available, install a working graphics card into your computer.


occurred.

If the problem persists, contact Dell Technical Support.


A possible display failure

Reseat the display cable (see Removing the Display Assembly).


has occurred.

If the problem persists, contact Dell Technical Support.


SPD data indicates all

Remove the unusable memory module (see Removing a Memory Module).


SODIMMs are unusable.

Replace with a usable memory module (see Replacing a Memory Module).


Hardware Troubleshooter

If a device is either not detected during the operating system setup, or is detected but incorrectly configured, you can use the Hardware Troubleshooter to resolve the issue.

Windows® XP:

1.Click Start Help and Support.

Image 56
Contents Page Base Assembly Removing the Bottom of the Base AssemblyReplacing the Bottom of the Base Assembly Removing the Base AssemblyBack to Contents Recommended Tools What You Need to Know for Your SafetyBefore Working on Your Computer Removing the Battery Replacing the BatteryBack to Contents Flashing the Bios From the Hard Drive Flashing the BiosFlashing the Bios From a CD/DVD Card Cage Removing the Card CageReplacing the Card Cage Removing the Card Cage Replacing the Card CageBack to Contents Replacing the Coin-Cell Battery Coin-Cell BatteryRemoving the Coin-Cell Battery Back to Contents Follow the instructions in Before Working on Your Computer Processor ModuleRemoving the Processor Module Replacing the Processor Module Discrete Graphics Thermal-Cooling Assembly Processor Thermal-Cooling AssemblyRemoving the Processor Thermal-Cooling Assembly Replacing the Processor Thermal-Cooling Assembly Integrated Graphics Thermal-Cooling AssemblyIntegrated Graphics Thermal-Cooling Assembly Daughter Card Removing the I/O Daughter CardReplacing the I/O Daughter Card Remove the see Removing the Hinge CoversBack to Contents Removing the Display Assembly DisplayReplacing the Display Assembly Removing the Display BezelRemoving the Ccfl Display Panel Replacing the Display BezelRemoving the Display Panel Replacing the Display Panel Removing the LED Display PanelReplacing the Ccfl Display Panel Replacing the LED Display PanelRemoving the Display Panel Brackets Replacing the Display Panel BracketsDisplay Inverter Removing the Display InverterRemoving the Camera and Microphone Assembly Replacing the Display InverterReplacing the Latch Hook Assembly Replacing the Camera and Microphone AssemblyRemoving the Latch Hook Assembly Removing the Display Cover Replacing the Display CoverBack to Contents Fan Removing the FanReplacing the Fan Removing the Fan Replacing the FanRemoving an FCM Replacing an FCM Flash Cache ModulesRemoving an FCM Replacing an FCM Removing the Hard Drive Replacing the Hard Drive Hard DriveRemoving the Hard Drive Replacing the Hard Drive Hinge Covers Removing the Hinge CoversReplacing the Hinge Covers Removing the Hinge Covers Replacing the Hinge CoversKeyboard Removing the KeyboardReplacing the Keyboard Removing the Keyboard Replacing the KeyboardBack to Contents LED Cover Removing the LED CoverReplacing the LED Cover Removing the LED Cover Replacing the LED CoverRemoving the Dimm B Module MemoryRemoving a Memory Module Replacing a Memory Module Dimm aOperation of the Computer Modem Removing the ModemReplacing the Modem Removing the Modem Replacing the ModemBack to Contents Optical Drive Removing the Optical DriveReplacing the Optical Drive Removing the Optical Drive Replacing the Optical DrivePage Palm Rest Assembly Removing the Palm Rest AssemblyReplacing the Palm Rest Assembly Back to Contents Removing the Power Module Replacing the Power Module Power ModuleRemoving the Power Module Replacing the Power Module Replace the palm rest see Replacing the Palm Rest AssemblyRight-Speaker and Fingerprint Reader Cover Removing the Right-Speaker and Fingerprint Reader CoverReplacing the Right-Speaker and Fingerprint Reader Cover Remove the processor see Removing the Processor Module System Board AssemblyRemoving the System Board Assembly Replacing the System Board Assembly Replace the processor see Replacing the Processor Module Back to Contents Troubleshooting Troubleshooting ToolsDiagnostic Lights Diagnostic Light Codes During PostStarting the Dell Diagnostics From Your Hard Drive Dell DiagnosticsWhen to Use the Dell Diagnostics Dell Diagnostics Main Menu Diagnostics Main MenuError Messages Tab FunctionDrive Problems Solving ProblemsBattery Problems Hard drive problems Optical drive problemsProblems writing to an optical drive Ieee 1394 Device Problems Lockups and Software ProblemsComputer does not start up Computer stops respondingProgram stops responding Program crashes repeatedlyMemory Problems Power ProblemsOther software problems Solid blue screen appearsSound and Speaker Problems No sound from headphonesSee Diagnostic Lights No sound from speakersOnly part of the display is readable Dell Technical Update ServiceVideo and Display Problems WLAN/WiMax Cards Removing a WLAN/WiMax CardReplacing a WLAN/WiMax Card Removing a WLAN/WiMax Card Replacing a WLAN/WiMax CardBack to Contents Removing a WPAN/UWB Card Replacing a WPAN/UWB Card WPAN/UWB CardsRemoving a WPAN/UWB Card Replacing a WPAN/UWB Card Wwan Card Removing a Wwan CardReplacing a Wwan Card Removing a Wwan Card Replacing a Wwan CardBack to Contents
Related manuals
Manual 50 pages 51.78 Kb Manual 72 pages 40.71 Kb