Samsung BN68-01416D-00 Teletext Feature depending on the model, Store, Size, Reveal, Mode, Down

Page 46

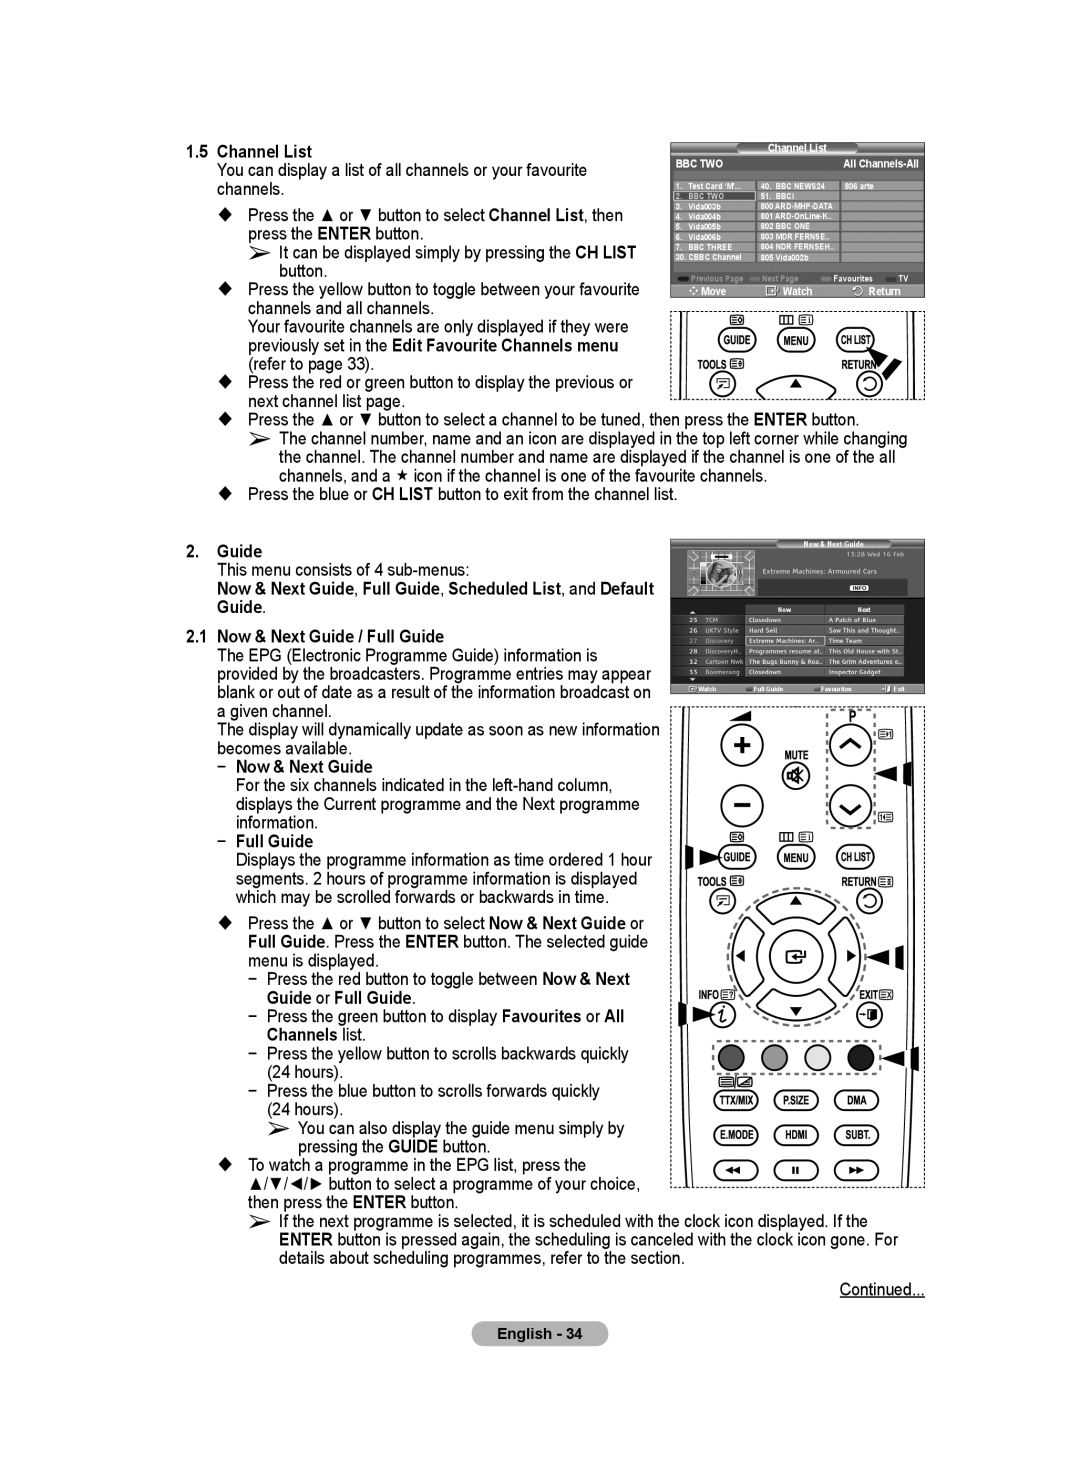
Teletext Feature (depending on the model)

Most television stations provide written information services via teletext. The index page of the teletext service gives you information on how to use the service. In addition, you can select various options to suit your requirements by using the remote control buttons.

For teletext information to be displayed correctly, channel reception must be stable. Otherwise, information may be missing or some pages may not be displayed.
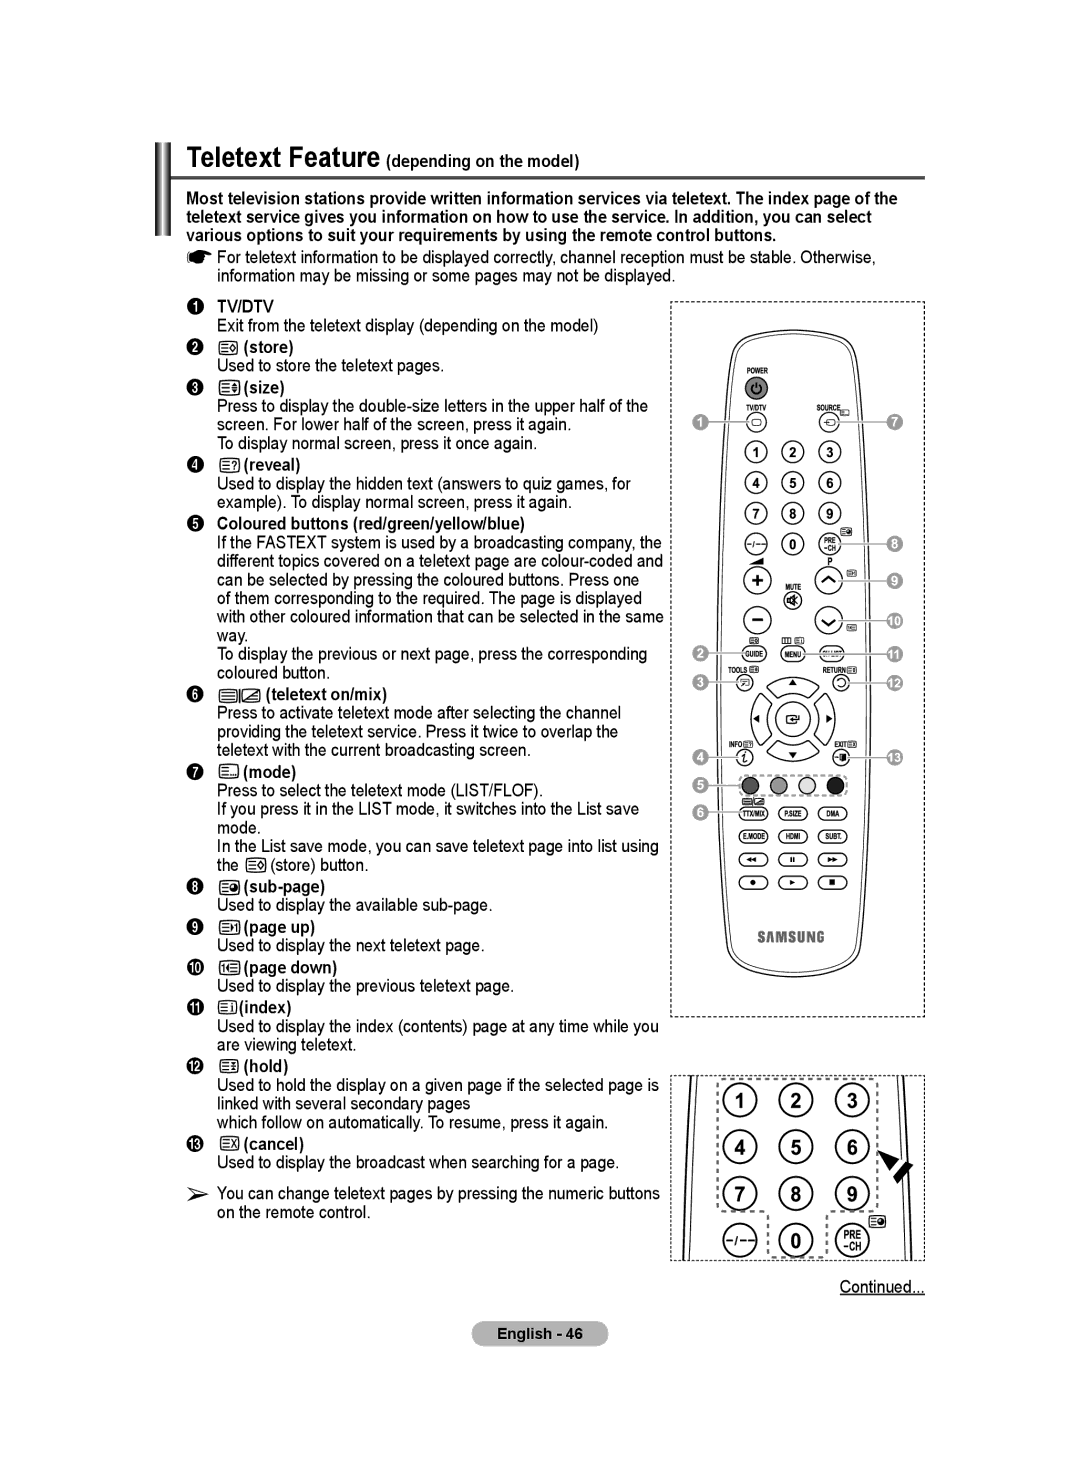
1TV/DTV

Exit from the teletext display (depending on the model)

2 (store)

Used to store the teletext pages.

3 (size)

Press to display the double-size letters in the upper half of the screen. For lower half of the screen, press it again.

To display normal screen, press it once again.

4 (reveal)

Used to display the hidden text (answers to quiz games, for example). To display normal screen, press it again.

5 Coloured buttons (red/green/yellow/blue)

If the FASTEXT system is used by a broadcasting company, the different topics covered on a teletext page are colour-coded and can be selected by pressing the coloured buttons. Press one of them corresponding to the required. The page is displayed with other coloured information that can be selected in the same way.

To display the previous or next page, press the corresponding coloured button.

6


(teletext on/mix)


Press to activate teletext mode after selecting the channel


providing the teletext service. Press it twice to overlap the


teletext with the current broadcasting screen.

7 (mode)

Press to select the teletext mode (LIST/FLOF).

If you press it in the LIST mode, it switches into the List save mode.

In the List save mode, you can save teletext page into list using the (store) button.

8 (sub-page)

Used to display the available sub-page.

9 (page up)

Used to display the next teletext page.

0 (page down)

Used to display the previous teletext page.

!(index)

Used to display the index (contents) page at any time while you are viewing teletext.

@ (hold)

Used to hold the display on a given page if the selected page is

linked with several secondary pages

which follow on automatically. To resume, press it again.

# (cancel)

Used to display the broadcast when searching for a page.

You can change teletext pages by pressing the numeric buttons on the remote control.

Continued...

English - 46

Image 46
Contents 0818 717 Samsung Contact Samsung WorldwideCountry Customer Care Centre  Web Site BN68-01416D-00User Instructions Contents Checking Parts Using the Stand-BaseFerrite Core Power Cord, S-Video Sold SeparatelyControl Panel Power IndicatorRemote Control Sensor Front or Side PanelConnection Panel Input/Output SpecificationEXT 1, EXT Side Panel Headphones jackHdmi in 1,2 Supported modes for HDMI/DVI and ComponentViewing the Remote Control Teletext FunctionsViewing the Menus Switching Your Television On and OffInstalling Batteries in the Remote Control Main lead is attached to the rear of the televisionMake sure that the antenna is connected to the TV Plug & Play FeaturePress the Enter button If you want to reset this feature … Spain OnlyUsing the Tools Button Viewing External Signal SourcesStoring Channels Automatically Not available in DTV or external input modeEditing Device Names You can give a name to the external source Colour System Auto/PAL/SECAM/NTSC4.43 Channel modeStoring Channels Manually  Sound System BG/DK/I/LAdded Adding / Locking Channels Adding channels  Locking channelsSorting the Stored Channels Assigning Names to ChannelsFine Tuning Channel Reception LNA Low Noise AmplifierPress the or button until you reach the optimal setting Customizing the Picture SettingsEasy Setting Changing the Picture StandardConfiguring Detailed Settings on the Picture Picture Options Side to side Horizontal Dot. The Time setting allows Using this function, you can adjust the Colour and Tint toBar Patterns, without using an additional Blue Filter − Pixel Shift Using this function, you can minutely moveYou can set detailed picture settings Resetting the Picture Settings to the Factory DefaultsOptimum condition for pixel shift TV/Ext/AV/Component Sound Features Connecting Headphones Sold separately Selecting the Sound Mode depending on the modelThis function is only available in Analog TV mode Press the or button to select Sleep Timer Time FeaturesPress the Tools button on the remote control  Timer 1 / Timer 2 / Timer Light Effect Off/In Standby/In Watching TV/Always Press the or button to select Setup, then press Language  Melody Off/Low/Medium/HighSetting up Your PC Software Based on Windows XP Sub Input Input Mode PCHDMI/DVI Input Image Reset Setting the PC Auto Adjustment Coarse/FinePreviewing the DTV Menu System Audio Language Displaying Programme InformationLanguage Primary Audio Language − Channel Operating the DTV MenuDigital Channel − Frequency Preview  AddChannel list  DeleteRefer to Channel ListChannels and all channels Next channel listDefault Guide Scheduled ListAll Channels and Favorite Channels Language The Audio Language, Subtitle Language, PreferenceLanguage, Subtitle Language, and the Teletext Teletext Language of the Language menu show aYou can set the translucency of the on-screen menu This menu consists of 11 sub-menusMenu Transparency Change PIN / Parental LockDigital Text Subtitle button on the remote controlActivates even though Hard of hearing mode is  Press the or button to select required menuYou can get information about the signal status − Installing the CI Card− Signal Information Error level / Signal StrengthFactory state Connecting Anynet+ Devices What is Anynet+?To connect to Home Theatre Meassage Configuring Anynet+ connection... is Setting Up Anynet+Scanning and Switching between Anynet+ Devices Turned OffRecording Check Points before Requesting Service Listening through a ReceiverStore Teletext Feature depending on the model# cancel SizeContents Wall Mount Kit Specifications Vesa QuantityEntering the menu Wall- mount adjustment Sold separatelyOr button to select Setup, then press the Enter button Remembering the PositionHow to assemble the Stand-Base depending on the model Moving to the remembered positionTroubleshooting Specifications Risk of Electric Shock do not Open United Kingdom This page is intentionally Left blank Correct Disposal of This Product