Mitsubishi Electronics DX-TL4U manual Callback Center Modem Setup screen

Page 64

User’s Manual

Highlight the box beside SMTP Server IP and enter the SMTP server IP address, obtained from your system administrator.

Highlight the box beside E-mail recipient and enter the recipient’s e-mail address. Use the virtual keyboard to enter the e-mail address.

Highlight the box beside E-mail sender and enter the sender’s e-mail address.

NOTE: The e-mail address must include the character “@” to be a valid address.

Highlight the box beside Authentication and press the button to toggle between On and Off.

Highlight the box beside ID and enter the SMTP ID. A virtual keyboard appears allowing you to enter the ID.

Highlight the box beside Password and enter the SMTP password. A virtual keyboard appears allowing you to enter the password.

NOTE: Authentication should be turned On and ID and Password should be entered when using the SMTP server requiring user authentication.

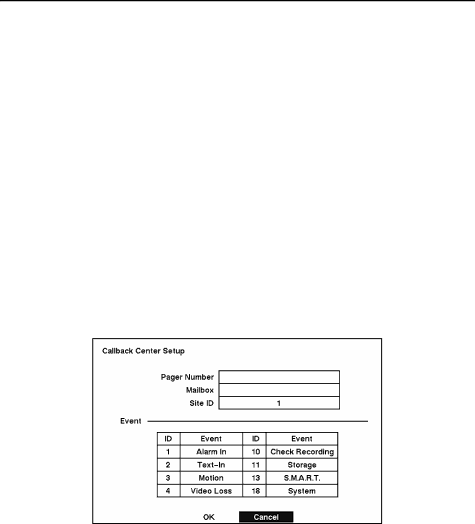
Callback Center Setup by Modem connections

Figure 72 — Callback Center (Modem) Setup screen.

Highlight the box beside Pager Number and enter the telephone number of the pager. Enter the number as it must be dialed from your telephone system; e.g., if you must dial “9” for an outside line, enter “9” before the pager number.

Highlight the box beside Mailbox and enter the voice mailbox number if your pager uses a voice mailbox.

Highlight the box beside Site ID and enter a three-digit site ID number.

54

Image 64
Contents Page Page Compliance Notice of FCC Important Safeguards CleaningTable of Contents OSD On-Screen Display Setup Main Monitoring Setup Screen Clip Copy Load Default SetupLoad / Save Setup Clear All Data PTZ Mode Digital Zoom ModeList of Illustrations Alarm In Event Action Record setup screen User’s Manual Viii Features IntroductionTechnical Overview Installation Package ContentsRequired Installation Tools Connecting the Video SourceConnecting Audio Connecting the Loop Through VideoSetting Unit for Cvbs or VGA output Connecting Alarms Connecting the MonitorConnecting the Spot Monitor AI 1 to 4 Alarm Connecting to the Network PortAlarm Out Connecting to the RS-232C Port Factory ResetConnecting to the USB Port Connecting the Power CordConfiguration Front Panel ControlsPanic Button Connecting the Infrared Remote Control Infrared Remote ControlInitial Unit Setup Turning on the PowerSetup Screen Four-Channel Digital Video Recorder Normal Setup Screen System InformationSystem Information Change screen System Upgrade screen Date/Time setup screen Holiday Setup screen Four-Channel Digital Video Recorder System Check Config. screen System Check Alarm Out / Notify screen M.A.R.T. Setup screen System Log screen Configuring Input Devices Camera Setup ScreenPTZ Device list Motion Detector setup screen Text-In Setup screen Text-In Generic Text Setup screen Alarm Out setup screen Alarm Out Schedule screen RS232 setup screen Configuring Recording Settings Record Mode Setup ScreenTime-Lapse Record Setup screen Time-Lapse Recording Schedule screen Pre-Event Record Setup screen Event Action Setup Alarm In Event Action Record Setup ScreenAlarm In Event Action Alarm Out setup screen Motion Detector Event Action Record setup screen Motion Detector Event Action Alarm Out setup screen Text-In Event Action Record setup screen Text-In Event Action Alarm Out setup screen Video Loss Event Action Record setup screen Video Loss Event Action Alarm Out setup screen Display Setup OSD On-Screen Display SetupFour-Channel Digital Video Recorder Main Monitoring Setup screen Network Setup Screen LAN Setup Screen LAN Manual Setup screenPort Number Setup screen LAN Dhcp Setup screen Modem Setup screen Dvrns Setup screen Callback Center LAN Setup screen Callback Center Modem Setup screen Password Setup Screen Password setup screenConfig Screen Clip CopyUSB Flash Memory Disk Partition Selection screen Load / Save Setup Load / Save Setup screenUser’s Manual Operation Live MonitoringPTZ Mode Live Monitoring Text-In screenPTZ Menu Preset Apply screen Recording VideoRecording Audio Playing Recorded VideoArrow Buttons Searching Video Digital Zoom screenDate/Time Search Date/Time Search screenEvent Log screen Event Search by Event screen Text-In Log screen User’s Manual Appendix a USB Hard Disk Drive Preparation Preparing the USB-IDE hard disk drive in WindowsUser’s Manual Appendix B Text-In Query Examples Query ExampleQuery Example Appendix C Troubleshooting Problem Possible SolutionAppendix D Connector Pin Outs Input OutputAppendix E Map of Screens Appendix F Specifications VideoStorage Weee Waste Electrical & Electronic Equipment