Go-Video VR3840 manual Initial Setup On-Screen Display Overview

Page 28

Initial Setup (Continued)

On-Screen Display Overview

The On-Screen Display provides feedback on the status of the DVD Recorder+VCR and/or the currently loaded disc or tape. To access the On-Screen Display (or OSD), press the DISPLAY button.

Displaying Disc Information

To display information about the currently loaded disc or tape:

On-screen display operation

1

Press DISPLAY repeatedly to

display/change the

information displayed on-screen.


2

To remove the on-screen display, press DIS-

PLAY or RETURN (O) repeatedly until it disap-

pears.

See the descriptions on pages 28 and 29 for detailed explanations of on-screen displays for each media type.

otes

Some discs may not provide all the features shown in the on-screen display examples.

The on-screen display disappears automatically if no button is pressed for seven seconds.

Temporary Feedback Icons

Resume play from this point

Action prohibited or not available

Displaying TV Information

While watching TV, press DISPLAY to display/ remove the on-screen display.

For example, when a DVD-RW in VR mode is inserted, you would see a screen similar to the following:

Changing TV Channels

If no disc is playing, you can change TV channels using the 0-9 or CH (+/-) buttons on the remote control or CH (v / V) buttons on the front panel.

ote

Antenna channels are numbered 2 through 69. Cable channels are numbered 1 through 125.

Changing TV Audio Channels

Some TV programs are broadcast with both a main and a Secondary Audio Program (SAP). You can change the TV audio using the AUDIO button.

Press AUDIO repeatedly to change the TV audio, according to Broadcast audio signal as shown below.

STEREO+SAP Audio Signal Stereo SAP Mono Stereo

STEREO Audio Signal

Stereo L R Mono Stereo

SAP Audio Signal Mono SAP Mono

MONO Audio Signal Mono

The current audio channel is displayed on-screen.

If SAP is selected, but there is no SAP channel being broadcast, you will still hear the main audio channel.

If the sound is poor quality when set to Stereo, you can often improve it by changing to Mono.

When an external input is selected, the audio channel can be switched only to Stereo.

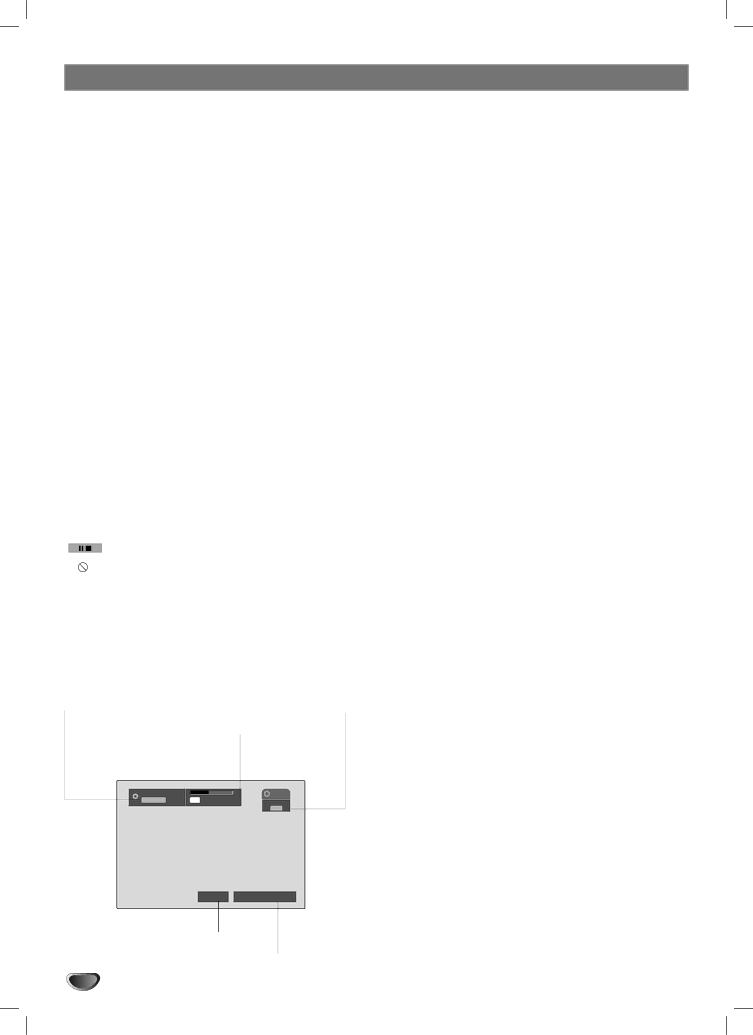
Indicates disc type.

Indicates Recording mode, free space, and elapsed time progress bar.

DVD-VR


VR Mode

SP 1H 32M Free

Mono

Indicates channel number and audio input signal received by the tuner.

DVD

Ch. 6

MONO

10/08/2004 11:35AM

Indicates audio output signal.

Indicates current date and time.

28

Image 28
Contents DVD Recorder+VCR Safety Precautions Regulatory Information FCC PartImportant Safety Instructions IntroductionTable of Contents Symbols Used in this Manual RecordingEditing ReferenceRecordable Discs OverviewPlayable Discs About Symbols What is ‘DoMiNoFX’?About the Symbol Symbols Used in this Manual Disc Related TermsAbout DVD-R and DVD-RW discs About DVD RecordingWhat is ‘CPRM’? Disc type Disc format Recording mode FunctionsRecording TV Audio Channels Restrictions on Video RecordingPrecautions Front Panel Overview Disc Type indicators Front Panel Display OverviewDVD SvcdRemote Control Overview COMPONENT/PROGRESSIVE Video OUT Y Pb Pr Rear Panel OverviewOptical Digital Audio Out Connecting Antenna/Cable Cable Service Without Cable BoxCable Service With Cable Box ConnectionsConnections Connecting a TV Digital Multi-Channel Sound Connections Connecting an Amplifier/ReceiverAudio OUT jacks Optical O or Coaxial X to Connections Connecting Optional Equipment Initial Setup Setup Menu Overview Setup Menu NavigationGeneral Settings Tuning BandInitial Setup Channel Add/DeleteClock Set Auto Clock Set ManualLanguage Settings Initial Setup Audio Settings Dolby DigitalDTS MpegInitial Setup Lock Settings PasswordMovie Rating Changing the 4-digit codeRecord Settings Disc Record ModeVCR Record Mode Select the first character using the vDisc Settings SetupAuto Chapter Disc InitializeDisc Finalize Disc ProtectPBC Finalize menu appearsYou can also use the remote control to AutoPlayYourDVD Disc LabelInitial Setup On-Screen Display Overview Initial Setup OSD Menu Options by Media Type Menu OptionsShows the current ModeShows the current mode Selection MethodShows recording tape InformationDVD/VCD Playback Playing a DVD/Video CD Selecting TitlesSelecting Chapters/Tracks Slow MotionDVD Discs Repeat Chapter/Title/All/Off Repeat A-BVideo CDs Repeat Track/All/Off Time Search DVD Video VR Marker SearchDisc Menus DVD Title Menus DVDRemember Disc Settings DVD Camera AngleChanging the Audio Language DVD Changing the Audio ChannelPlaying an Audio CD or MP3/WMA Music menu optionsMusic-Audio CD menu options CD Music-CD menu options MP3 WMAAudio CD and MP3/WMA Operation Repeat A-B CDSkip Tracks Search CDProgram Playback with Audio CD and MP3/WMA Program List menu optionsMove DeleteRepeating Programmed Tracks Erasing a TrackChanging Track Order Erasing Multiple TracksJpeg Disc Operation Viewing a Jpeg File Jpeg Photo menu optionsPhoto-CD menu options Jpeg Slide ShowJpeg Disc Operation Still PictureSkip Images Rotate ImagesVCR Playback Before You Begin Special Playback Features VHSPlaying a VHS Tape VHS Basic Recording Recording from TV One Touch Record OTROne Touch Copy DVD to VHS Basic RecordingOne Touch Copy VHS to DVD Timer Recording Checking Timer Recording DetailsCanceling a Timer Recording Stopping a Timer Recording in ProgressAbout Playing Recordings on Other DVD Players Recording from an External InputFinalizing a Disc Using the Chapter List-Original menu Using the Title List-Original menu VRTitle List and Chapter List Menu Using the Title List-Playlist Menu VR Using the Chapter List-Playlist MenuDeleting a Title Video Using the Title List menu VideoIf the disc has already been finalized About Original vs. Playlist Content Title and Chapter EditingAbout Titles, Chapters and Parts VR Adding Chapter MarkersTitle appears in the updated Playlist menu Making a New Playlist VRAdding Titles/Chapters to a Playlist If you want to display the Chapter List-OriginalDeleting Part of a Title VR Renaming a Title VR Video Combining Two Chapters VRUse v/V to select the ‘Rename’ option then press Enter Character then press Enter to confirm yourProtecting a Title VR Moving a Playlist Chapter VROverwriting a Disc VR Video Buttons Used to Operate Your TV Programming the MultiBrand Remote to Control Your TVCH 4/3 VOL + Language Code List Code LanguageCountry Code List Code CountryTroubleshooting Symptom Cause SolutionIf you observe any of the following symptoms Reset the DVD Recorder+VCRYou can reset the DVD Recorder+VCR as follows Technical Specifications Accessory OutputsLimited Warranty Who Provides the Limited Warranty3834RV0011D