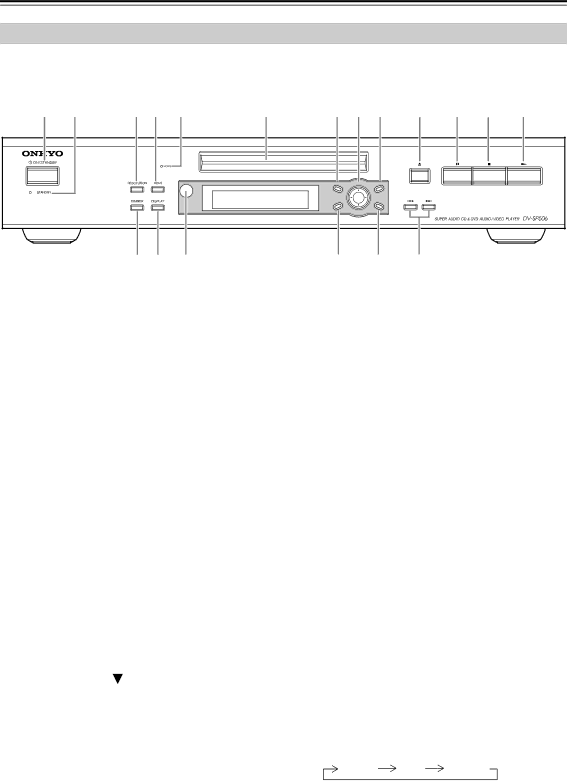
Onkyo DV-SP506 instruction manual Front & Rear Panels, Front Panel

Page 12

Front & Rear Panels

Front Panel

For detailed information, refer to the pages in brackets.

1 2

3 4 5

6

7 8 9 J K L M

TOP MENU

CURSOR

MENU

RETURN


SETUP

P

R


U


S

TE


H TO EN


S R Q P O N

AON/STANDBY button [29]

This button is used to set the DV-SP506 to On or Standby.

Don’t turn on the power until you’ve completed, and double checked all connections.

BSTANDBY indicator [29]

This indicator lights up when the DV-SP506 is in Standby.

CRESOLUTION button [46]

This button is used to select the video resolution for the HDMI output. When the HDMI Output Setting is set to Off, it sets the component video output to progressive or interlaced.

DHDMI button [46]

This button is used to turn HDMI on or off.

EHDMI indicator [46]

This indicator lights up when a HDMI signal is being output.

FDisc tray [31]

Discs are loaded here.

GTOP MENU button [34, 36]

With DVD discs, this button displays the main menu. With a JPEG disc, it displays thumbnails of the images. With a Video CD, it turns PBC on or off.

H Cursor / // & ENTER buttons [48]

The four cursor buttons located around the central [ENTER] button are used to navigate DVD-Video menus and the onscreen setup menus.

The central [ENTER] button is used to start play- back of the selected title, chapter, or track and to confirm settings.

IMENU button [34, 36]

J (open/close) button [31]

This button is used to open and close the disc tray.

K (pause) button [31, 33]

This button is used to pause playback.

L (stop) button [32]

This button is used to stop playback.

M (play) button [31]

This button is used to start playback.

N Previous/Next / buttons [32]

The Previous button is used to select the previous chapter or track. During playback it selects the beginning of the current track.

The Next button is used to select the next chapter or track.

OSETUP button [48]

This button is used to open and close the onscreen setup menus.

PRETURN button

This button is used to exit the onscreen setup.

QRemote control sensor [11]

This sensor receives control signals from the remote controller.

RDISPLAY button [45]

This button is used to display information about the title, chapter, or track, including the elapsed time, remaining time, total time, and so on. Press it repeatedly to display more information.

SDIMMER button [29]

This button is used to adjust the display brightness.

normal dim dimmer

This button is used to display a menu on a DVD or to open the Disc Navigator when using a JPEG disc.

12

Image 12
Contents DV-SP506 Important Safety Instructions AvisPrecautions PowerInstalling this Unit Preventing Hearing Loss CautionPrecautions Label on the right is applied on the rear panelFCC Information for User Supplied Accessories For models having a power cord with a polarized plugMake sure you have the following accessories Sur les modèles dont la fiche est polariséeFeatures IntroductionContents Introduction Disc NotesSupported Discs Function SupportMP3/WMA/JPEG Compatibility About WMAAbout DivX DivX video compatibilityCleaning Discs Handling DiscsCopyright Storing DiscsBefore Using the DV-SP506 Installing the BatteriesUsing the Remote Controller Open the battery compartment, as shownFront & Rear Panels Front PanelFront & Rear Panels DisplayRear Panel North American modelEuropean model Other modelsSurr Mode switch AV Connector European model onlyHdmi OUT RS 232 North American model onlyRemote Controller ASPECT/ZOOM button 43 Search button 37Memory button Repeat buttonConnecting the DV-SP506 AV Connecting Cables & ConnectorsConnecting the DV-SP506 Using Hdmi to Connect an AV Receiver or HdtvBefore Making Any Connections Choosing a Connection Method Hdmi & the DV-SP506Video Audio FormatsConnection method AV receiverVideo Video Output Audio Input Audio Settings Hdmi Audio Output Settings Hdmi Audio Output setting set to AutoHdmi Audio Output setting set to 6ch DSD or 6ch PCM Hdmi Audio Output setting set to 2ch PCM Hdmi Audio Output setting set to OffAudio format Multichannel*1 Video Settings Hdmi Output SettingVideo output Using Scart European model only Connecting -compatible ComponentsChannel Analog Audio Input If your TV has a SCART-type AV input, you can use aConnecting the Power/Turning on the DV-SP506 Adjusting the Display BrightnessInitial Setup First Time SetupStarting, Pausing & Stopping Playback Playing DiscsPlaying Discs Select Next & Previous track/chapterStop To stop playback, press the Stop ButtonForward Frame-by-Frame Playback Fast Forward & ReverseSlow-motion Playback Navigating DVD & VCD Disc Menus Navigating CDs & Super Audio CDsNavigating MP3, WMA & DivX Discs Viewing a Slideshow of Jpeg Images Advanced Playback Press the Play or EnterButton to start playback Specified title, chapter, or trackAdvanced Playback Searching by TimeTime Specified timeRepeat Playback To cancel random playback, use Random PlaybackRandom button to select Random OffMemory Playback Adding New Items to the ListLast Memory Deleting Items from the ListEditing Items Zooming Selecting Camera AnglesSelecting Soundtracks Selecting SubtitlesDisplaying Information Hdmi and Progressive Settings Setting the HdmiSelecting Progressive or Interlaced Ton to turn on HdmiMenu Setting Description Configuring the DV-SP506Picture LanguageUsing the Onscreen Setup Menus Press the Setup buttonWhen you’ve finished, press Setup button againView Mode Hdmi Output SettingProgressive Setting Picture MenuHD Resolution HD Jpeg ModePAL Output Setting Not North American model Video Black LevelScart Output Setting European model only Audio MenuHdmi Audio Out Digital Audio OutCenter Delay and Surr. Delay Linear PCM OutSpeaker Configuration Dolby Pro Logic Setting Sacd Audio SetupDownmix Setting Test ToneLanguage Menu On-Screen LanguageDisc Menu Language Audio LanguageUse this list when specifying other languages DivX Subtitle Not North American modelOperation Setting Menu Display MenuDVD Priority Contents Sacd Priority ContentsChange the Security Code Hdmi ControlInitial Setup Menu Power ControlAuto power off Direct ChangeDisc Content Organization Additional informationInitializing the DV-SP506 DVD-Video regionsGlossary Mpeg video PBC PlayBack Control Video CD onlyPCM Pulse Code Modulation Progressive scan videoTroubleshooting Symptom Possible cause RemedyTroubleshooting No Sound from the Hdmi OUT?Functions don’t Work?Restoring the Default Settings Rihd doesn’t work?Hdmi Status Mode No picture from the Hdmi connectionDisplayed ID Message No sound from the Hdmi connectionSpecifications GeneralOnkyo Europe Electronics GmbH Onkyo Europe UK Office
Related manuals
Manual 16 pages 38.85 Kb