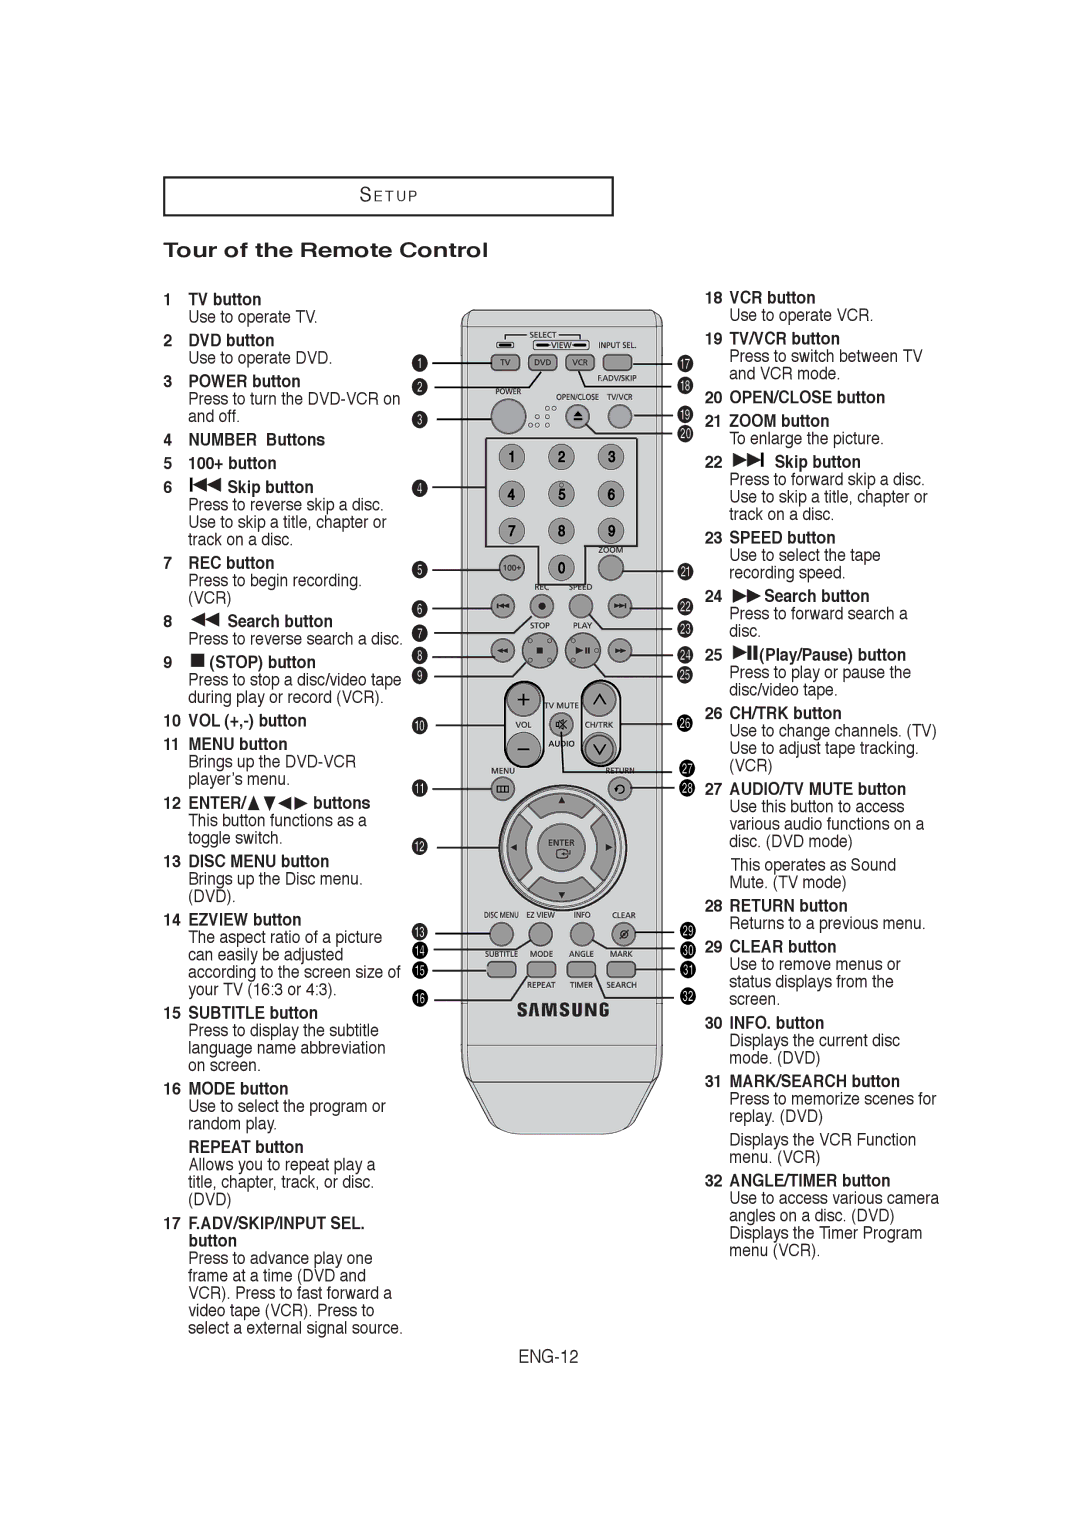
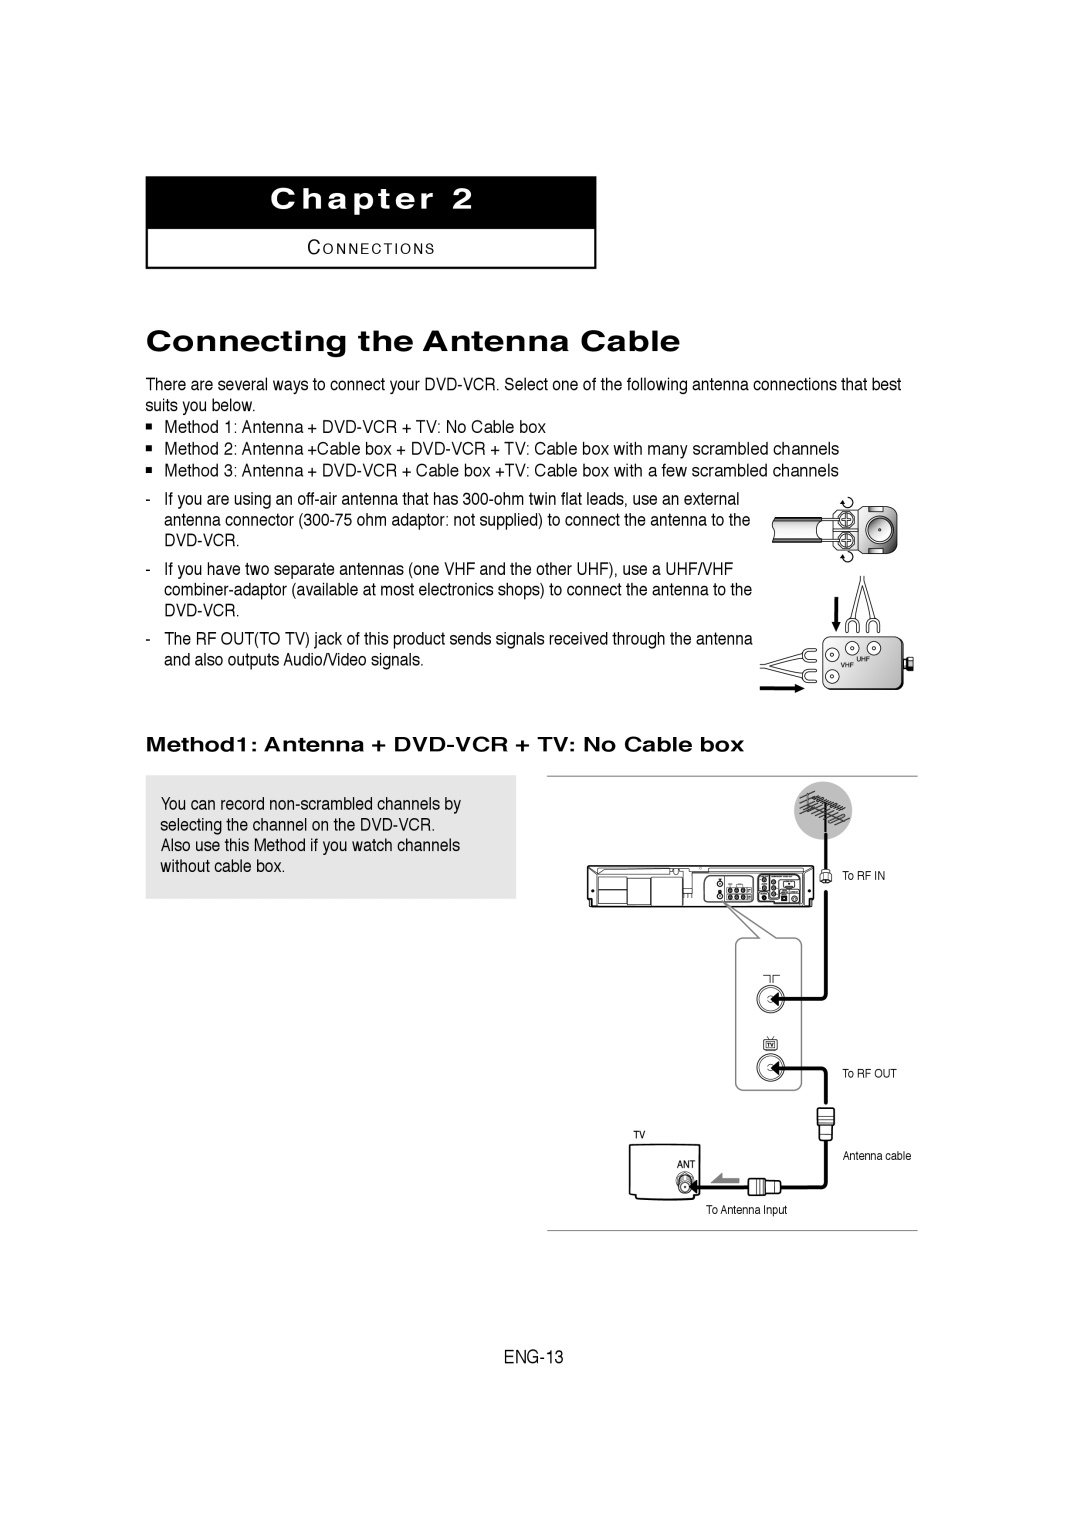
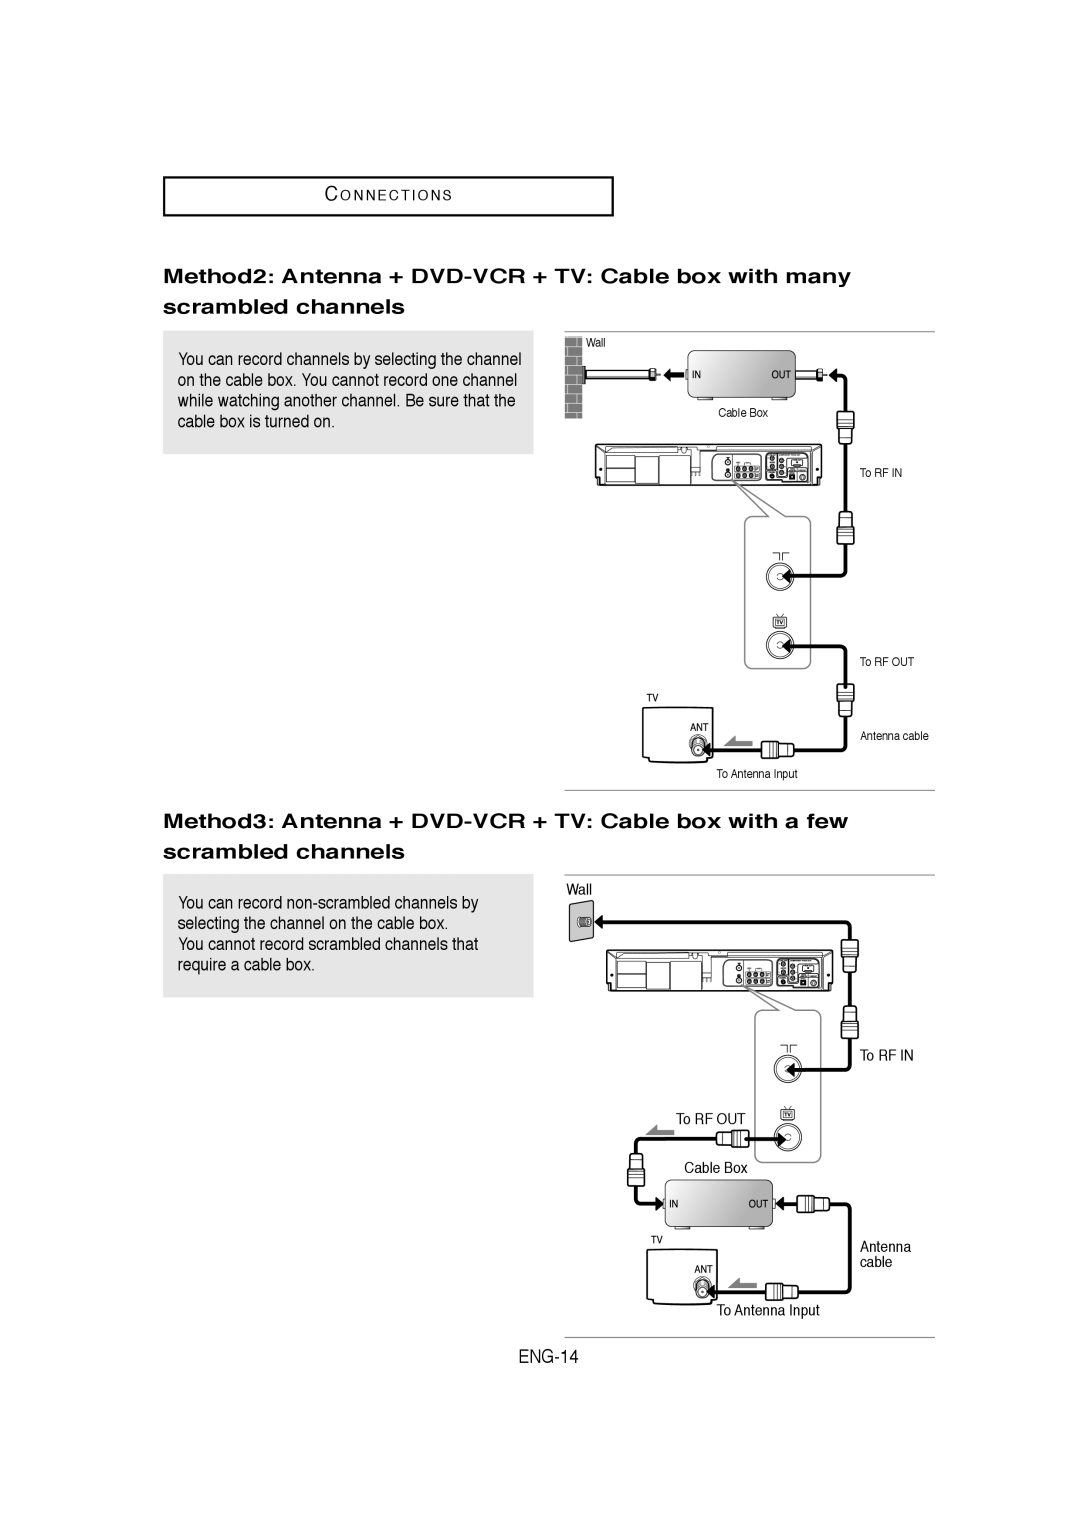
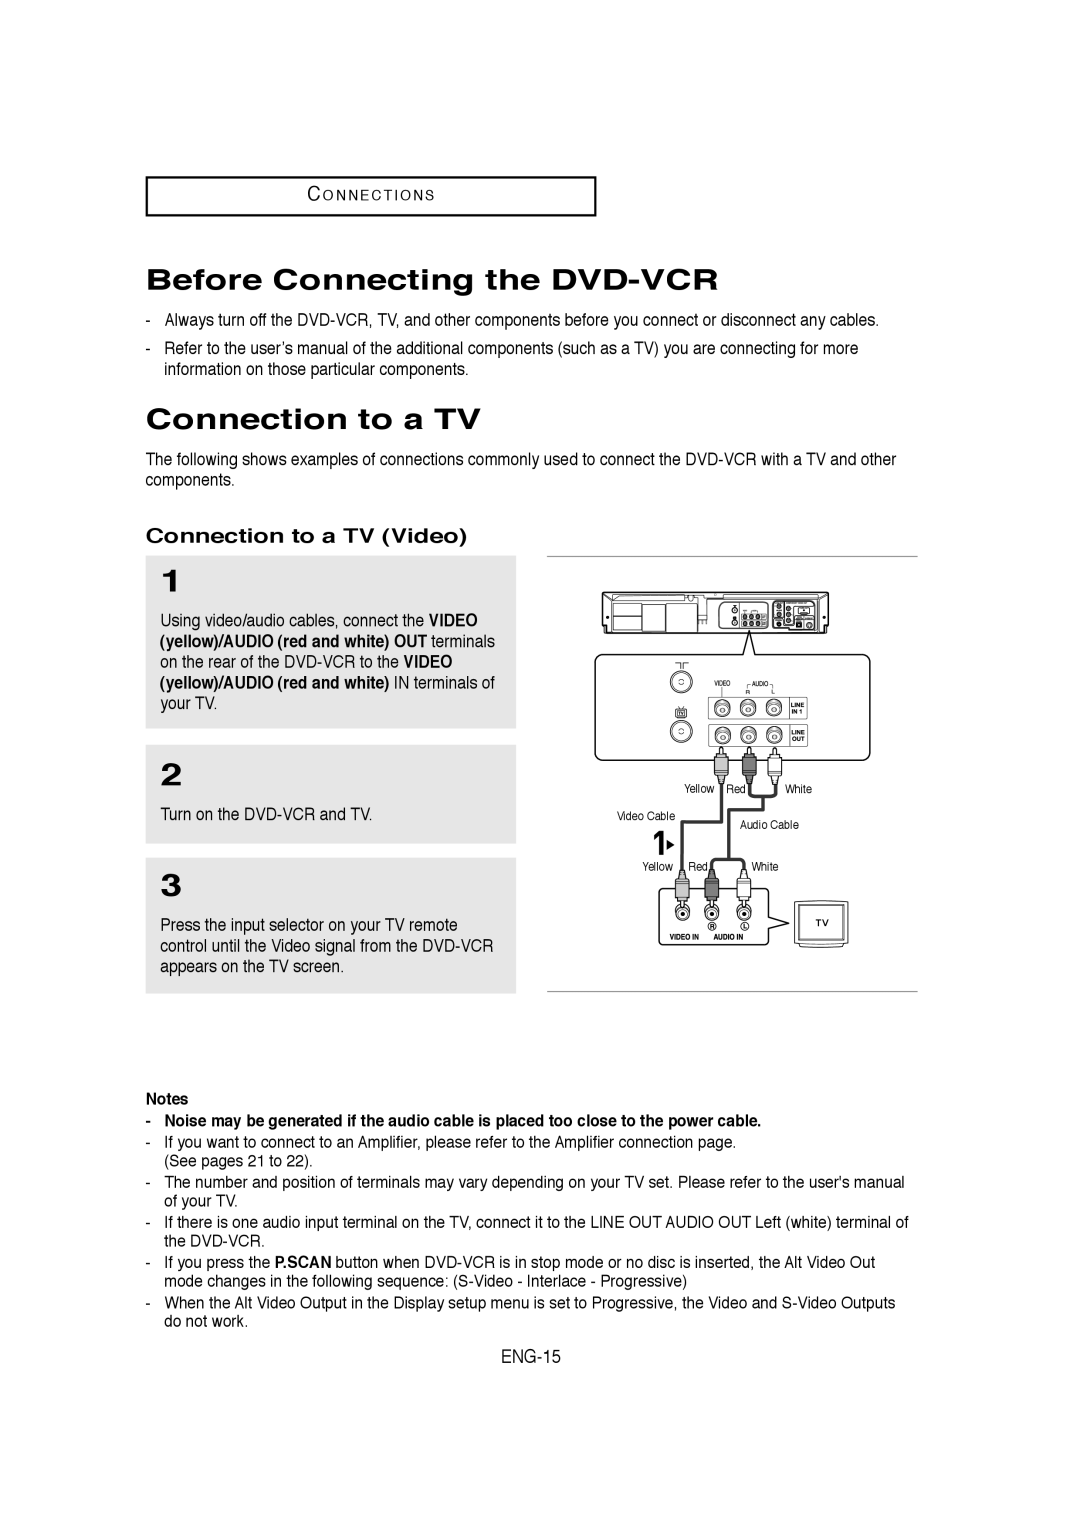
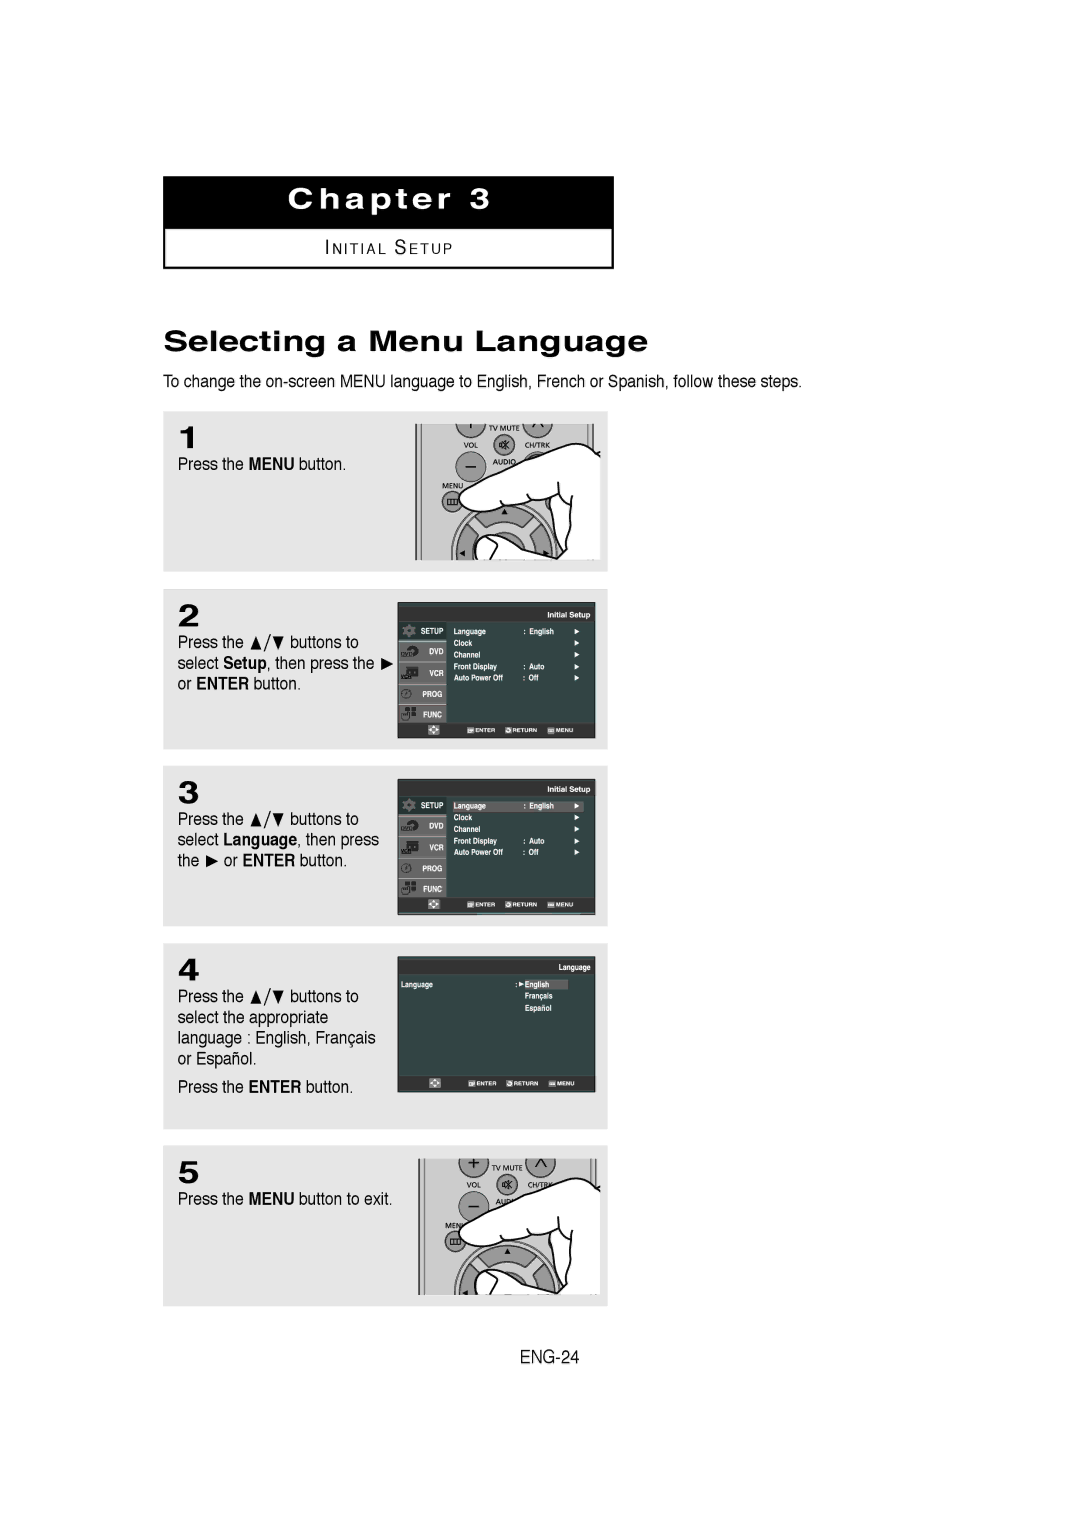
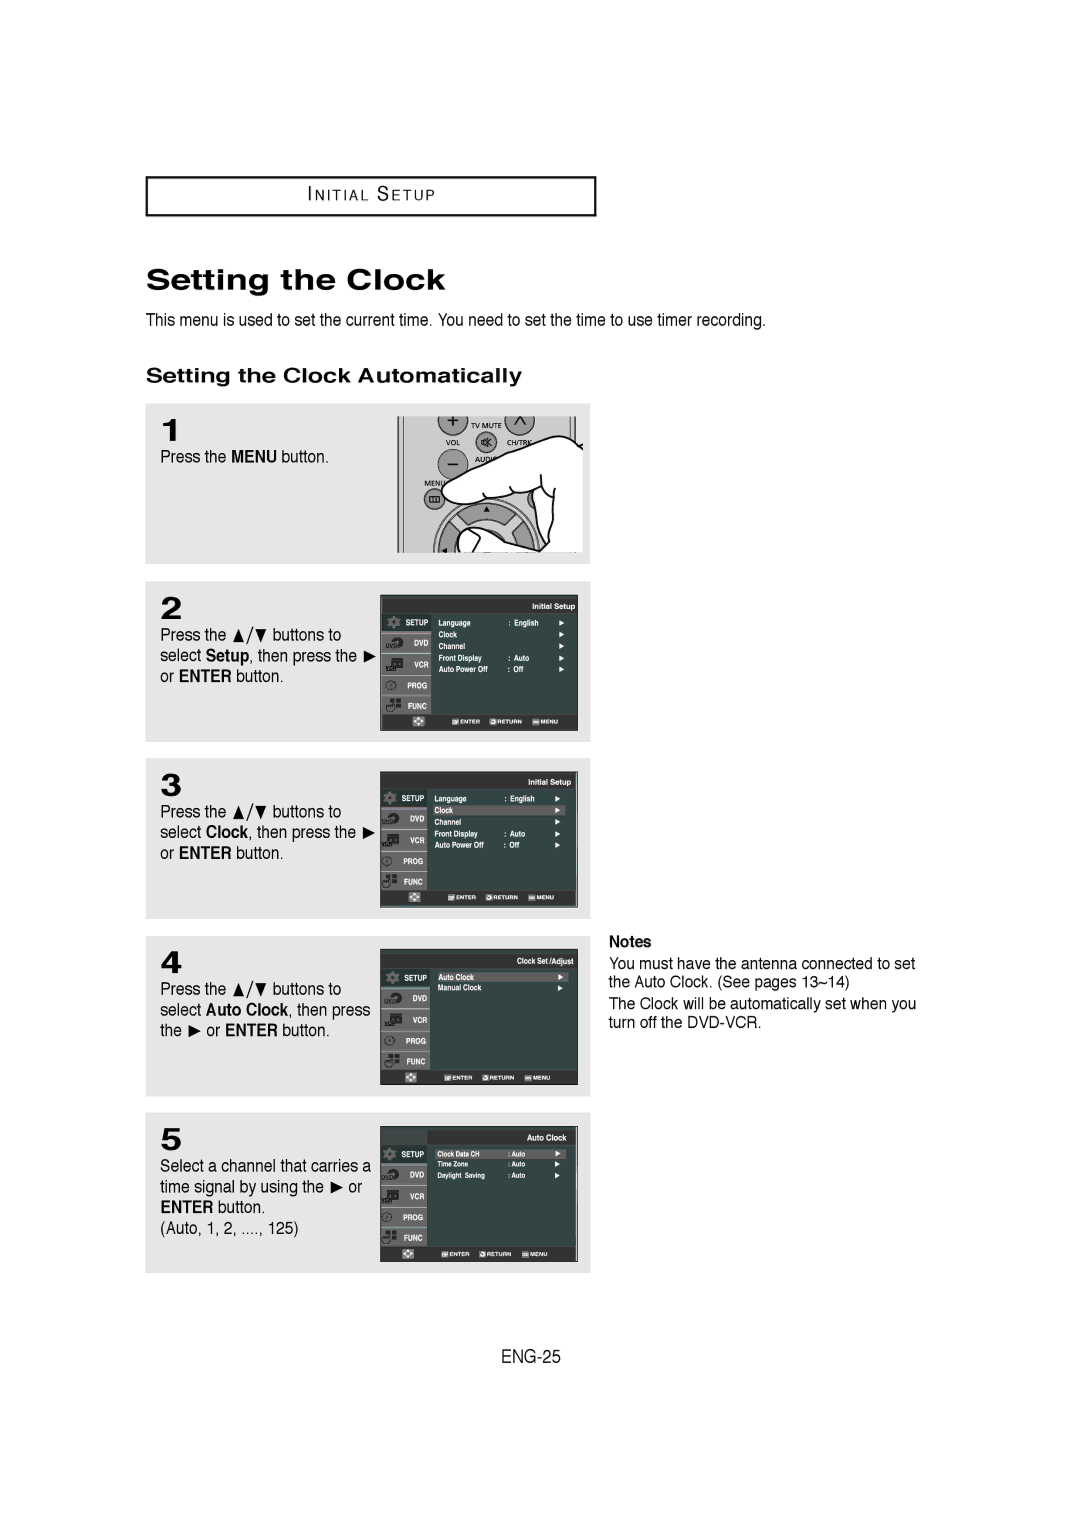
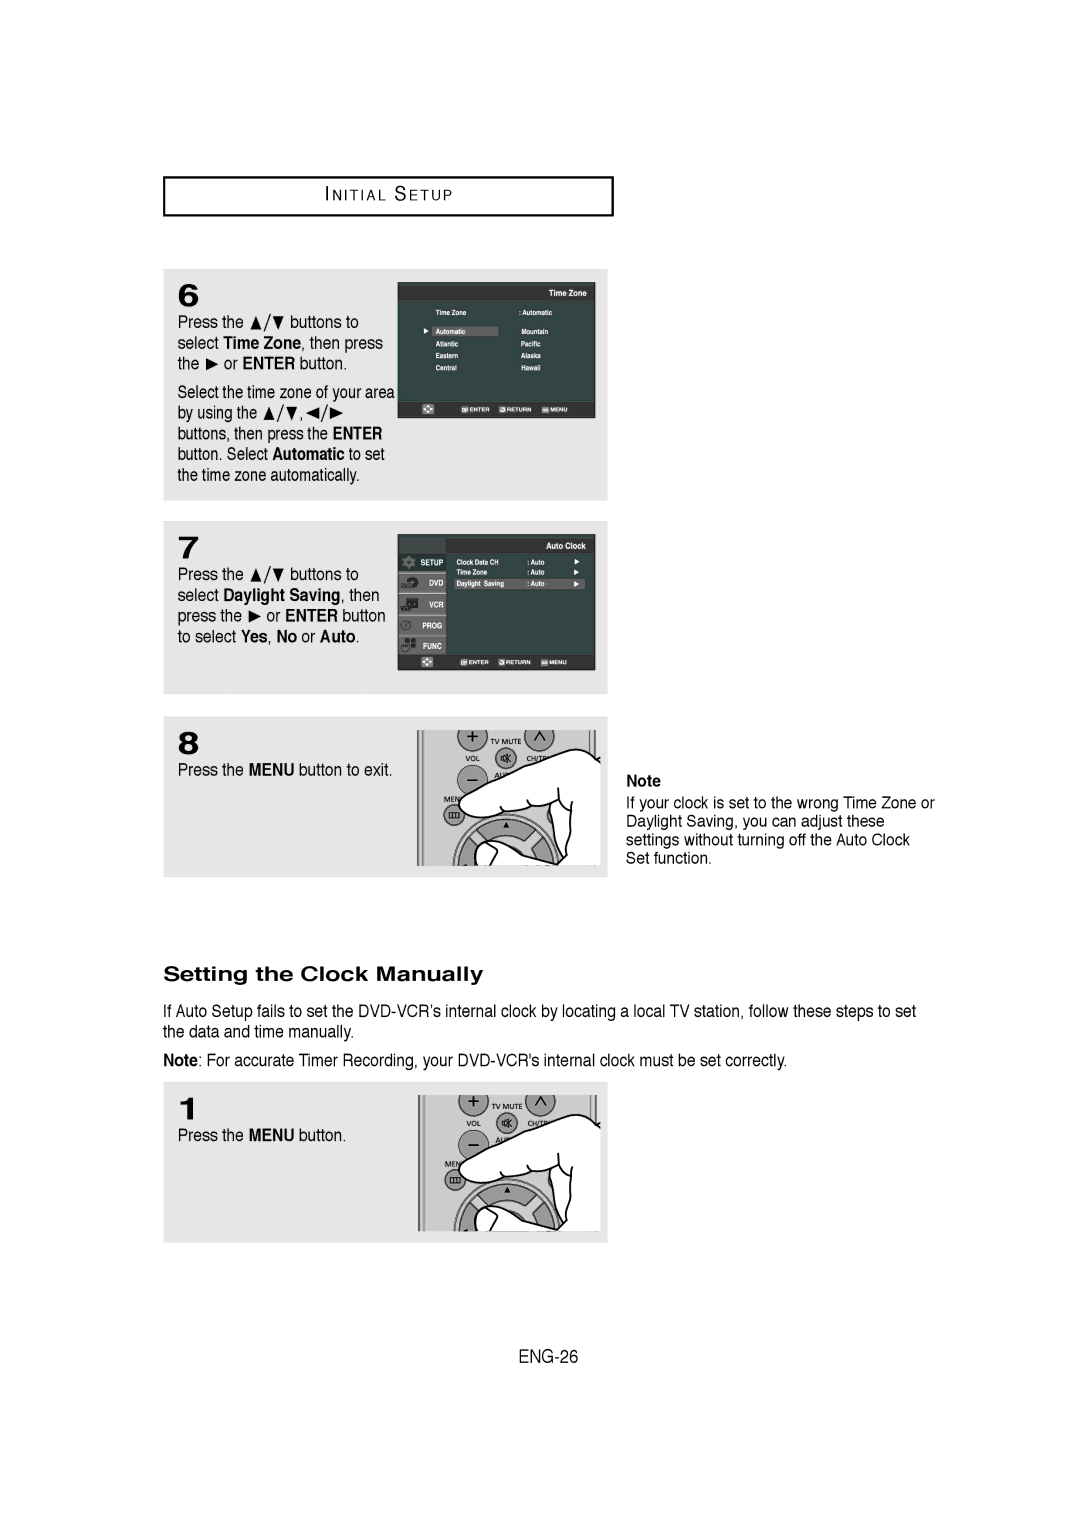
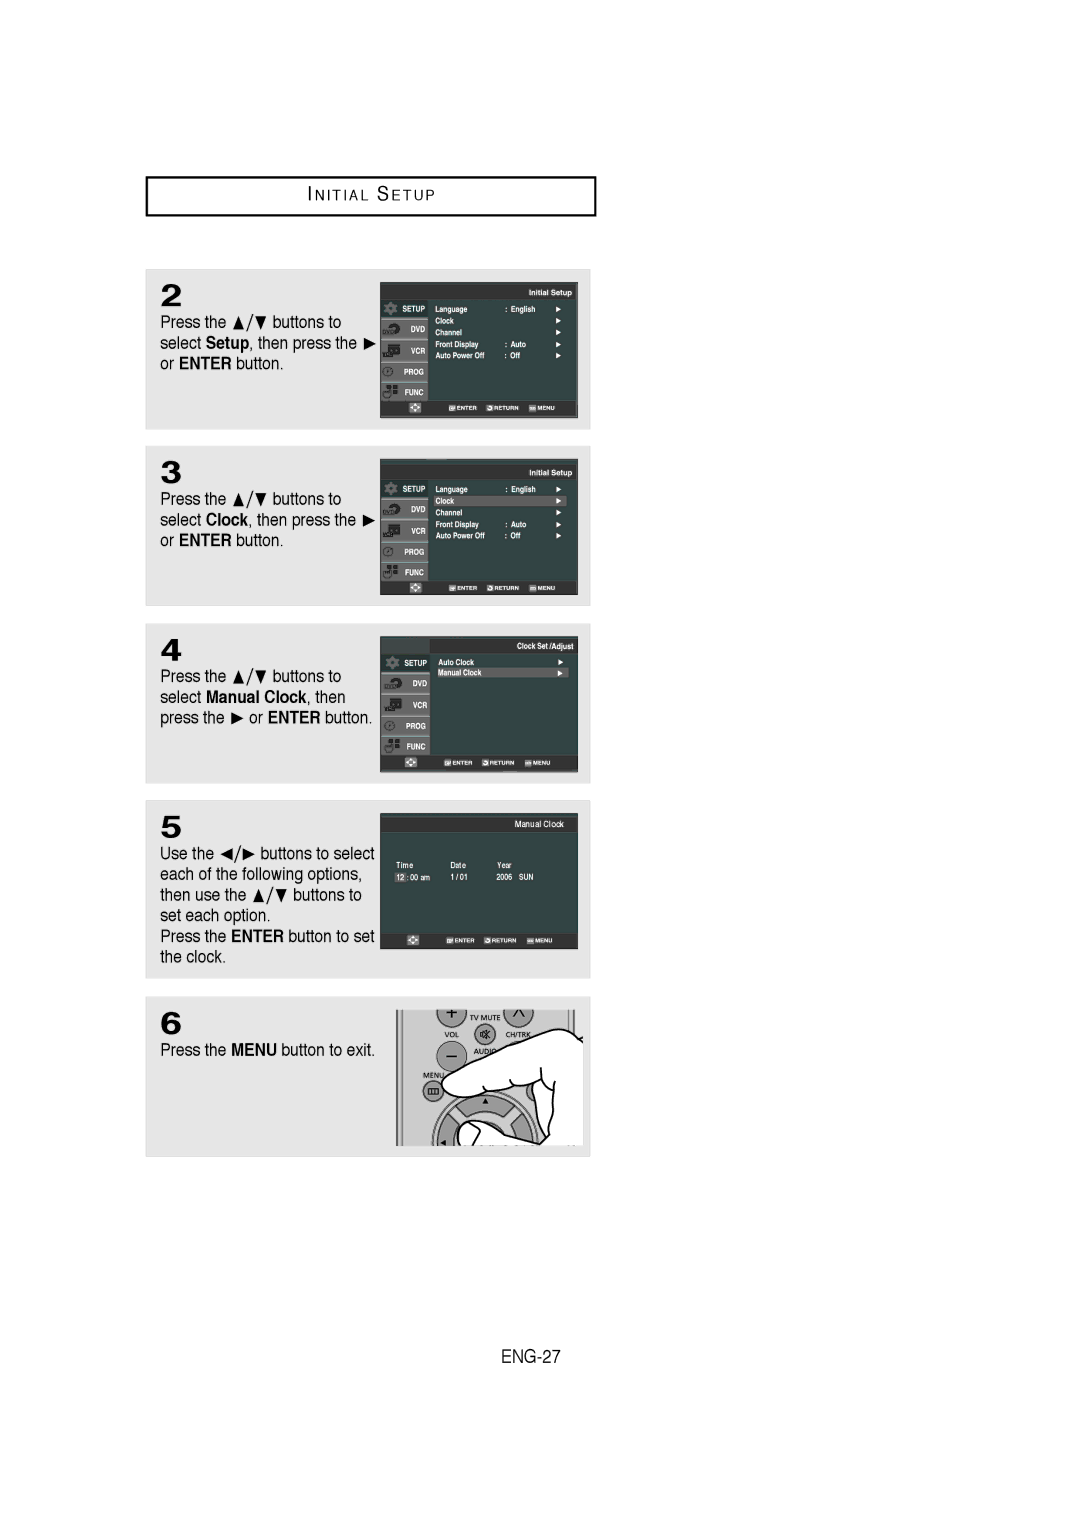
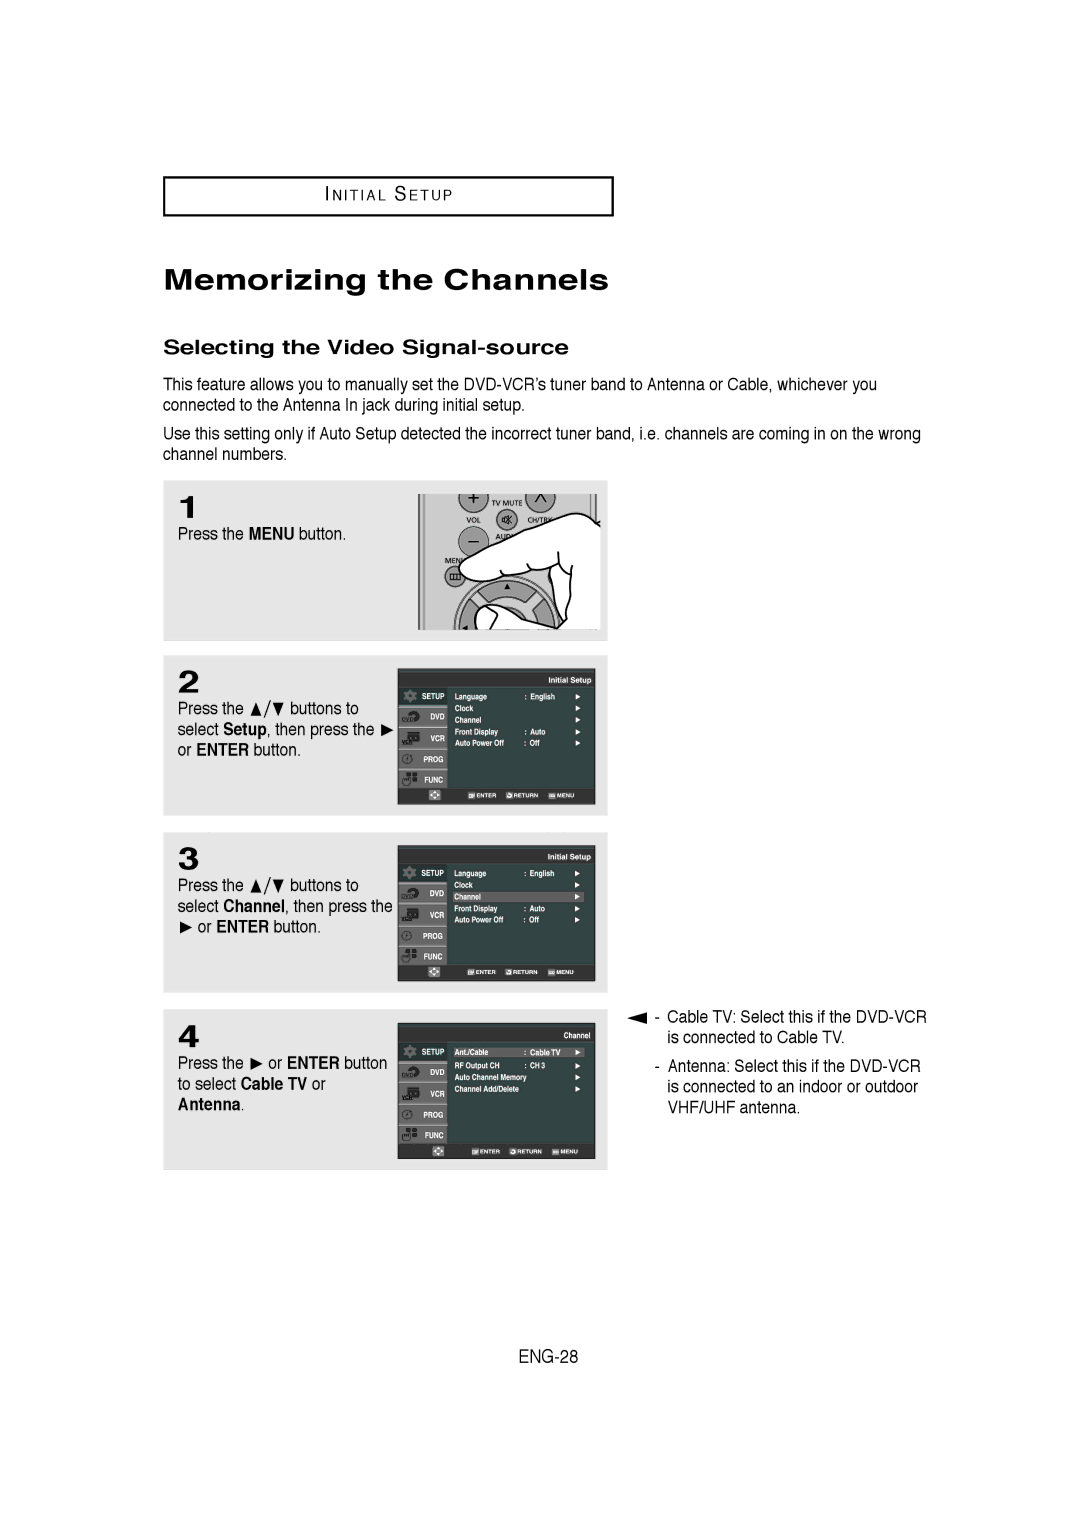
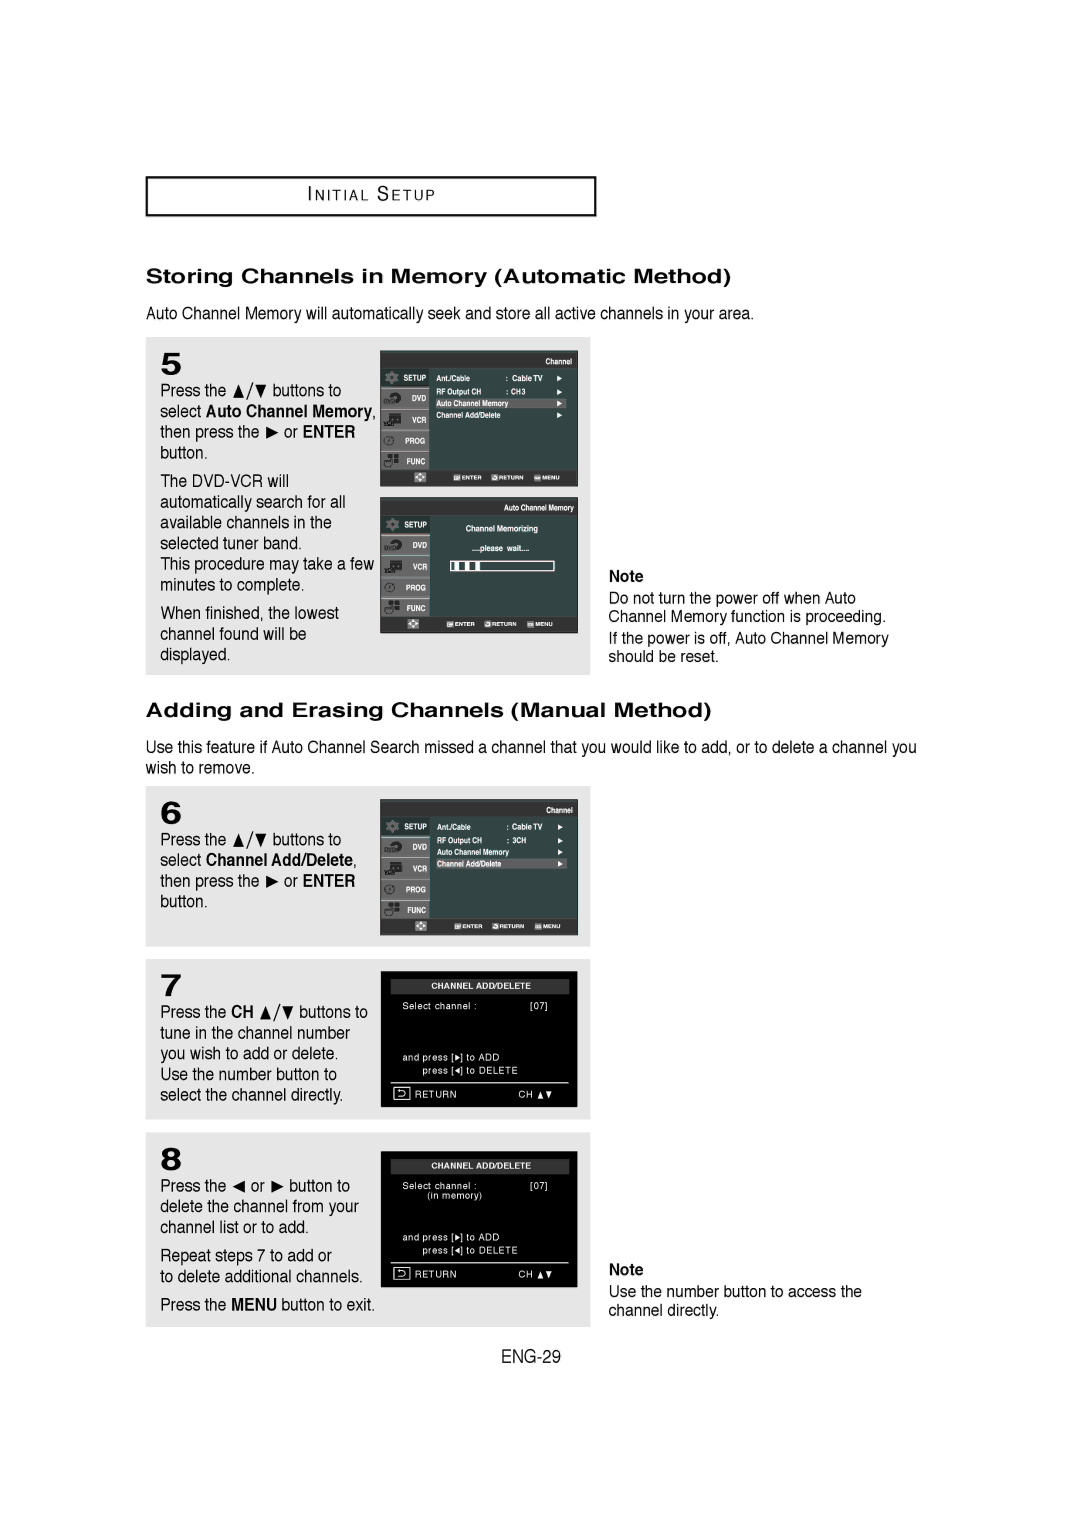
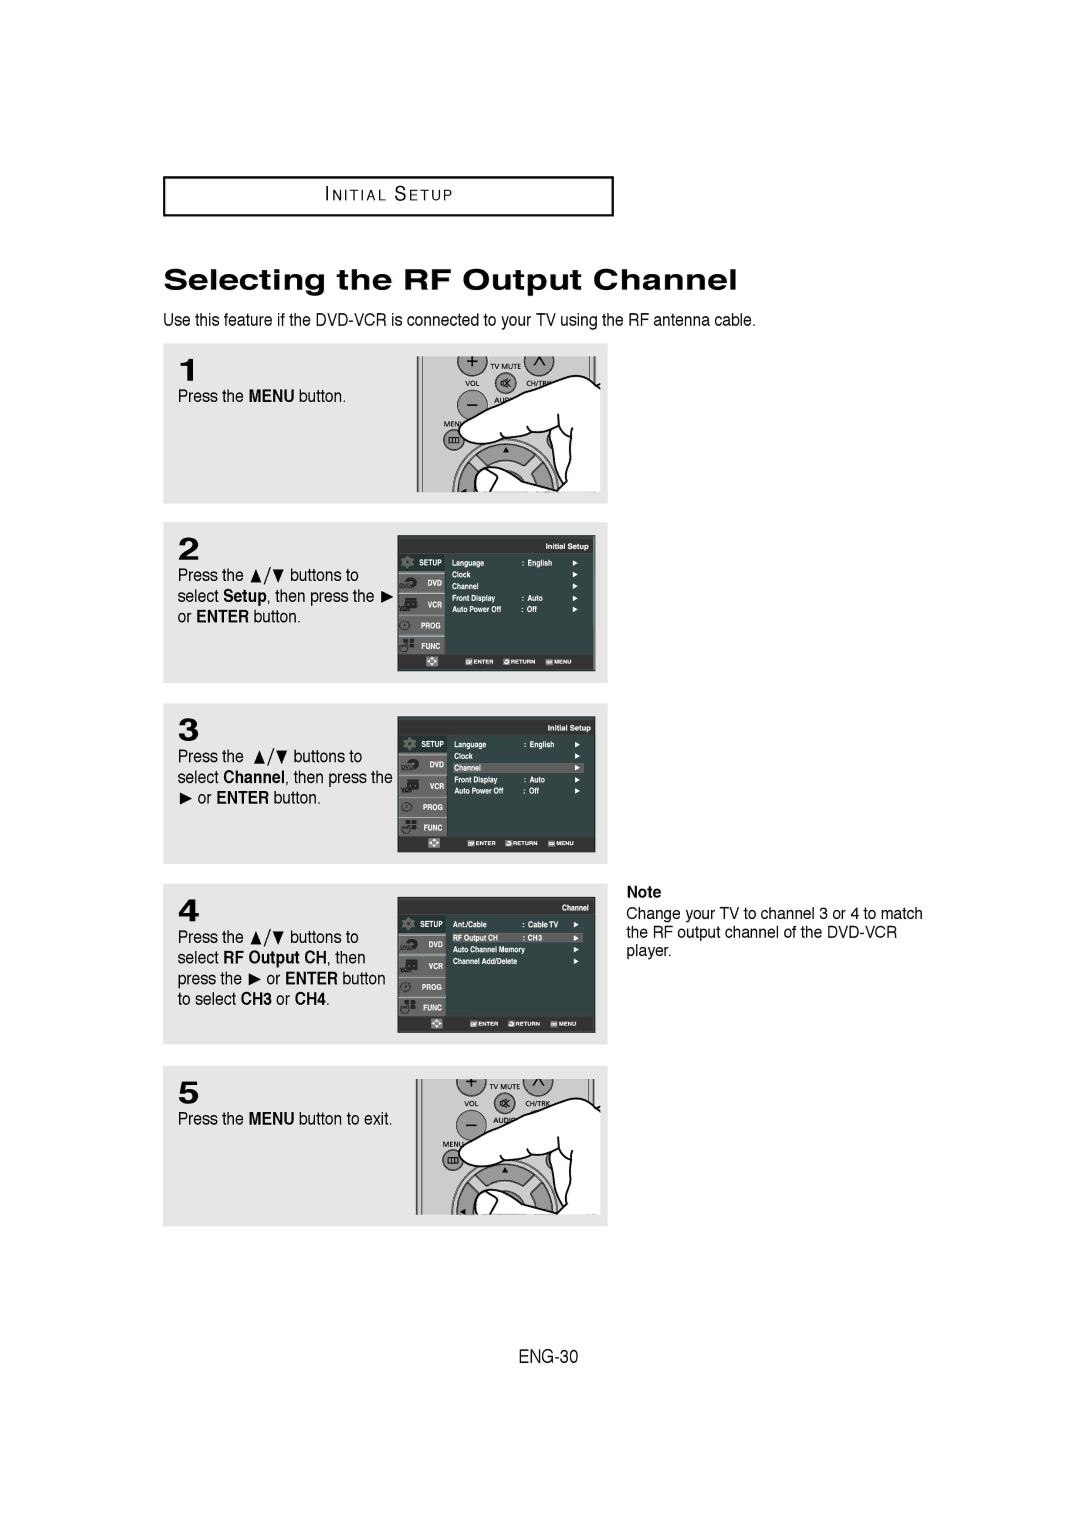
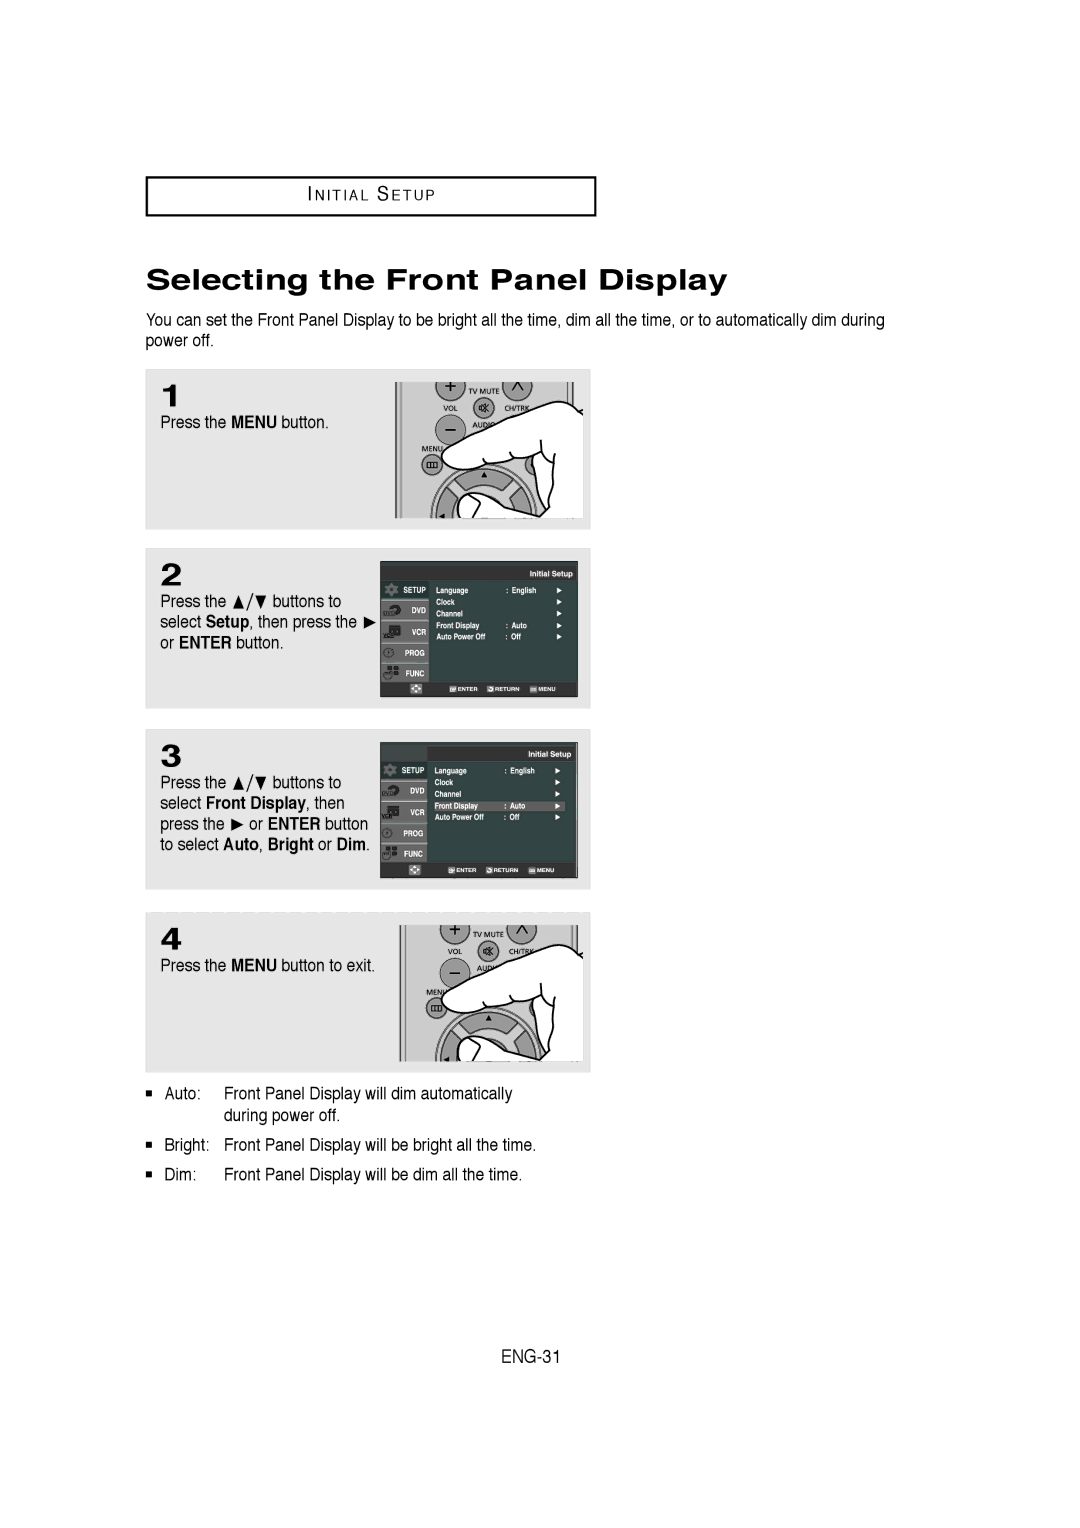
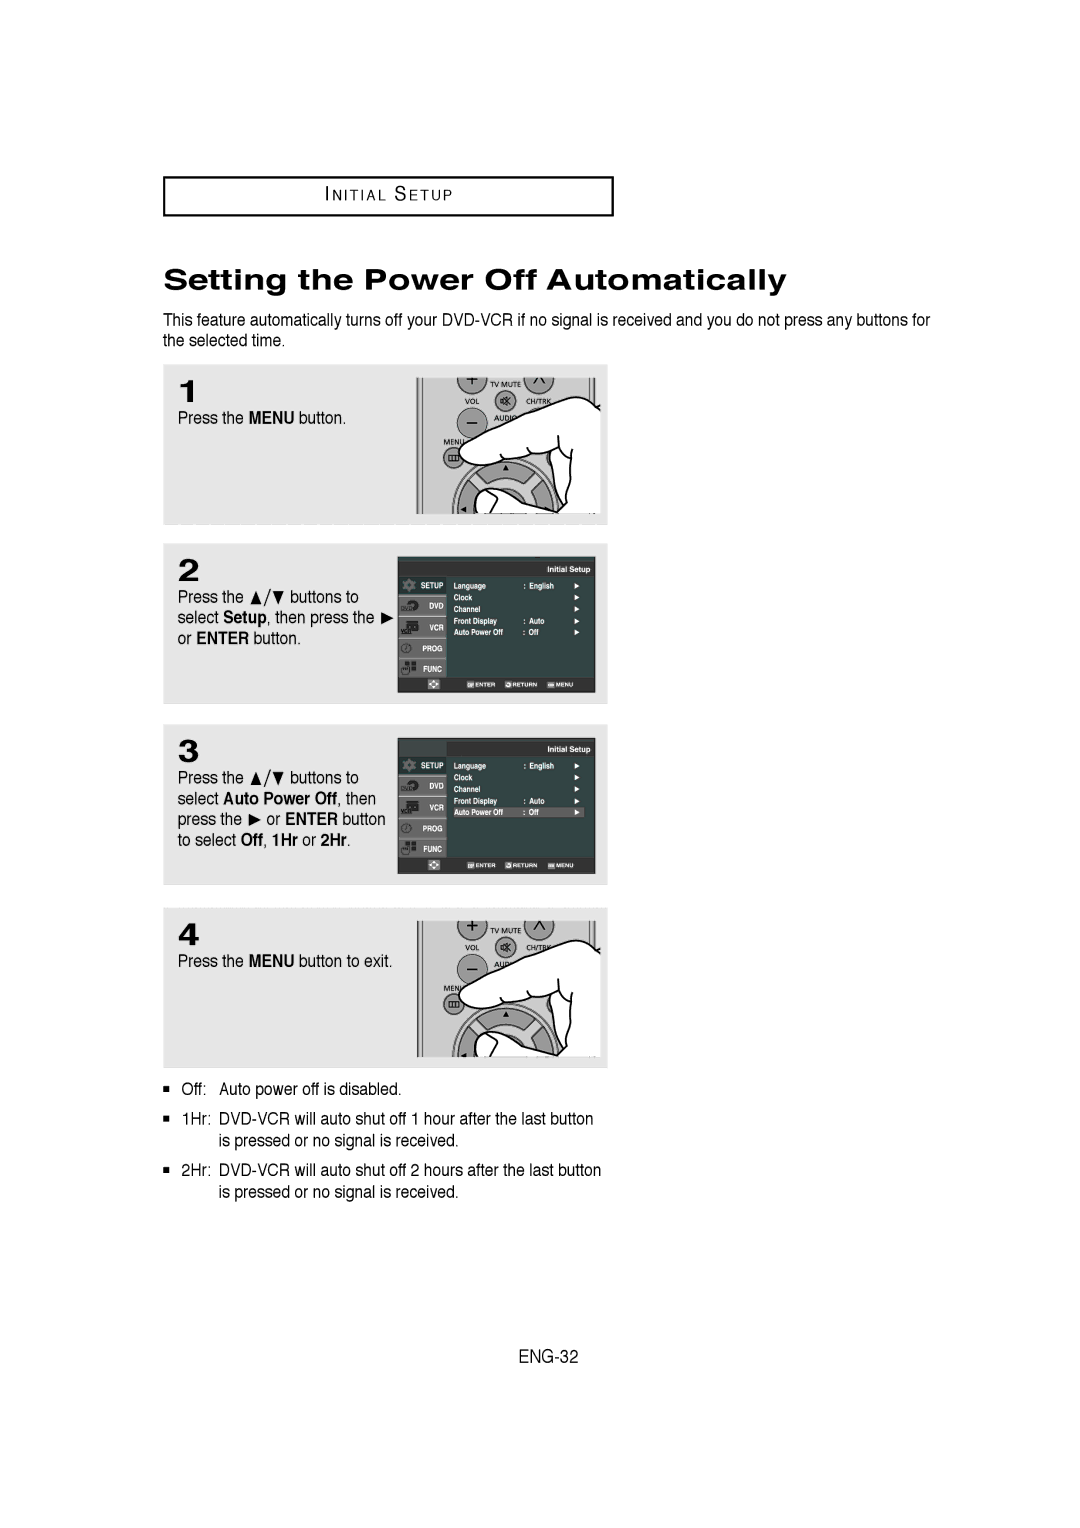
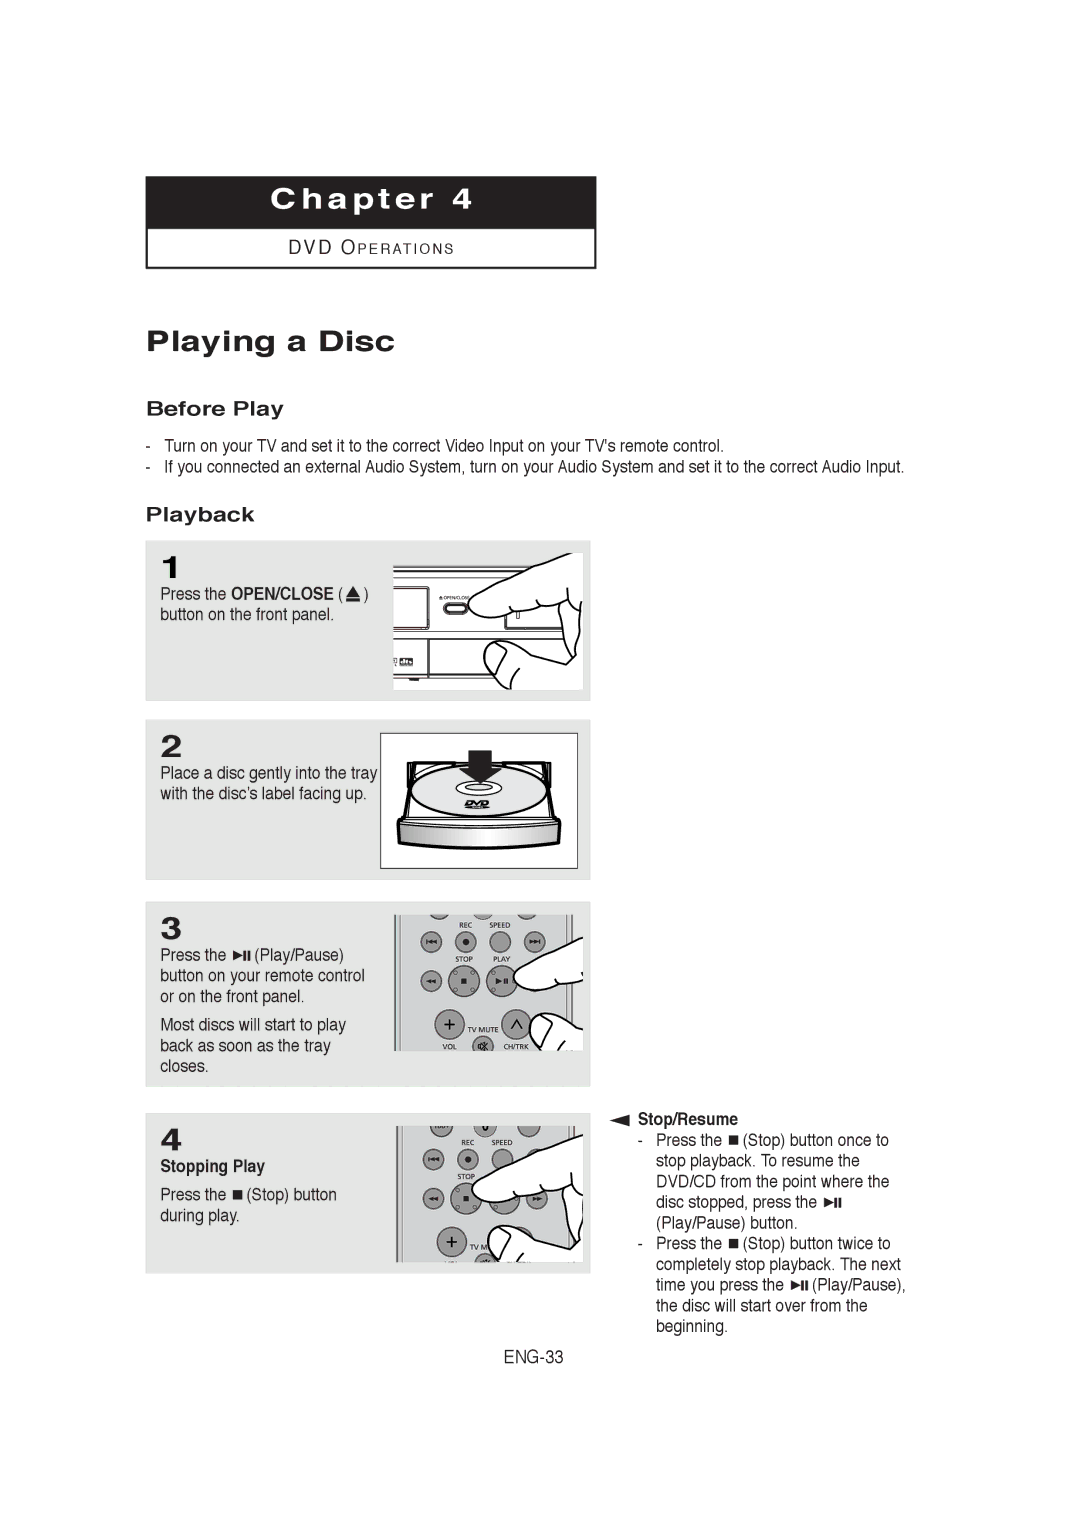
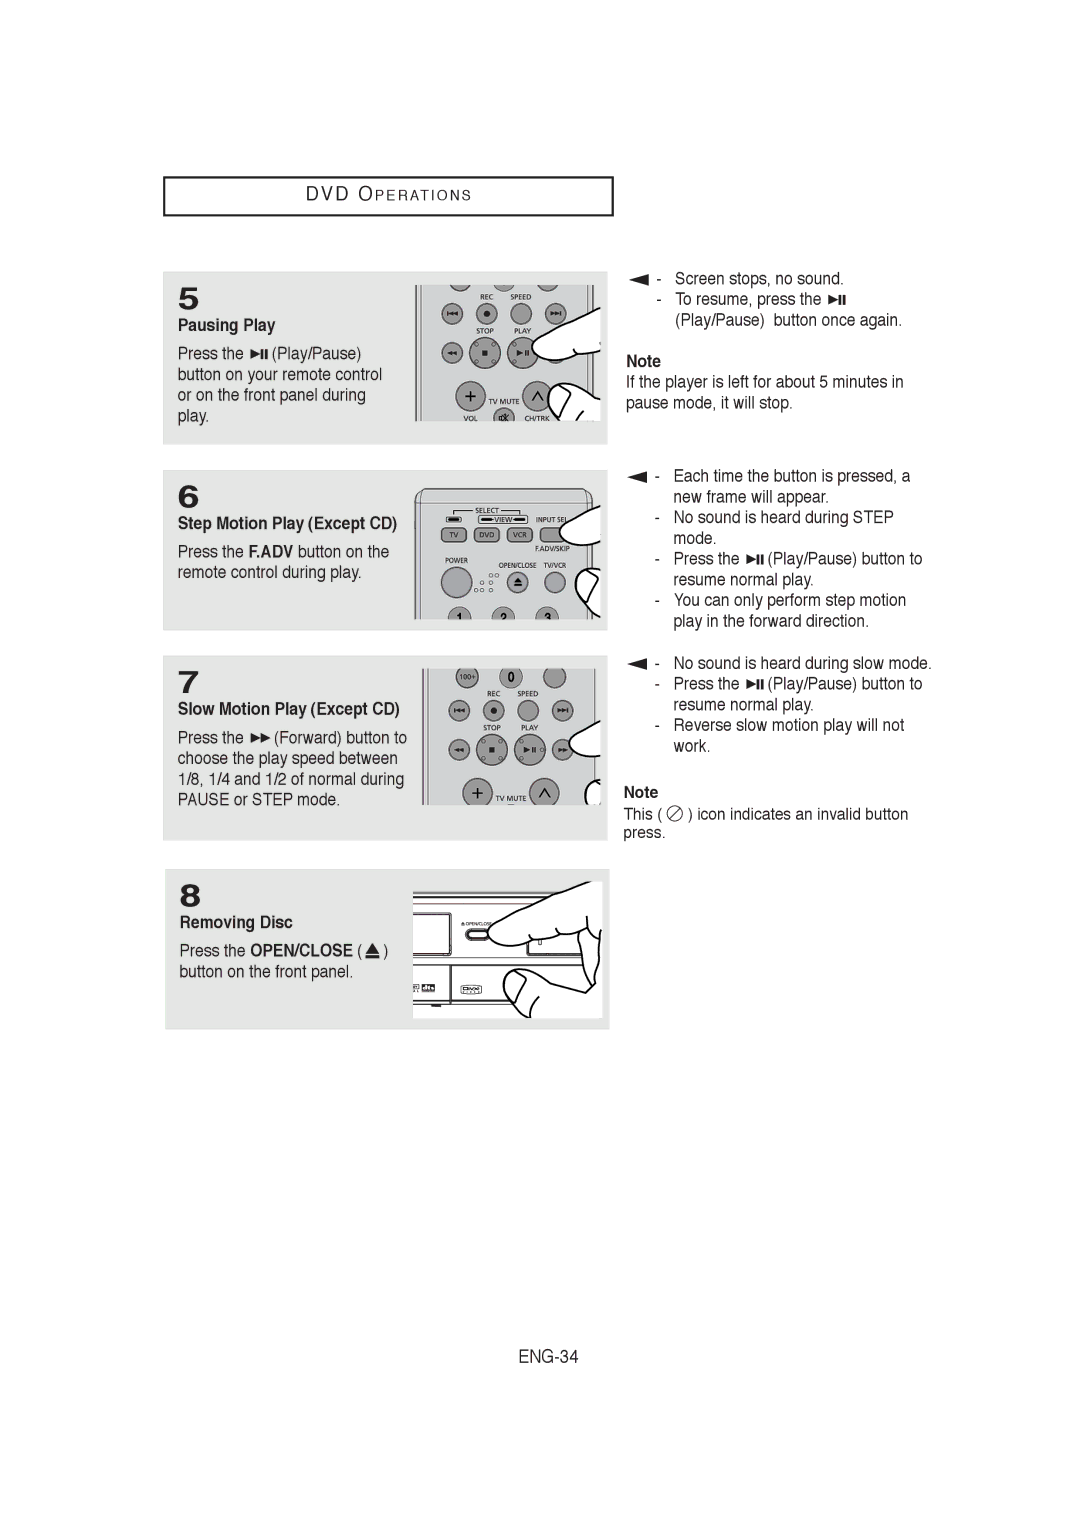
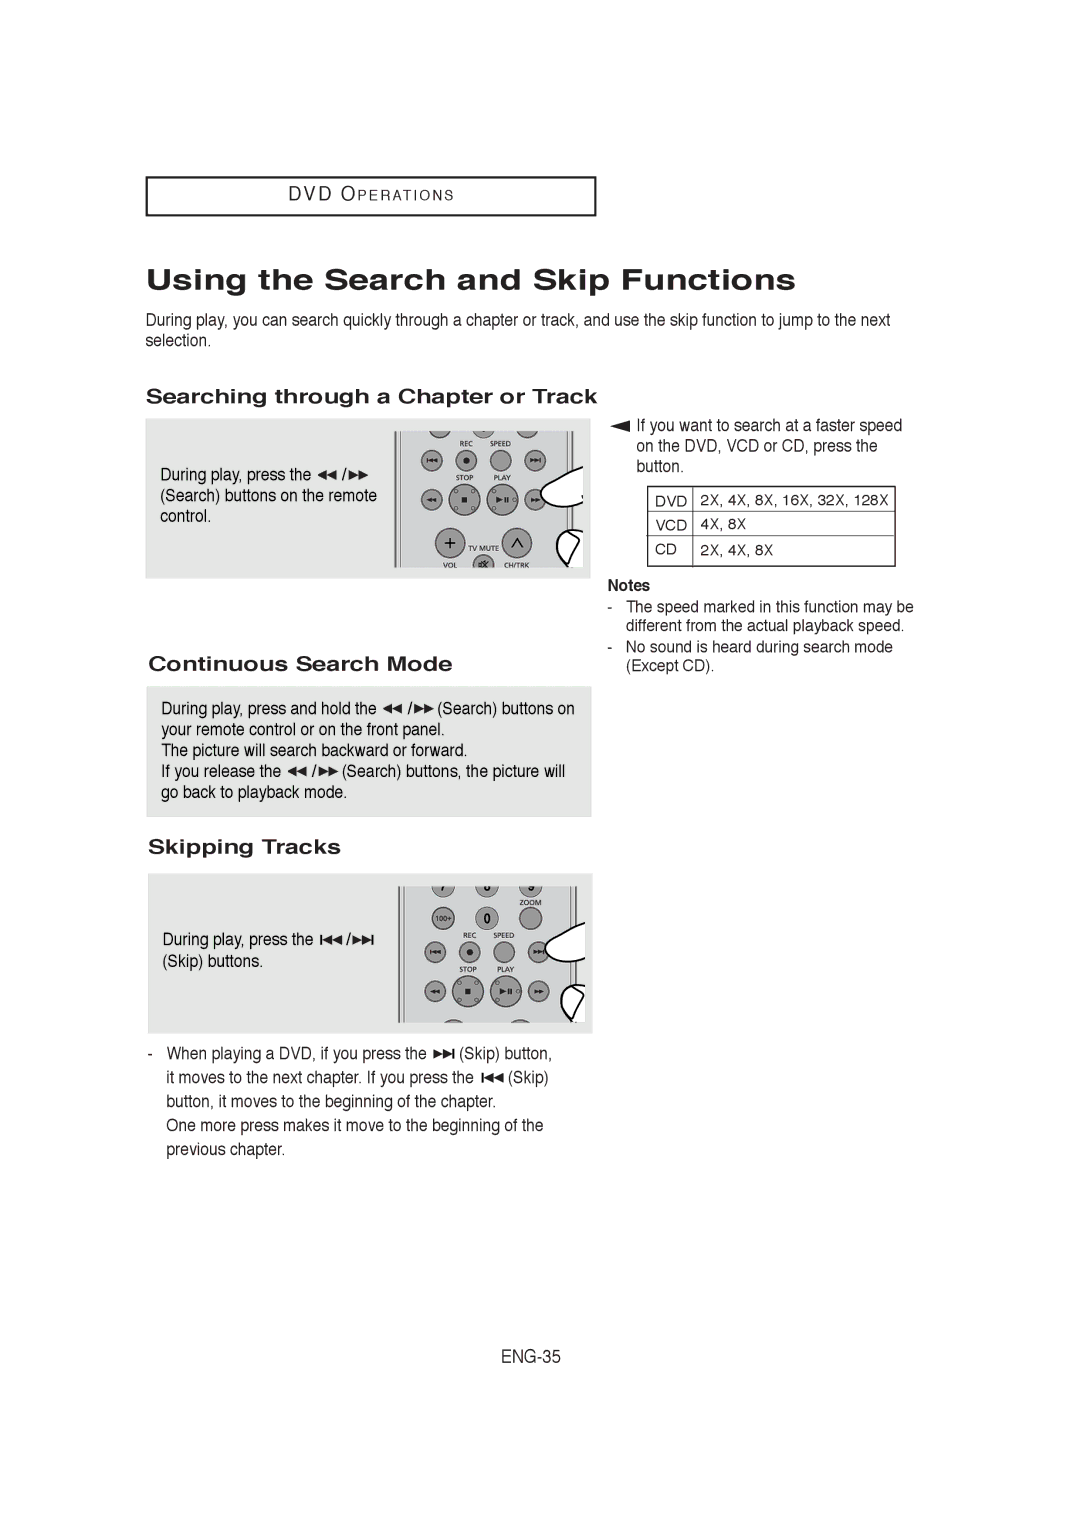
Samsung 00956L, V9650-XAC Connection to a TV with Hdmi Jack, ENG-19, Hdmi Video Specifications

Page 19

C O N N E C T I O N S

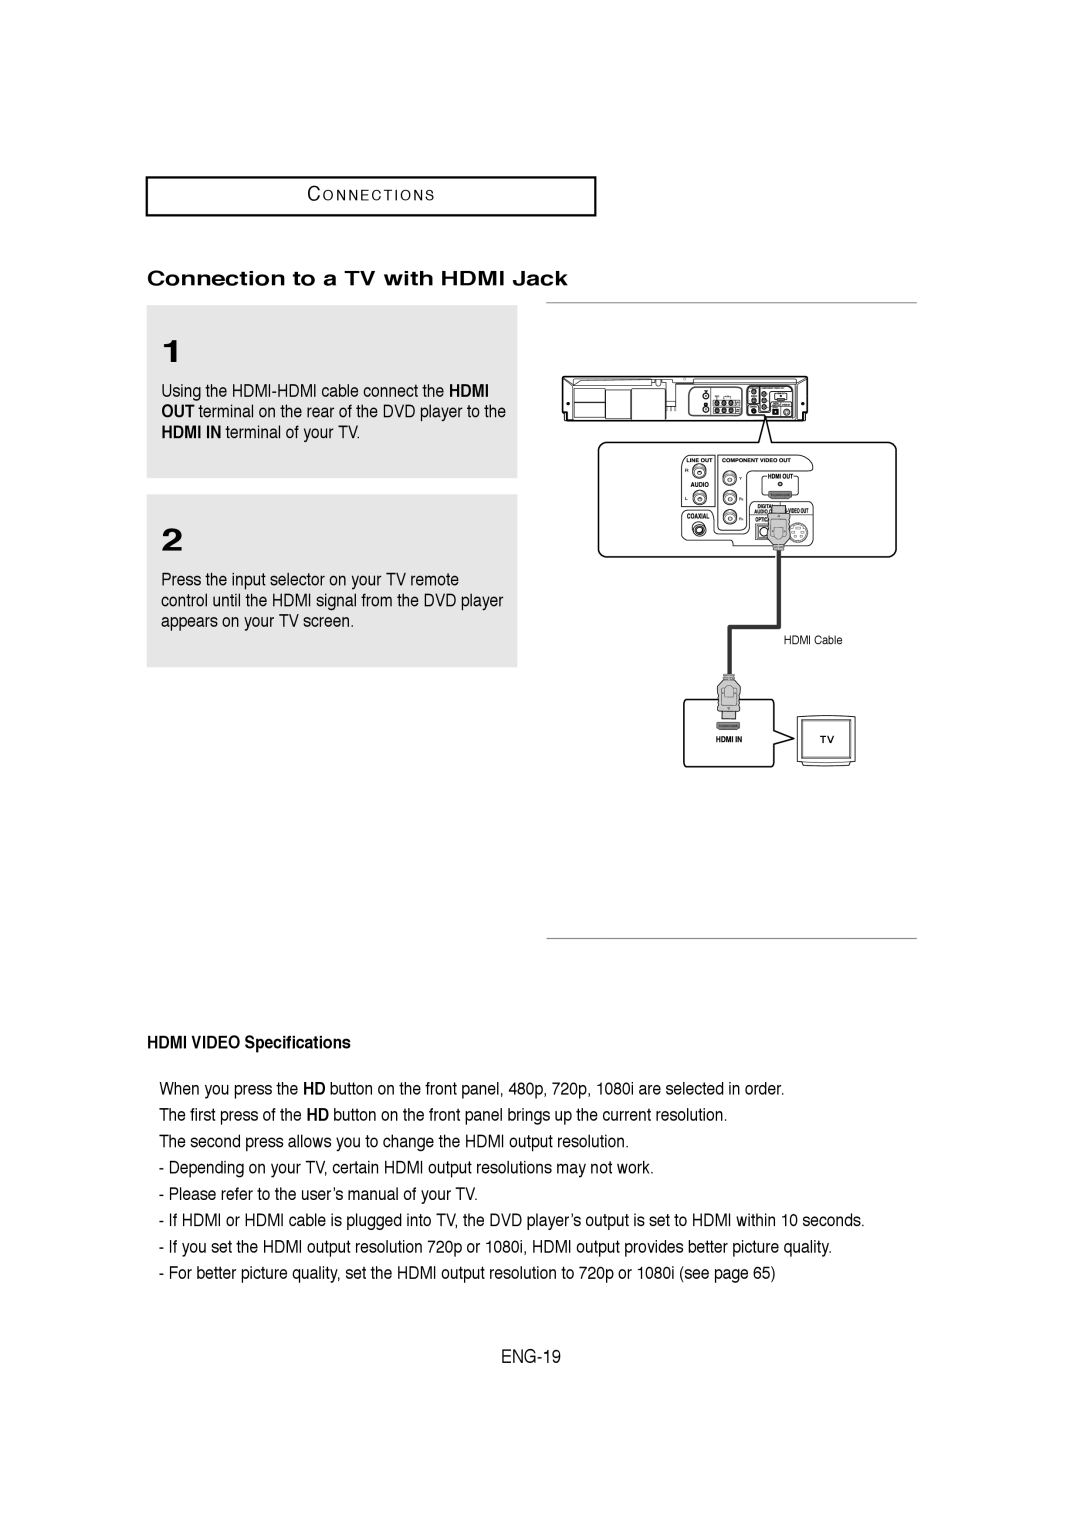
Connection to a TV with HDMI Jack

1

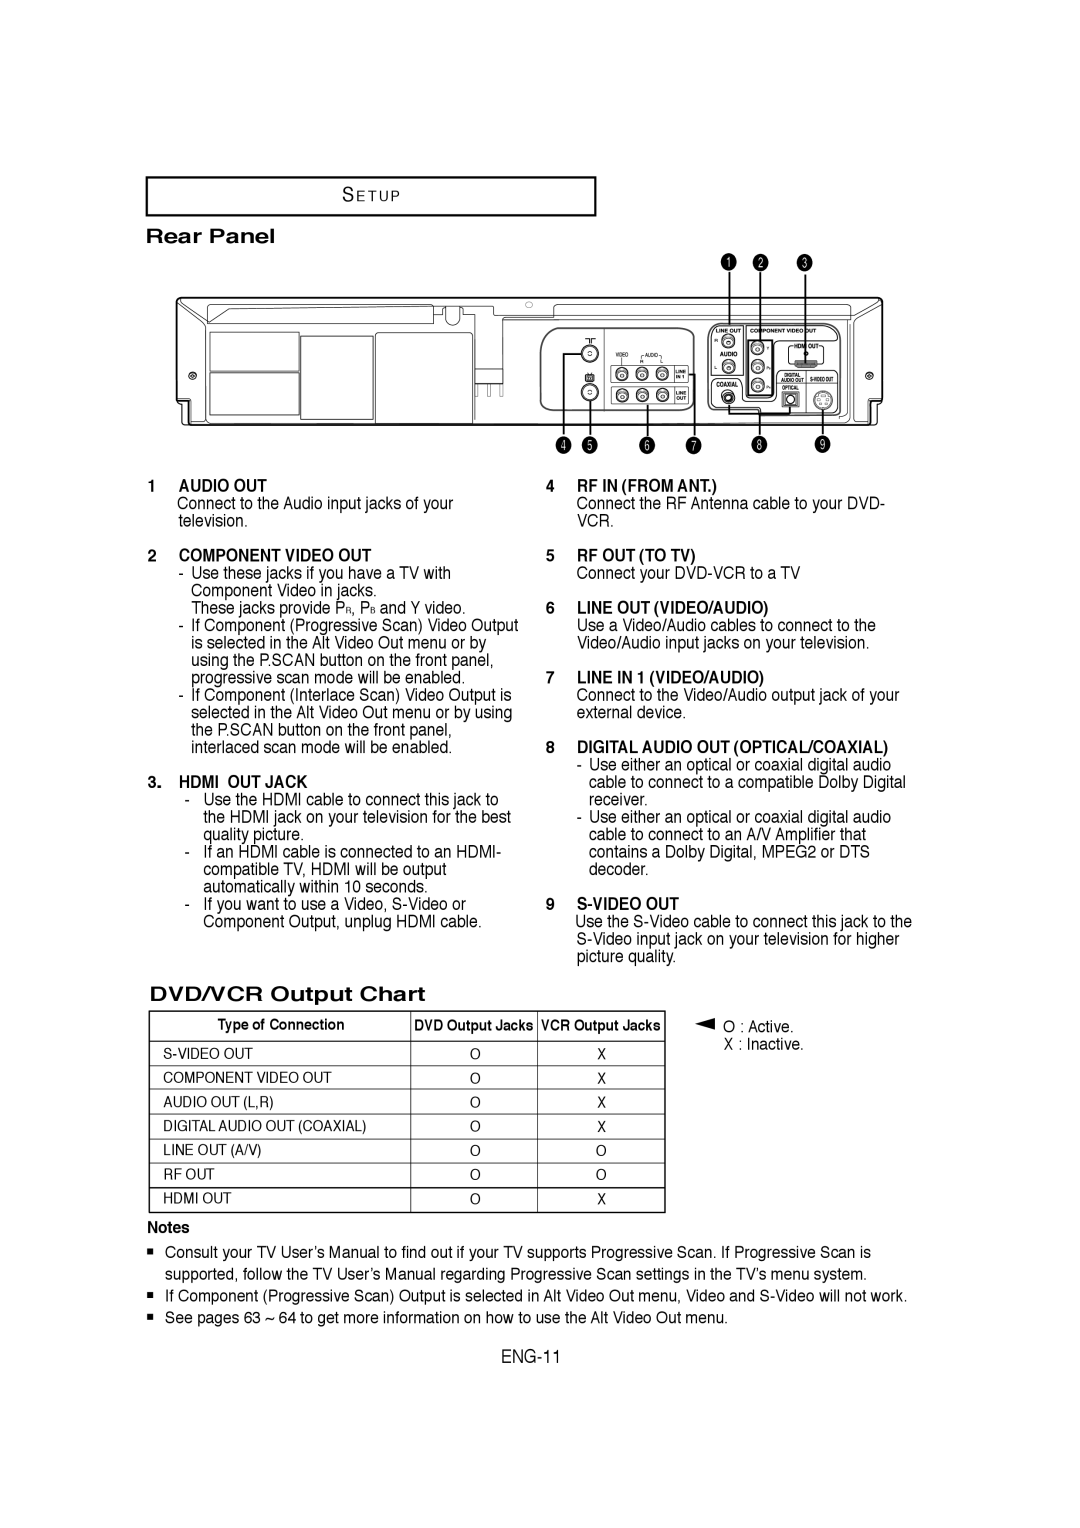
Using the HDMI-HDMI cable connect the HDMI

OUT terminal on the rear of the DVD player to the

HDMI IN terminal of your TV.

2

Press the input selector on your TV remote control until the HDMI signal from the DVD player appears on your TV screen.

HDMI VIDEO Specifications

HDMI Cable

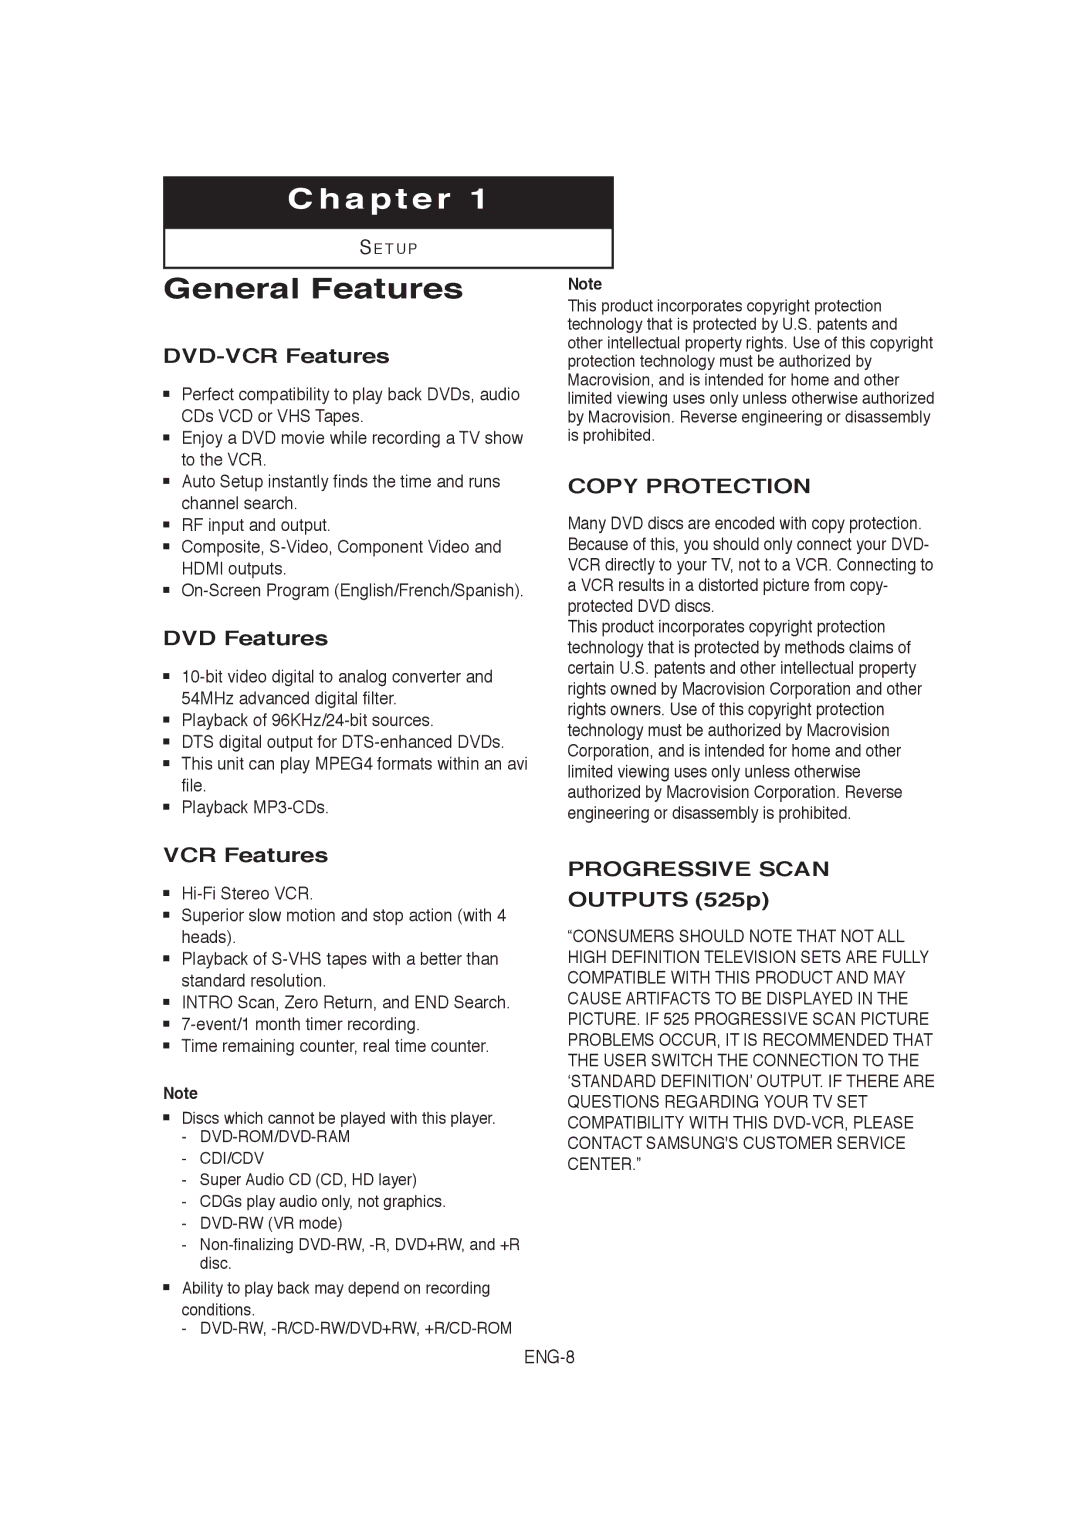
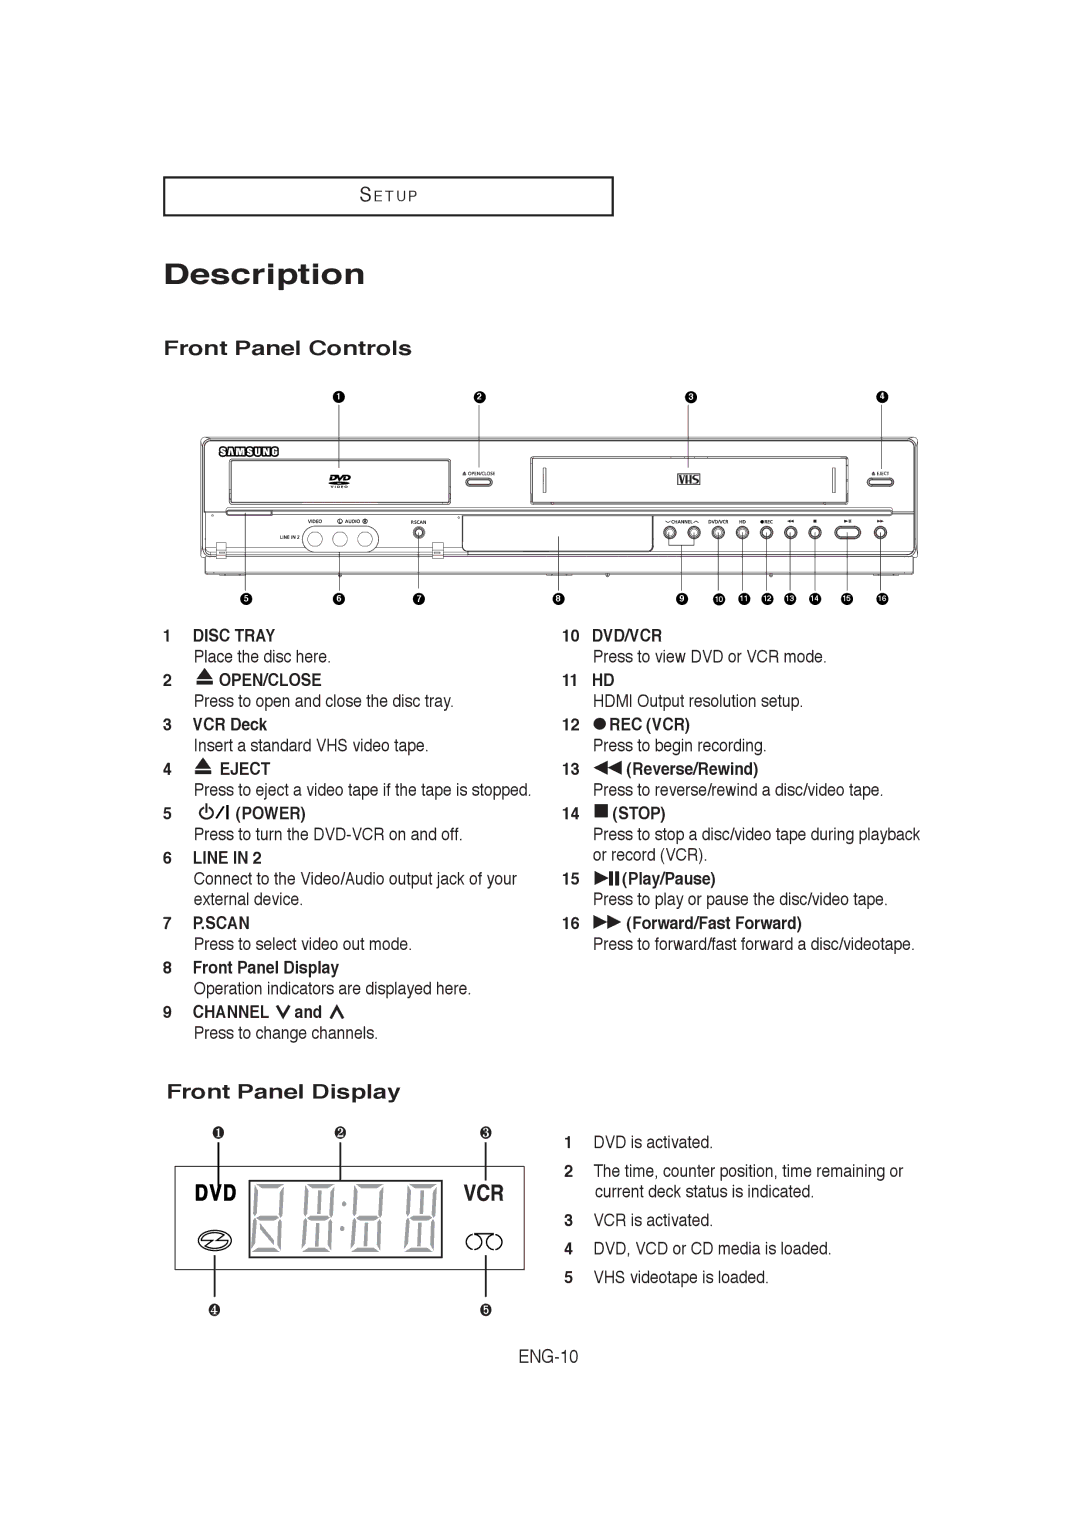
When you press the HD button on the front panel, 480p, 720p, 1080i are selected in order. The first press of the HD button on the front panel brings up the current resolution.

The second press allows you to change the HDMI output resolution.

-Depending on your TV, certain HDMI output resolutions may not work.

-Please refer to the user’s manual of your TV.

-If HDMI or HDMI cable is plugged into TV, the DVD player’s output is set to HDMI within 10 seconds.

-If you set the HDMI output resolution 720p or 1080i, HDMI output provides better picture quality.

-For better picture quality, set the HDMI output resolution to 720p or 1080i (see page 65)
ENG-19

Image 19
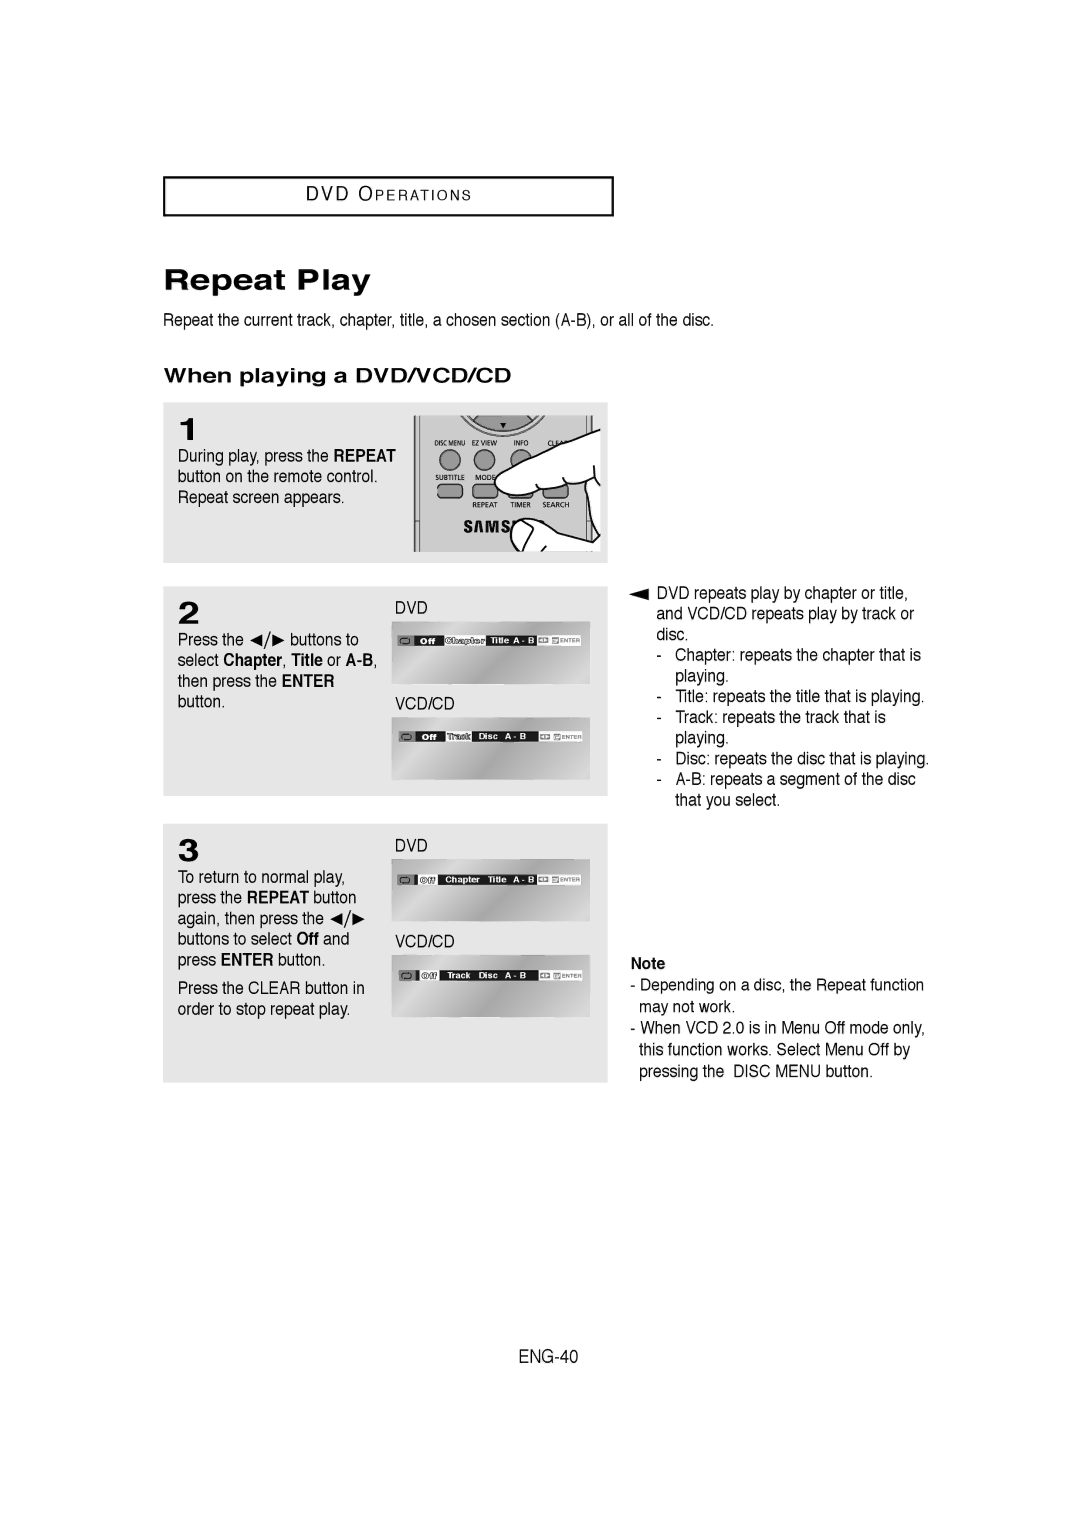
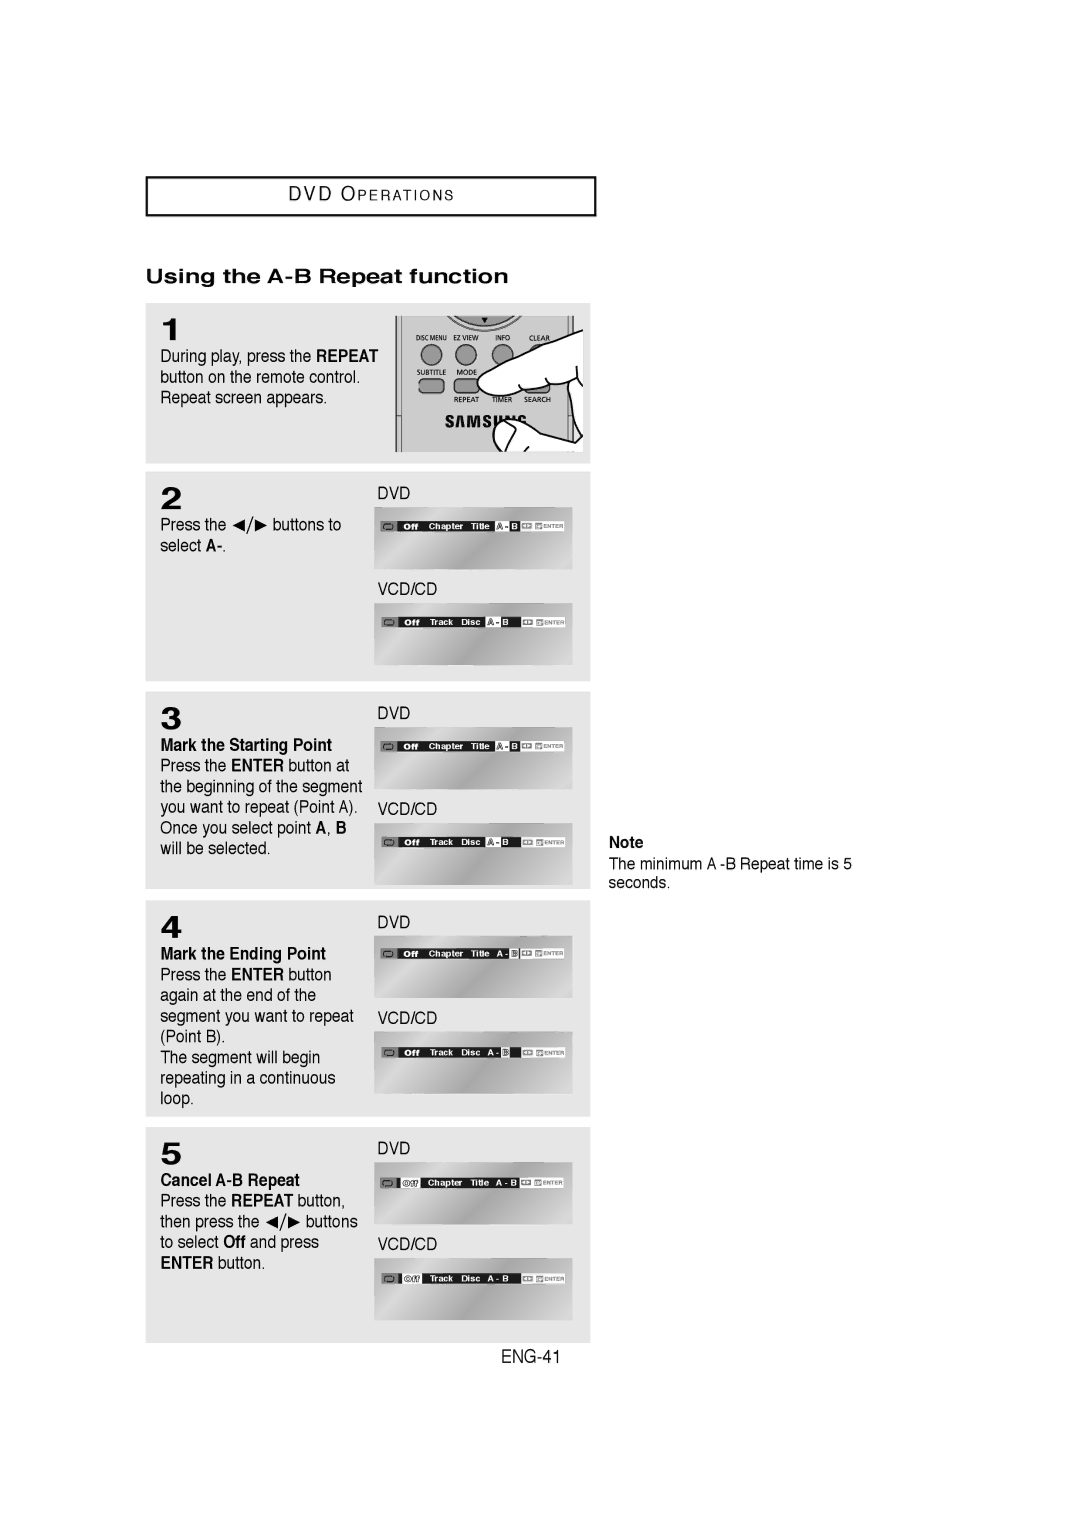
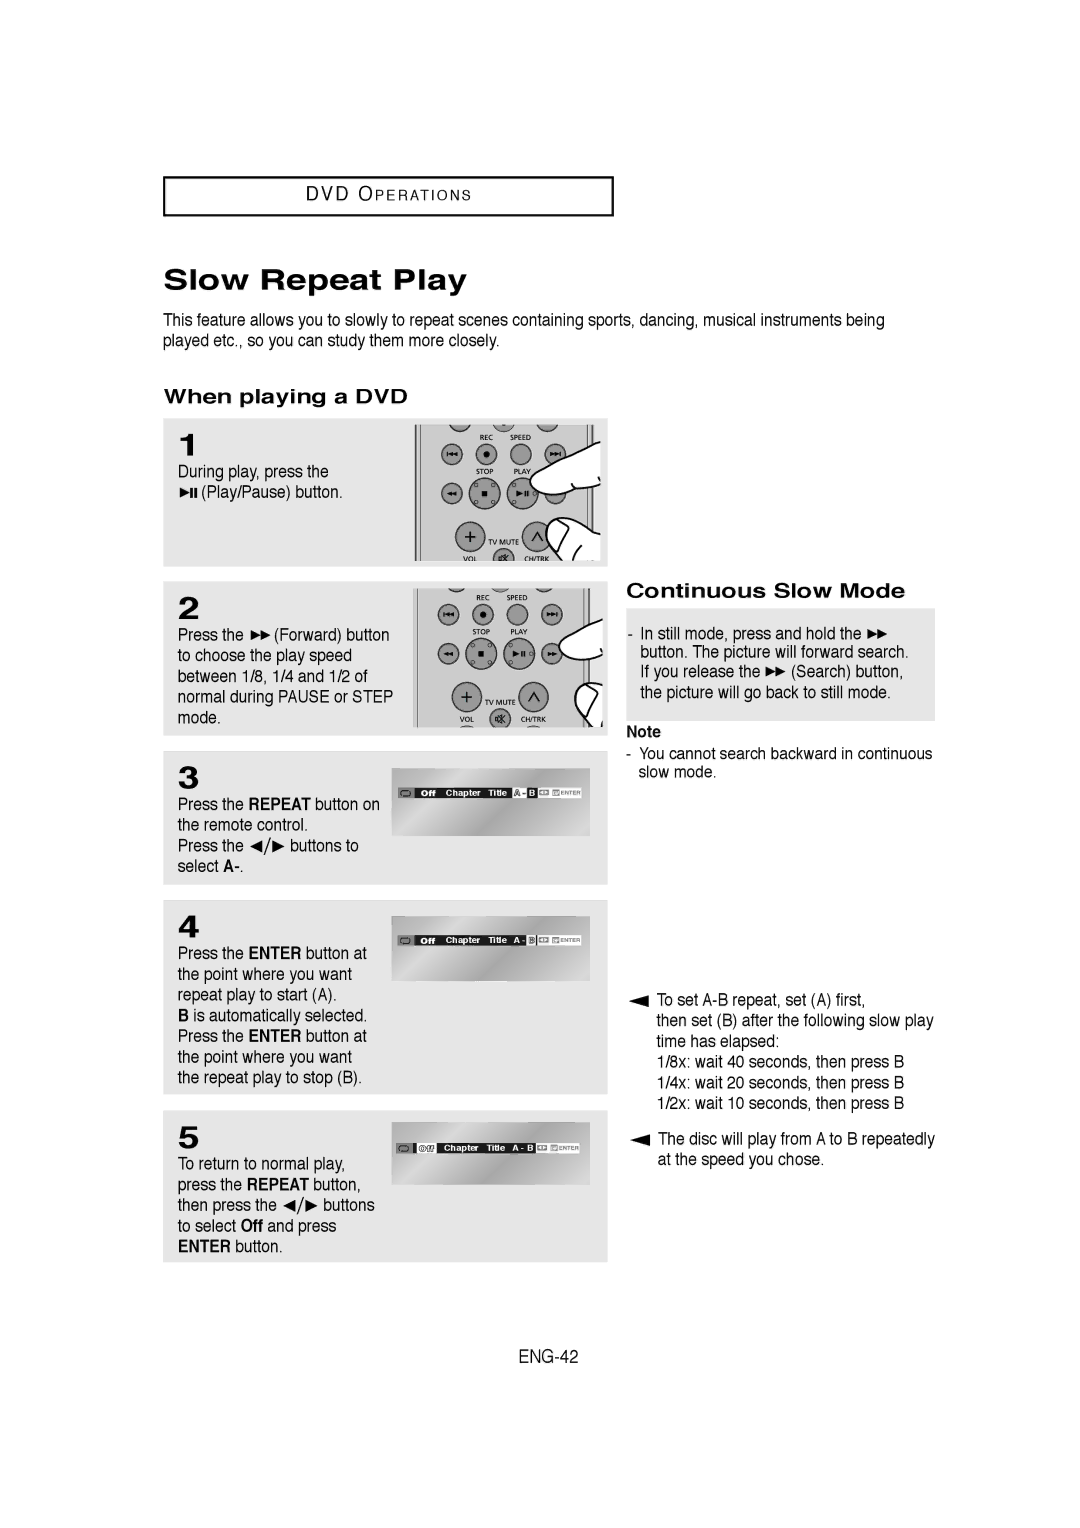
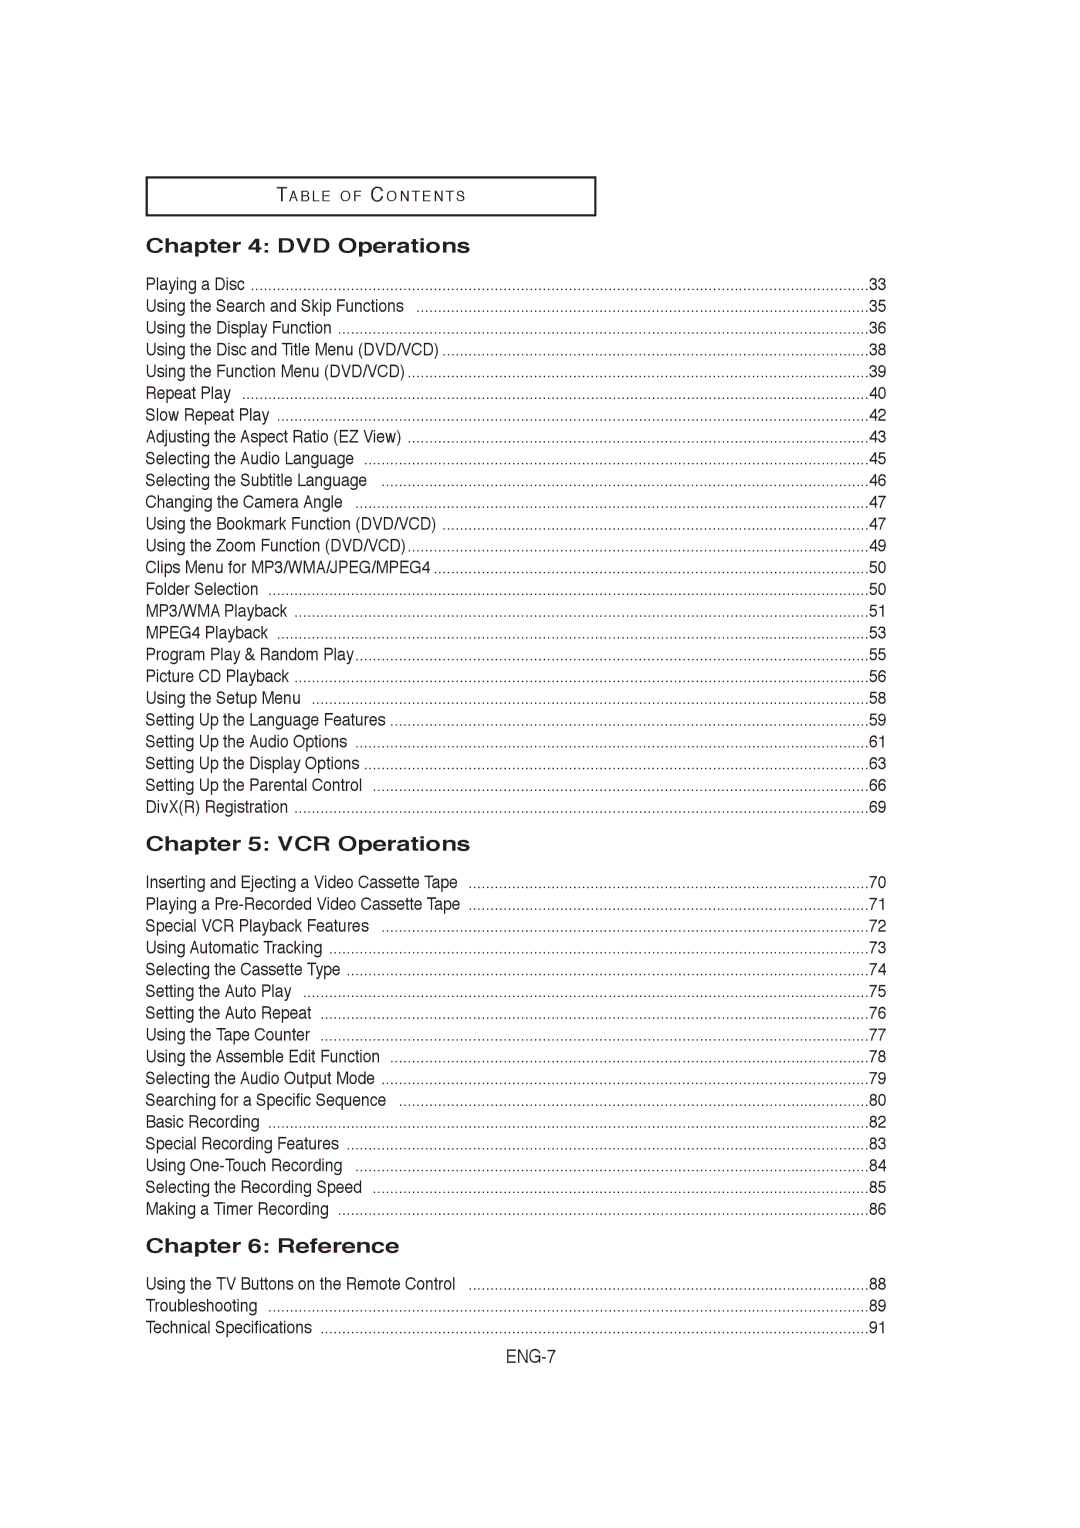
Contents CA AK68-00956L.01 DVD-V9650Important Safety Instructions FCC Note for U.S.A PrecautionsHandling Cautions Before you start AccessoriesInstall Batteries in the Remote Control If the remote control doesn’t operate properlyTable of Contents VCR Operations DVD OperationsReference VCR Features General FeaturesDVD-VCR Features DVD FeaturesRegion Number Disc Type and CharacteristicsCharacteristics Disc MarkingsENG-10 DescriptionFront Panel Controls Front Panel DisplayRear Panel DVD/VCR Output ChartENG-11 ENG-12 Tour of the Remote ControlMethod1 Antenna + DVD-VCR + TV No Cable box Connecting the Antenna CableENG-13 ENG-14 ENG-15 Before Connecting the DVD-VCRConnection to a TV Connection to a TV VideoENG-16 Connection to a TV S-VideoENG-17 Connection to a TV InterlaceENG-18 Connection to a TV ProgressiveConnection to a TV with Hdmi Jack Hdmi Video SpecificationsENG-19 Hdmi connection description Why does Samsung use HDMI?ENG-20 Hdmi High Definition Multimedia InterfaceConnection to an Audio System 2 Channel Amplifier Connection to an Audio SystemENG-21 ENG-22 ENG-23 Connecting a Power Cord & Auto SetupENG-24 Selecting a Menu LanguageSetting the Clock Automatically Setting the ClockENG-25 ENG-26 Setting the Clock ManuallySelect the time zone of your area Press ENG-27Use the  Memorizing the Channels Selecting the Video Signal-sourceENG-28 Repeat steps 7 to add or To delete additional channels Storing Channels in Memory Automatic MethodAdding and Erasing Channels Manual Method ENG-29ENG-30 Selecting the RF Output ChannelTo select CH3 or CH4 ENG-31 Selecting the Front Panel DisplayENG-32 Setting the Power Off AutomaticallyENG-33 Playing a DiscBefore Play PlaybackSlow Motion Play Except CD Pausing PlayENG-34 Step Motion Play Except CDSkipping Tracks Using the Search and Skip FunctionsContinuous Search Mode Searching through a Chapter or TrackPress the  buttons to select the desired item Using the Display FunctionWhen Playing a DVD/CD/MPEG4 ENG-36To exit the menu, press Info button again ENG-37ENG-38 Using the Disc and Title Menu DVD/VCDInfo Using the Function Menu DVD/VCDENG-39 Press Buttons toPressing the Disc Menu button When playing a DVD/VCD/CDRepeat Play ENG-40Segment will begin repeating in a continuous loop Using the A-B Repeat functionENG-41 Select aENG-42 When playing a DVDContinuous Slow Mode Slow Repeat PlayENG-43 Adjusting the Aspect Ratio EZ ViewTo Playback using Aspect Ratio DVD If you are using a 169 TVFor 169 aspect ratio discs Letter Box If you are using a 43 TVDisplays the content of the DVD title in 43 aspect ratio ENG-44During play, press the Audio button Using the Audio button DVD/VCD/CD/MPEG4Selecting the Audio Language ENG-45ENG-46 Using the Subtitle button DVD/MPEG4Subtitle changes when the  button is pressed repeatedly Selecting the Subtitle LanguageChanging the Camera Angle Using the Bookmark FunctionUsing the Angle button DVD/VCD Using the Mark button DVD/VCDClearing a Bookmark Recalling a Marked SceneENG-48 Press  buttons to Using the Zoom Function DVD/VCDRemote control ENG-49Folder Selection Clips Menu for MP3/WMA/JPEG/MPEG4ENG-50 Off, Track, Folder Random MP3/WMA PlaybackRepeat/Random playback ENG-51ENG-52 CD-R MP3/WMA fileDo not try recording copyright protected MP3 files ENG-53 MPEG4 PlaybackMPEG4 Play Function Repeat PlaybackDivX5 MPEG4 Function DescriptionThese functions may not work depending on MPEG4 file CD-R AVI fileProgram Play Program Play & Random PlayENG-55 ENG-56 Picture CD PlaybackENG-57 CD-R Jpeg DiscsENG-58 Using the Setup MenuENG-59 Setting Up the Language FeaturesAudio Language FunctionENG-60 Disc MenuENG-61 Setting Up the Audio OptionsDynamic Compression Audio OptionsENG-62 Dolby/DTS Digital OutENG-63 Setting Up the Display OptionsAlt Video Out Display OptionsENG-64 TV AspectFormat ResolutionENG-65 480p 720 x 720p 1280 x 1080i 1920 xPlayer is locked Setting Up the Parental ControlENG-66 Appears.0~9Select Rating Level, then Press Setting Up the Rating LevelEnter your password Press Buttons to ENG-67ENG-68 Changing the PasswordEnter your password Press the  Buttons to Select Change PasswordSelect DivXR Registration DivXR RegistrationENG-69 Or Enter button Press the  buttons toENG-70 Inserting and Ejecting a Video Cassette TapeTo Insert a Video Cassette Tape To Eject a Video Cassette TapePlaying the Tape Playing a Pre-Recorded Video Cassette TapeENG-71 Fps/Rps Review Special VCR Playback FeaturesENG-72 Frame AdvanceENG-73 Using Automatic TrackingInsert and play a video cassette tape Selecting the Cassette Type Press the Menu button on the remote controlENG-74 ENG-75 Setting the Auto PlayENG-76 Setting the Auto RepeatWhen you are ready Using the Tape CounterENG-77 ENG-78 Using the Assemble Edit FunctionCH or button for television channel Input SEL. button for Selecting the Audio Output ModeAudio output Mode ENG-79Next Etc Seq Searching for a Specific SequenceENG-80 PrevENG-81 Variable Search SystemENG-82 Basic RecordingProtecting a Recorded Cassette RecordingPause/Resume Recording Press the Play/Pause button Special Recording FeaturesTo Watch a different Channel while Recording ENG-83ENG-84 Using One-Touch RecordingTo Watch a DVD while Recording To Add Recording TimeMaximum Recording Time SP vs. SLP Selecting the Recording SpeedENG-85 Add Recording TimeSelect Channel Number Making a Timer RecordingTo Begin Setting the Timer Recording ENG-86Selecting Auto Speed ENG-87Daily/Weekly Date Programming ENG-88 Using the TV Buttons on the Remote ControlButton Function Identifying DVD Problems TroubleshootingENG-89 Identifying VCR Problems ENG-91 Technical SpecificationsInputs ENG-92 ENG-93 Contact Samsung World Wide Limited Warranty to Original Purchaser