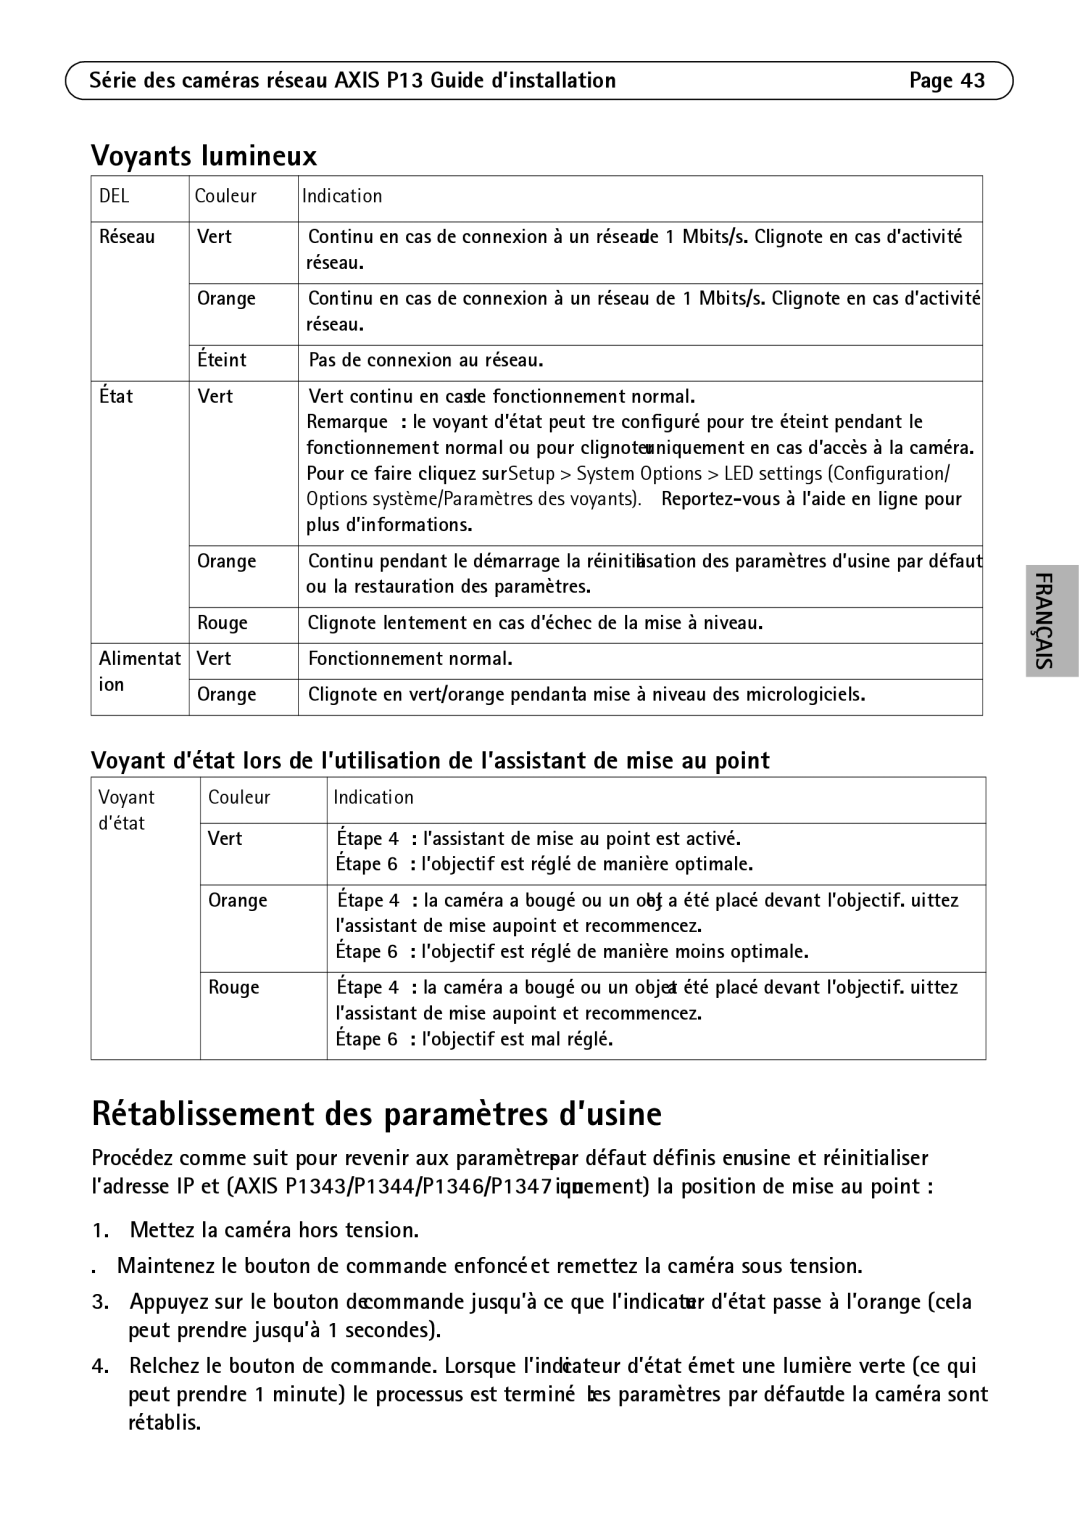
Axis Communications P1347, P1344, P1343, P1311 manual Lieferumfang, Installationsschritte, Wichtig

Page 45

Netzwerk-Kamera-Serie AXIS P13 Installationsanleitung

Seite 45

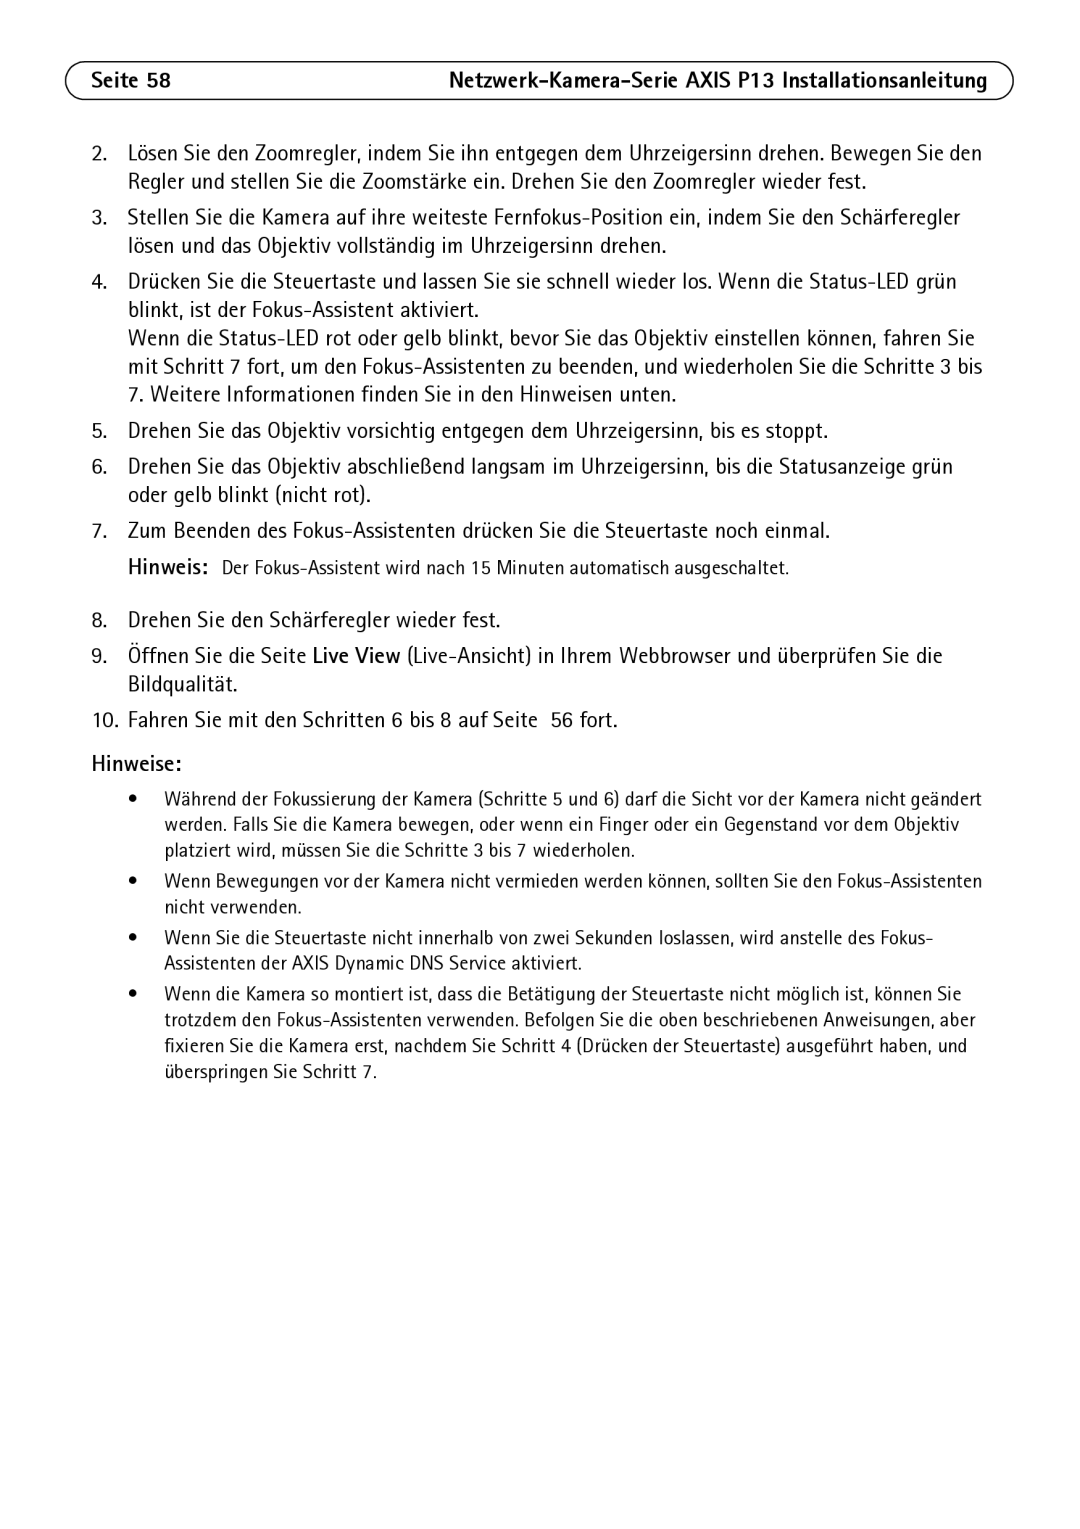
Netzwerk-Kamera-Serie AXIS P13 -

Installationsanleitung

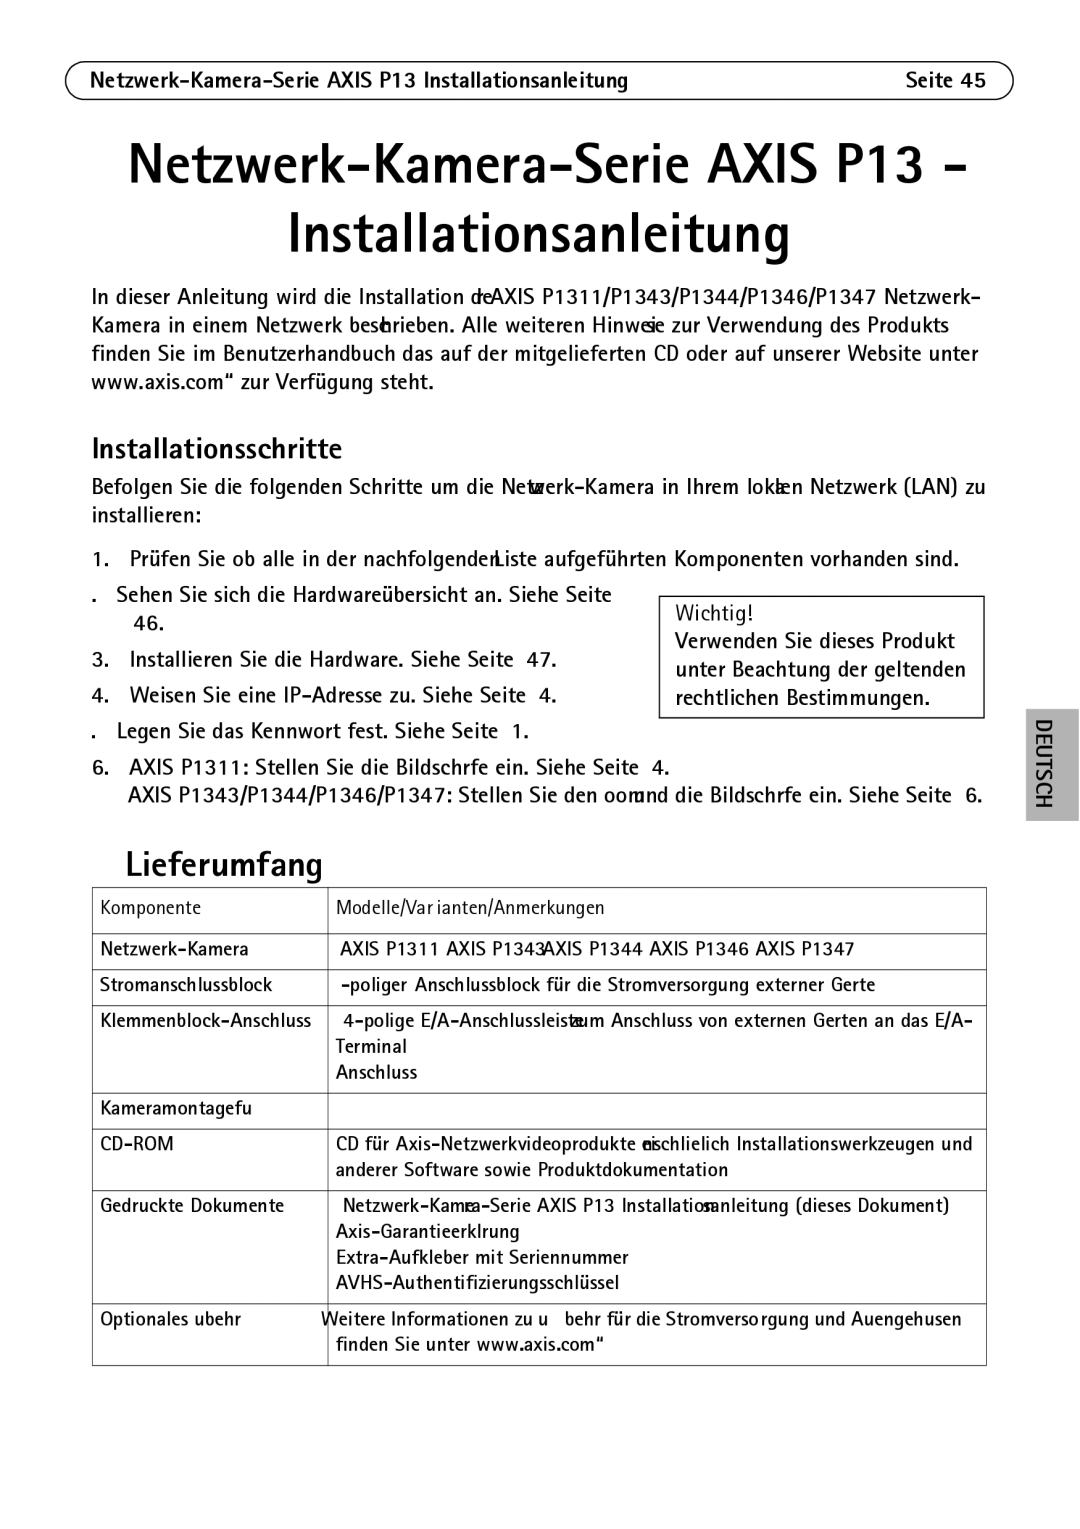
In dieser Anleitung wird die Installation der AXIS P1311/P1343/P1344/P1346/P1347 Netzwerk- Kamera in einem Netzwerk beschrieben. Alle weiteren Hinweise zur Verwendung des Produkts finden Sie im Benutzerhandbuch, das auf der mitgelieferten CD oder auf unserer Website unter „www.axis.com“ zur Verfügung steht.

Installationsschritte

Befolgen Sie die folgenden Schritte, um die Netzwerk-Kamera in Ihrem lokalen Netzwerk (LAN) zu installieren:

1. Prüfen Sie, ob alle in der nachfolgenden Liste aufgeführten Komponenten vorhanden sind.

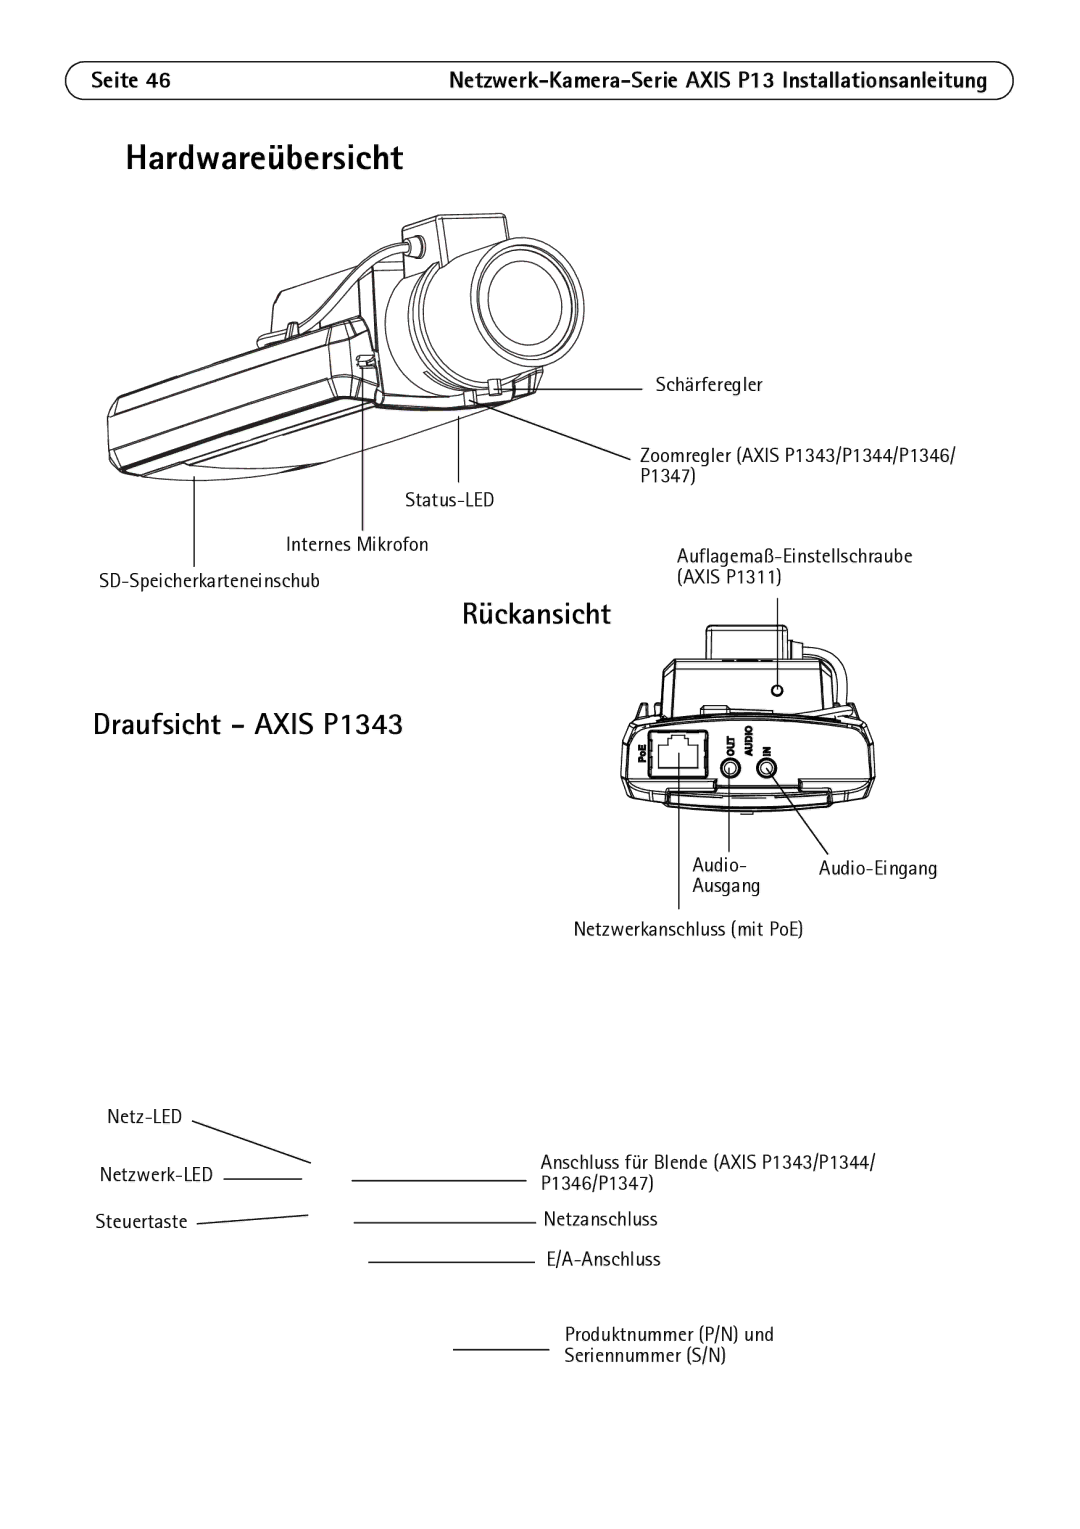
2.Sehen Sie sich die Hardwareübersicht an. Siehe Seite 46.

3.Installieren Sie die Hardware. Siehe Seite 47.

4.Weisen Sie eine IP-Adresse zu. Siehe Seite 48.

5.Legen Sie das Kennwort fest. Siehe Seite 51.

Wichtig!

Verwenden Sie dieses Produkt unter Beachtung der geltenden rechtlichen Bestimmungen.

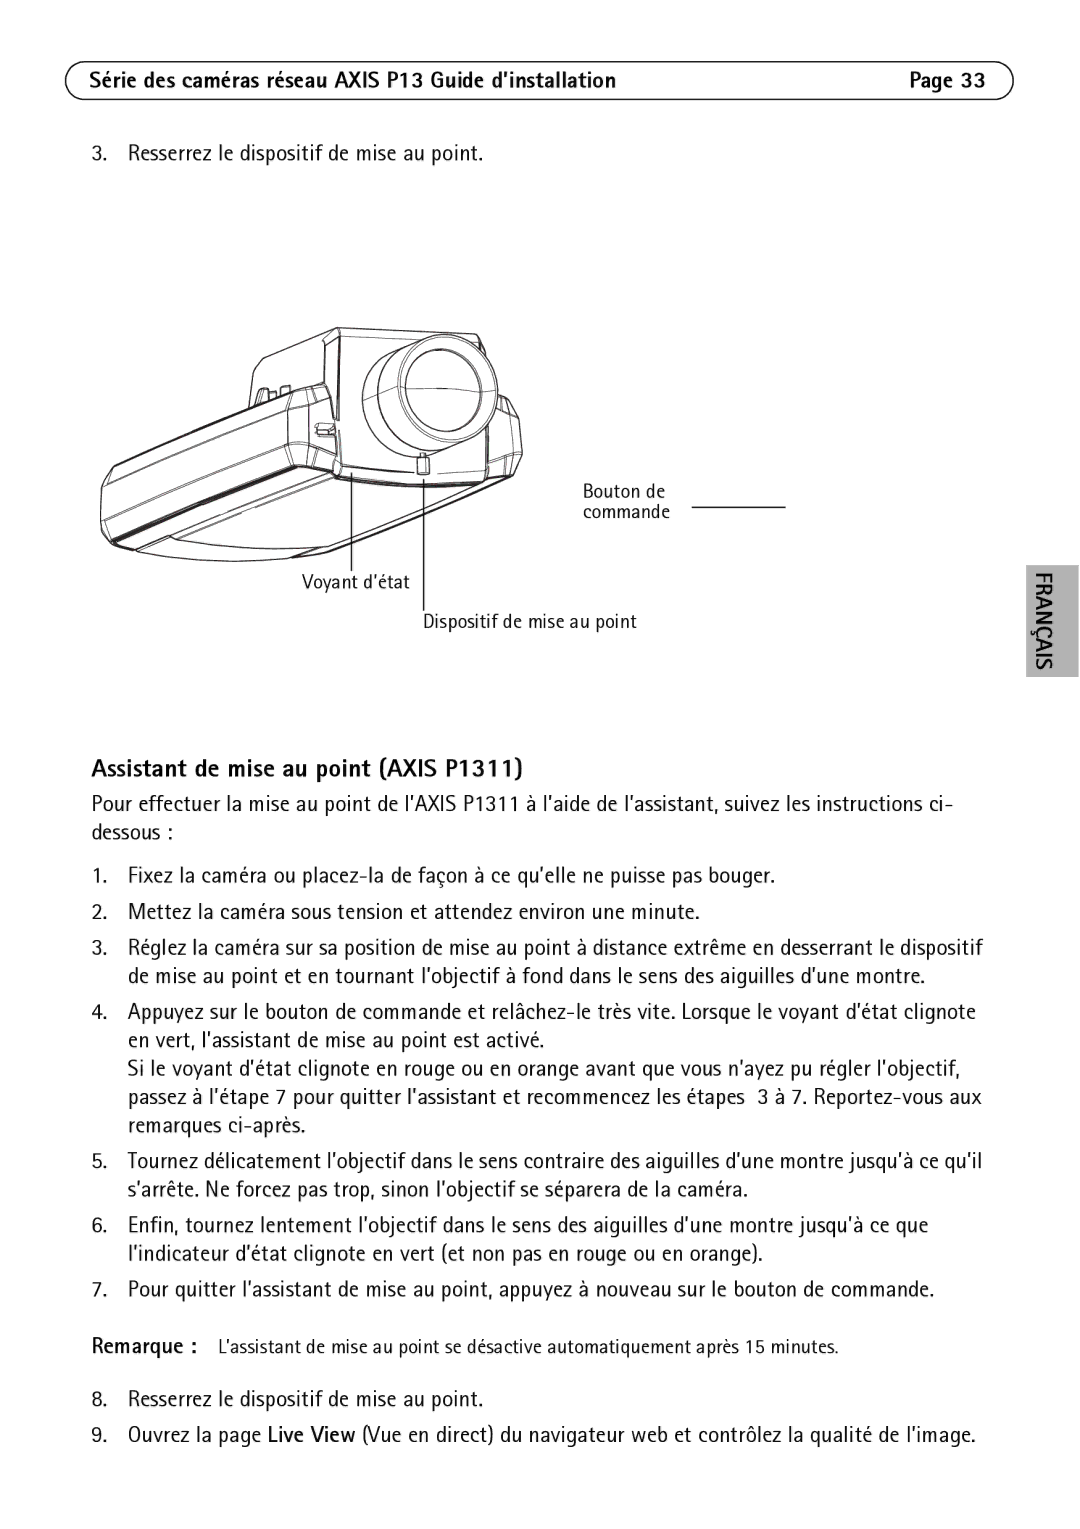
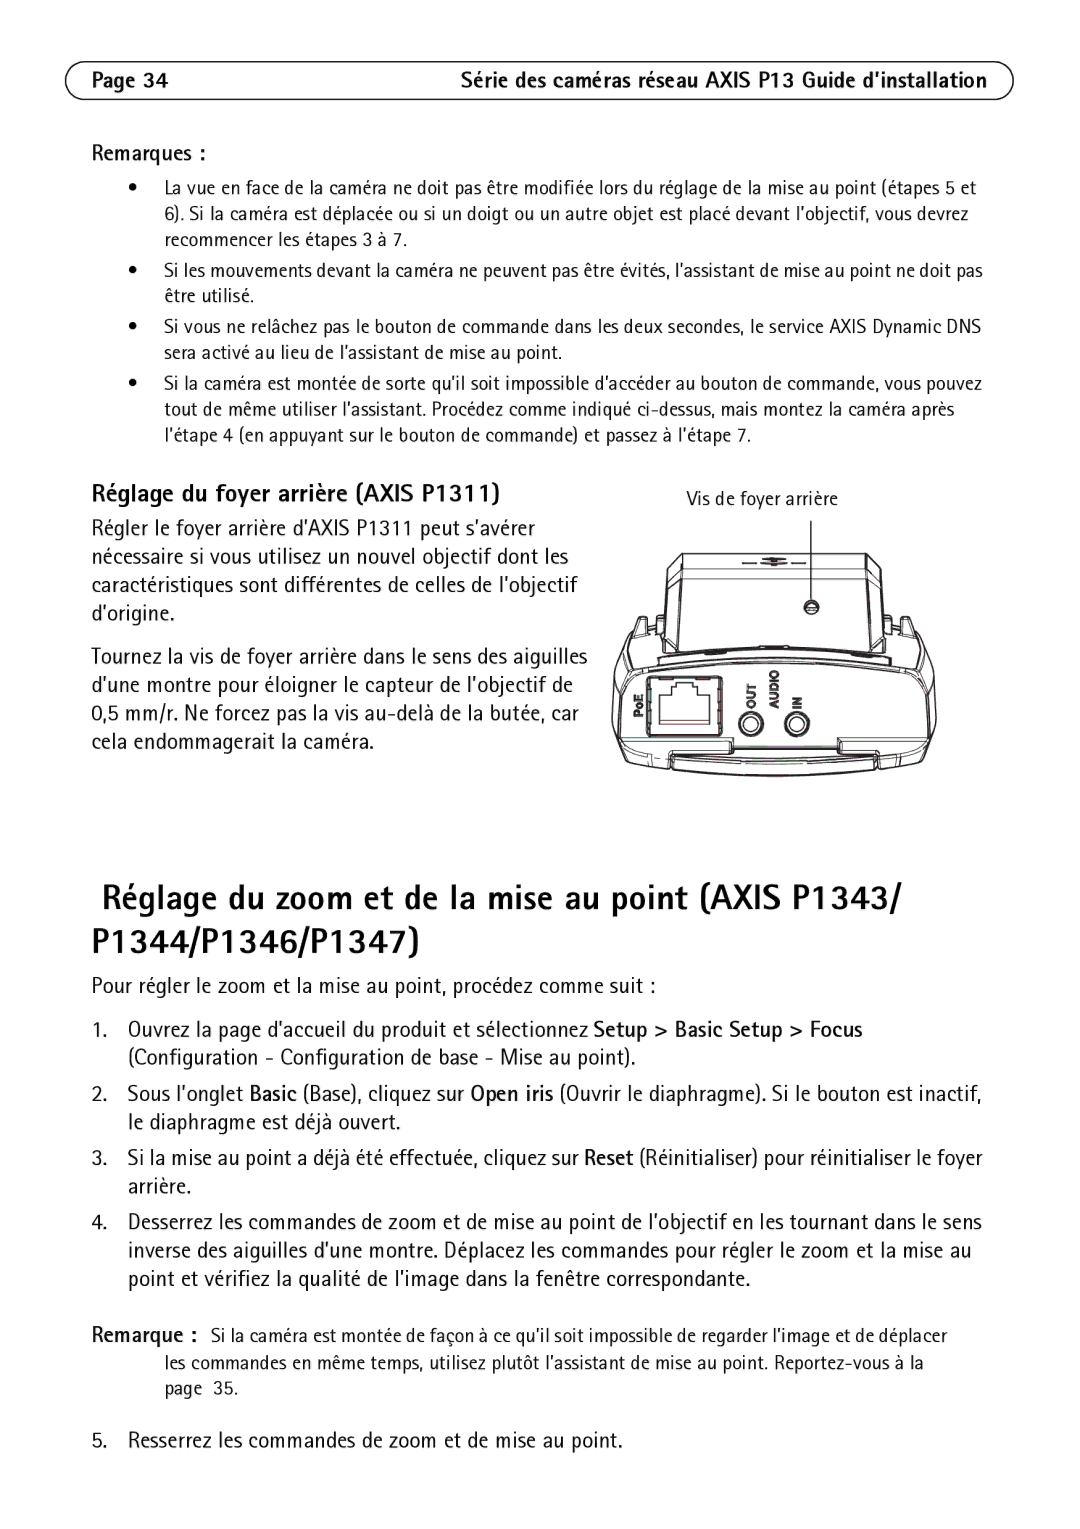
6.AXIS P1311: Stellen Sie die Bildschärfe ein. Siehe Seite 54.

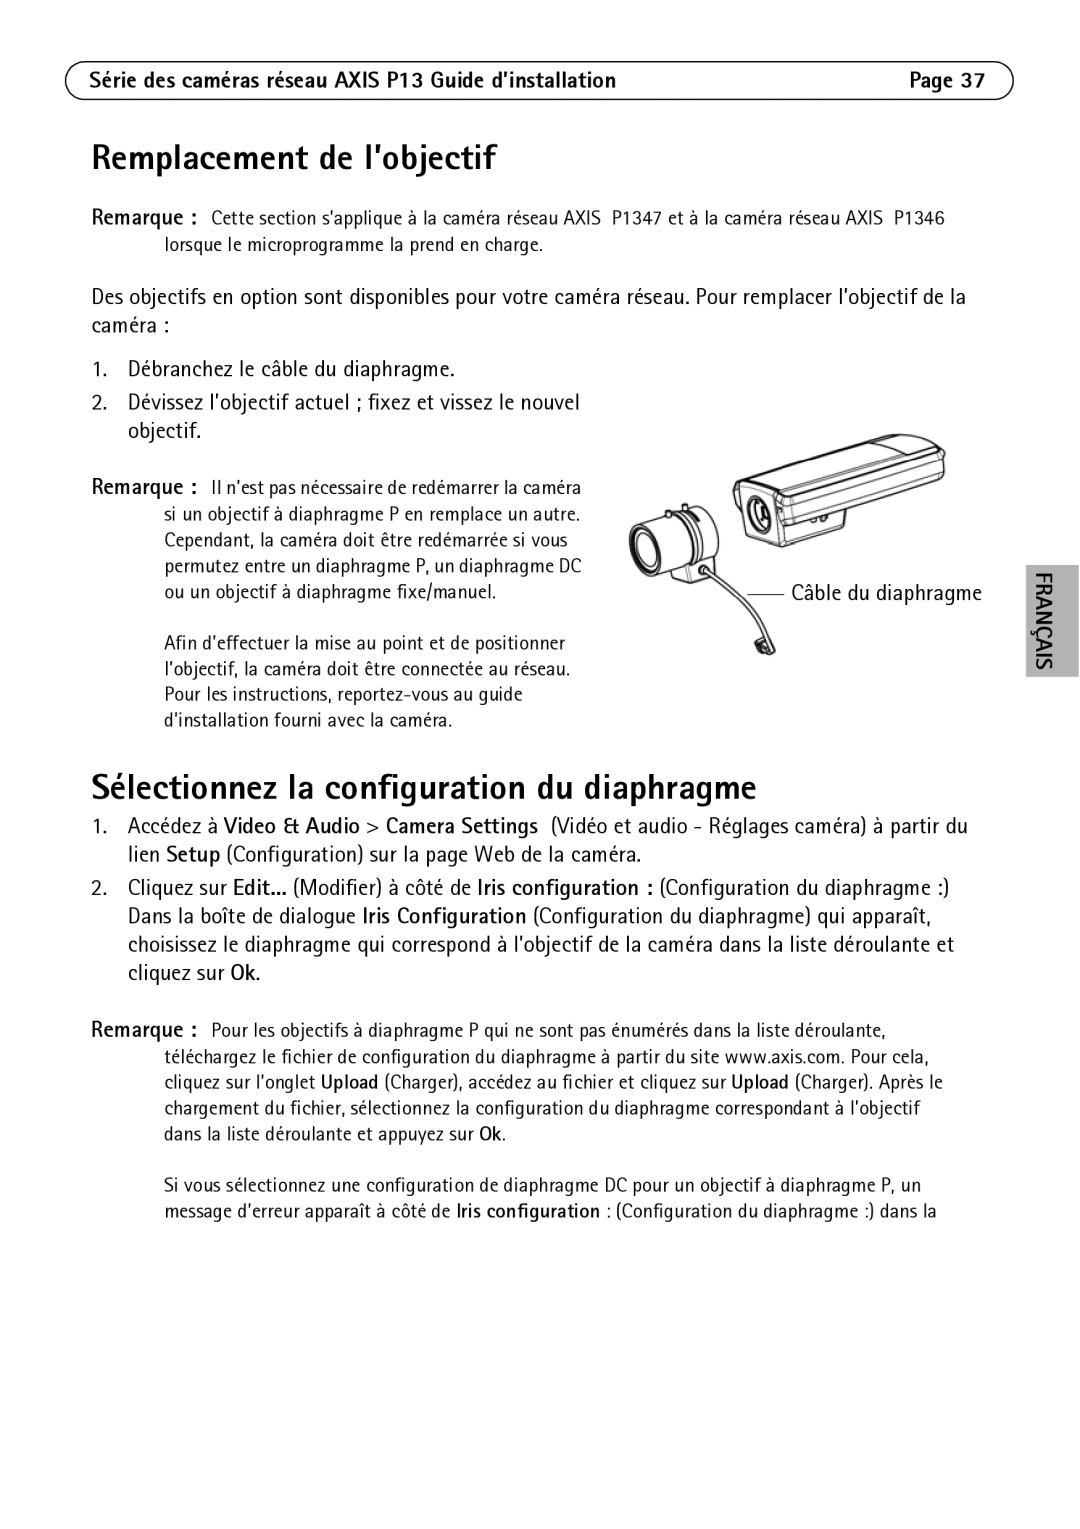
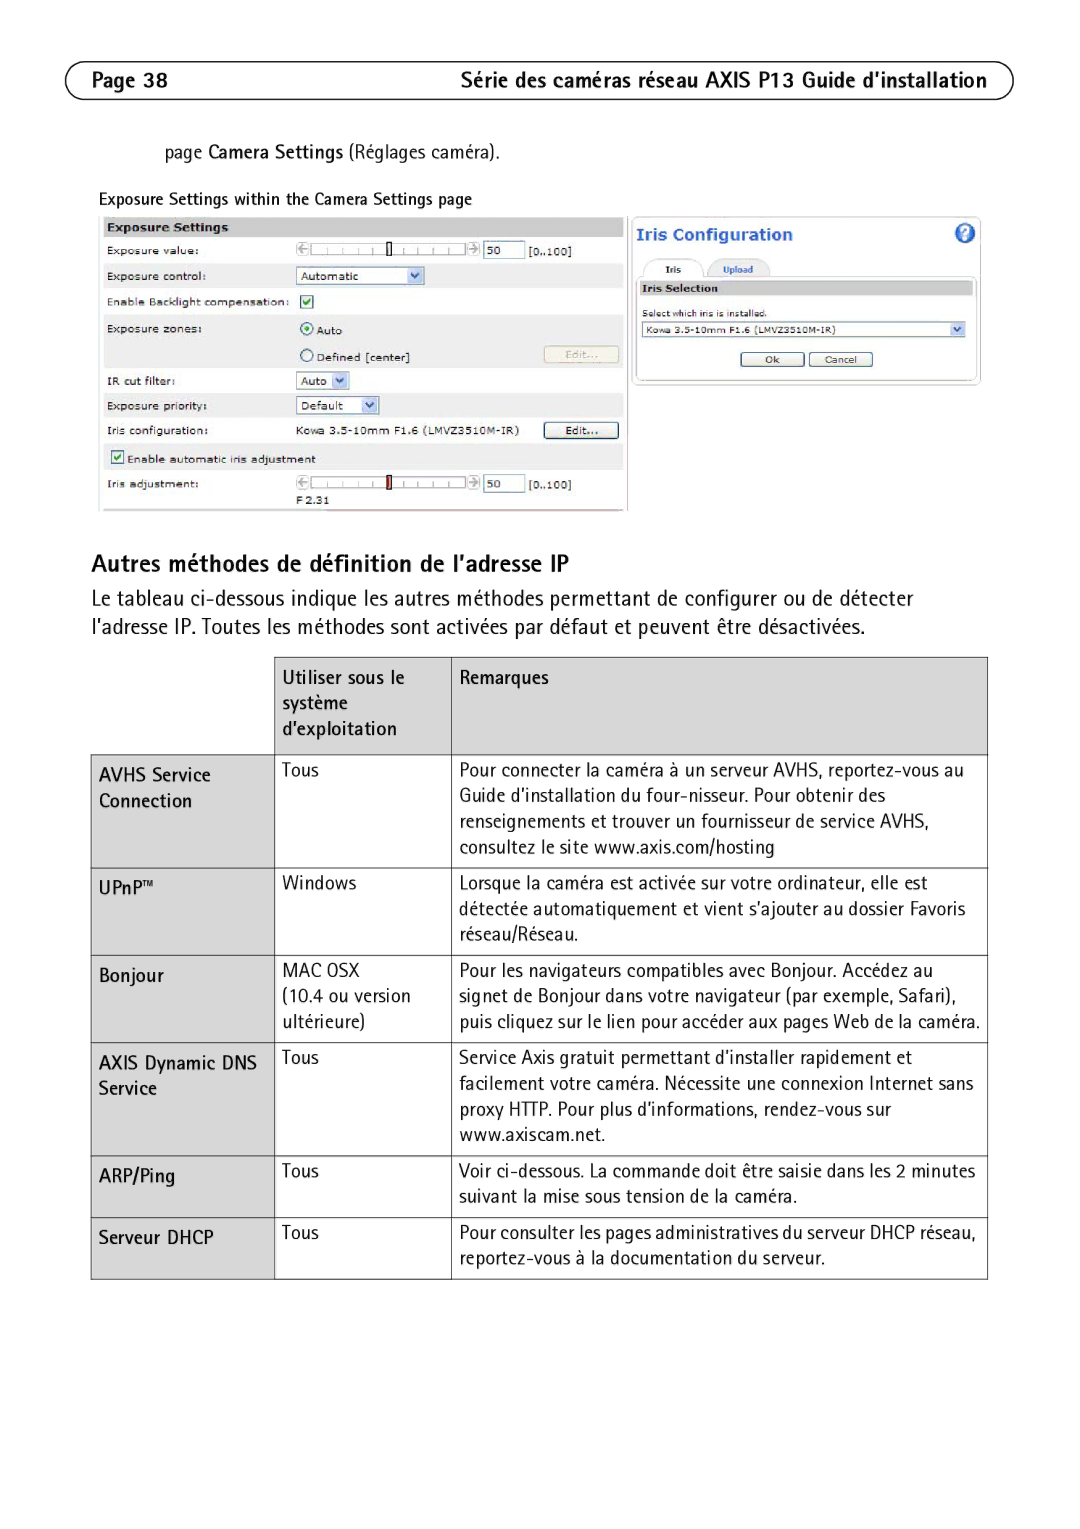
AXIS P1343/P1344/P1346/P1347: Stellen Sie den Zoom und die Bildschärfe ein. Siehe Seite 56.

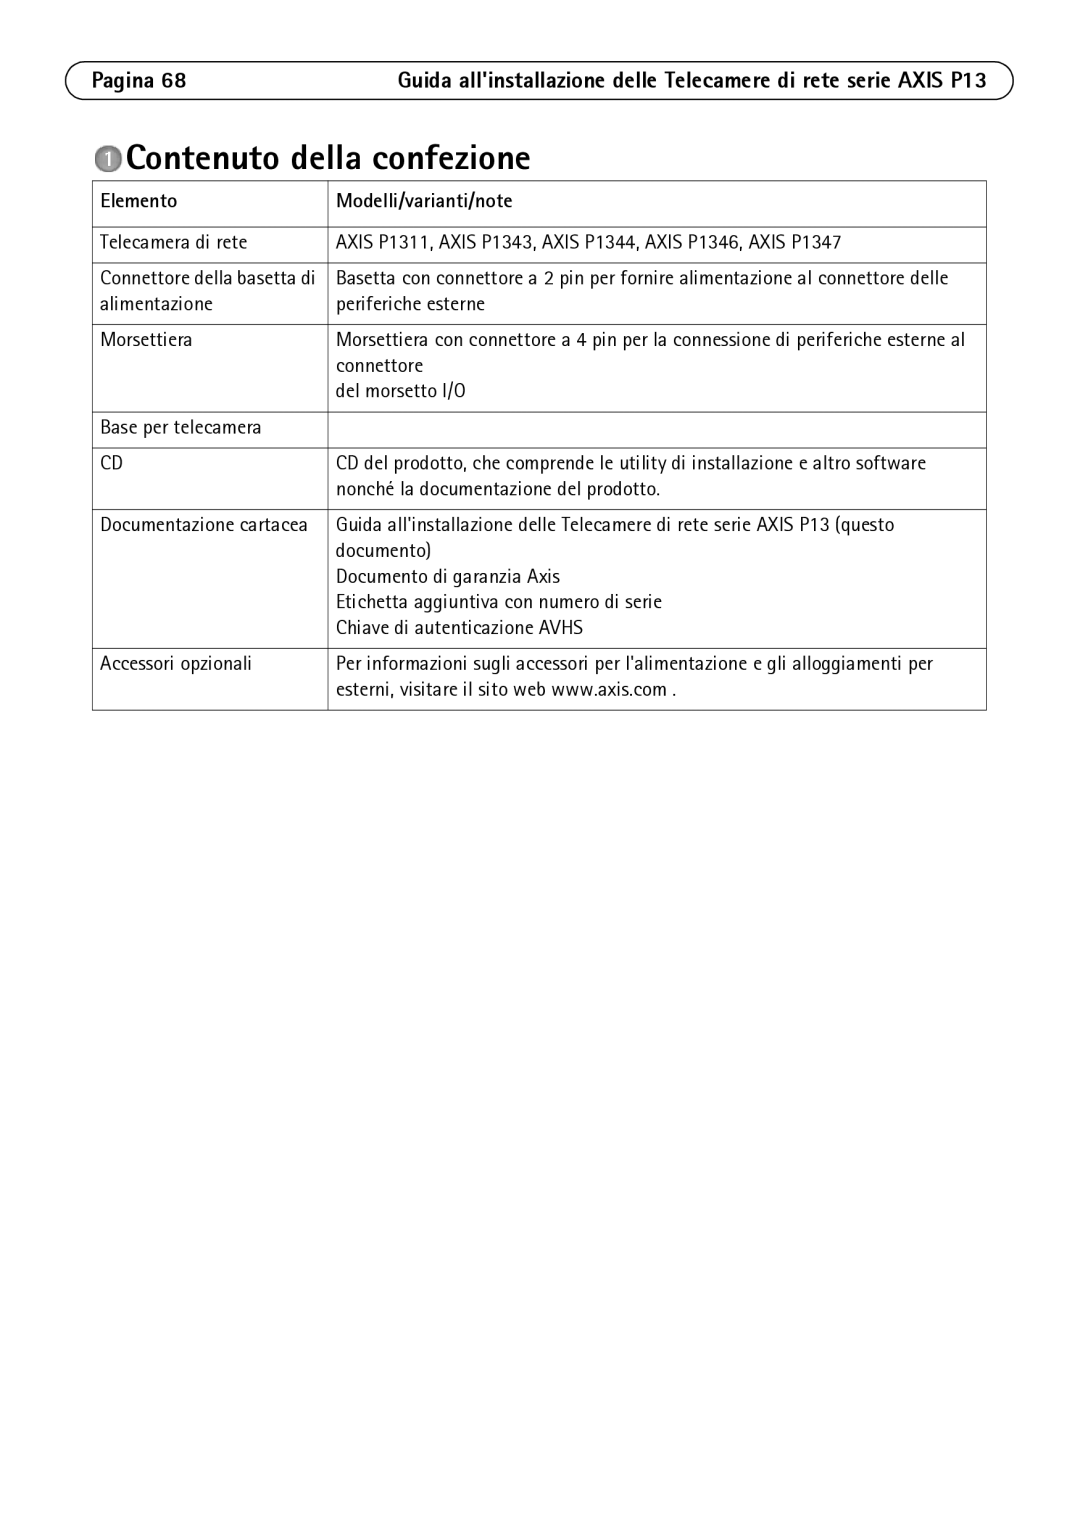
Lieferumfang

Komponente

Modelle/Varianten/Anmerkungen


Netzwerk-Kamera

AXIS P1311, AXIS P1343, AXIS P1344, AXIS P1346, AXIS P1347


Stromanschlussblock

2-poliger Anschlussblock für die Stromversorgung externer Geräte


Klemmenblock-Anschluss

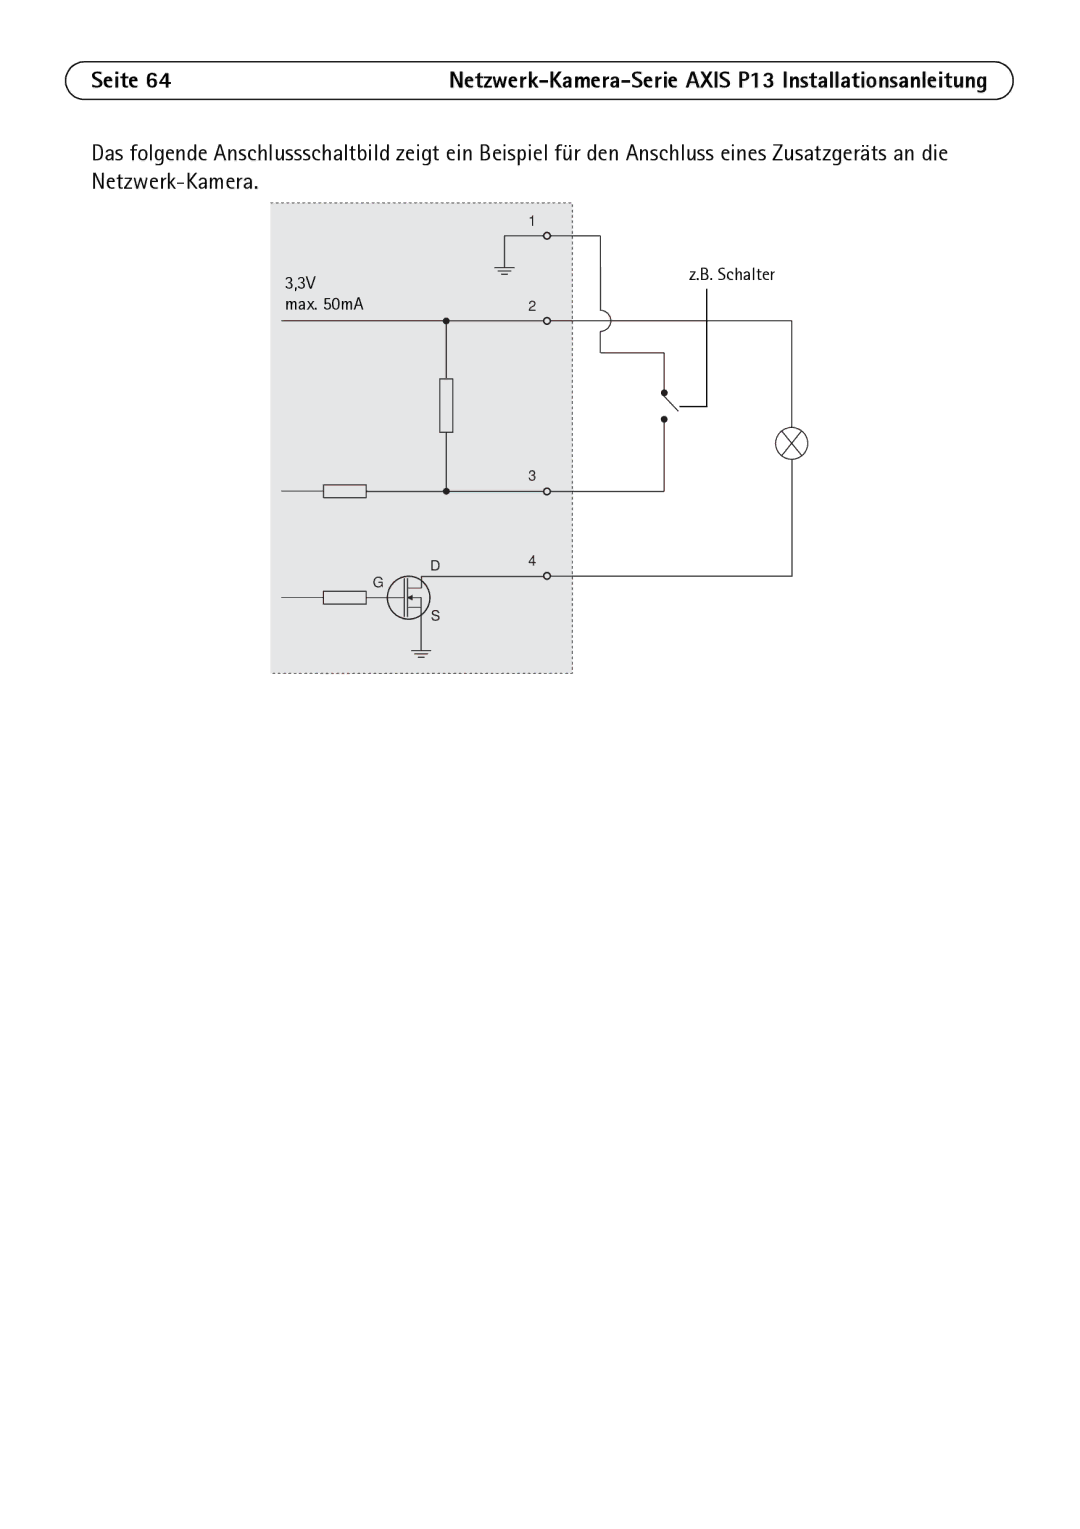
4-polige E/A-Anschlussleiste zum Anschluss von externen Geräten an das E/A-


Terminal


Anschluss


Kameramontagefuß


CD-ROM

CD für Axis-Netzwerkvideoprodukte einschließlich Installationswerkzeugen und


anderer Software sowie Produktdokumentation


Gedruckte Dokumente

Netzwerk-Kamera-Serie AXIS P13 Installationsanleitung (dieses Dokument)


Axis-Garantieerklärung


Extra-Aufkleber mit Seriennummer


AVHS-Authentifizierungsschlüssel


Optionales Zubehör

Weitere Informationen zu Zubehör für die Stromversorgung und Außengehäusen


finden Sie unter „www.axis.com“


DEUTSCH

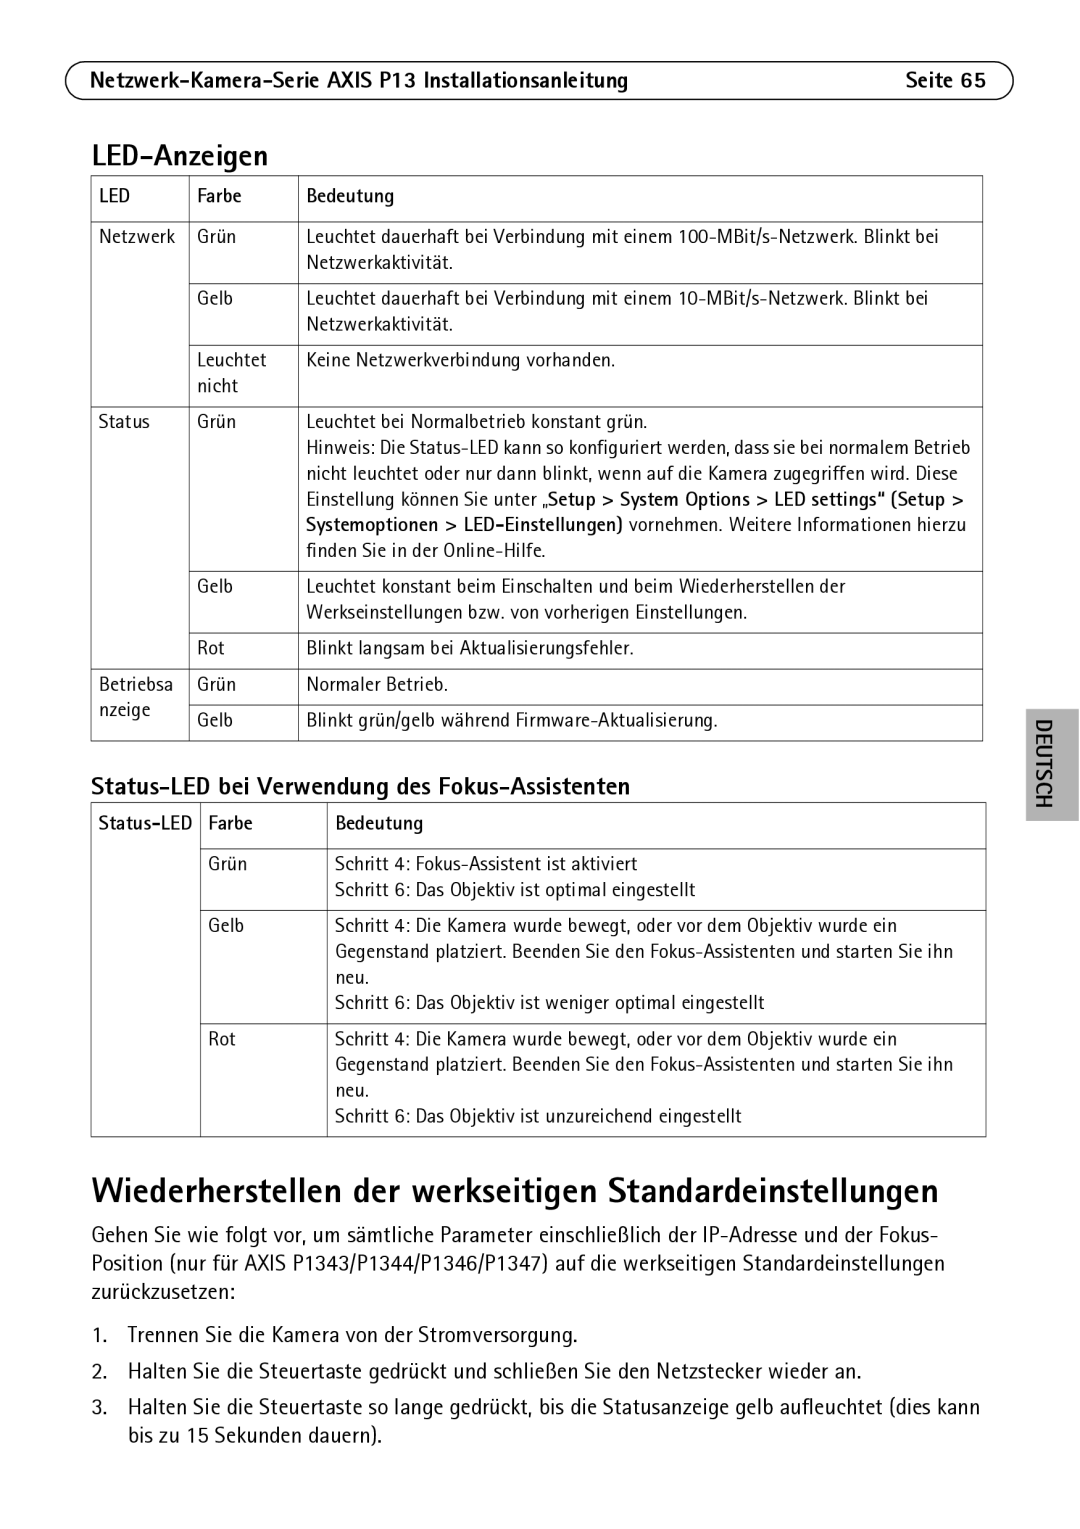
Image 45
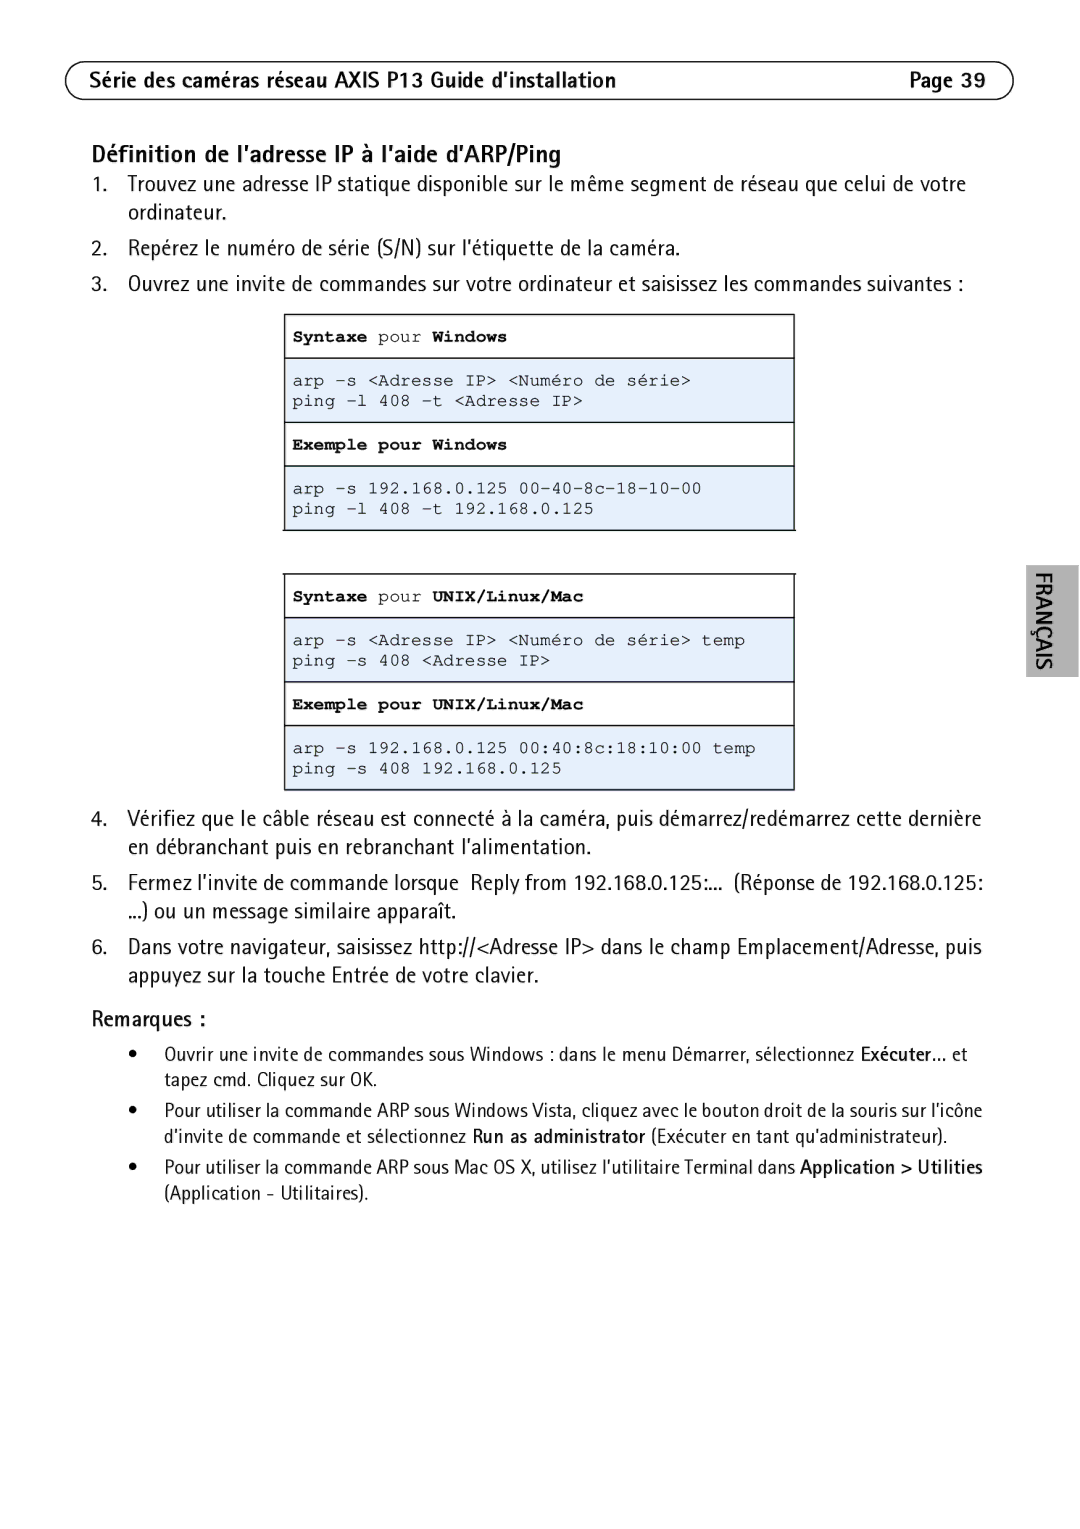
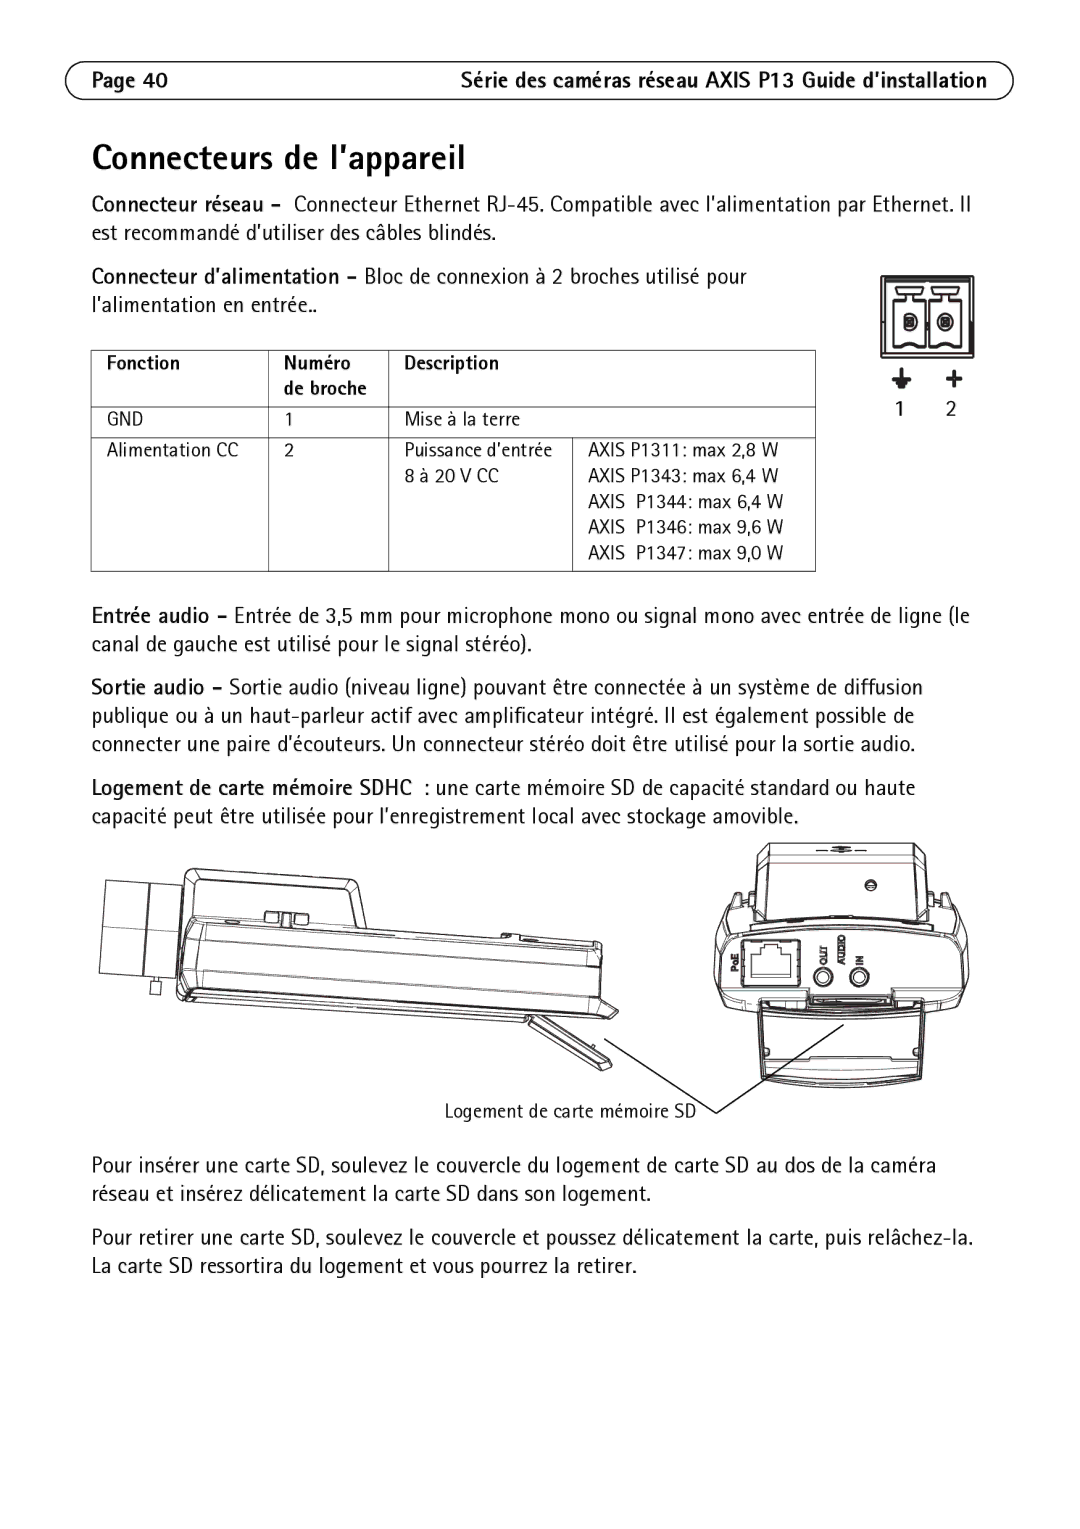
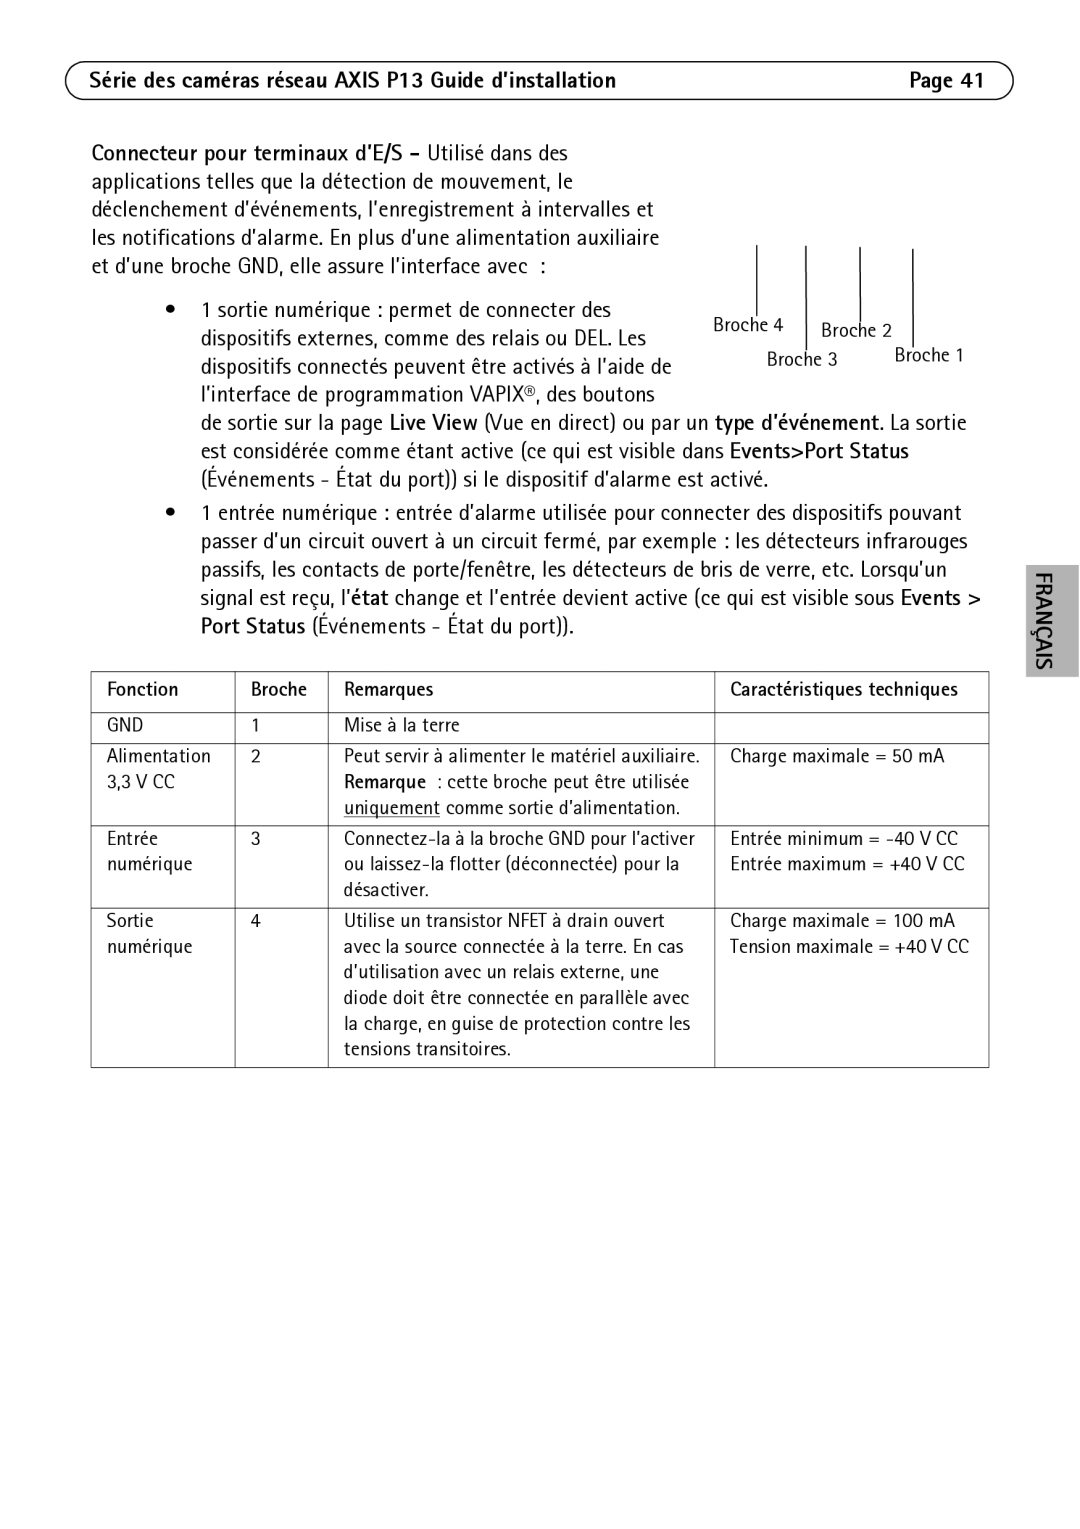
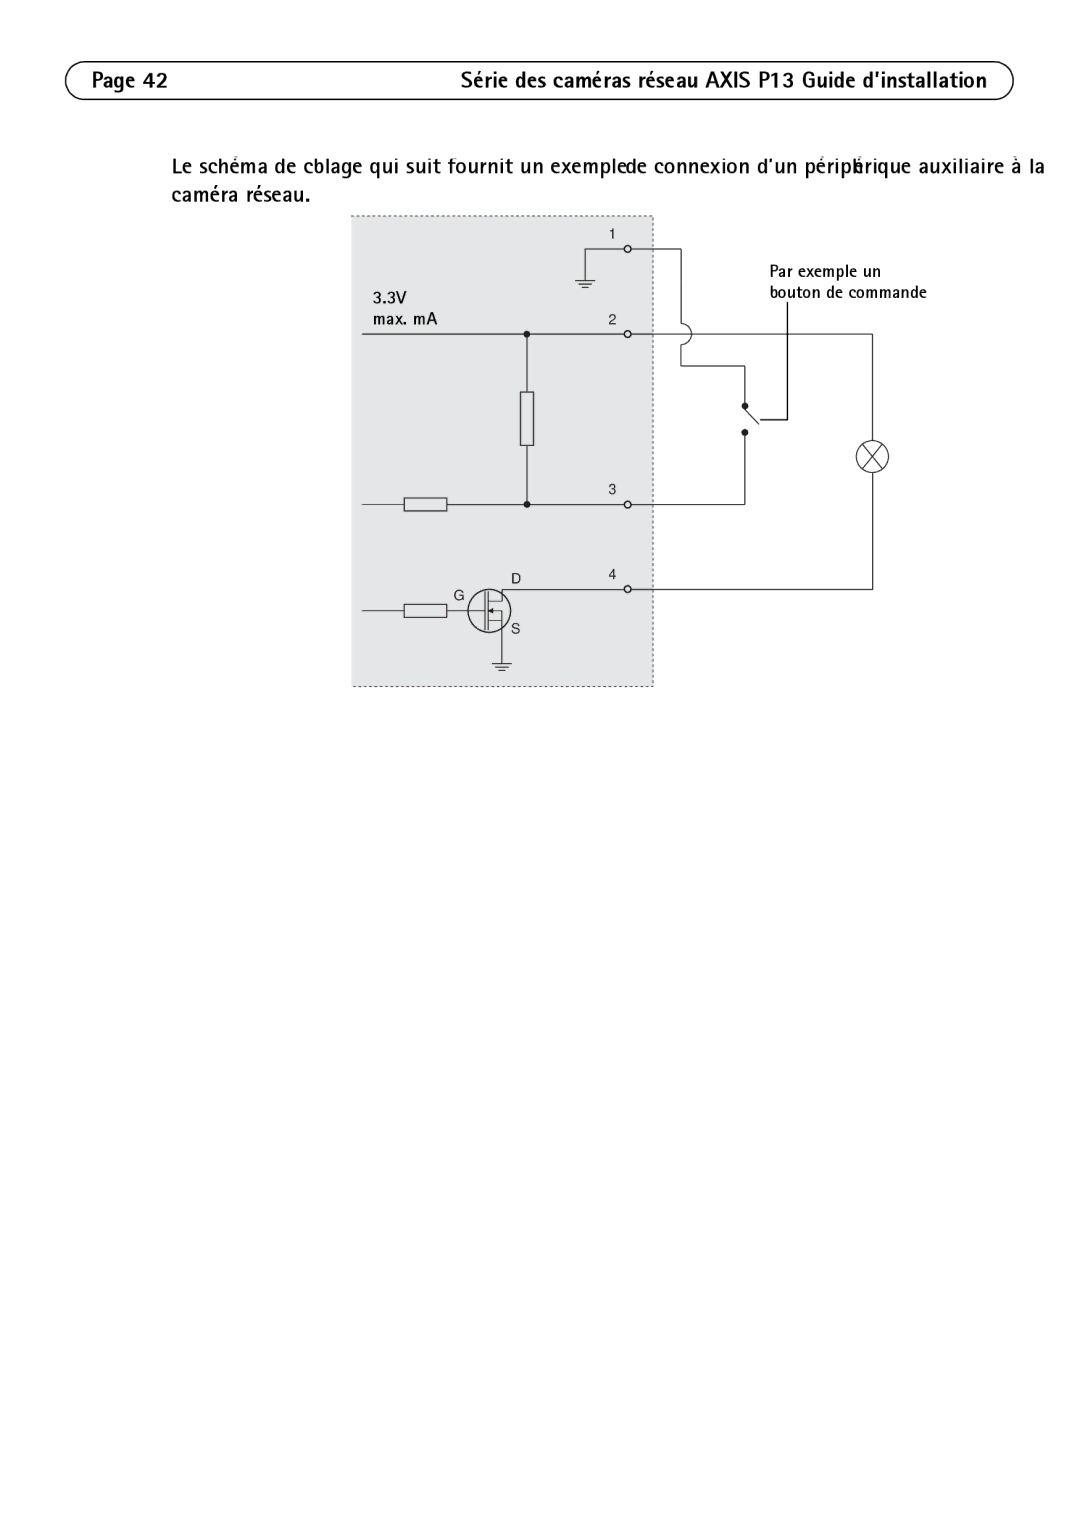
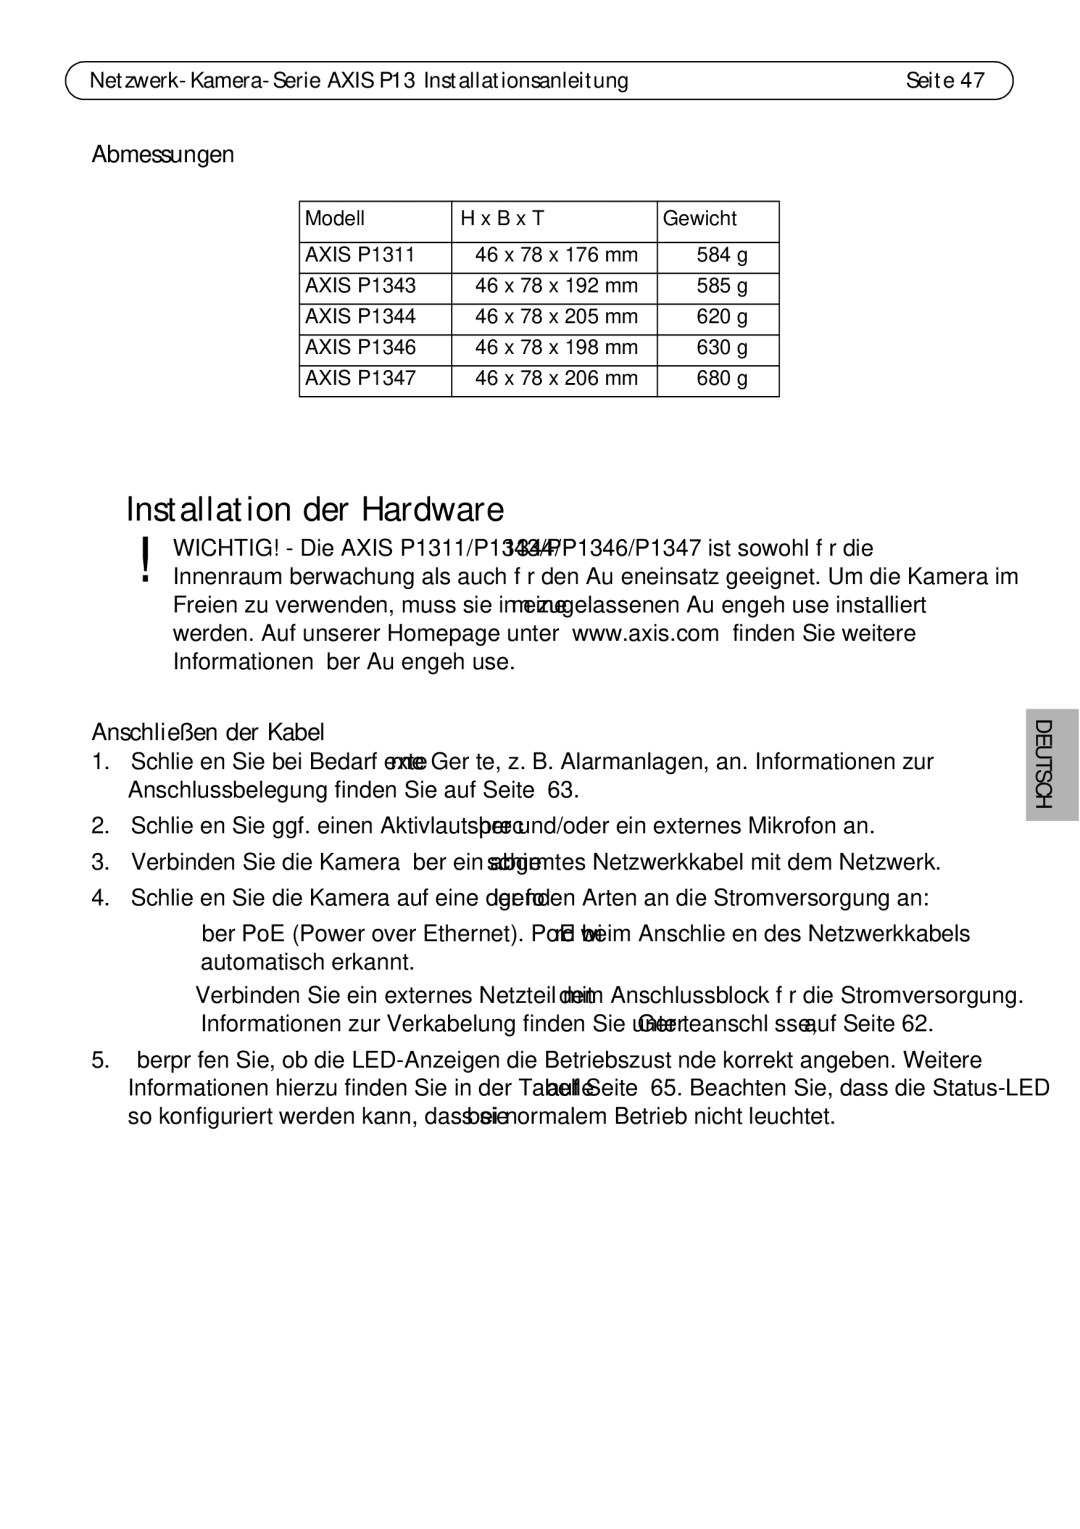
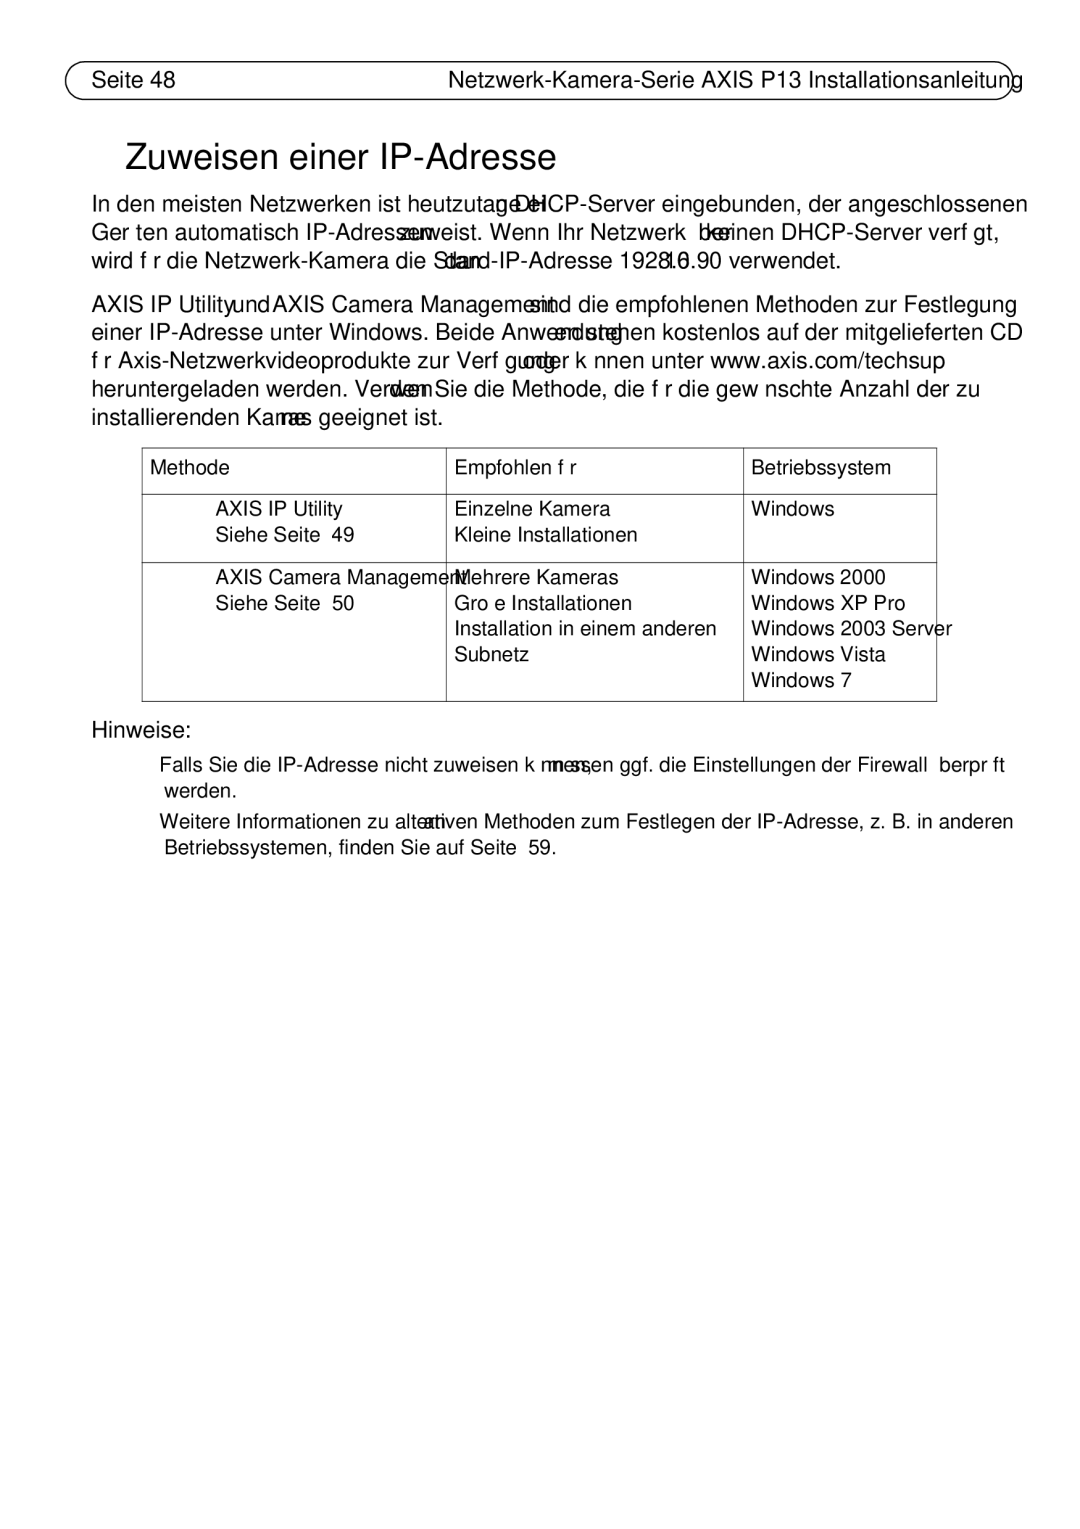
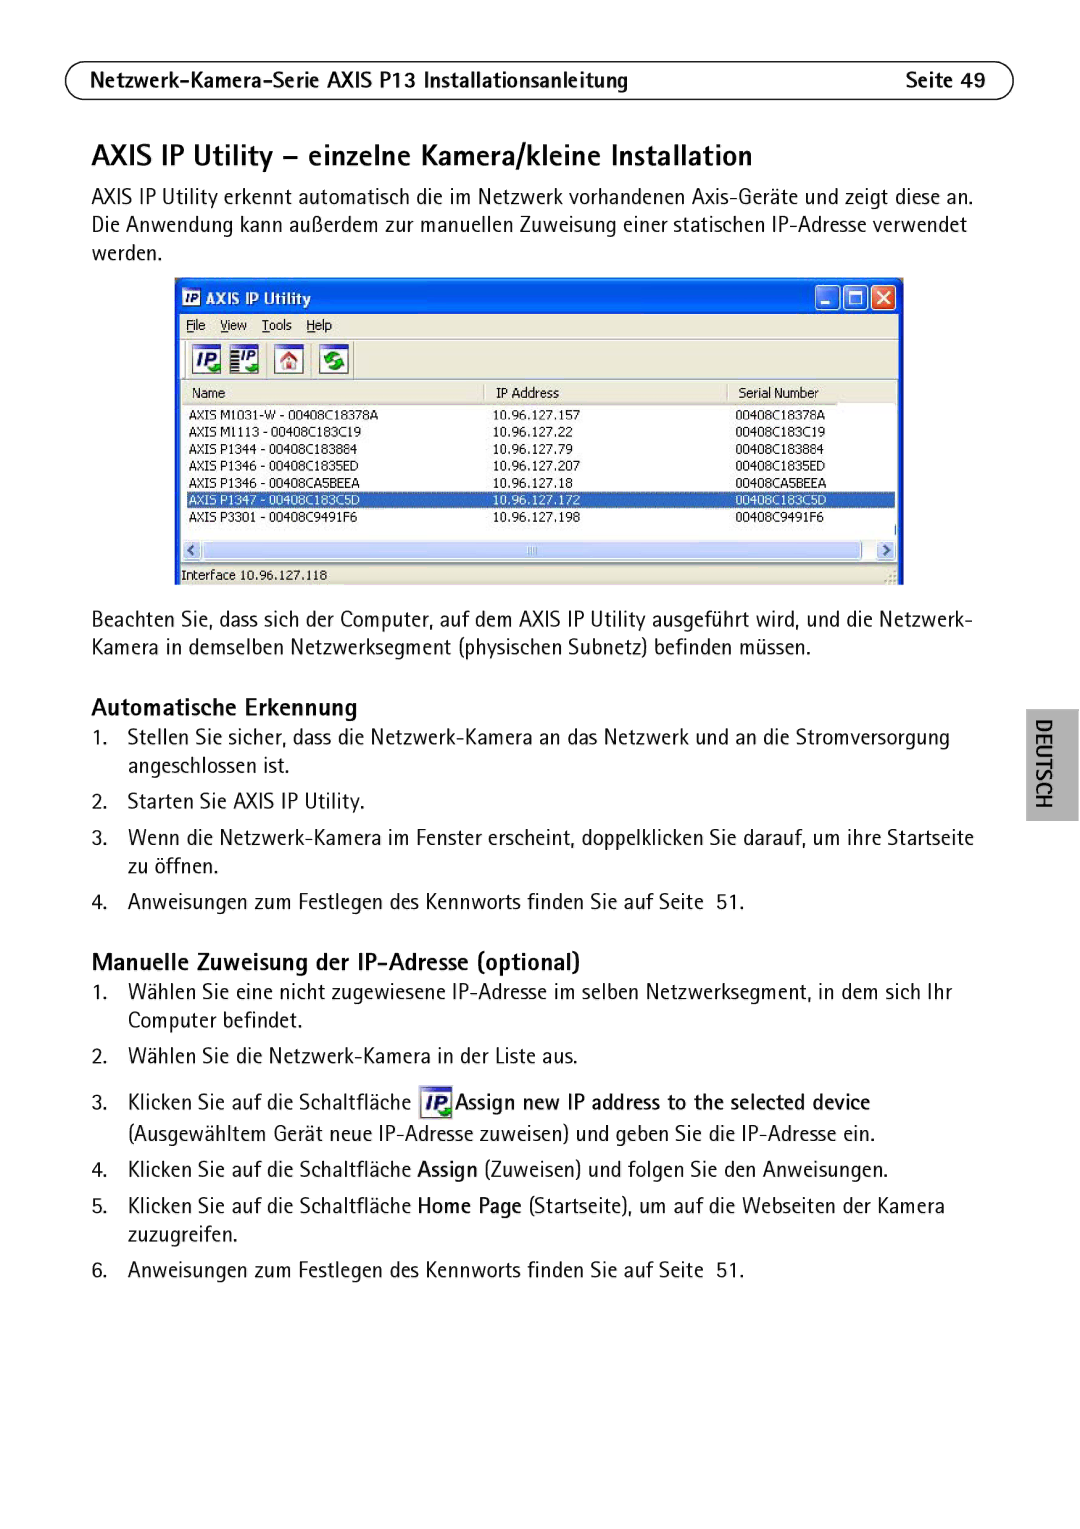
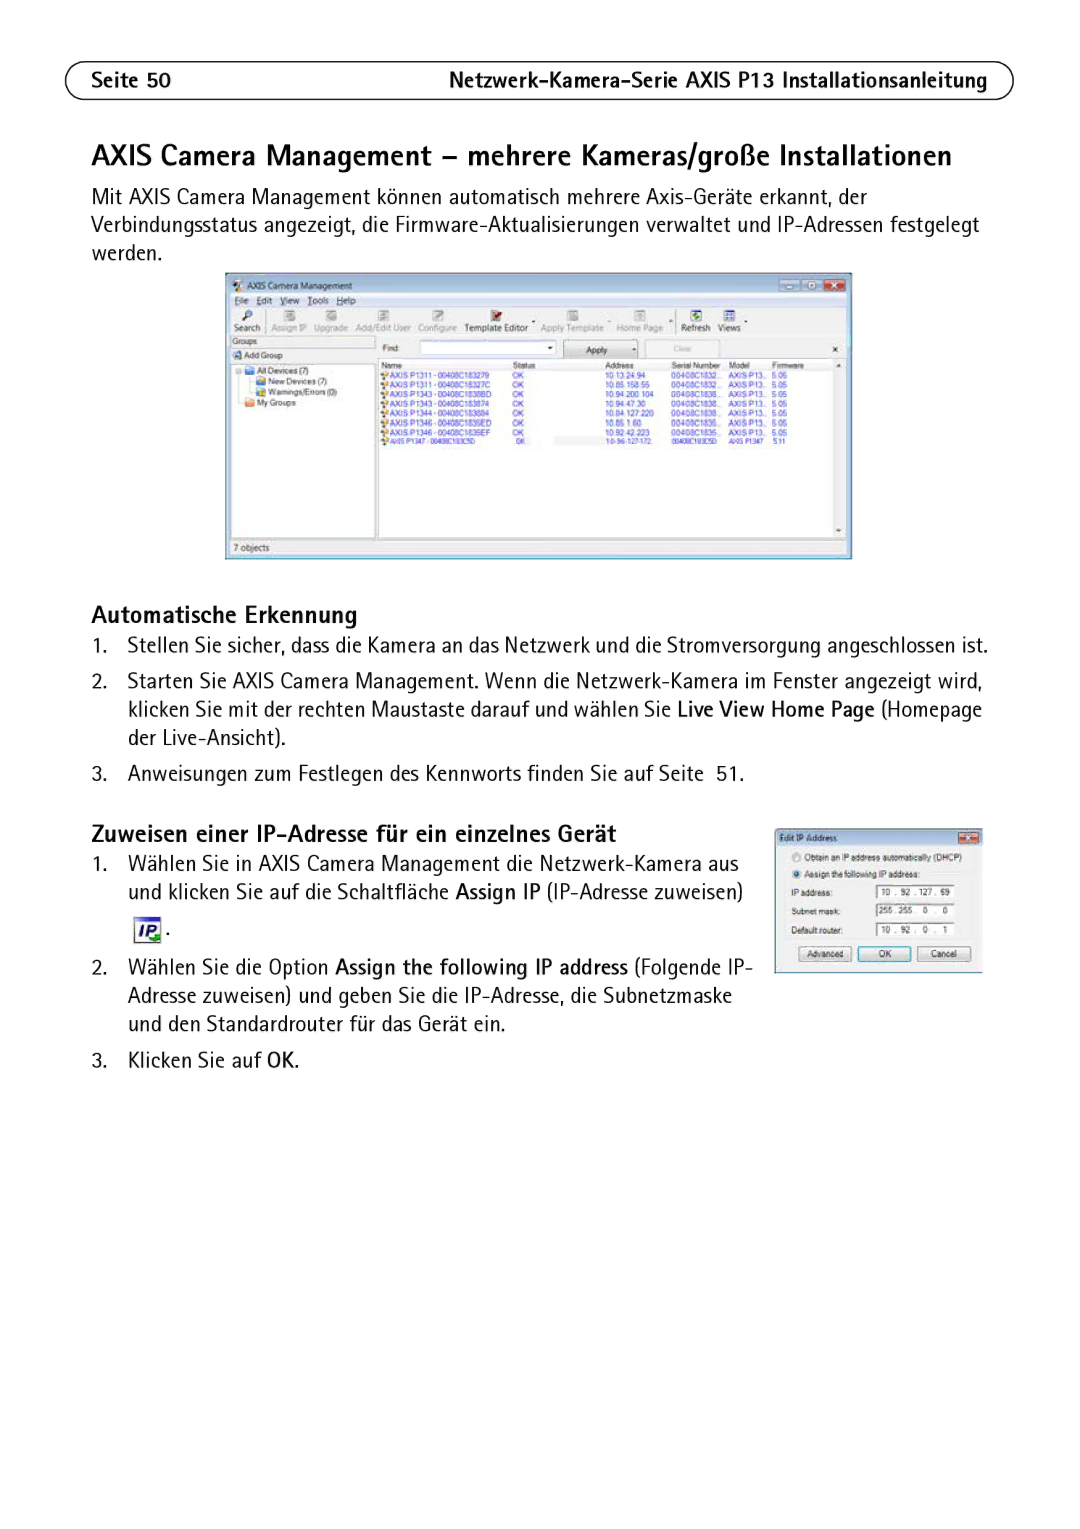
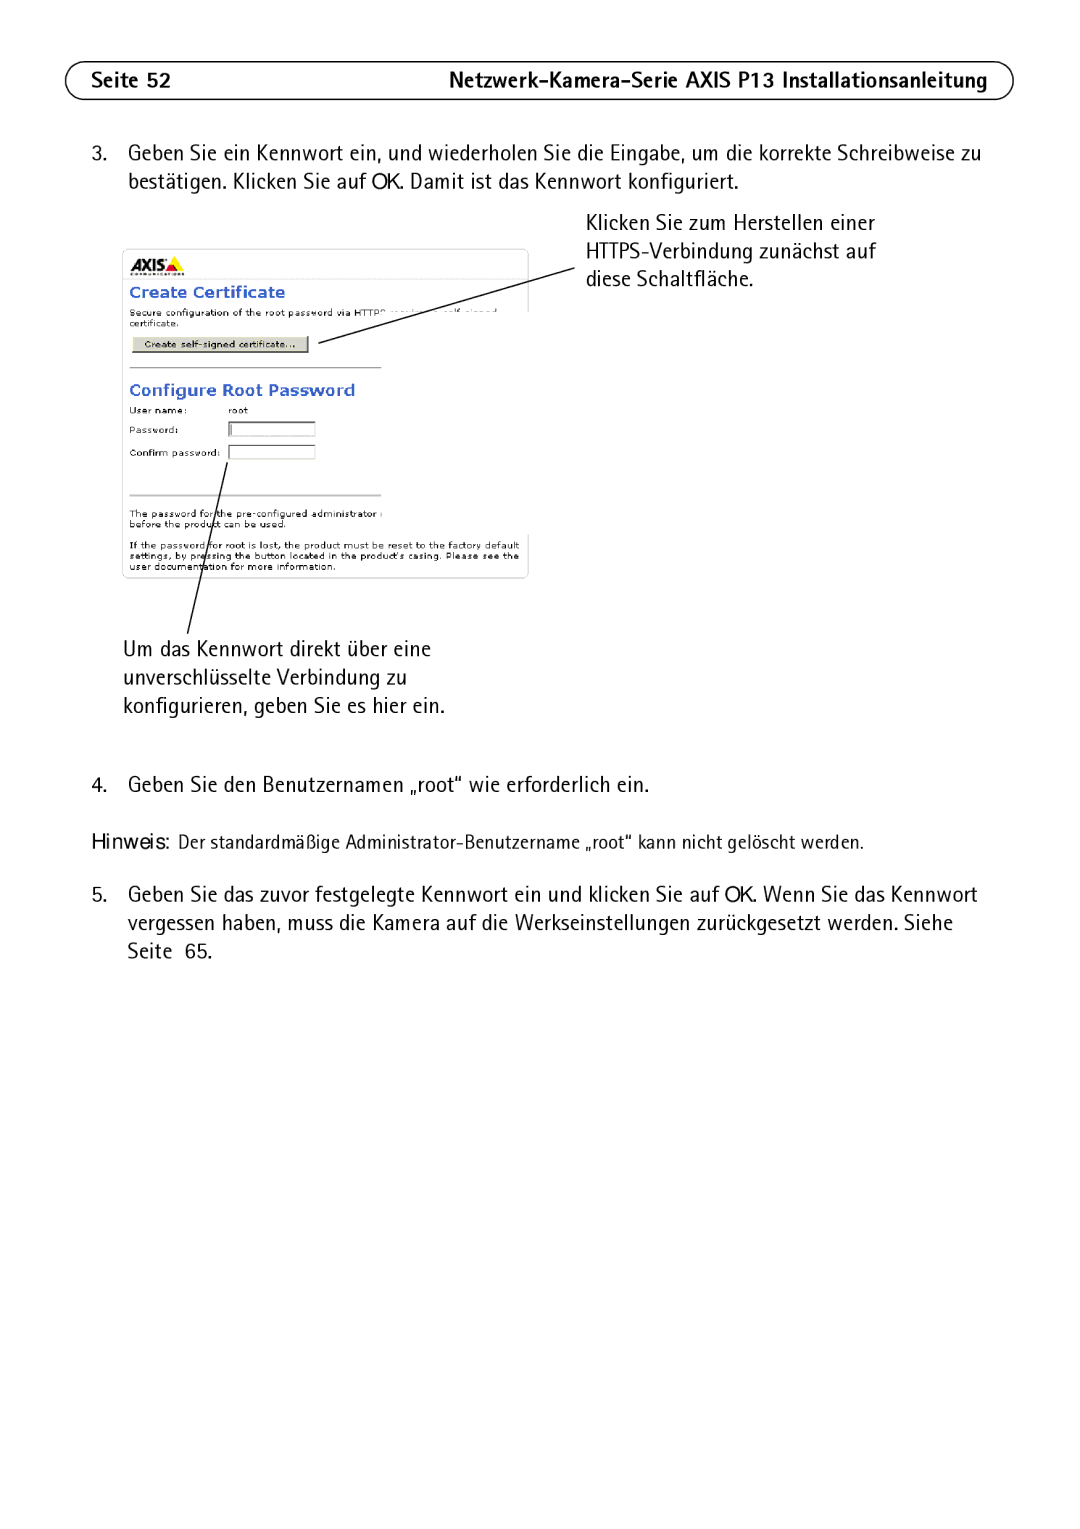
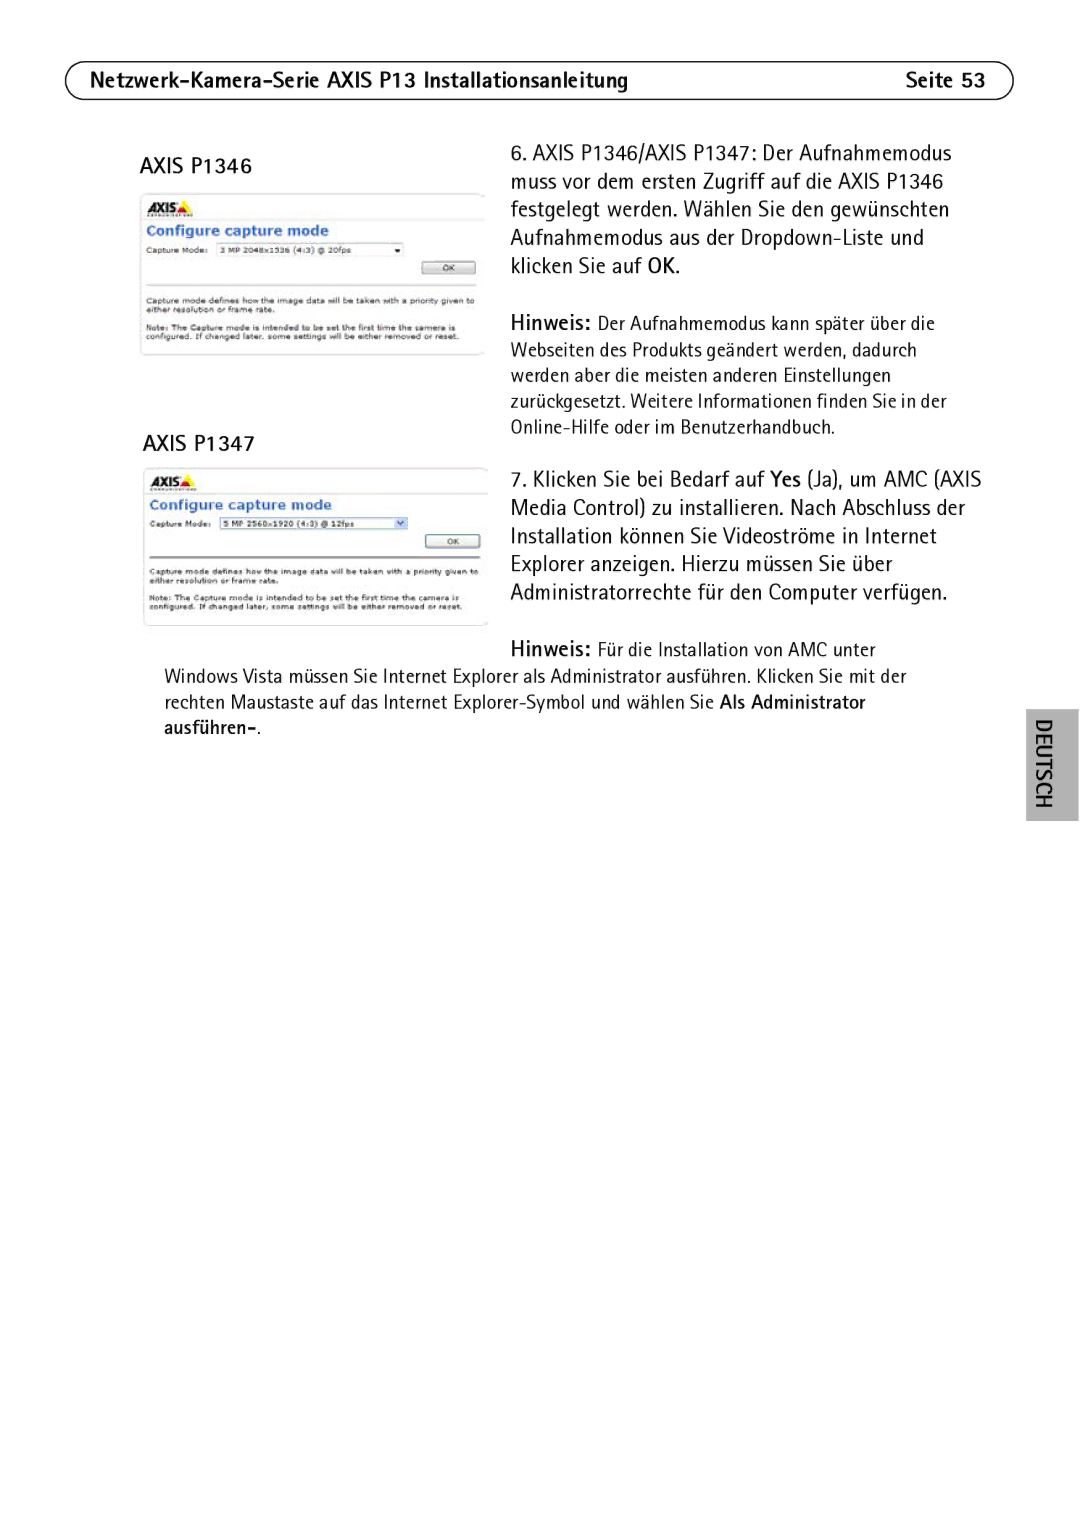
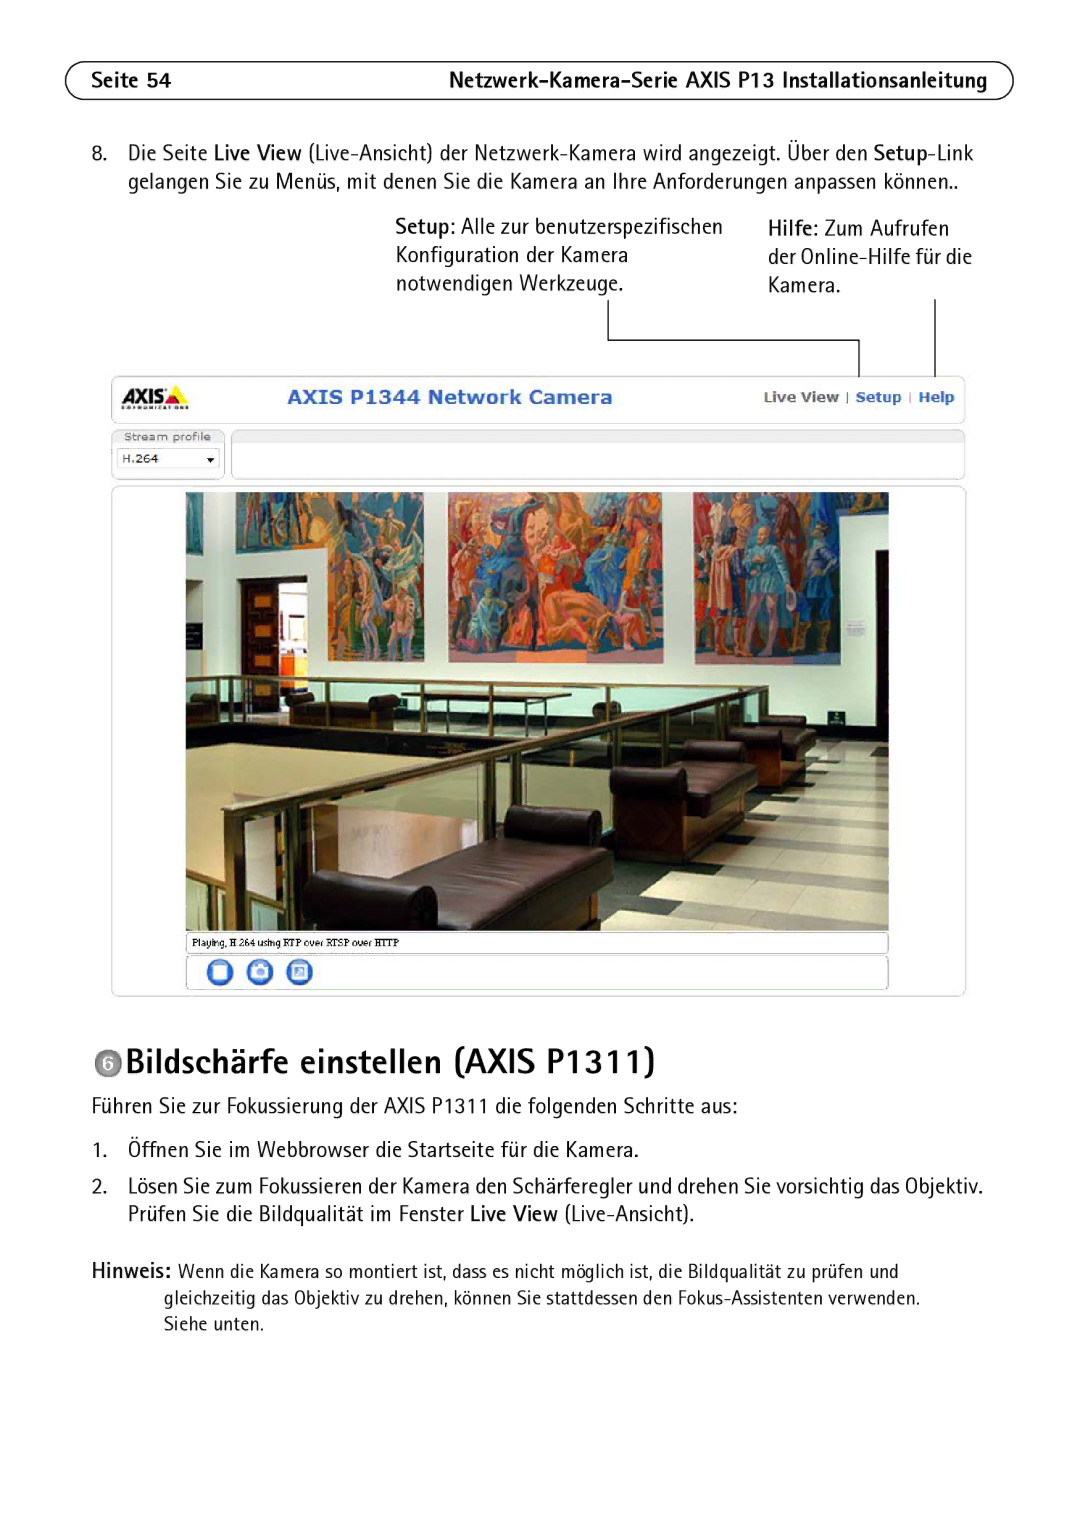
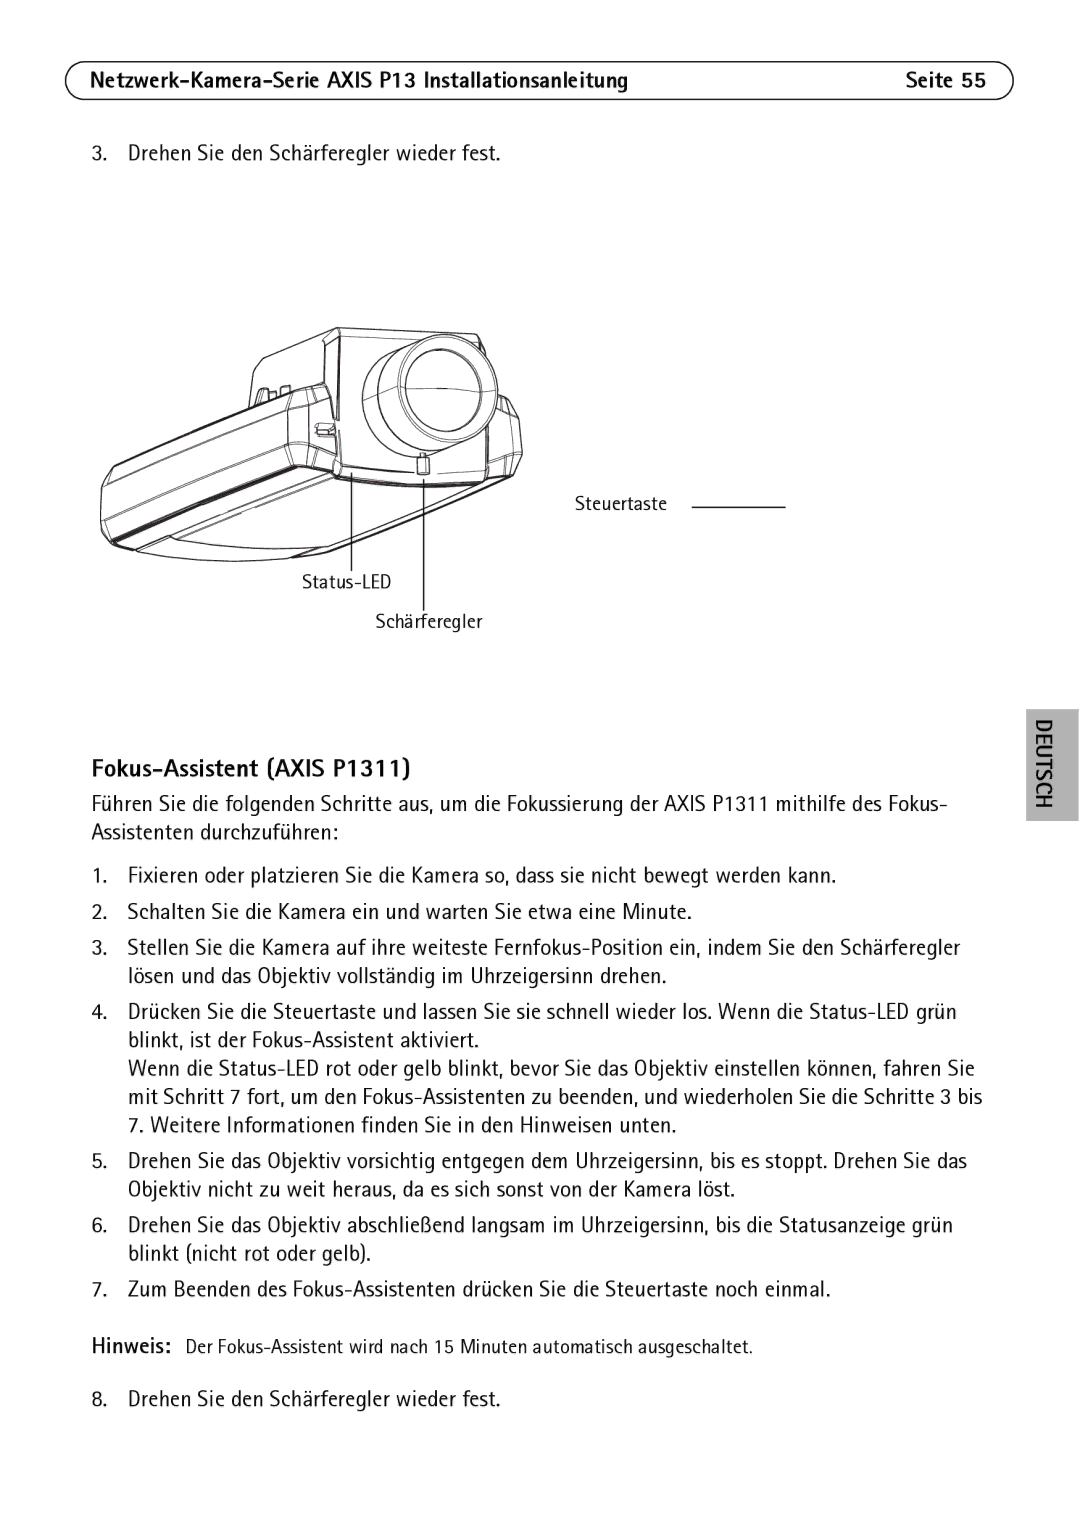
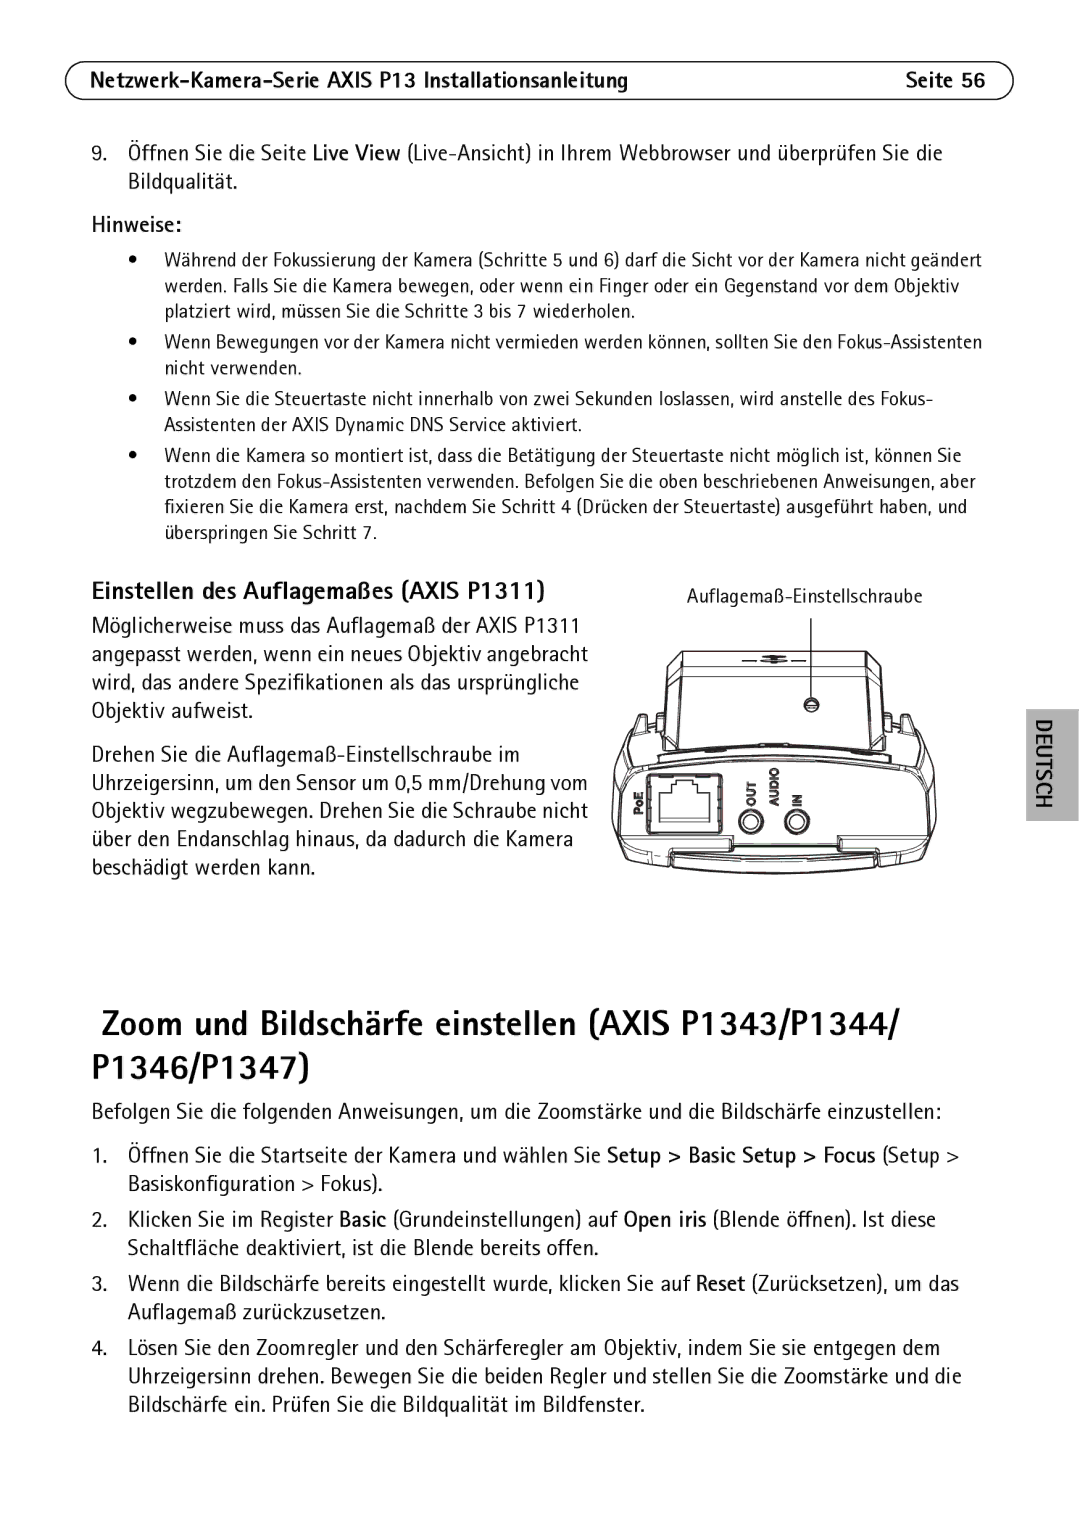
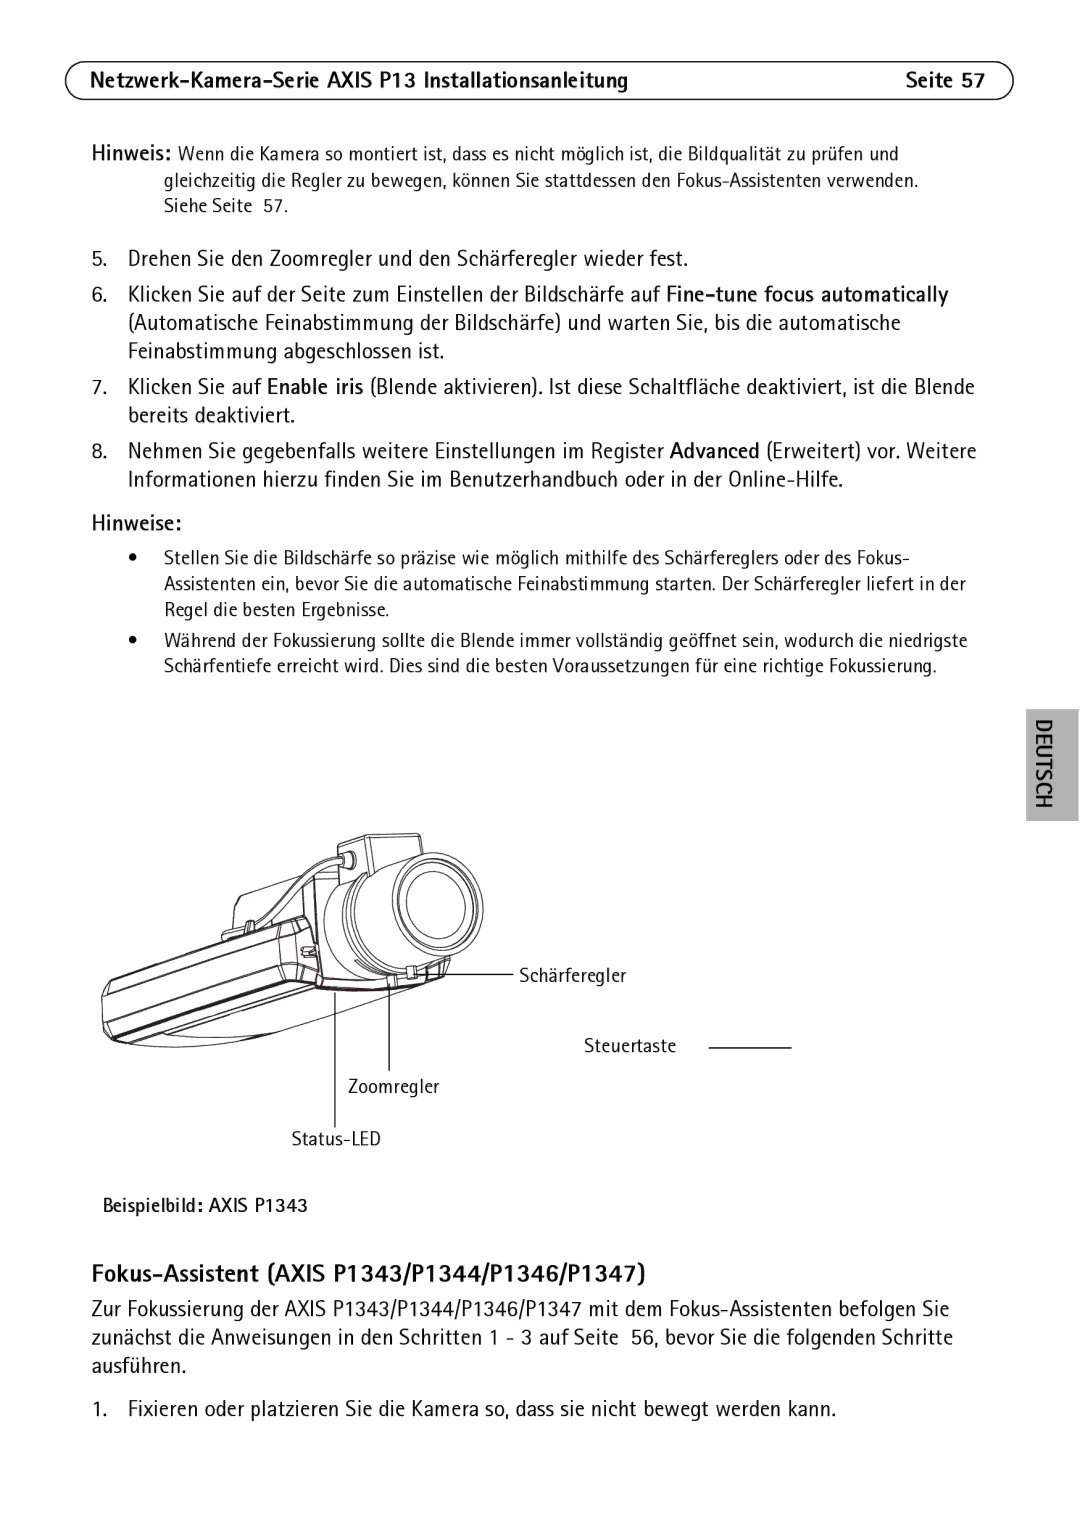
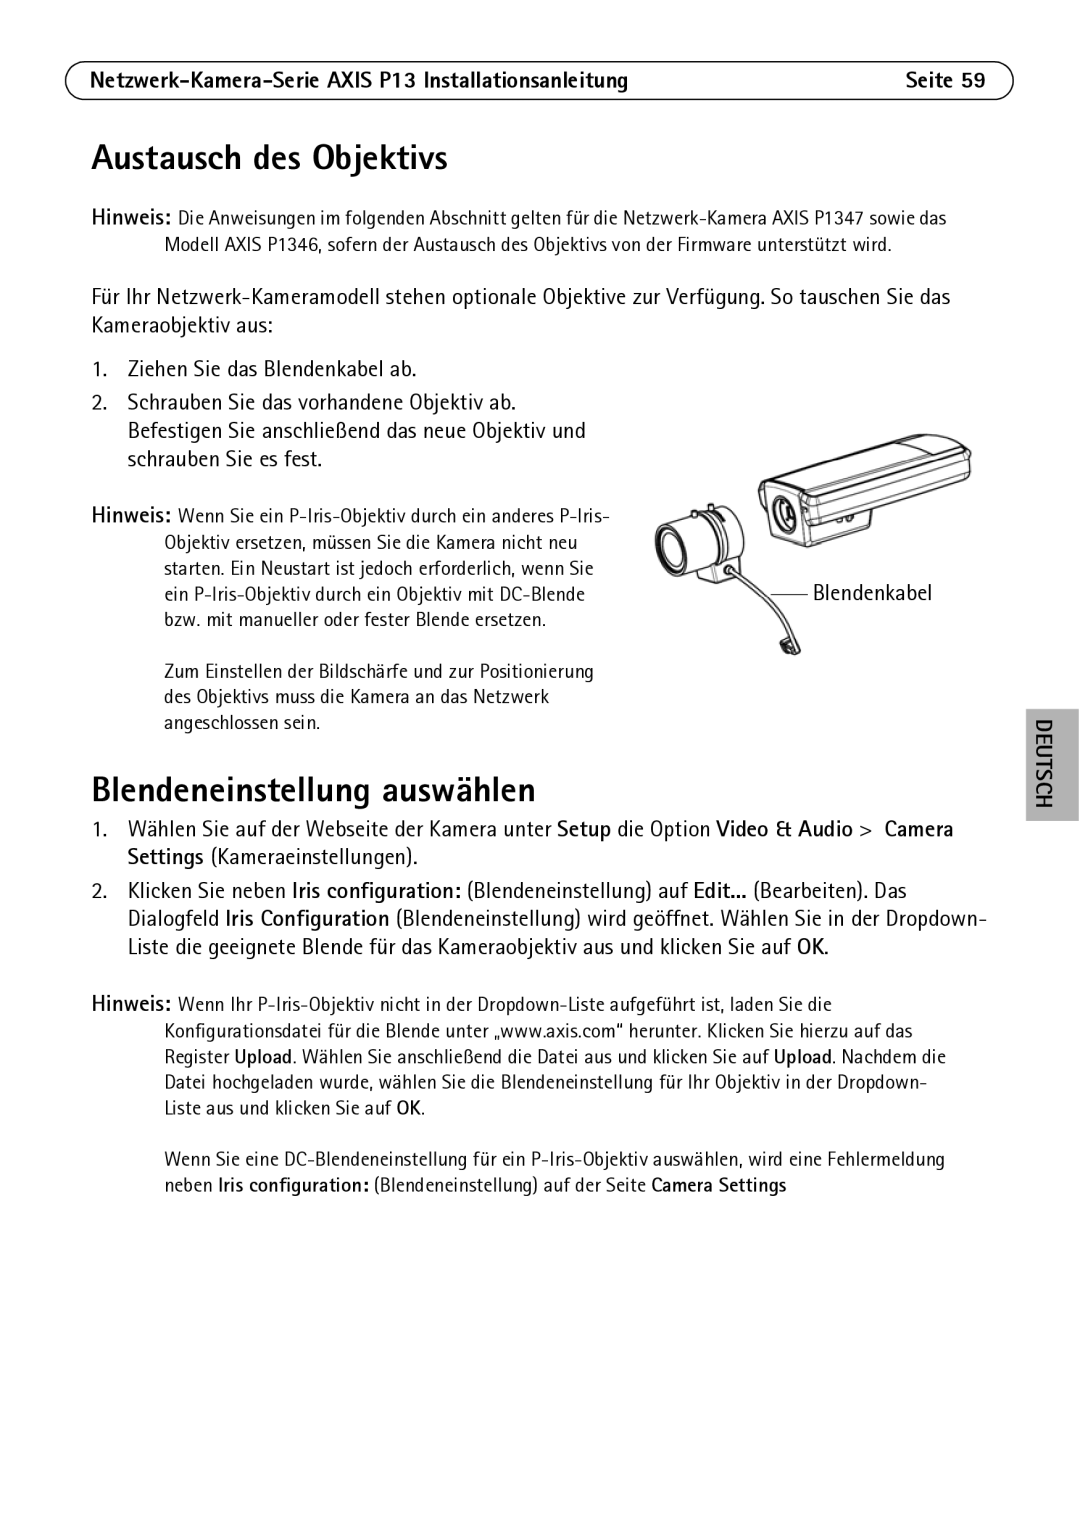
Contents Installation Guide Legal Considerations About this DocumentElectromagnetic Compatibility EMC Equipment ModificationsPackage contents Installation GuideRear view Top view Axis P1343 Hardware overviewDimensions Install the hardwareAxis P13 Network Camera Series Installation GuidePage Model W x D WeightMethod Recommended for Assign an IP addressAxis IP Utility single camera/small installation Automatic discoverySet the IP address manually optional Axis Camera Management multiple cameras/large installations Assign an IP address in a single deviceAssign IP addresses in multiple devices Click the Create self-signed certificate button Set the passwordOn the computer to do this Focus Assistant Axis P1311 Adjust focus Axis P1311Adjusting the back focus Axis P1311 Adjust zoom and focus Axis P1343/P1344/P1346/P1347Example image Axis P1343 Focus Assistant Axis P1343/P1344/P1346/P1347Axis P13 Network Camera Series Installation Guide Replacing the lens Select the iris configurationOther methods of setting the IP address Set the IP address with ARP/Ping Unit connectors FunctionDescription Function Pin Specifications LED indicators Resetting to the factory default settingsStatus LED when using the Focus Assistant Color IndicationAccessing the camera from the Internet Further informationTip Page Série des caméras réseau Axis P13 Guide d’installation Procédure d’installationContenu de l’emballage Élément Modèles/variantes/remarquesDescription du matériel Vue arrièreVue de dessus Axis P1343 Série des caméras réseau Axis P13 Guide d’installationPage Installation du matérielBranchement des câbles Modèle W x D PoidsMéthode Recommandée pour Système ’exploitation Attribution d’une adresse IPRemarques Axis IP Utility une seule caméra/petite installation Configuration manuelle de l’adresse IP facultatifDétection automatique Attribution d’une adresse IP à un seul périphérique Configuration du mot de passe Attribution d’adresses IP à plusieurs périphériquesRemarque Pour créer une connexion HTTPS, cliquez sur ce bouton P1346 Sur OKP1347 Réglage de la mise au point Axis P1311 Assistant de mise au point Axis P1311 Réglage du foyer arrière Axis P1311 Exemple de l’image Axis P1343 Assistant de mise au point Axis P1343/P1344/P1346/P1347Continuez avec les étapes 6 à 8 à la Sélectionnez la configuration du diaphragme Remplacement de l’objectifServeur Dhcp Autres méthodes de définition de l’adresse IPDéfinition de l’adresse IP à l’aide d’ARP/Ping Fonction Numéro Description Connecteurs de l’appareilFonction Broche Remarques Sortie numérique permet de connecter desMax mA Voyants lumineux Rétablissement des paramètres d’usineCouleur Indication Voyant Couleur Indication ’étatAccès à la caméra sur Internet Plus d’informationsConseil Netzwerk-Kamera-Serie Axis P13 Installationsanleitung InstallationsschritteLieferumfang WichtigHardwareübersicht Rückansicht Draufsicht Axis P1343Seite Netzwerk-Kamera-Serie Axis P13 InstallationsanleitungSeite Installation der HardwareAbmessungen Anschließen der KabelZuweisen einer IP-Adresse HinweiseMethode Empfohlen für Betriebssystem Axis IP Utility einzelne Kamera/kleine Installation Automatische ErkennungManuelle Zuweisung der IP-Adresse optional Zuweisen einer IP-Adresse für ein einzelnes Gerät Axis Camera Management mehrere Kameras/große InstallationenFestlegen des Kennworts Zuweisen von IP-Adressen für mehrere GeräteHinweis Geben Sie den Benutzernamen „root wie erforderlich ein Ausführen Axis P1347Bildschärfe einstellen Axis P1311 Fokus-Assistent Axis P1311 Einstellen des Auflagemaßes Axis P1311 Beispielbild Axis P1343 Fokus-Assistent Axis P1343/P1344/P1346/P1347Seite Blendeneinstellung auswählen Austausch des ObjektivsAndere Methoden zum Festlegen der IP-Adresse AVHS-ServiceHinweise DHCP-ServerZuweisen der IP-Adresse per ARP/Ping Geräteanschlüsse FunktionBedeutung Ummer Hinweise Spezifikationen Sie als Schnittstelle fürMax mA Schalter LED-Anzeigen Status-LED bei Verwendung des Fokus-AssistentenFarbe Bedeutung Zugriff auf die Kamera über das Internet Weitere InformationenTipp Importante Procedura di installazioneContenuto della confezione PaginaElemento Modelli/varianti/note Panoramica dell’hardware Vista posterioreVista dallalto Axis P1343 Dimensioni Installazione dellhardwareCollegamento dei cavi ModelloMetodo Consigliato per Assegnazione di un indirizzo IPAxis IP Utility telecamera singola/piccole installazioni Rilevamento automaticoAssegnazione manuale dell’indirizzo IP facoltativa Assegnazione di un indirizzo IP a un singolo dispositivo Axis Camera Management più telecamere/grandi installazioniImpostazione della password Assegnazione degli indirizzi IP a più telecamereNota Italiano Axis P1346 Axis P1347 Nota Per installare AMC in Windows Vista, è necessarioRegolazione della messa a fuoco Axis P1311 Pulsante di comando LED di stato Levetta di messa a fuoco Regolazione della messa a fuoco posteriore Axis P1311 Immagine di esempio Axis P1343 Italiano Sostituzione dellobiettivo Selezionare la configurazione del diaframmaImpostazioni telecamera Altri metodi di assegnazione dell’indirizzo IPOperativo Connessione al Servizio AvhsAssegnazione dell’indirizzo IP con ARP/Ping Funzione Numero Descrizione Pin ConnettoriFunzione Pin Dati tecnici Uscita digitale Per collegare dispositivi esterniEsempio pulsante Ripristino delle impostazioni predefinite Indicatori LEDLED di stato durante luso di Focus Assistant Colore IndicazioneAccesso alla telecamera da Internet Ulteriori informazioniSuggerimento Page Pasos para la instalación Contenido del paqueteGuía de instalación de la serie de cámaras de red Axis P13 Artículo Modelos/variantes/notasVista superior Axis P1343 Presentación del hardwareVista posterior PáginaInstalación del hardware DimensionesConexión de los cables Modelo Alt. x Anch. x Prof PesoAsignación de una dirección IP NotasMétodo Recomendado para Detección automática Configuración manual de la dirección IP opcionalAsignación de una dirección IP en un dispositivo individual Asignación de direcciones IP en varios dispositivos Configuración de la contraseñaPágina Español Ajuste del enfoque Axis P1311 Asistente de enfoque Axis P1311 Ajuste del enfoque posterior Axis P1311 Ajuste del zoom y del enfoque Axis P1343/P1344/P1346/ P1347Imagen de ejemplo Axis P1343 Asistente de enfoque Axis P1343/P1344/P1346/P1347Página Sustitución del objetivo Seleccione la configuración del irisUso en sistema Notas Operativo Servicio de Otros métodos para configurar la dirección IPConexión Avhs Servicio de DNSConfiguración de la dirección IP con ARP/Ping Función Número Descripción De pin Conectores de la unidadFunción Pin Notas Especificaciones Ej. botón pulsador Indicadores LED Restablecimiento de los valores inicialesLED de estado al utilizar el Asistente de enfoque Color IndicaciónAcceso a la cámara desde Internet Más informaciónUn consejo English FRANÐáAI Deutsch Italiano ESPAÐëO Ver

P1343, P1344, P1311, P1347 specifications

Axis Communications is a leader in network video solutions, renowned for its pioneering technologies and commitment to quality. Among its extensive lineup of products, the P1347, P1311, P1344, and P1343 models stand out for their advanced features and capabilities, making them suitable choices for a variety of surveillance applications.

The Axis P1347 is equipped with a high-resolution 2 MP sensor, delivering excellent image quality with detailed color reproduction. This model features Lightfinder technology, which enhances low-light performance, enabling clear images even in challenging lighting conditions. Moreover, it supports comprehensive H.264 and Motion JPEG compression formats, offering flexibility in managing bandwidth and storage without compromising on video quality.

In contrast, the Axis P1311 is designed for exceptional indoor surveillance. It also has a 1 MP resolution, making it suitable for a range of environments requiring clear monitoring. One notable feature of the P1311 is its day/night functionality, which allows the camera to switch between color and monochrome modes based on lighting conditions, ensuring optimal visibility at all times. This model also includes axis’ Zipstream technology, which intelligently reduces bandwidth and storage requirements by optimizing the compression of complex scenes.
The Axis P1344 model further enhances the video surveillance experience with its progressive scan technology. This feature ensures that images are captured without motion blur, making it ideal for monitoring fast-moving subjects, such as in retail or transportation settings. Like its counterparts, the P1344 supports H.264 and Motion JPEG formats, providing versatility in video encoding.

Lastly, the Axis P1343 camera combines simplicity and effectiveness. It offers a 1 MP resolution and is equipped with features such as wide dynamic range (WDR) capabilities, allowing for clear images in scenes with significant lighting contrasts. The P1343 is also designed for ease of installation with Power over Ethernet (PoE) support, which reduces cabling requirements and simplifies setup.

In summary, the Axis P1347, P1311, P1344, and P1343 each come with distinct features tailored to various surveillance needs. From high-resolution imaging and low-light performance to advanced compression technologies and ease of deployment, these cameras exemplify Axis Communications’ commitment to innovation and reliability in the field of video surveillance.