Sharp MD-MX20 Important Safeguards, Near water for example, near a bathtub, washbowl

Page 3

IMPORTANT SAFEGUARDS

CAUTION

All the safety and operating instructions should be read before the appliance is operated, and should be retained for future reference.

Electrical energy can perform many useful functions. This unit has been engineered and manufactured to assure your personal safety. Improper use can result in potential electrical shock or fire hazards. In order not to defeat the safeguards, observe the following basic rules for its installation, use and servicing.

1

Heed Warnings - All warnings on the appliance and in


the operating instructions should be adhered to.

2

Follow Instructions - All operating and use instructions


should be followed.

3

Water and Moisture - The appliance should not be used


near water - for example, near a bathtub, washbowl,

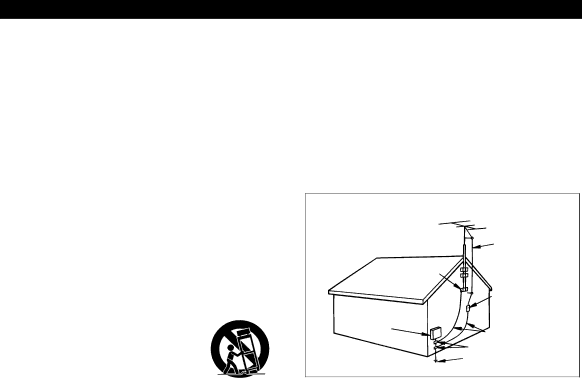
12 Outdoor Antenna Grounding - If an outside antenna is connected to the receiver, be sure the antenna system is grounded so as to provide some protection against voltage surges and built-up static charges. Section 810 of the National Electrical Code, ANSI/NFPA No. 70- 1984, provides information with respect to proper grounding of the mast and supporting structure, ground- ing of the lead-in wire to an antenna discharge unit, size of grounding conductors, location of antenna-dis- charge unit, connection to grounding electrodes, and requirements for the grounding electrode.

EXAMPLE OF ANTENNA GROUNDING AS PER

NATIONAL ELECTRICAL CODE

kitchen sink, laundry tub, in a wet basement, or near a

swimming pool, etc.

4 Carts and Stands - The appliance should be used only

with a cart or stand that is recommended by the manu-

facturer.

● An appliance and cart combination

should be moved with care.

Quick stops, excessive force, and un- even surfaces may cause the appli- ance and cart combination to overturn.

GROUND

CLAMP

E L E C T R I C

S E R V I C E

EQUIPMENT

NEC - NATIONAL ELECTRICAL CODE S2898A

ANTENNA LEAD

IN WIRE

ANTENNA DI SCHARG E UNIT

(NEC SECTION 810-20)

GROUNDING CONDUCTORS (NEC SECTION 810-21)

GROUND CLAMPS

POWER SERVICE GROUNDING ELECTRODE SYSTEM

(NEC ART 250, PART H)

5Wall or Ceiling Mounting - The appliance should be mounted to a wall or ceiling only as recommended by the manufacturer.

6Ventilation - The appliance should be situated so that its location or position does not interfere with its proper ventilation. For example, the appliance should not be situated on a bed, sofa, rug, or similar surface that may block the ventilation openings; or, placed in a built-in installation, such as a bookcase or cabinet that may impede the flow of air through the ventilation openings.

7Heat - The appliance should be situated away from heat sources such as radiators, heat registers, stoves, or other appliances (including amplifiers) that produce heat.

8Power Sources - The appliance should be connected to a power supply only of the type described in the op- erating instructions or as marked on the appliance.

9Power-Cord Protection - Power-supply cords should be routed so that they are not likely to be walked on or pinched by items placed upon or against them, paying particular attention to cords at plugs, convenience re-

ceptacles, and the point where they exit from the appli- ance.

10 Do not use liquid cleaners or aerosol cleaners. Use a damp cloth for cleaning.

11 Power Lines - An outdoor antenna should be located away from power lines.

13 Nonuse Periods - The power cord of the appliance should be unplugged from the outlet when left unused for a long period of time.

14 Object and Liquid Entry - Care should be taken so that objects do not fall and liquids are not spilled into the enclosure through openings.

15 Damage Requiring Service - The appliance should be serviced by qualified service personnel when:

AThe power-supply cord or the plug has been damaged; or

BObjects have fallen, or liquid has been spilled into the appliance; or

CThe appliance has been exposed to rain; or

DThe appliance does not appear to operate normally or exhibits a marked change in performance; or

EThe appliance has been dropped, or the enclosure dam- aged.

16 Servicing - The user should not attempt to service the appliance beyond that described in the operating in- structions. All other servicing should be referred to quali- fied service personnel.

17Grounding or Polarization - Precautions should be taken so that the grounding or polarization means of an ap- pliance is not defeated.

2

Image 3
Contents MD-MX20 Please retain this information Special NotesNear water for example, near a bathtub, washbowl Important SafeguardsAccessories ContentsCare of compact discs PrecautionsVolume control GeneralFront panel Names of Controls and IndicatorsRear panel Display windowRemote control Speaker section Preparation for USE Antenna connectionSpeaker connection Placing the system Connecting the AC power cordDemo mode Removing the speaker grillesDimmer Remote control To change the brightness of the displayPrecautions for battery use When bright Lights up When dark Goes outSetting the Clock ON/STAND-BY Memory EnterClock Extra bass X-BASS VolumeSound Control Pre-programmed equalizerCD playback Compact Disc OperationPress the MD 06 button Minidisc OperationMiniDisc playback To remove a MiniDiscMD/CD 3 MD/CD Convenient CD and Minidisc OperationsApss Auto Program Search System Cue and reviewApms Automatic Programmable Music Selector CD HClear CD H MD H Mode Repeat and random playDisplay Switching the time displayChanging the display during MiniDisc playback TimeAuto tuning Manual tuningClear Memory Enter Preset tuningPreset memory scan PresetAbout track numbers Minidisc RecordingDifferences from tape recordings Disc writing TOCTo stop recording To cancel the operationRecording from a CD onto a MiniDisc One-Touch Editing To check the remaining time available for record- ingTrack editing from a CD onto a MiniDisc Press the CD 06 button To record without using One-Touch EditingApms recording from a CD onto a MiniDisc Press the REC buttonRecording from the built-in radio onto a MiniDisc To record the track number while recordingCheck the recordable time by pressing the Display button To create a disc name TIMER/DELETEMinidisc Editing What the editing function can doTo erase a track name To create a track nameTo add a character TIMER/DELETE NAME/TOC Edit 3 MD Memory EnterTo change disc names and track names Jog dial To delete a characterPress the MEMORY/ENTER button again When both tracks have a nameDivide Combine Two consecutive tracks can be combined into one trackDesignated track can be moved to any desired position MoveAll of the tracks you want to erase can be erased at once Erase All EraseTracks you want to erase can be erased one at a time To erase tracks one at a timeTuner Band 2 AUX Timer OperationTimer playback/Timer recording Jog dial 2 CD HSimultaneous sleep and timer operation Sleep operationSTAND-BY Using External Units Connecting external unitsHeadphones Manual recording Listening to sound from an external unitWhat is a MINIDISC? General TroubleshootingIf a problem occurs Minidisc System LimitationsRadio reception Resetting the MicrocomputerRemote control MiniDisc recording and playbackNumber or Error MessagesError messages Meaning Remedy SymbolSpecifications MaintenanceMemo Memo Model Specific Section Where to Obtain Service What to do to Obtain Service