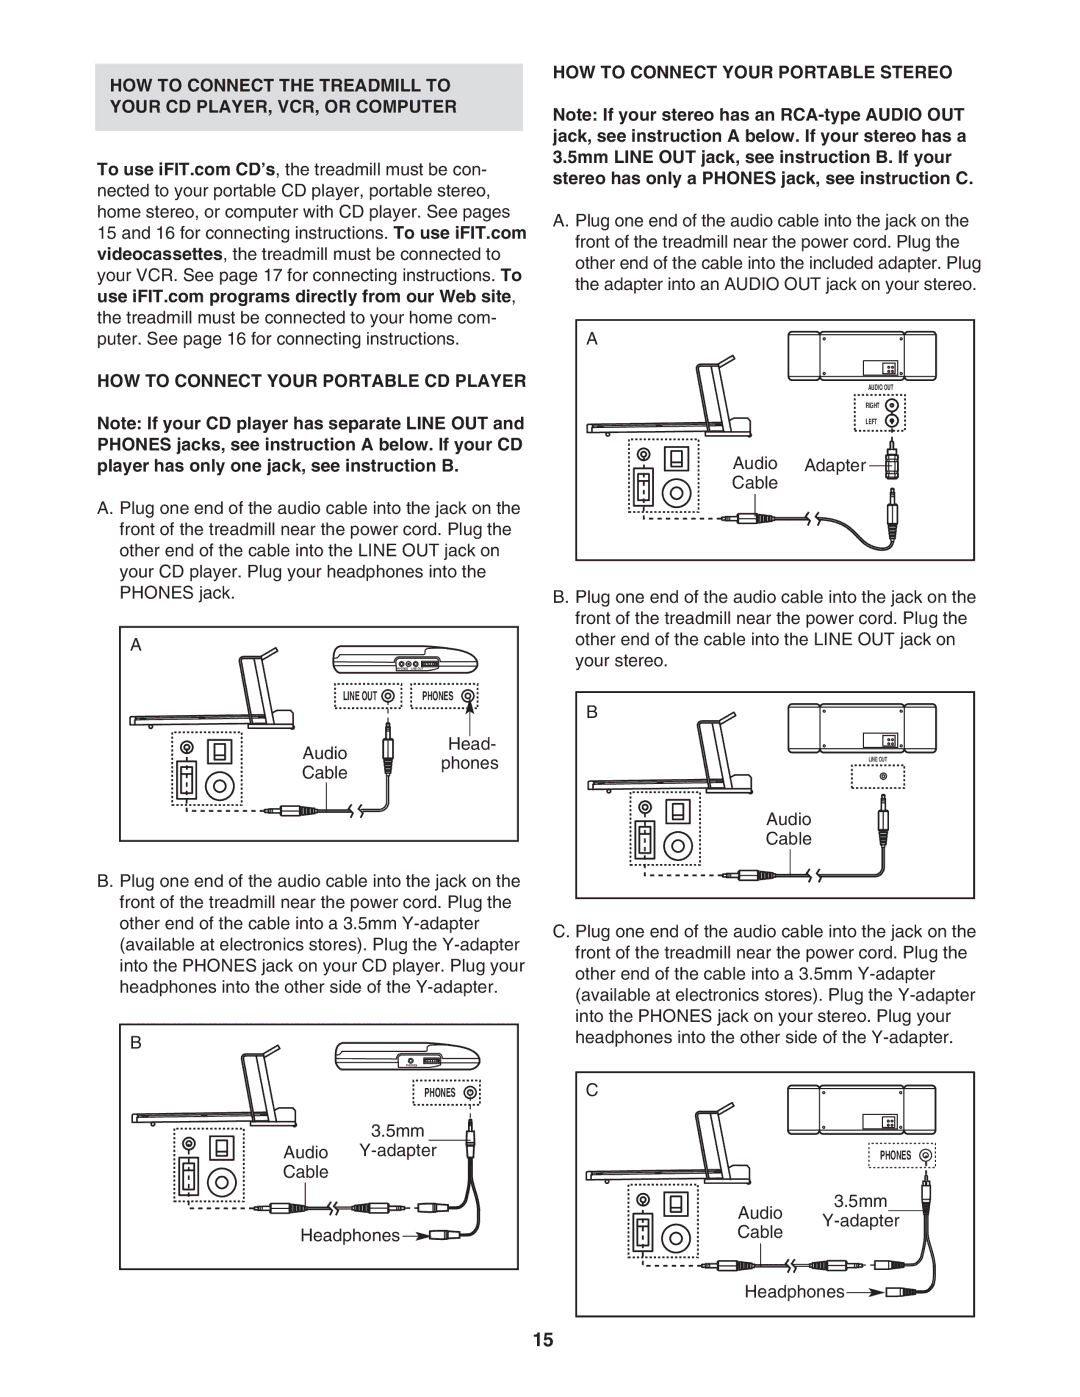
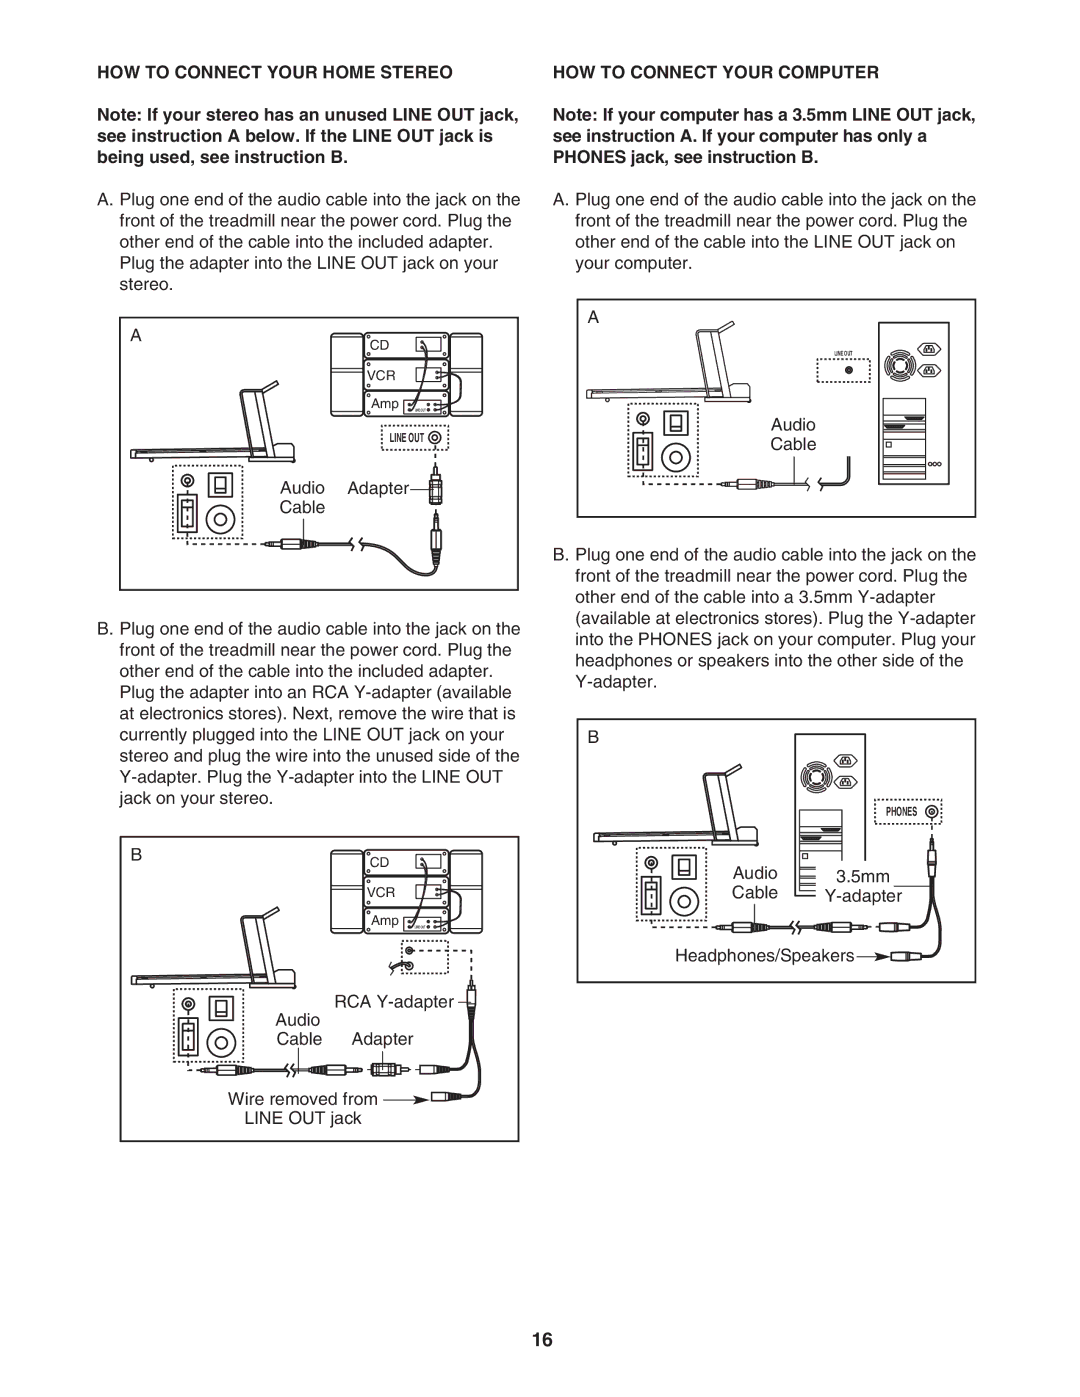
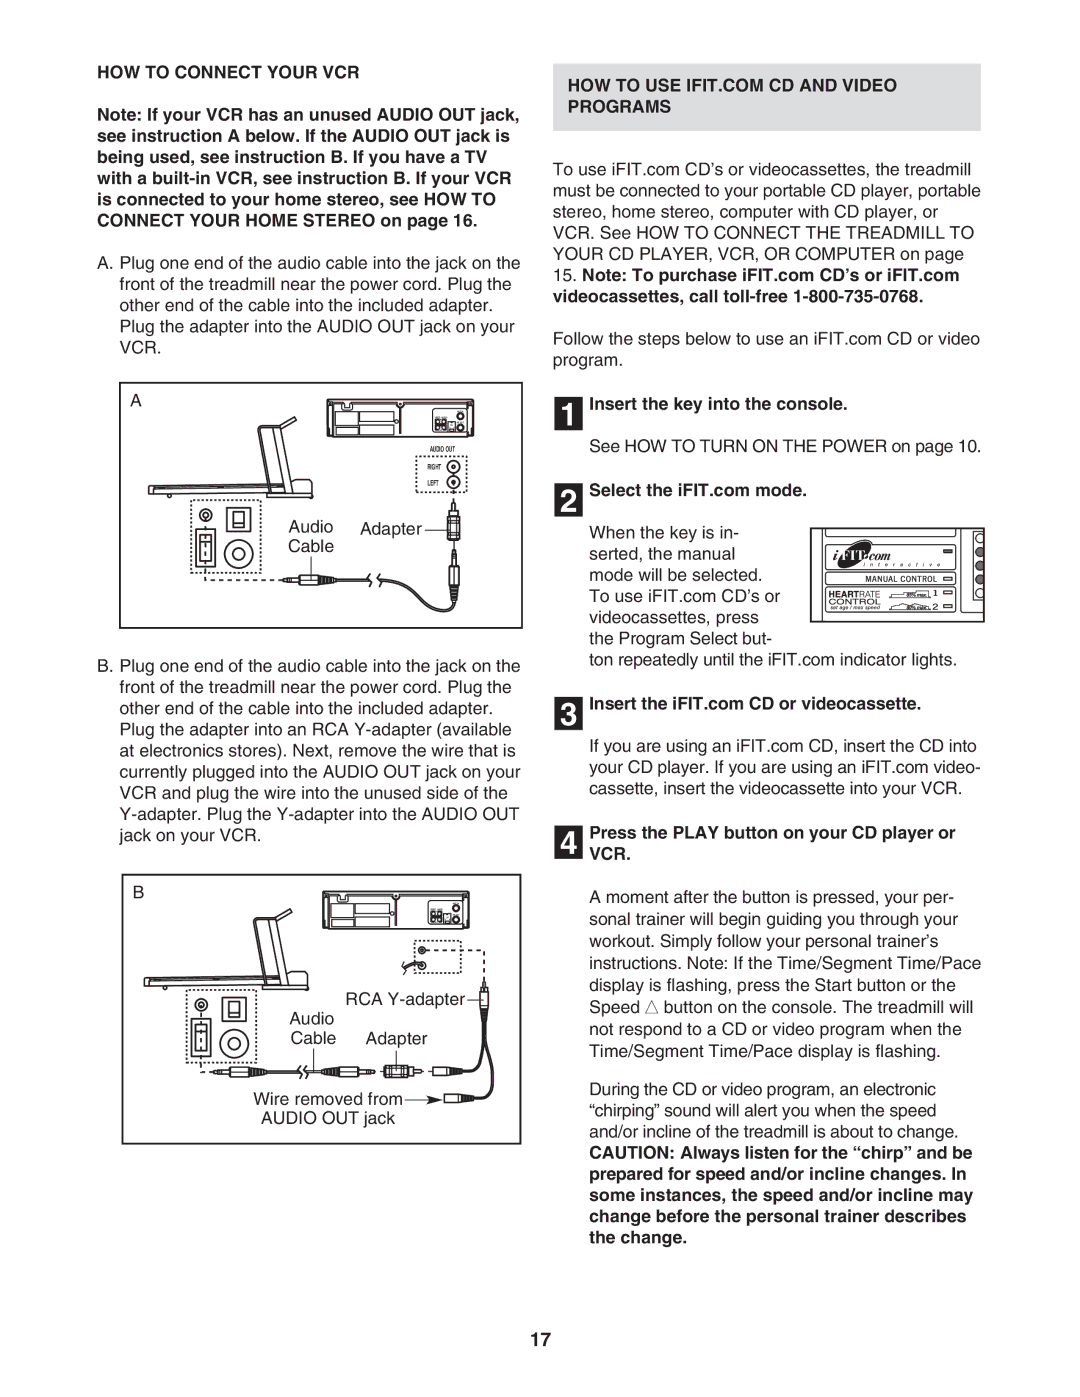
Reebok Fitness RBTL12921 manual HOW to Order Replacement Parts, Part Identification Chart

Page 31

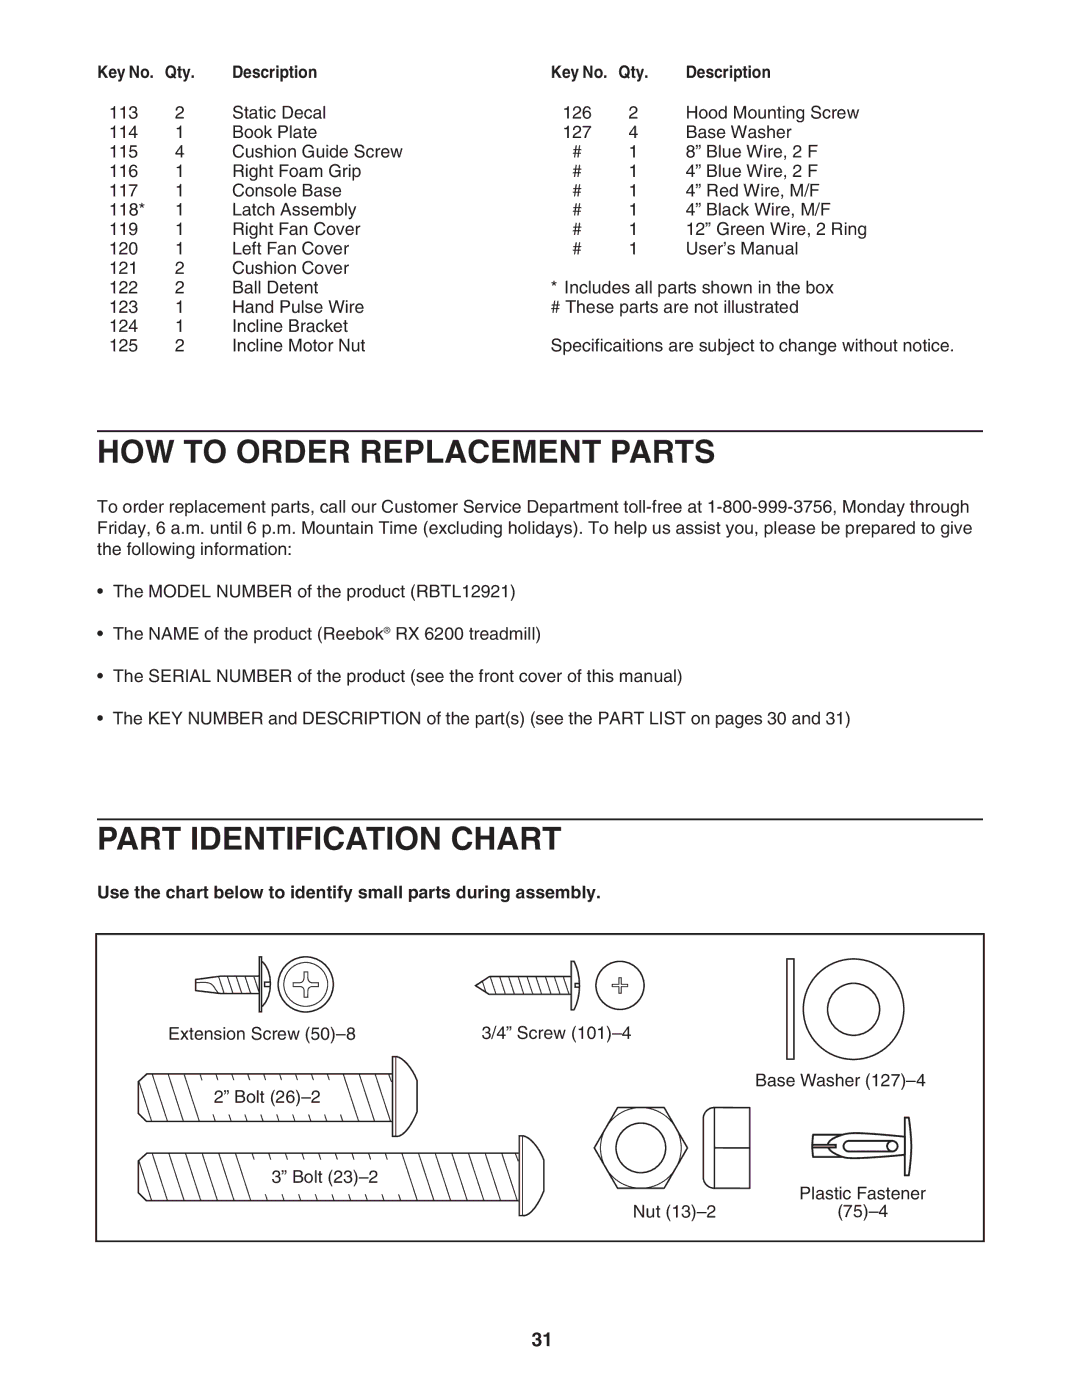
Key No.

Qty.

Description

Key No.

Qty.

Description

113

2

Static Decal

126

2

Hood Mounting Screw

114

1

Book Plate

127

4

Base Washer

115

4

Cushion Guide Screw

#

1

8” Blue Wire, 2 F

116

1

Right Foam Grip

#

1

4” Blue Wire, 2 F

117

1

Console Base

#

1

4” Red Wire, M/F

118*

1

Latch Assembly

#

1

4” Black Wire, M/F

119

1

Right Fan Cover

#

1

12” Green Wire, 2 Ring

120

1

Left Fan Cover

#

1

User’s Manual

121

2

Cushion Cover


122

2

Ball Detent

* Includes all parts shown in the box

123

1

Hand Pulse Wire

# These parts are not illustrated

124

1

Incline Bracket

Specificaitions are subject to change without notice.

125

2

Incline Motor Nut

HOW TO ORDER REPLACEMENT PARTS

To order replacement parts, call our Customer Service Department toll-free at 1-800-999-3756, Monday through Friday, 6 a.m. until 6 p.m. Mountain Time (excluding holidays). To help us assist you, please be prepared to give the following information:

The MODEL NUMBER of the product (RBTL12921)

The NAME of the product (Reebok® RX 6200 treadmill)

The SERIAL NUMBER of the product (see the front cover of this manual)

The KEY NUMBER and DESCRIPTION of the part(s) (see the PART LIST on pages 30 and 31)

PART IDENTIFICATION CHART

Use the chart below to identify small parts during assembly.

Extension Screw (50)–8

3/4” Screw (101)–4

2” Bolt (26)–2

3” Bolt (23)–2

Base Washer (127)–4


Plastic Fastener

Nut (13)–2

(75)–4

31

Image 31
Contents Model No. RBTL12921 Serial No QUESTIONS?Customer HOT Line Table of Contents Important Precautions Page Back Before YOU BeginRight Side Assembly Uprights 65 as shown, with the Bumpers 98 under Make sure that no wires are pinched. See stepTurn the Receiver B so the cylinder is on the side Treadmill Operation HOW to Plug in the Power CordPerformant Lubetm Walking Belt Features of the Console HOW to USE the Manual Mode HOW to Turn on the PowerSee page 20 and turn off the demo mode When you are finished exercising, removeAdjust the incline of the treadmill to the lowest Removed, the console is in the demo modeSelect one of the preset workout programs HOW to USE Preset Workout ProgramsSelect a heart rate program HOW to USE Heart Rate ProgramsFollow your progress with the displays Put on the optional chest pulse sensorEnter your age and a maximum speed setting For the program HOW to Connect Your Portable Stereo HOW to Connect Your Computer HOW to Connect Your Home StereoVCR HOW to Connect Your VCRInsert the key into the console Press the Play button on your CD player orWhenkey. the program is completed, remove Return to the treadmill and stand on the foot HOW to USE Programs Directly from OUR WEB SiteWhen the program has ended, remove the key Follow the on-line instructions to start ProgramHOW to Adjust the Firmness of the Cushioning System Information MODE/DEMO ModeOptional Chest Pulse Sensor HOW to Fold the Treadmill for Storage HOW to Fold and Move the TreadmillHOW to Move the Treadmill HOW to Lower the Treadmill for USE Problem The power turns off during use TroubleshootingProblem The walking belt slows when walked on Top View Problem The displays of the console do not function properlyWalking and Reduced Risk for CARDIOVAS- Cular Disease Walking and Weight ReductionReebok University Walking and Cardiorespiratory EnduranceWalking and Injuries Walking and Stress ReductionReferences Exercise Frequency Exercise GuidelinesExercise Intensity Workout GuidelinesSuggested Stretches Page Qty Description R1203APart Identification Chart HOW to Order Replacement PartsUse the chart below to identify small parts during assembly RBTL12921 Exploded Limited Warranty