Miele W 1113 Cleaning the water inlet filters, Cleaning the inlet hose filter

Page 32

Washer care

Cleaning the water inlet filters

The washer has two water inlet filters to protect each inlet valve. These filters should be checked every 6 months and cleaned, if necessary. (This may need to be performed more frequently with some water supplies).

,Inspect the hose regularly. The hose must be in good condition to withstand high water pressure. The hose should be replaced if there are cracks in the surface, or if it has been otherwise damaged or cut.

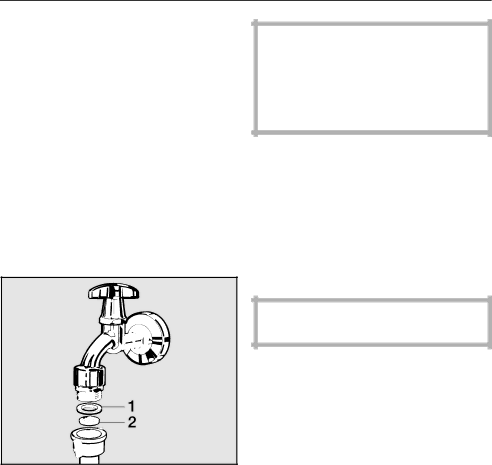
Cleaning the inlet hose filter

^Turn off the water valve.

^Unscrew the inlet hose from the valve by turning the connector counterclockwise using a wrench if necessary.

^Remove the rubber seal, 1, from the connector.

^Using needle nose pliers, grasp the plastic filter, 2, and pull it out of the hose connector.

^Clean the filter under running water and carefully remove any large particles. Replace the filter, seal and reconnect the hose.

^Slowly turn on the valve and check for leaks.

Cleaning the filter in the inlet valve

^Using a wrench, carefully loosen and remove the plastic hose connector on the inlet valve.

^Using needle nose pliers, remove the plastic filter (see illustration). Rinse under water and return parts.

Both filters must be put back in place after cleaning.

28

Image 32
Contents Operating instructions Washer 1113 Contents Contents Important Safety Instructions Guide to the washer Control panelBefore using for the first time General tips Using the washerPrepare and sort the laundry Load the laundry Select a program Close the drum doorProgram guide Temperatures Fabric Spin Laundry Care Speed Symbol Woolens Cold MedSilk HandwashSelect wash options if needed Select the temperature and spin speed Special spin options Hold No spinTo start the final spin To finish the programToo much detergent may cause Add detergentToo little detergent may cause Detergent Liquid detergent insertWater hardness Water softenerNormal soiling Heavy soilingFabric softener Starch Do not exceed the maximum fill levelSelect Delay Start if needed Canceling Delay StartStart the program Activate the program lock if necessaryRemove the laundry Interrupting a program Canceling a programMaking changes to the program Adding / removing laundry during a wash program Drum door cannot be opened ifLocking the washer Electronic program lockWasher care Cleaning the washerCleaning the drum Cleaning the detergent drawer Cleaning the drain pump and lint trap Open the access panelQuick Guide Remove this guide for easy referenceQuick Guide Sort the laundryLoad the laundry Select a programSelect the temperature and spin speed Select Delay Start if neededAdd detergent Start the programNormal Options Washer care Cleaning the filter in the inlet valve Cleaning the water inlet filtersCleaning the inlet hose filter Changing the light bulb Frequently asked questions Wash program cannot be startedProgram was interrupted and a fault message appears General issues with the washer Poor wash results Door will not open when the Door button is pressed Opening the drum door during a power failure Remove the toolTechnical Service PC UpdateOptional accessories RepairsInstallation Instructions Disposal of an appliance Help protect our environmentDisposal of the packing material Installation Front viewBack view Installation site Do not lift the washer by the drum door InstallationRemove the shipping struts Installation Pull out the shipping strutInstalling the shipping struts Adjust the four leveling feet Level the washerInstallation beneath a counter Washer stand with drawer Reinstallation of the machine lid Washer / Dryer StackHose extension optional accessory PlumbingTips for a hot water connection Water connectionDo not connect the washer to hot water only Drainage Electrical connection Grounding InstructionsAlterations rights reserved / 2106 / with det insert
Related manuals
Manual 56 pages 23.56 Kb