Fostex VR800 owner manual Side Panel

Page 15

5.MIDI IN jack [MIDI IN] (Connector: DIN 5-pin)

Connect this jack to the MIDI OUT jack of an external MIDI device. You can control the VR800 remotely by inputting MMC (MIDI Machine Control) command or FEX (Fostex System Exclusive Message) here.

MIDI

IN

Refer to page 68 for more information on using the MIDI IN

jack.

6. Word Out jack [WORD OUT] (Connector: BNC)

Word clock signal from the VR800 is output here.

This jack and WORD IN of the external digital equipment must be connected if the WORD IN connector ia provided in the external digital equipment (digital mixer, etc.) which is connected to the VR800.

Refer to the separate “Quick Operation Guide” for operating

procedures.

VR800 Owner’s Manual (Names and Functions)

7. AC IN connector

The power cable packaged with this recorder ia connected here.

Note: Always plug the power cable to the recorder before

plugging the cable into the wall outlet.

8. Power switch [POWER]

This switch turns power on and off to the VR800.
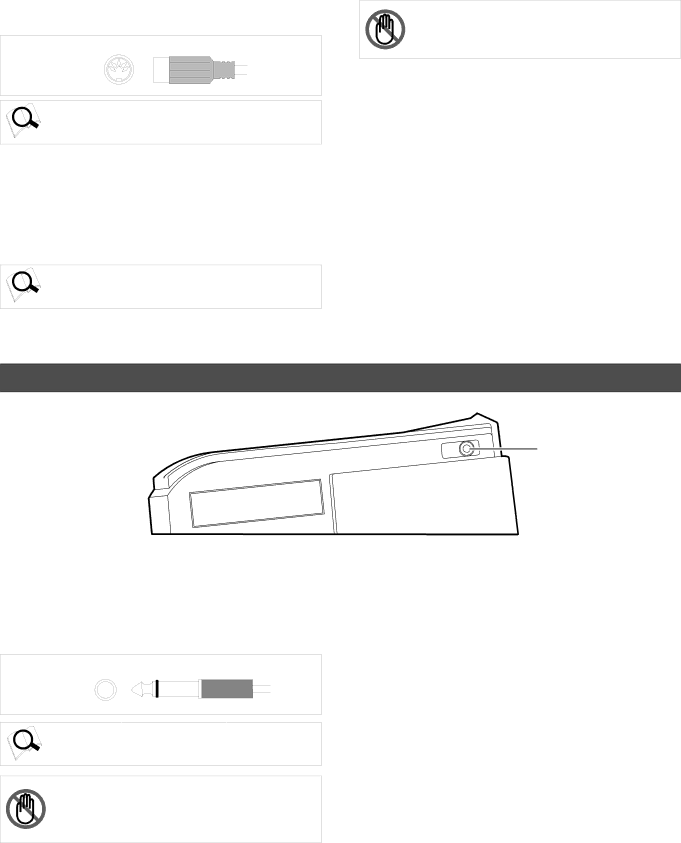
Side Panel

PUNCH

IN/OUT

1. Punch in/out jack [PUNCH IN/OUT] (Connector: phone)

Using an optional foot switch connected to this jack enables you to perform the manual punch In/Out operation (including rehearsal) using your foot. Connect an optional Fostex foot switch, Model 8051.

PUNCH

IN/OUT

Refer to page 40 for more information on using the PUNCH

IN/OUT jack.

Note: Be sure to use an “unlatch type” foot switch if you use a foot switch other than the Model 8051. Otherwise, a malfunction could occur.

1

15

Image 15
Contents Model Safety Instructions Table of Contents 106 Introduction Precautions Top panel Names and FunctionsRecord track select keys Record Track 1 Access LED AccessExecute/Yes key EXECUTE/YES Contrast adjustment knobSetup key Setup Clipboard In key Clipboard IN/ PreviewScrub key Scrub Auto Return/Auto Play mode on/off keyEdit key Edit JOG dial JOG/ ShuttleRewind button Rewind Vari Pitch key Vari PITCH/ P.EDITShift key Shift Fast forward button F FWDRecord button RECORD/ Auto Punch Store key StoreHold/ key Hold Auto Punch Out key Auto Return End key Auto RTN END/ PreviewAuto Return Start key Auto Punch In key Auto Punch IN/ PreviewScsi connector Scsi Connector D-SUB 25-pin Data output jack Data OUT Connector OpticalData input jack Data in Connector Optical Midi OUT jack Midi OUT Connector DIN 5-pinSide Panel Display Section Digital Time base is ABSTime base is MTC Time base is BAR/BEAT/CLKAction to take Acc Error messageLoad Err message Unformat ! messageTime Base Before StartingRecording method and Remain indicator Remain indicatorRecording method You can name a program Managing songs by Program Change functionReal tracks and Additional tracks You can swap data between twenty-four mono tracksAdditional tracks in units of eight tracks Input monitoring When you set a track to recording modeWhen you set a track to recording stand-by mode Input monitoring and playback monitoringAbout an audio file Audio file and eventHints Formatting a Disk Recording modeFormatting a new disk Formatting a current drive disk Scsi diskPress the EXECUTE/YES key again Re-formatting a formatted diskInsert a formatted disk into the Scsi drive Press the EXECUTE/YES keyFormatting a current drive disk 3.5-inch E-IDE hard disk Formatting a backup disk Scsi diskFormatting an unformatted disk for backup Insert a new disk into the backup driveFormatting a backup disk fixed disk Re-formatting a formatted disk for backupInsert a formatted disk into the backup drive While holding down the HOLD/ key, press the Store key Turn on the power to the VR800 and a connected Scsi driveHandling Programs Creating a new ProgramTo enter a title Using a Program Change functionDeleting a Program Press the Setup key while the VR800 is stoppedEditing a Program title JOG dial to enter characters or numbersAfter you enter the title, press the EXECUTE/YES key Storing the edit points What is Punch In/Out recording?Punch In/Out Recording Auto Punch In/OutMusic instrument Guitar Recording level Rehearsing Auto Punch In/Out recordingPress the Record button while holding down the Shift key Set the track for Auto Punch In/Out to ReadyPress the Record button while holding down the Play button When you finish recording, press the Stop buttonAuto Punch In/Out Take Undo/Redo Auto Punch In/Out recordingPlay the guitar accompanying the playback of tracks Press the foot switch while holding down the Stop buttonManual Punch In/Out Rehearsing Manual Punch In/Out recordingManual Punch In/Out take Cancelling Rehearsal modeUndo/Redo Manual Punch In/Out recording Music Instrument Recording to a Metronome SoundCreating a Tempo Map Turning the Metronome function onQuitting recording Adjusting monitor/record level of the musical instrumentChecking the metronome sound Starting recordingDigital recording from an external digital device Connecting an external digital deviceAssigning tracks and setting the digital-in clock Digital RecordingDigital recording to an external device Selecting a recording trackStarting and quitting recording Selecting a playback program Setting a digital output trackMemory key Storing a Locate Point Edit PointPress the desired memory key Storing and editing the locate points to the memory keysStoring in real-time Press the Store keyPress the memory key that you pressed in again Editing and storing locate dataEditing and storing data Press the HOLD/ key while the VR800 is stoppedStoring and editing Locate key Select the Locate number desired using the JOG dial Next press the Locate keyPress the Store key. the Store key lamp lights up Edit and re-store data that is already stored Direct Locate Locate FunctionAuto Return Auto PlayStart playback a little before the Auto RTN Start point Auto RepeatCue & Review function using the Rewind and F FWD buttons Cue & Review function using the Shuttle featureCue & Review Function Press the Stop button to stop the digital scrubbing Digital scrubbing using the Scrub functionPress the Scrub key while the VR800 is stopped Turn the JOG dial to perform digital scrubbingPreviewing the fall of the sound fade out Preview FunctionExecuting the Preview function Previewing the rise of the sound fadePress the Stop button or the EXIT/NO key Trimming the sound while previewingMove & Paste Editing TracksCopy & Paste and Move & Paste Copy & PasteKey for which you wish to check the edit point Executing Copy or MoveChecking the clipboard data Paste start pointTurn the JOG dial to enter the number of repeats Repeat= Executing PasteUndo/Redo Paste Select a destination track to paste dataErase Erasing a specified part of the data between ABS 0Erasing data from a specified point to REC END Executing Erase Undo/Redo EraseStoring the erase start and end points Swapping mono track data between Real tracks, Addi Track ExchangeExecuting Track Exchange Connecting external equipment Refer to connecting schematic Midi sync functionConnect the VR800 Midi OUT to Midi in of the Midi sequencer Confirming the Midi clock sync Setup of VR800Execution of recording MTC sync/MIDI machine control systemSetup of external equipment Connecting to external equipmentConfirming MTC sync/MMC Offset mode For ABSConnection to external equipment External Midi equipment sync system by the slave modeConfirming chase lock Precautions at MTC related setupsUsing a Scsi drive as the current drive Saving and Loading Song DataOutline of the save/load operation Fostex D-5, Pioneer D-05 Save DAT or adat Title of data to be saved to a backup Scsi disk Saving/loading data using another Scsi driveInsert an unformatted disk into the backup drive Press the EXIT/NO key to exit Setup modeSave PGM ? menu Load PGM ? menu Select a flashing SCSi id-6 and press EXECUTE/YES keySaving/loading via a DAT or adat DAT or adat connection and preparation Saving song data via a DAT or adatUse the JOG dial to select a Program to save Use the JOG dial to select the desired tracksStart recording on the DAT or adat Progresses Loading song data via a DAT or adatUse the JOG dial to select a Program into which to load data Start playing the DAT or adatSaving and loading song data via a Scsi drive If you do not wish to delete the existing data If you wish to delete the existing dataChanging the Initial Settings Setup Mode Following diagram shows the position of each menu Selecting Setup modeSetting a time signature Sign. Set ? menu Storing a time signatureSelect a Program for which to set a time signature Clearing all time signature and tempo settings Modifying or deleting stored time signaturesChanging the BAR at ABS 0 of the time base Storing a tempo value Setting a tempo Tempo Set ? menuChecking the stored tempo setting Select a Program to check the tempo setting forSetting the Metronome function Click ? menu Setting the Metronome functionRepeat steps 3-5 to store necessary tempo data Turn the JOG dial to enter a desired preroll time value Setting a preroll value Preroll ? menuSetting a preroll time Turn the JOG dial to select on or oFFSetting Midi sync output signal Sync Out ? menu Setting Midi sync signalTurn the JOG dial to select the desired Midi sync signal Turn the JOG dial to enter the desired frame rate Setting an MTC frame rate Frame Rate ? menuSetting an MTC offset value Mtc Offset ? menu Setting an MTC frame rateSetting an MTC offset Setting Offset mode Ofset Mode ? menuUse the JOG dial to select the desired Offset mode Setting the Slave mode Slave Mode ? menuSetting MTC Offset mode Turning Slave mode on and offUse the JOG dial to select the desired Slave type Setting the Slave type Slave Type ? menuSetting the Slave type Use the JOG dial to turn Slave mode on and off100 Setting the Record Protect function Rec Protect ? menuRecording enabled/disabled Use the JOG dial to enable or disable recordingSetting digital input tracks Digi. In ? menu Setting digital input tracks101 102 Setting digital output tracks Digi. Out ? menuSetting a clock of digital Setting digital output tracksSetting BAR/BEAT resolution mode Resolu ? menu Setting BAR/BEAT resolution mode103 104 Setting the Midi device number Device ID ? menuSetting the Midi device ID Use the JOG dial to turn the mode on or offChecking the number of track events NOs Event ? menu Checking the number of track events105 Midi Implementation Chart 106Transmitted Recognized Remarks Command List Movement Recorder MMC Response/Information Field List Command107 108 Fostex Midi System Exclusive Message Format for VR800109 Status Request110 Example 2 Locate memory is recalled using the read commandData Type 111Signature map 112113 114 115 Status Request Command116 117 118 Maintenance119 Declaration of EC DirectiveIndex Remain Fostex Corporation
Related manuals
Manual 24 pages 22.9 Kb