Fostex VR800 Cue & Review Function, Cue & Review function using the Rewind and F FWD buttons

Page 57

VR800 Owner’s Manual (Cue & Review Function)

Cue & Review Function

This chapter explains how to use the “Cue & Review” function with the REWIND button, the F FWD button, and the SHUTTLE function, and also explains “Digital Scrubbing” with the scrub mode function. During Cue/Review and Digital Scrubbing you will hear the sound recorded on the disk, which makes it easy for you to swiftly locate the desired point without failure while listening to the sounds.

The prerequisite of the following operation is that the time base is ABS, however, the operation can be executed in any time base. To execute this function with a non-ABS time base there is a need to priory switch over to the desired time base.

Cue & Review function using the REWIND and F FWD buttons

You may cue & review the audio data at three-times speed while the recorder is playing.

1.Press the PLAY button to play the audio data.

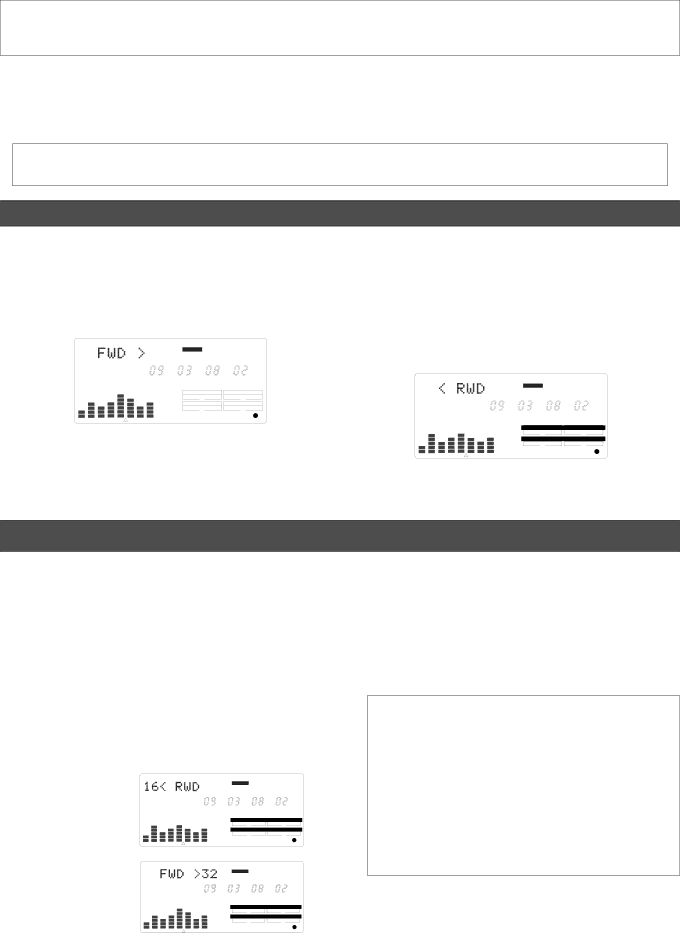
2.Press the F FWD button during playback.

[FWD>] appears on the display, and the VR800 cues in the forward direction at three-times speed.

DIGITAL44.1kHz

ABS

MSF


PGM


SYNC OUT


DRIVE

CLK

SCSI


AUTO


A.PUNCH

3.Adjust the monitor sound of the track to monitor on the mixer.

4.Press the PLAY button again to restore the original play back speed.

5.Press the REWIND button instead of the F FWD

button.

[<RWD] appears on the display, and the VR800 cues in the reverse direction at three-times speed.


DIGITAL

44.1kHz

ABS


M

S

F


PGM


SYNC OUT

DRIVE


CLK

SCSI


AUTO

A.PUNCH

6.Press the PLAY button to restore the original playback speed.

Cue & Review function using the SHUTTLE feature

You can use the SHUTTLE mode for 1-time~64-times Cue/Review while playing back the recorder section.

1.Press the PLAY button to start playback.

2.Hold down the SHIFT key and turn the JOG dial

clockwise or counter-clockwise.

Turning the JOG dial clockwise qqwill change the cueing speed. Turning the JOG dial counter-clockwise will change the reviewing speed.

The VR800 displays the selected cue or review speed, which you can select from normal, two-times, four-times, eight-times, 16-times, 32-times, and 64-times speed.

As long as you are holding down the SHIFT key, playback continues at the selected speed.


DIGITAL

44.1kHz


ABS


Display of 16-times review

M

S

F


PGM


SYNC OUT

DRIVE


CLK

SCSI


AUTO

A.PUNCH


DIGITAL

44.1kHz

Display of 32-times cue

ABS


M

S

F


PGM


SYNC OUT

DRIVE


CLK

SCSI


AUTO

A.PUNCH

3.Adjust the monitor sound of the track to monitor on the mixer.

4.Release the SHIFT key to cancel the cue and review

operation.

The VR800 resumes playback at the original speed.

Note: The cue and review operation does not affect pitch. Because the VR800 performs this function by skipping part of data during playback.

Note: When the beginning of the disk is reached during the review operation, the VR800 starts qnormal playback, even if you are still holding down the SHIFT key. When the end of the disk (ABS time: 23H 59M 59S) is reached during the cue operation, the VR800 stops and the PLAY button lamp flashes.

57

Image 57
Contents Model Safety Instructions Table of Contents 106 Introduction Precautions Top panel Names and FunctionsRecord track select keys Record Track 1 Access LED AccessSetup key Setup Contrast adjustment knobClipboard In key Clipboard IN/ Preview Execute/Yes key EXECUTE/YESEdit key Edit Auto Return/Auto Play mode on/off keyJOG dial JOG/ Shuttle Scrub key ScrubShift key Shift Vari Pitch key Vari PITCH/ P.EDITFast forward button F FWD Rewind button RewindRecord button RECORD/ Auto Punch Store key StoreHold/ key Hold Auto Return Start key Auto Return End key Auto RTN END/ PreviewAuto Punch In key Auto Punch IN/ Preview Auto Punch Out keyData input jack Data in Connector Optical Data output jack Data OUT Connector OpticalMidi OUT jack Midi OUT Connector DIN 5-pin Scsi connector Scsi Connector D-SUB 25-pinSide Panel Display Section Digital Time base is ABSTime base is MTC Time base is BAR/BEAT/CLKLoad Err message Acc Error messageUnformat ! message Action to takeTime Base Before StartingRecording method and Remain indicator Remain indicatorRecording method You can name a program Managing songs by Program Change functionReal tracks and Additional tracks You can swap data between twenty-four mono tracksAdditional tracks in units of eight tracks When you set a track to recording stand-by mode When you set a track to recording modeInput monitoring and playback monitoring Input monitoringAbout an audio file Audio file and eventHints Formatting a Disk Recording modeFormatting a new disk Formatting a current drive disk Scsi diskInsert a formatted disk into the Scsi drive Re-formatting a formatted diskPress the EXECUTE/YES key Press the EXECUTE/YES key againFormatting an unformatted disk for backup Formatting a backup disk Scsi diskInsert a new disk into the backup drive Formatting a current drive disk 3.5-inch E-IDE hard diskFormatting a backup disk fixed disk Re-formatting a formatted disk for backupInsert a formatted disk into the backup drive Handling Programs Turn on the power to the VR800 and a connected Scsi driveCreating a new Program While holding down the HOLD/ key, press the Store keyTo enter a title Using a Program Change functionDeleting a Program Press the Setup key while the VR800 is stoppedEditing a Program title JOG dial to enter characters or numbersAfter you enter the title, press the EXECUTE/YES key Punch In/Out Recording What is Punch In/Out recording?Auto Punch In/Out Storing the edit pointsMusic instrument Guitar Press the Record button while holding down the Shift key Rehearsing Auto Punch In/Out recordingSet the track for Auto Punch In/Out to Ready Recording levelAuto Punch In/Out Take When you finish recording, press the Stop buttonUndo/Redo Auto Punch In/Out recording Press the Record button while holding down the Play buttonManual Punch In/Out Press the foot switch while holding down the Stop buttonRehearsing Manual Punch In/Out recording Play the guitar accompanying the playback of tracksManual Punch In/Out take Cancelling Rehearsal modeUndo/Redo Manual Punch In/Out recording Creating a Tempo Map Recording to a Metronome SoundTurning the Metronome function on Music InstrumentChecking the metronome sound Adjusting monitor/record level of the musical instrumentStarting recording Quitting recordingAssigning tracks and setting the digital-in clock Connecting an external digital deviceDigital Recording Digital recording from an external digital deviceDigital recording to an external device Selecting a recording trackStarting and quitting recording Selecting a playback program Setting a digital output trackMemory key Storing a Locate Point Edit PointStoring in real-time Storing and editing the locate points to the memory keysPress the Store key Press the desired memory keyEditing and storing data Editing and storing locate dataPress the HOLD/ key while the VR800 is stopped Press the memory key that you pressed in againStoring and editing Locate key Select the Locate number desired using the JOG dial Next press the Locate keyPress the Store key. the Store key lamp lights up Edit and re-store data that is already stored Direct Locate Locate FunctionAuto Return Auto PlayStart playback a little before the Auto RTN Start point Auto RepeatCue & Review function using the Rewind and F FWD buttons Cue & Review function using the Shuttle featureCue & Review Function Press the Scrub key while the VR800 is stopped Digital scrubbing using the Scrub functionTurn the JOG dial to perform digital scrubbing Press the Stop button to stop the digital scrubbingExecuting the Preview function Preview FunctionPreviewing the rise of the sound fade Previewing the fall of the sound fade outPress the Stop button or the EXIT/NO key Trimming the sound while previewingCopy & Paste and Move & Paste Editing TracksCopy & Paste Move & PasteChecking the clipboard data Executing Copy or MovePaste start point Key for which you wish to check the edit pointUndo/Redo Paste Executing PasteSelect a destination track to paste data Turn the JOG dial to enter the number of repeats Repeat=Erase Erasing a specified part of the data between ABS 0Erasing data from a specified point to REC END Executing Erase Undo/Redo EraseStoring the erase start and end points Swapping mono track data between Real tracks, Addi Track ExchangeExecuting Track Exchange Connecting external equipment Refer to connecting schematic Midi sync functionConnect the VR800 Midi OUT to Midi in of the Midi sequencer Confirming the Midi clock sync Setup of VR800Execution of recording MTC sync/MIDI machine control systemSetup of external equipment Connecting to external equipmentConfirming MTC sync/MMC Offset mode For ABSConnection to external equipment External Midi equipment sync system by the slave modeConfirming chase lock Precautions at MTC related setupsUsing a Scsi drive as the current drive Saving and Loading Song DataOutline of the save/load operation Fostex D-5, Pioneer D-05 Save DAT or adat Title of data to be saved to a backup Scsi disk Saving/loading data using another Scsi driveInsert an unformatted disk into the backup drive Press the EXIT/NO key to exit Setup modeSave PGM ? menu Load PGM ? menu Select a flashing SCSi id-6 and press EXECUTE/YES keySaving/loading via a DAT or adat DAT or adat connection and preparation Saving song data via a DAT or adatUse the JOG dial to select a Program to save Use the JOG dial to select the desired tracksStart recording on the DAT or adat Progresses Loading song data via a DAT or adatUse the JOG dial to select a Program into which to load data Start playing the DAT or adatSaving and loading song data via a Scsi drive If you do not wish to delete the existing data If you wish to delete the existing dataChanging the Initial Settings Setup Mode Following diagram shows the position of each menu Selecting Setup modeSetting a time signature Sign. Set ? menu Storing a time signatureSelect a Program for which to set a time signature Clearing all time signature and tempo settings Modifying or deleting stored time signaturesChanging the BAR at ABS 0 of the time base Checking the stored tempo setting Setting a tempo Tempo Set ? menuSelect a Program to check the tempo setting for Storing a tempo valueSetting the Metronome function Click ? menu Setting the Metronome functionRepeat steps 3-5 to store necessary tempo data Setting a preroll time Setting a preroll value Preroll ? menuTurn the JOG dial to select on or oFF Turn the JOG dial to enter a desired preroll time valueSetting Midi sync output signal Sync Out ? menu Setting Midi sync signalTurn the JOG dial to select the desired Midi sync signal Setting an MTC offset value Mtc Offset ? menu Setting an MTC frame rate Frame Rate ? menuSetting an MTC frame rate Turn the JOG dial to enter the desired frame rateSetting an MTC offset Setting Offset mode Ofset Mode ? menuSetting MTC Offset mode Setting the Slave mode Slave Mode ? menuTurning Slave mode on and off Use the JOG dial to select the desired Offset modeSetting the Slave type Setting the Slave type Slave Type ? menuUse the JOG dial to turn Slave mode on and off Use the JOG dial to select the desired Slave typeRecording enabled/disabled Setting the Record Protect function Rec Protect ? menuUse the JOG dial to enable or disable recording 100Setting digital input tracks Digi. In ? menu Setting digital input tracks101 Setting a clock of digital Setting digital output tracks Digi. Out ? menuSetting digital output tracks 102Setting BAR/BEAT resolution mode Resolu ? menu Setting BAR/BEAT resolution mode103 Setting the Midi device ID Setting the Midi device number Device ID ? menuUse the JOG dial to turn the mode on or off 104Checking the number of track events NOs Event ? menu Checking the number of track events105 Midi Implementation Chart 106Transmitted Recognized Remarks Command List Movement Recorder MMC Response/Information Field List Command107 108 Fostex Midi System Exclusive Message Format for VR800109 Status Request110 Example 2 Locate memory is recalled using the read commandData Type 111Signature map 112113 114 115 Status Request Command116 117 118 Maintenance119 Declaration of EC DirectiveIndex Remain Fostex Corporation
Related manuals
Manual 24 pages 22.9 Kb