VR800 Owner’s Manual (MIDI Synchronization)
* If correct sync cannot be obtained,
Note: In the VR800, the "ABS 0" position is set at
This setting is made in consideration of the time required (it will not sync immediately) for a MIDI sequencer, etc. to enter into sync. As a result, if the VR800 is played back from ABS 0 (LOCATE ABS 0), sync will be completed by the time it reaches the first bar, and will thus synchronize from the head of the tune. A BAR value of
Execution of recording
Various ways of recording can be conducted while synchronizing the VR800 and the MIDI sequencer with the MIDI clock.
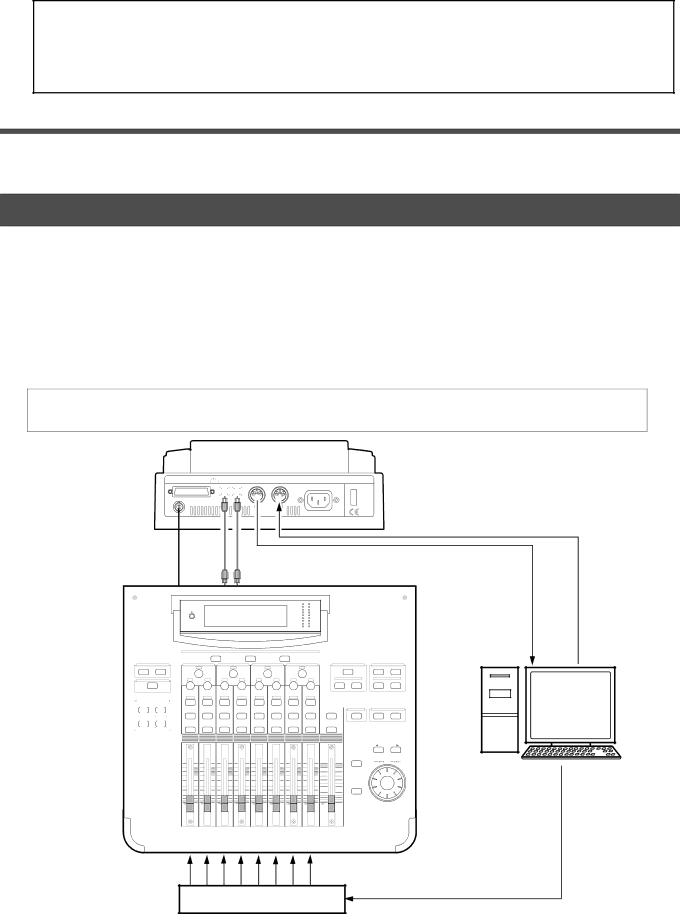
MTC sync/MIDI machine control system
The following will explain synchronization by the MTC (MIDI time code) output and the computer controlling system using MMC (MIDI machine control). In this system, the VR800 will be the master and the computer (with sequence software) will be the slave. The VR800 will attach any desired offset (time difference) against ABS time (absolute time) and output it as MTC in any desired frame rate.
It can also carry out the proper operation upon receiving an MMC and Fostex System Exclusive Message from outside. In this case, because the VR800 can setup a DEVICE ID number by the SETUP mode "MIDI Device ID Setting" menu, a multiple number of VR800's can be separately controlled by changing the DEVICE ID numbers in the transmitted message from the computer. In regards to the corresponding content for MMC, refer to the "MMC list" on page "107" and on the Fostex System Exclusive Message, the "Fostex Exclusive List" on page "108."
*Set VR800 in the initial state.
*Confirm the program and sampling frequency of the digital mixer.
|
|
| DATA |
|
| MIDI |
|
| |
WORD OUT SCSI | OPTICAL | OUT | IN | OUT | IN | AC IN | POWER | ||
|
|
|
|
|
|
|
|
|
|
|
|
|
|
|
|
|
|
|
|
|
|
|
|
|
|
|
|
|
|
|
|
|
|
|
|
|
|
|
|
MMC or Fostex System Exclusive Message
MTC
SETUP
SYSTEMMIDI
CURRENT SCENE STATUS
|
| KEY MODE | ||
| ROUTING/ |
|
| PAIR/ |
| PHASE |
|
| GROUP |
|
|
|
|
|
|
| MMC SEND |
| |
|
|
| CHANNEL/ | |
| CH VIEW |
|
| METER |
|
|
|
|
|
|
|
|
|
|
|
|
|
|
|
| METER |
|
|
|
| |
|
|
|
|
|
|
| OL |
|
|
|
|
|
|
|
|
|
|
|
|
|
|
| |
|
|
|
|
|
|
|
|
|
|
| |
|
|
|
|
|
|
|
|
|
|
| |
|
|
|
|
|
|
|
|
|
|
| |
|
|
|
|
|
|
|
|
|
|
| |
|
|
|
|
|
|
|
|
|
|
| |
|
|
|
|
|
|
|
|
|
|
| |
|
|
|
|
|
|
|
|
|
|
| |
|
|
|
|
|
| L | R |
|
|
|
|
|
|
|
|
|
| ST BUSS/SOLO |
|
|
|
| |
|
|
|
| PAGE SELECT |
|
|
|
|
|
|
|
|
|
|
|
|
|
|
|
| |||
EQ/LO |
|
|
| EQ/HI |
| SELECTED EQ |
| EFF EDIT | |||
GAIN |
| GAIN |
| GAIN |
| GAIN |
|
| EQ ON | EFF1 | EFF2 |
|
|
|
|
|
|
|
|
| EQ LIBRARY |
| EFF LIBRARY |
FREQ | Q | FREQ | Q | FREQ | Q | FREQ | Q | RECALL | STORE | RECALL | STORE |
|
|
|
|
|
|
|
| ||||
PAN | PAN | PAN | PAN | PAN | PAN | PAN | PAN |
|
|
|
|
EQ EDIT | EQ EDIT | EQ EDIT | EQ EDIT | EQ EDIT | EQ EDIT | EQ EDIT | EQ EDIT |
|
|
|
|
|
|
|
|
|
|
|
|
| REC BUSS | SCENE MEMORY | |
SOLO | SOLO | SOLO | SOLO | SOLO | SOLO | SOLO | SOLO | SOLO | SOLO | RECALL | STORE |
ON | ON | ON | ON | ON | ON | ON | ON | ON |
|
|
|
|
|
|
|
|
|
|
|
| +1/ | |
|
|
|
|
|
|
|
|
| EXIT |
|
+10 | +10 | +10 | +10 | +10 | +10 | +10 | +10 | 0 |
| DATA |
0 | 0 | 0 | 0 | 0 | 0 | 0 | 0 |
|
| |
|
| |||||||||
|
|
|
|
|
|
|
| ENTER |
| |
|
|
| ||||||||
|
|
|
|
|
|
|
|
|
| |
|
|
| ||||||||
|
| |||||||||
- | - | - | - | - | - | - | - | - |
|
|
Computer
with MMC/MTC
soft ware
MIDI sound sources
MIDI IN | MIDI |
70