Fostex VR800 owner manual Start playing the DAT or adat

Page 85

VR800 Owner’s Manual (Saving and Loading Song Data)

Loading data

*You can load data using the “Load PGM ?” menu in SETUP mode. The following procedure assumes that the current drive disk
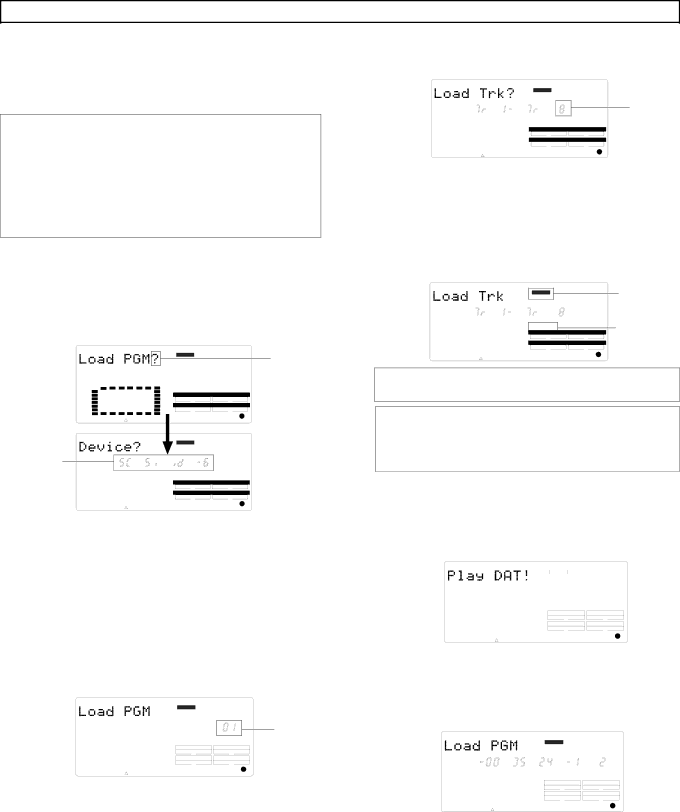
 (3.5-inch E-IDE hard disk) does not contain any recordings, and that Program 1 (P01) has been set up on the disk.

<[Load PGM ?] menu>

*Input signal options: [AdAt], [dAT], [SCSi id-6]

*Program options: P01 - P99 (an individual Program)

* Track options:

When using an adat or DAT: tracks 1–8,


tracks 1–16, Tracks 1–24;


When using a SCSI disk (SCSi id-6): All tracks


will be automatically selected.

1.Press the SETUP key to enter SETUP mode.

2.Use the JOG dial to select [Load PGM ?] menu,

then press the EXECUTE/YES key.

[Device ?] appears and the selected input signal option flashes. ([SCSi id-6] flashes.)

DIGITAL

44.1kHz

Flashing

SETUP


SYNC OUT

DRIVE


CLK

IDE


AUTO

A.PUNCH


DIGITAL

44.1kHz


SETUP


Flashing


SYNC OUT

DRIVE


CLK

IDE


AUTO

A.PUNCH


3.Use the JOG dial to select the desired type of digital signal used for the load operation ([dAT] or [AdAt]).

[AdAt]

Select this to load data in the adat digital signal

format from a connected adat.


[dAT]

Select this to save data in the S/P DIF digital signal

format from a connected DAT.


6. Press the EXECUTE/YES key.

The VR800 displays the track selection screen. You can change the value of a flashing number.

DIGITAL44.1kHz

SETUP

Flashing

SYNC OUT

DRIVE

CLKIDE

AUTO

A.PUNCH

7. Use the JOG dial to select the desired tracks.

Options are Tr 1–8, Tr 1–16 (Real track 1–8 and Additional track 9–16), or Tr 1–24 (Real track 1–8 and Additional track 9–24). In this example, select Tr 1–8.

8. Press the EXECUTE/YES key.

The VR800 enters “load standby” mode and displays the following. [SURE ?] flashes.

DIGITAL

44.1kHz

Lights up


SETUP


SYNC OUT

DRIVE

Flashing

SURE ?


CLK

IDE


AUTO

A.PUNCH


Flashing [DIGITAL] indicates that signal is not input from the digital device (DAT or adat) correctly. Check the connections.

Note: Althoogh the [ASYnC] (Asynchronous mode) indicator may be kit in the display, during loading, the VR800 will operate in the [SYnC] (Synchronous mode). Be careful of making a digi- tal loop which can be created by the digital in clock.

9. Make sure that [DIGITAL] lights up steadily, and press the EXECUTE/YES key.

The VR800 displays the following, indicating “Start playing the DAT!” If you are using an adat, [Play AdAt] flashes.

Flashing


44.1kHz


DIGITAL


SETUP


SYNC OUT


DRIVE


CLK


IDE


AUTO


A.PUNCH

4. Press the EXECUTE/YES key.

The number of the Program set up on the current drive flashes on the display.

DIGITAL44.1kHz

SETUP

Flashing

10. Start playing the DAT (or adat).

Start playing the tape from a point slightly prior to the top of the Program data. The VR800 reads the recorded pilot signal, then automatically starts loading data. (Wait a while until the following indication appears.)


PGM


SYNC OUT


DRIVE

CLK

IDE


AUTO


A.PUNCH

5. Use the JOG dial to select a Program into which to load data.

REMAIN

DIGITAL44.1kHz

SETUP

H MS

SYNC OUT


DRIVE

CLK

IDE


AUTO


A.PUNCH

If only one Program has been set up, turning the JOG dial enables you to select [01] or [02]. If you select [02], “PGM” of [Load PGM] and [New] flash alternately.

This means that a new Program (P02) should be set up before you execute the load operation. (If multiple Programs exist in the current drive disk, turn the JOG dial to select a Program from these Programs plus one new Program.)

The VR800 displays the track numbers being loaded and the total time of the Program. The time value starts counting down as the load operation progresses.

The RECORD TRACK select key lamps for tracks 1 and 2 flash,and level meters 1 and 2 indicate the level of signal input from the DAT. (All RECORD TRACK select lamps flash and level meters 1–8 indicate the level of signal input from an adat.)

85

Image 85
Contents Model Safety Instructions Table of Contents 106 Introduction Precautions Top panel Names and FunctionsRecord track select keys Record Track 1 Access LED AccessSetup key Setup Contrast adjustment knobClipboard In key Clipboard IN/ Preview Execute/Yes key EXECUTE/YESEdit key Edit Auto Return/Auto Play mode on/off keyJOG dial JOG/ Shuttle Scrub key ScrubShift key Shift Vari Pitch key Vari PITCH/ P.EDITFast forward button F FWD Rewind button RewindStore key Store Record button RECORD/ Auto PunchHold/ key Hold Auto Return Start key Auto Return End key Auto RTN END/ PreviewAuto Punch In key Auto Punch IN/ Preview Auto Punch Out keyData input jack Data in Connector Optical Data output jack Data OUT Connector OpticalMidi OUT jack Midi OUT Connector DIN 5-pin Scsi connector Scsi Connector D-SUB 25-pinSide Panel Display Section Digital Time base is ABSTime base is MTC Time base is BAR/BEAT/CLKLoad Err message Acc Error messageUnformat ! message Action to takeTime Base Before StartingRemain indicator Recording method and Remain indicatorRecording method You can name a program Managing songs by Program Change functionYou can swap data between twenty-four mono tracks Real tracks and Additional tracksAdditional tracks in units of eight tracks When you set a track to recording stand-by mode When you set a track to recording modeInput monitoring and playback monitoring Input monitoringAbout an audio file Audio file and eventHints Formatting a Disk Recording modeFormatting a new disk Formatting a current drive disk Scsi diskInsert a formatted disk into the Scsi drive Re-formatting a formatted diskPress the EXECUTE/YES key Press the EXECUTE/YES key againFormatting an unformatted disk for backup Formatting a backup disk Scsi diskInsert a new disk into the backup drive Formatting a current drive disk 3.5-inch E-IDE hard diskRe-formatting a formatted disk for backup Formatting a backup disk fixed diskInsert a formatted disk into the backup drive Handling Programs Turn on the power to the VR800 and a connected Scsi driveCreating a new Program While holding down the HOLD/ key, press the Store keyTo enter a title Using a Program Change functionDeleting a Program Press the Setup key while the VR800 is stoppedJOG dial to enter characters or numbers Editing a Program titleAfter you enter the title, press the EXECUTE/YES key Punch In/Out Recording What is Punch In/Out recording?Auto Punch In/Out Storing the edit pointsMusic instrument Guitar Press the Record button while holding down the Shift key Rehearsing Auto Punch In/Out recordingSet the track for Auto Punch In/Out to Ready Recording levelAuto Punch In/Out Take When you finish recording, press the Stop buttonUndo/Redo Auto Punch In/Out recording Press the Record button while holding down the Play buttonManual Punch In/Out Press the foot switch while holding down the Stop buttonRehearsing Manual Punch In/Out recording Play the guitar accompanying the playback of tracksManual Punch In/Out take Cancelling Rehearsal modeUndo/Redo Manual Punch In/Out recording Creating a Tempo Map Recording to a Metronome SoundTurning the Metronome function on Music InstrumentChecking the metronome sound Adjusting monitor/record level of the musical instrumentStarting recording Quitting recordingAssigning tracks and setting the digital-in clock Connecting an external digital deviceDigital Recording Digital recording from an external digital deviceSelecting a recording track Digital recording to an external deviceStarting and quitting recording Selecting a playback program Setting a digital output trackMemory key Storing a Locate Point Edit PointStoring in real-time Storing and editing the locate points to the memory keysPress the Store key Press the desired memory keyEditing and storing data Editing and storing locate dataPress the HOLD/ key while the VR800 is stopped Press the memory key that you pressed in againStoring and editing Locate key Next press the Locate key Select the Locate number desired using the JOG dialPress the Store key. the Store key lamp lights up Edit and re-store data that is already stored Direct Locate Locate FunctionAuto Return Auto PlayStart playback a little before the Auto RTN Start point Auto RepeatCue & Review function using the Shuttle feature Cue & Review function using the Rewind and F FWD buttonsCue & Review Function Press the Scrub key while the VR800 is stopped Digital scrubbing using the Scrub functionTurn the JOG dial to perform digital scrubbing Press the Stop button to stop the digital scrubbingExecuting the Preview function Preview FunctionPreviewing the rise of the sound fade Previewing the fall of the sound fade outPress the Stop button or the EXIT/NO key Trimming the sound while previewingCopy & Paste and Move & Paste Editing TracksCopy & Paste Move & PasteChecking the clipboard data Executing Copy or MovePaste start point Key for which you wish to check the edit pointUndo/Redo Paste Executing PasteSelect a destination track to paste data Turn the JOG dial to enter the number of repeats Repeat=Erasing a specified part of the data between ABS 0 EraseErasing data from a specified point to REC END Undo/Redo Erase Executing EraseStoring the erase start and end points Swapping mono track data between Real tracks, Addi Track ExchangeExecuting Track Exchange Midi sync function Connecting external equipment Refer to connecting schematicConnect the VR800 Midi OUT to Midi in of the Midi sequencer Confirming the Midi clock sync Setup of VR800Execution of recording MTC sync/MIDI machine control systemSetup of external equipment Connecting to external equipmentConfirming MTC sync/MMC Offset mode For ABSConnection to external equipment External Midi equipment sync system by the slave modeConfirming chase lock Precautions at MTC related setupsSaving and Loading Song Data Using a Scsi drive as the current driveOutline of the save/load operation Fostex D-5, Pioneer D-05 Save DAT or adat Title of data to be saved to a backup Scsi disk Saving/loading data using another Scsi drivePress the EXIT/NO key to exit Setup mode Insert an unformatted disk into the backup driveSave PGM ? menu Load PGM ? menu Select a flashing SCSi id-6 and press EXECUTE/YES keySaving/loading via a DAT or adat DAT or adat connection and preparation Saving song data via a DAT or adatUse the JOG dial to select the desired tracks Use the JOG dial to select a Program to saveStart recording on the DAT or adat Progresses Loading song data via a DAT or adatUse the JOG dial to select a Program into which to load data Start playing the DAT or adatSaving and loading song data via a Scsi drive If you do not wish to delete the existing data If you wish to delete the existing dataChanging the Initial Settings Setup Mode Following diagram shows the position of each menu Selecting Setup modeStoring a time signature Setting a time signature Sign. Set ? menuSelect a Program for which to set a time signature Modifying or deleting stored time signatures Clearing all time signature and tempo settingsChanging the BAR at ABS 0 of the time base Checking the stored tempo setting Setting a tempo Tempo Set ? menuSelect a Program to check the tempo setting for Storing a tempo valueSetting the Metronome function Setting the Metronome function Click ? menuRepeat steps 3-5 to store necessary tempo data Setting a preroll time Setting a preroll value Preroll ? menuTurn the JOG dial to select on or oFF Turn the JOG dial to enter a desired preroll time valueSetting Midi sync signal Setting Midi sync output signal Sync Out ? menuTurn the JOG dial to select the desired Midi sync signal Setting an MTC offset value Mtc Offset ? menu Setting an MTC frame rate Frame Rate ? menuSetting an MTC frame rate Turn the JOG dial to enter the desired frame rateSetting an MTC offset Setting Offset mode Ofset Mode ? menuSetting MTC Offset mode Setting the Slave mode Slave Mode ? menuTurning Slave mode on and off Use the JOG dial to select the desired Offset modeSetting the Slave type Setting the Slave type Slave Type ? menuUse the JOG dial to turn Slave mode on and off Use the JOG dial to select the desired Slave typeRecording enabled/disabled Setting the Record Protect function Rec Protect ? menuUse the JOG dial to enable or disable recording 100Setting digital input tracks Setting digital input tracks Digi. In ? menu101 Setting a clock of digital Setting digital output tracks Digi. Out ? menuSetting digital output tracks 102Setting BAR/BEAT resolution mode Setting BAR/BEAT resolution mode Resolu ? menu103 Setting the Midi device ID Setting the Midi device number Device ID ? menuUse the JOG dial to turn the mode on or off 104Checking the number of track events Checking the number of track events NOs Event ? menu105 106 Midi Implementation ChartTransmitted Recognized Remarks MMC Response/Information Field List Command Command List Movement Recorder107 108 Fostex Midi System Exclusive Message Format for VR800109 Status Request110 Example 2 Locate memory is recalled using the read commandData Type 111Signature map 112113 114 115 Status Request Command116 117 118 Maintenance119 Declaration of EC DirectiveIndex Remain Fostex Corporation
Related manuals
Manual 24 pages 22.9 Kb