Fostex VR800 owner manual Auto Play, Auto Return

Page 55

VR800 Owner’s Manual (Locate Function)

Auto Play

The Auto Play function allows the VR800 to start play back automatically from the located point. AUTO PLAY mode should be turned on before you execute the Direct Locate function described above.

Note: This function is effective within 24 ABS hours. Therefore, if playback continues over the recording end point, the VR800 will still continue counting the time. Also, when the VR800 locates ABS REC END, it will continue counting the time from the recording end point. (However, the VR800 does not access the disk after reaching the recording end point.)

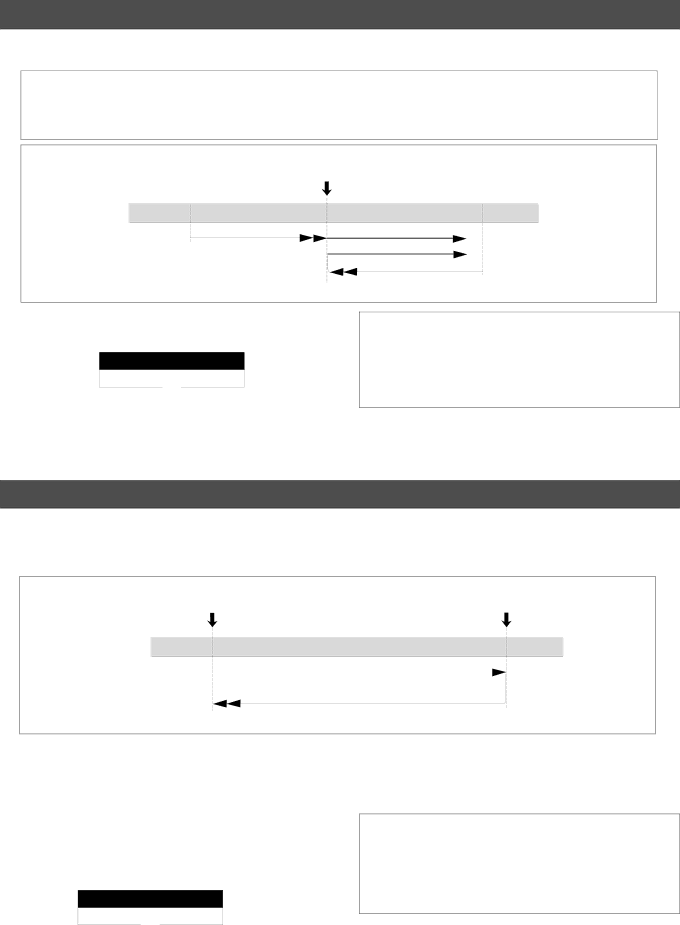
<Example: Operation at locating to the AUTO PUNCH IN point.>


AUTO PUNCH IN point


PLAYBACK

LOCATE

LOCATE

PLAYBACK

START


LOCATE LOCATE

START

1.Press the AUTO RTN/AUTO PLAY key to turn on the [PLAY] indicator on the bottom of the display.

AUTO

Lights up


PLAY


2. Press the LOCATE key, or memory key.

The VR800 locates the point and plays as shown in the diagram.

You can set a preroll time in the [Preroll Time ?] menu in SETUP mode so that the VR800 will start playback preroll time before the locate point. You can set the preroll time from 0 to 10 seconds. Refer to the chapter “Changing the Initial Settings (SETUP Mode)” on page 94.

3.Press the STOP button to stop the VR800.

Auto Return

This function allows the VR800 to play data up to the AUTO RTN END point, then automatically locate the AUTO RTN START point as shown in the diagram below. To enable this function, AUTO RTN mode should be on and the AUTO RTN START point and AUTO RTN END point should already be set.

<Operation of the Auto Return mode.>

AUTO RTN START point

AUTO RTN END point

PLAYBACK

PLAYBACK

START

Automatic locating to the AUTO RTN START point


subsequent to playback to the AUTO RTN END point.


LOCATE


STOP

1. Store the AUTO RTN START and AUTO RTN END points.

Refer to the chapter “Storing a Locate Point (Edit Point)” on page 48 for information on storing the desired points in the AUTO RTN START key and the AUTO RTN END key.

2.Press the AUTO RTN/AUTO PLAY key to turn on the [RTN] indicator on the bottom of the display.

AUTO

RTN


Lights up


3. Start playback a little before the AUTO RTN END point.

The VR800 operates as shown in the diagram.

You can set a preroll time in the [Preroll Time ?] menu in SETUP mode so that the VR800 will start playback preroll time before the locate point. You can set the preroll time from 0 to 10 seconds. Refer to the chapter “Changing the Initial Settings (SETUP Mode)” on page 94.

55

Image 55
Contents Model Safety Instructions Table of Contents 106 Introduction Precautions Top panel Names and FunctionsRecord track select keys Record Track 1 Access LED AccessExecute/Yes key EXECUTE/YES Contrast adjustment knobSetup key Setup Clipboard In key Clipboard IN/ PreviewScrub key Scrub Auto Return/Auto Play mode on/off keyEdit key Edit JOG dial JOG/ ShuttleRewind button Rewind Vari Pitch key Vari PITCH/ P.EDITShift key Shift Fast forward button F FWDStore key Store Record button RECORD/ Auto PunchHold/ key Hold Auto Punch Out key Auto Return End key Auto RTN END/ PreviewAuto Return Start key Auto Punch In key Auto Punch IN/ PreviewScsi connector Scsi Connector D-SUB 25-pin Data output jack Data OUT Connector OpticalData input jack Data in Connector Optical Midi OUT jack Midi OUT Connector DIN 5-pinSide Panel Display Section Digital Time base is ABSTime base is MTC Time base is BAR/BEAT/CLKAction to take Acc Error messageLoad Err message Unformat ! messageTime Base Before StartingRemain indicator Recording method and Remain indicatorRecording method You can name a program Managing songs by Program Change functionYou can swap data between twenty-four mono tracks Real tracks and Additional tracksAdditional tracks in units of eight tracks Input monitoring When you set a track to recording modeWhen you set a track to recording stand-by mode Input monitoring and playback monitoringAbout an audio file Audio file and eventHints Formatting a Disk Recording modeFormatting a new disk Formatting a current drive disk Scsi diskPress the EXECUTE/YES key again Re-formatting a formatted diskInsert a formatted disk into the Scsi drive Press the EXECUTE/YES keyFormatting a current drive disk 3.5-inch E-IDE hard disk Formatting a backup disk Scsi diskFormatting an unformatted disk for backup Insert a new disk into the backup driveRe-formatting a formatted disk for backup Formatting a backup disk fixed diskInsert a formatted disk into the backup drive While holding down the HOLD/ key, press the Store key Turn on the power to the VR800 and a connected Scsi driveHandling Programs Creating a new ProgramTo enter a title Using a Program Change functionDeleting a Program Press the Setup key while the VR800 is stoppedJOG dial to enter characters or numbers Editing a Program titleAfter you enter the title, press the EXECUTE/YES key Storing the edit points What is Punch In/Out recording?Punch In/Out Recording Auto Punch In/OutMusic instrument Guitar Recording level Rehearsing Auto Punch In/Out recordingPress the Record button while holding down the Shift key Set the track for Auto Punch In/Out to ReadyPress the Record button while holding down the Play button When you finish recording, press the Stop buttonAuto Punch In/Out Take Undo/Redo Auto Punch In/Out recordingPlay the guitar accompanying the playback of tracks Press the foot switch while holding down the Stop buttonManual Punch In/Out Rehearsing Manual Punch In/Out recordingManual Punch In/Out take Cancelling Rehearsal modeUndo/Redo Manual Punch In/Out recording Music Instrument Recording to a Metronome SoundCreating a Tempo Map Turning the Metronome function onQuitting recording Adjusting monitor/record level of the musical instrumentChecking the metronome sound Starting recordingDigital recording from an external digital device Connecting an external digital deviceAssigning tracks and setting the digital-in clock Digital RecordingSelecting a recording track Digital recording to an external deviceStarting and quitting recording Selecting a playback program Setting a digital output trackMemory key Storing a Locate Point Edit PointPress the desired memory key Storing and editing the locate points to the memory keysStoring in real-time Press the Store keyPress the memory key that you pressed in again Editing and storing locate dataEditing and storing data Press the HOLD/ key while the VR800 is stoppedStoring and editing Locate key Next press the Locate key Select the Locate number desired using the JOG dialPress the Store key. the Store key lamp lights up Edit and re-store data that is already stored Direct Locate Locate FunctionAuto Return Auto PlayStart playback a little before the Auto RTN Start point Auto RepeatCue & Review function using the Shuttle feature Cue & Review function using the Rewind and F FWD buttonsCue & Review Function Press the Stop button to stop the digital scrubbing Digital scrubbing using the Scrub functionPress the Scrub key while the VR800 is stopped Turn the JOG dial to perform digital scrubbingPreviewing the fall of the sound fade out Preview FunctionExecuting the Preview function Previewing the rise of the sound fadePress the Stop button or the EXIT/NO key Trimming the sound while previewingMove & Paste Editing TracksCopy & Paste and Move & Paste Copy & PasteKey for which you wish to check the edit point Executing Copy or MoveChecking the clipboard data Paste start pointTurn the JOG dial to enter the number of repeats Repeat= Executing PasteUndo/Redo Paste Select a destination track to paste dataErasing a specified part of the data between ABS 0 EraseErasing data from a specified point to REC END Undo/Redo Erase Executing EraseStoring the erase start and end points Swapping mono track data between Real tracks, Addi Track ExchangeExecuting Track Exchange Midi sync function Connecting external equipment Refer to connecting schematicConnect the VR800 Midi OUT to Midi in of the Midi sequencer Confirming the Midi clock sync Setup of VR800Execution of recording MTC sync/MIDI machine control systemSetup of external equipment Connecting to external equipmentConfirming MTC sync/MMC Offset mode For ABSConnection to external equipment External Midi equipment sync system by the slave modeConfirming chase lock Precautions at MTC related setupsSaving and Loading Song Data Using a Scsi drive as the current driveOutline of the save/load operation Fostex D-5, Pioneer D-05 Save DAT or adat Title of data to be saved to a backup Scsi disk Saving/loading data using another Scsi drivePress the EXIT/NO key to exit Setup mode Insert an unformatted disk into the backup driveSave PGM ? menu Load PGM ? menu Select a flashing SCSi id-6 and press EXECUTE/YES keySaving/loading via a DAT or adat DAT or adat connection and preparation Saving song data via a DAT or adatUse the JOG dial to select the desired tracks Use the JOG dial to select a Program to saveStart recording on the DAT or adat Progresses Loading song data via a DAT or adatUse the JOG dial to select a Program into which to load data Start playing the DAT or adatSaving and loading song data via a Scsi drive If you do not wish to delete the existing data If you wish to delete the existing dataChanging the Initial Settings Setup Mode Following diagram shows the position of each menu Selecting Setup modeStoring a time signature Setting a time signature Sign. Set ? menuSelect a Program for which to set a time signature Modifying or deleting stored time signatures Clearing all time signature and tempo settingsChanging the BAR at ABS 0 of the time base Storing a tempo value Setting a tempo Tempo Set ? menuChecking the stored tempo setting Select a Program to check the tempo setting forSetting the Metronome function Setting the Metronome function Click ? menuRepeat steps 3-5 to store necessary tempo data Turn the JOG dial to enter a desired preroll time value Setting a preroll value Preroll ? menuSetting a preroll time Turn the JOG dial to select on or oFFSetting Midi sync signal Setting Midi sync output signal Sync Out ? menuTurn the JOG dial to select the desired Midi sync signal Turn the JOG dial to enter the desired frame rate Setting an MTC frame rate Frame Rate ? menuSetting an MTC offset value Mtc Offset ? menu Setting an MTC frame rateSetting an MTC offset Setting Offset mode Ofset Mode ? menuUse the JOG dial to select the desired Offset mode Setting the Slave mode Slave Mode ? menuSetting MTC Offset mode Turning Slave mode on and offUse the JOG dial to select the desired Slave type Setting the Slave type Slave Type ? menuSetting the Slave type Use the JOG dial to turn Slave mode on and off100 Setting the Record Protect function Rec Protect ? menuRecording enabled/disabled Use the JOG dial to enable or disable recordingSetting digital input tracks Setting digital input tracks Digi. In ? menu101 102 Setting digital output tracks Digi. Out ? menuSetting a clock of digital Setting digital output tracksSetting BAR/BEAT resolution mode Setting BAR/BEAT resolution mode Resolu ? menu103 104 Setting the Midi device number Device ID ? menuSetting the Midi device ID Use the JOG dial to turn the mode on or offChecking the number of track events Checking the number of track events NOs Event ? menu105 106 Midi Implementation ChartTransmitted Recognized Remarks MMC Response/Information Field List Command Command List Movement Recorder107 108 Fostex Midi System Exclusive Message Format for VR800109 Status Request110 Example 2 Locate memory is recalled using the read commandData Type 111Signature map 112113 114 115 Status Request Command116 117 118 Maintenance119 Declaration of EC DirectiveIndex Remain Fostex Corporation
Related manuals
Manual 24 pages 22.9 Kb