PRACTICAL GUIDE TO INSTALLATION
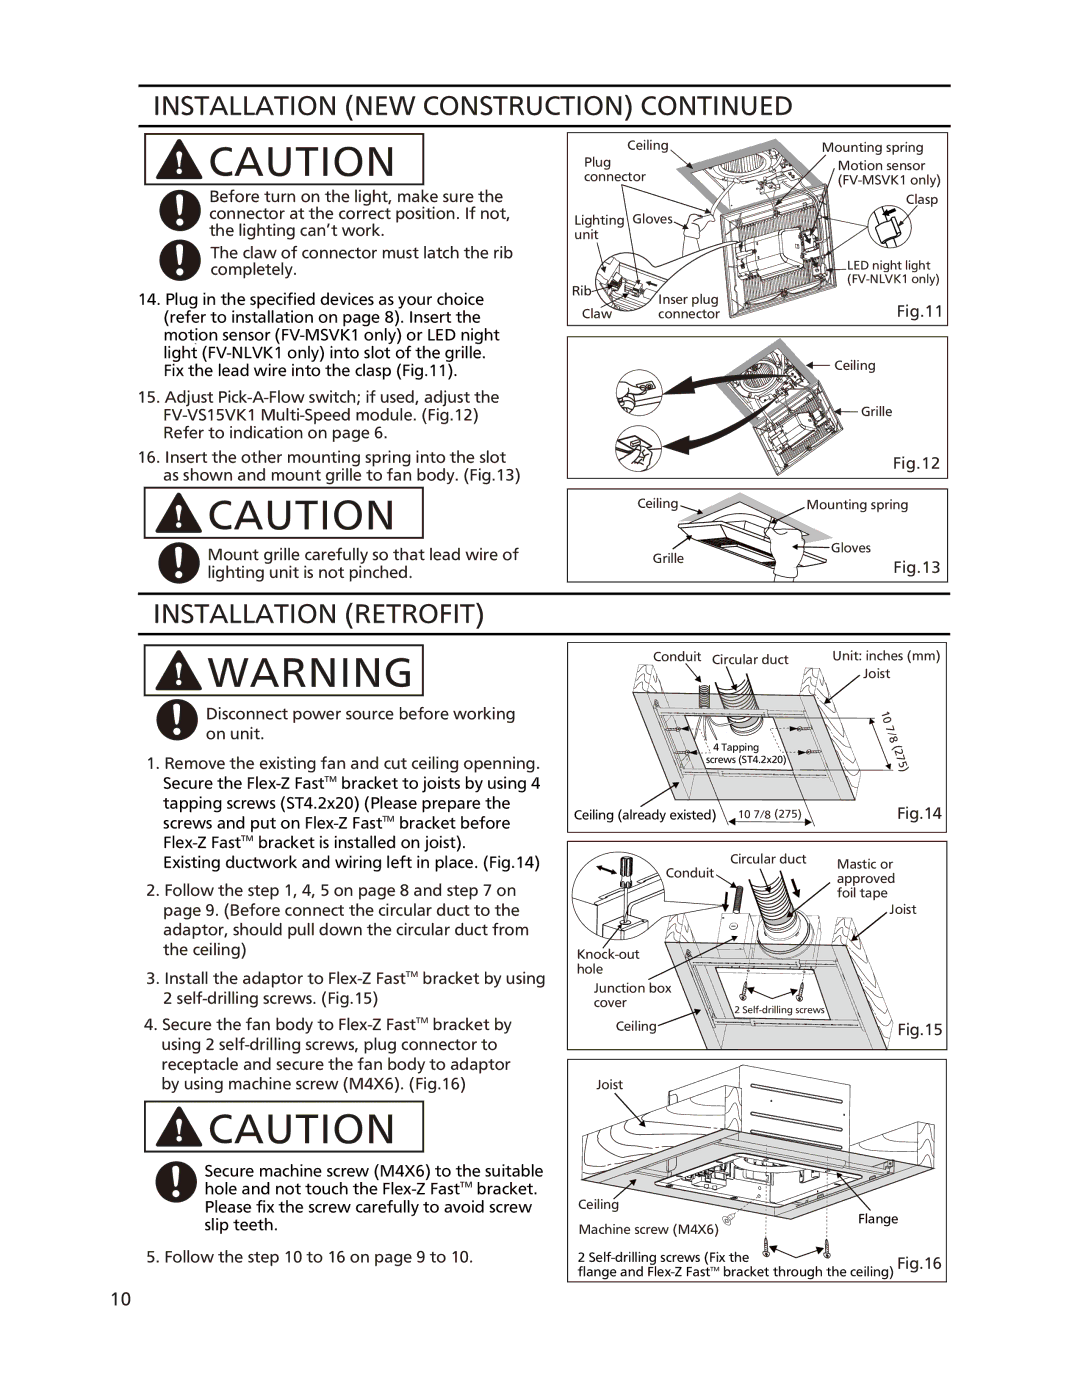
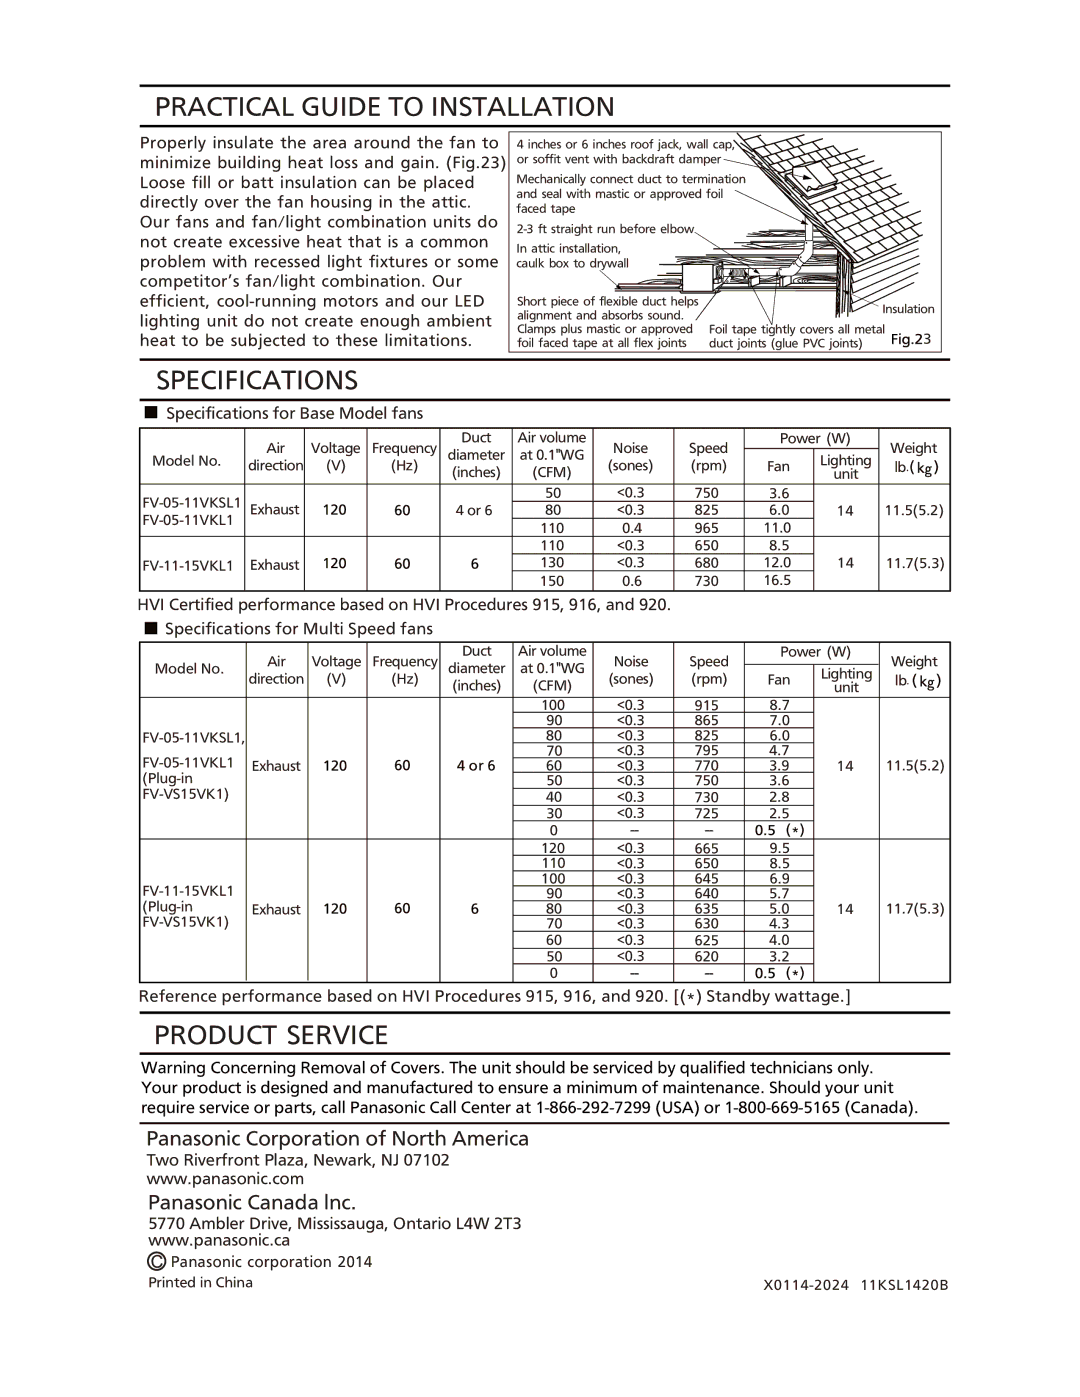
Properly insulate the area around the fan to minimize building heat loss and gain. (Fig.23) Loose fill or batt insulation can be placed directly over the fan housing in the attic. Our fans and fan/light combination units do not create excessive heat that is a common problem with recessed light fixtures or some competitor’s fan/light combination. Our efficient,
4 inches or 6 inches roof jack, wall cap, ![]()
![]()
![]()
![]()
![]() or soffit vent with backdraft damper
or soffit vent with backdraft damper ![]()
![]()
Mechanically connect duct to termination and seal with mastic or approved foil faced tape
In attic installation, caulk box to drywall
Short piece of flexible duct helps | Insulation | ||
alignment and absorbs sound. | |||
|
| ||
Clamps plus mastic or approved | Foil tape tightly covers all metal | 3 | |
foil faced tape at all flex joints | duct joints (glue PVC joints) | ||
SPECIFICATIONS
Specifications for Base Model fans
| Air | Voltage | Frequency | Duct | Air volume | Noise | Speed | Power (W) | Weight | ||
| diameter | at 0.1"WG |
|
| |||||||
Model No. |
| Lighting | |||||||||
direction | (V) | (Hz) | (inches) | (CFM) | (sones) | (rpm) | Fan | lb. | |||
| unit | ||||||||||
|
|
|
|
|
|
|
| ||||
Exhaust |
|
|
| 50 | <0.3 | 750 | 3.6 |
|
| ||
|
| 4 or 6 | 80 | <0.3 | 825 | 6.0 | 14 | 11.5(5.2) | |||
|
|
|
|
|
|
|
|
|
| ||
|
|
|
| 110 | 0.4 | 965 | 11.0 |
|
| ||
|
|
|
|
|
|
| |||||
|
|
|
|
| 110 | <0.3 | 650 | 8.5 |
|
| |
Exhaust |
|
|
| 130 | <0.3 | 680 | 12.0 | 14 | 11.7(5.3) | ||
|
|
|
|
| 150 | 0.6 | 730 | 16.5 |
|
| |
HVI Certified performance based on HVI Procedures 915, 916, and 920.
![]() Specifications for Multi Speed fans
Specifications for Multi Speed fans
| Air | Voltage | Frequency | Duct | Air volume | Noise | Speed | Power (W) | Weight | |
Model No. | diameter | at 0.1"WG |
|
| ||||||
| Lighting | |||||||||
| direction | (V) | (Hz) | (inches) | (CFM) | (sones) | (rpm) | Fan | lb. | |
| unit | |||||||||
|
|
|
|
|
|
|
| |||
|
|
|
|
| 100 | <0.3 | 915 | 8.7 |
|
|
|
|
|
|
| 90 | <0.3 | 865 | 7.0 |
|
|
|
|
|
| 80 | <0.3 | 825 | 6.0 |
|
| |
Exhaust |
|
|
| 70 | <0.3 | 795 | 4.7 | 14 | 11.5(5.2) | |
|
|
| 60 | <0.3 | 770 | 3.9 | ||||
|
|
|
| 50 | <0.3 | 750 | 3.6 |
|
| |
|
|
|
| 40 | <0.3 | 730 | 2.8 |
|
| |
|
|
|
|
| 30 | <0.3 | 725 | 2.5 |
|
|
|
|
|
|
| 0 |
|
|
|
|
|
|
|
|
|
| 120 | <0.3 | 665 | 9.5 |
|
|
|
|
|
|
| 110 | <0.3 | 650 | 8.5 |
|
|
|
|
|
| 100 | <0.3 | 645 | 6.9 |
|
| |
|
|
|
| 90 | <0.3 | 640 | 5.7 |
|
| |
Exhaust |
|
|
| 80 | <0.3 | 635 | 5.0 | 14 | 11.7(5.3) | |
|
|
|
| 70 | <0.3 | 630 | 4.3 |
|
| |
|
|
|
|
| 60 | <0.3 | 625 | 4.0 |
|
|
|
|
|
|
| 50 | <0.3 | 620 | 3.2 |
|
|
|
|
|
|
| 0 |
|
|
|
|
|
Reference performance based on HVI Procedures 915, 916, and 920. [(*) Standby wattage.]
PRODUCT SERVICE
Warning Concerning Removal of Covers. The unit should be serviced by qualified technicians only. Your product is designed and manufactured to ensure a minimum of maintenance. Should your unit require service or parts, call Panasonic Call Center at
Panasonic Corporation of North America
Two Riverfront Plaza, Newark, NJ 07102
www.panasonic.com
Panasonic Canada lnc.
5770 Ambler Drive, Mississauga, Ontario L4W 2T3 www.panasonic.ca
![]() Panasonic corporation 2014
Panasonic corporation 2014
Printed in China |

