EFJohnson 7780 service manual Receiver Circuit Description, RF Amplifier Q1, First Mixer Q2

Page 67

CIRCUIT DESCRIPTION

frequency is low, the VCO-derived input to the phase detector is lower than the TCXO-derived input (or the phase lags the TCXO-derived input). Pin 15 of IC1 then pulses low and turns Q1 on. This charges the loop filter capacitors which increases the VCO control voltage. The VCO frequency then increases until the phase detector inputs are again the same frequency and phase. If the VCO frequency is too high, pin 16 pulses high which discharges the loop filter capacitors.

The loop filter is formed by R7-R9 and C4/C5. This is a low-pass filter which controls synthesizer stability and lock-up time and suppresses the 6.25 kHz reference frequency.

4.3 RECEIVER CIRCUIT DESCRIPTION

NOTE: A block diagram of the RF and logic units is located on page 8-3.

4.3.1 RF AMPLIFIER (Q1), FIRST MIXER (Q2)

The receive signal from the antenna is fed through low-pass filter FI7 and the antenna switch (see Section 4.4.2) to bandpass filter FI1. This filter attenu- ates the image and other unwanted frequencies and also prevents the injection signal from being fed out to the antenna.

The signal is then fed to RF amplifier Q1. Imped- ance matching with FI1 is provided by L32, C4, C138, and R104. The RF amplifier is used to recover filter losses and improve the sensitivity of the receiver. The output of Q1 is fed to FI2 which is a bandpass filter similar to FI1. Impedance matching is provided by L5 and C7.

From FI2 the signal is fed to gate 1 of first mixer Q2. This is a dual-gate MOSFET device which mixes the receive frequency with the first injection frequency to produce a first IF of 45.225 MHz (low-side injec- tion is used). The injection frequency is from the synthesizer, and it is fed through a low-pass filter consisting of C22-C24 and L12. This filter attenuates harmonic frequencies present in the injection signal. A 3-dB pad consisting of R9-R11 provides the required input level to the mixer, and L11 and C12 provide matching.

Impedance matching on the input of Q2 is provided by C11, L6-L8, and L33. Likewise, imped-

ance matching on the output is provided by C15, L9, L10, C18, C19, and R99. The first IF signal is then fed to four-pole crystal filter FI3. This filter attenuates wideband noise, adjacent channels, frequencies resulting from intermodulation, and other frequencies close to the receive channel.

44.775 MHz

1

Mixer

16

2nd Injection


44.775


2

MHz


15

Ceramic Filters

3

Oscillator

45.225

14


450 kHz 2nd IF


MHz

FI4, FI5,


Limiter-Amp

1st IF

13

FI6

4


Noise Det


5


RSSI

12


6


IF

11


Out

10


7


Quad.


Detector

9


8


Audio


Amp

Out


Figure 4-1


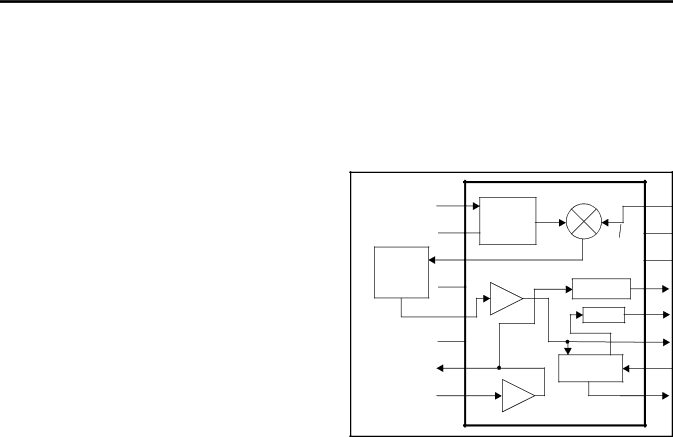
Limiter/Mixer/Detector IC3


4.3.2IF AMPLIFIER (Q2), LIMITER/DETECTOR (IC3)

From crystal filter FI3, the IF signal is fed to IF amplifier Q2 on the IF board. This stage provides the required input level to the next stage. The signal is then fed to limiter/detector IC3. This device contains second mixer and oscillator, limiter, detector, squelch, and RSSI stages (see Figure 4-1).

The IF signal is fed in on pin 16 which is the input of an internal mixer.The 45.225 MHz first IF signal is mixed with the 44.775 MHz second injection signal to produce a second IF of 450 kHz. The 44.775 injection signal is produced by multiplying the TCXO frequency by three. This multiplication is performed by Q18 and other components.

The 450 kHz second IF is fed out of IC3 on pin 3 and applied to ceramic filters FI6, FI5, and FI4. These filters are used to attenuate wideband noise. A switching network consisting of D13-D16 routes the IF signal through all three filters with narrow band and NPSPAC operation, and through only FI4 with wide- band operation. This switching network is controlled by WIDE and NAR signals from Q19-Q21. The W/N


November 1999

4-3

Part No. 001-7780-500

Image 67
Contents 7780 Page Page Table of Contents Table of Contents CONT’D List of Figures List of TablesScope of Manual Equipment Description General InformationTransceiver Identification AccessoriesFactory Customer Service Part Number BreakdownFactory Returns AccessoriesAccessory Toll-Free 800Internet Home Intrinsically Safe Information Replacement PartsDefinitions Classification of Hazardous Areas and Atmospheres Temperature Code T3CPossible Ignition Sources Intrinsically Safe and Nonincendive RatingsArea Classification Accessing PC BoardsMaterial Classification Typical Hazard Group ClassRemoving Logic Unit Removing RF UnitGeneral SpecificationsTransceiver Operation FeaturesControls and Display Low-Battery Indicator Amber TX Indicator Red Indicates when the transmitter is keyedFront Panel Keys Full Keypad Model DisplayDisplay Backlight Turning Power on and Setting VolumeOption Switches General OperationFunction Conv Option Switch FunctionsSee Scanning Tone ENABLE/DISABLEConventional and SMARTNET/ Smartzone Operation Display Mode Selection Conventional FeaturesMonitoring Before Transmitting Busy Channel Lockout Monitor ModeCall Guard Squelch Conventional Mode Scanning Penalty TimerConversation Timer Power Output SelectPriority Channel Sampling Standard Conventional Calls DTMF/ANI SignalingEnhanced Private Conversation Calls SMARTNET/SMARTZONE FeaturesViewing Unit ID Standard Group CallsTransceiver Operation Private Conversation II Calls Telephone Calls Call Alert Messaging Emergency Alarm and CallSending Status Conditions SMARTNET/SMARTZONE Scanning Failsoft OperationDynamic Regrouping Supervisory Tones Menu Description Keypad ProgrammingZone Change Parameter System Parameters Channel Change ParameterChannel Parameters Computer Description Programming SetupPctrunk Software Installation Transceiver ProgrammingHelp Files Connecting RPI to Computer and TransceiverStarting and Exiting Programming File TypesCreating and Displaying Systems Screen Pop-Up Buttons and File Size IndicatorProgramming Procedure File Size IndicationMenu Bar Menu CommandsWindow Menu Radio Type MenuDownload Menu Upload Menu Systems MenuZones DefaultsRADIO-WIDE Parameter Screens BandAssign Function Buttons Radio Wide Scan ListRadio-Wide Scan List Screen Modify List ScreenHot Dtmf RADIO-WIDE Conventional ScreenRADIO-WIDE SMARTNET/SMARTZONE Screen Full Spectrum CC ScanConventional System General Screen Adjustable ParametersRADIO-WIDE Portable Options Screen Programming Conventional Systems and ChannelsScan List Button TimersConventional System Modify Scan List Screen Keypad EditingSetting UP Conventional Channels Scan TimersPriority Channel Selection Selected Channel Conventional Channel Screen ParametersTx Time-Out Transmit PowerSignaling Channel TypeSplinter Channels Restricted AccessTime-Out Timer ISW Delay TimePrivate Call SMARTNET/SMARTZONE System Other ID’S ScreenSMARTNET/SMARTZONE System Phone Interconnect Screen Phone InterconnectFailsoft Channel SMARTNET/SMARTZONE System Emergency Settings ScreenEmergency Alarm SMARTNET/SMARTZONE System Talk Groups ScreenTrunking Phone List Screen SMARTNET/SMARTZONE System Lists ScreensMessage Aliasing Screen Control Channels Screen Announcement Groups ScreenTrunking Call List Screen Status Aliasing Screen Setting UP SMARTNET/SMART- Zone ChannelsSMARTNET/SMARTZONE Channel Screen Parameters Other Screen Parameters SMARTNET/SmartZone Channel ScreenRecommended Tone Call Guard Codes Freq Call Guard CTCSS/DCS Codes and TonesMHz Channels MHz Channels MHz Channels MHz Channels MHz Channels MHz Channels Synthesizer Description Power Switching and RegulationPower Switching Circuit DescriptionSynthesizer Chip IC1 VCO and Tcxo ModulationCharge Pump Q1, Q2, Loop Filter RF Amplifier Q1, First Mixer Q2 Receiver Circuit DescriptionIf Amplifier Q2, LIMITER/DETECTOR IC3 Amplifier Q9, Driver Q8 Antenna Switch and LOW-PASS FilterSquelch Circuit IC4A/B, IC5A Transmitter DescriptionReceive Audio Processing Control Logic and DisplayPin Port Name Input or Description Active High Output Microprocessor IC306 Pin DescriptionsHvfulswlrq Receive and Transmit Data Processing Audio Amplifier IC104-IC106Receive Data FILTER/DETECTOR IC102A/B, IC107A/B Transmit Audio Processing Transmit Data Filter IC206B/ IC206ASmartnet Data Processing LOW-PASS Filter IC205A/BFunction Fahrenheit Celsius Battery Pack and Charger InformationBattery Pack Power Setting Operating TimeBattery Pack and Charger Information Test Setup Alignment Procedure and Performance TestsMm/3/32 Mm/1/8 Phone Jack Tune Software HqhudoMain Pctune Screen Preliminary SetupModulation Balance Transmit Frequency and PowerTransmit Power Adjustment Screen High Power Level = 3.0 watts Low Power Level = 1.0 wattData Deviation Squelch AdjustRssi Adjust Audio DeviationReceiver Performance Tests Performance TestsTransmit Modulation Power OutputTransmitter Performance Tests Transmit FrequencyThis page intentionally left blank Ref No Description Parts ListDisplay Assembly Chassis PartsDisplay Assembly KEY AssemblyKEY Assembly If AssemblyIf Assembly RF Unit PLL AssemblyRF Unit NJM2904V-TE1 IC RF Unit Logic Unit Logic Unit TDA7233D IC Logic Unit 200K ERJ3GE MP35 MP18 MP25 EP2 KEY Front PanelEP1 MP32 MP33 MP27 MP34 MP28 MP29 MP23 MP22 MP30 MP24 MP26 MP18 PLL Board TOP View Schematic Diagrams and Component LayoutsPLL Board Bottom View If Board Bottom View If Board TOP ViewRF Unit Transceiver Block DiagramMIC RF Board TOP ViewIf AMP RF Board SchematicHD1 Logic Board TOP ViewReceive Audio Processing Logic Board SchematicGND KEYR3 KEYR2 KEYR1 KEYR0 KEYS3 KEYS2 KEYS1 KEYS0 GND Display Board Bottom ViewDS3 DS4 DS5 Display Board SchematicKEY Board Back View KEY Board Front ViewS S R R R R KEY Board SchematicScan HC2 HC7 HC8 HC3 Schematic Diagrams and Component Layouts