Lincoln Electric SVM167-A service manual Control BOARD, GUN Trigger and Wire Drive Motor

Page 34

Return to Section TOC

Return to Master TOC

E-4

THEORY OF OPERATION

E-4

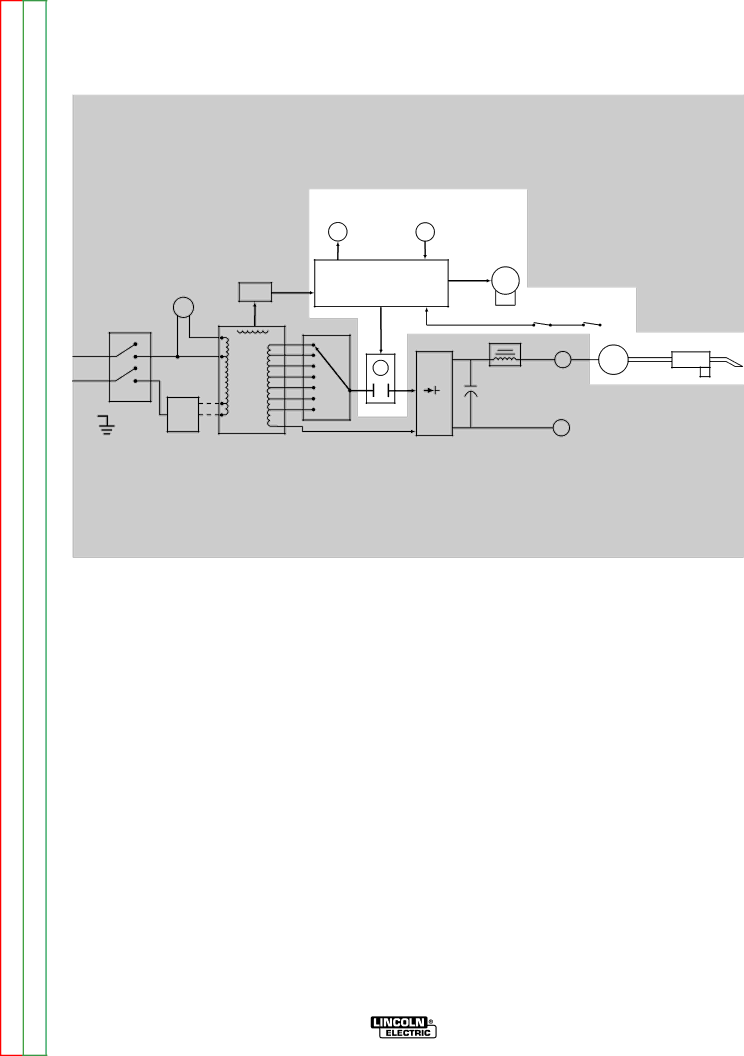
FIGURE E.4 – OPTIONAL CIRCUITS.

WIRE

GASSPEED

SOLENOIDCONTROL

FAN

MOTOR

LINE

SWITCH

RECTIFIER

DIODE

BRIDGE

VAC28TAP SELECTOR SWITCH

CONTROL BOARD

CONTACTOR

CONTROL

CONTACTOR

WIRE

DRIVE

MOTOR

TACH

GUN TRIGGER

OUTPUT DIODE

BRIDGE

+

OUTPUT

CHOKE

OUTPUT

CAPACITORS

-

TRANSFORMER

OUTPUT BRIDGE

THERMOSTAT

THERMOSTAT


+

POSITIVE

TERMINAL

-

GUN

ASSEMBLY

Return

Return

RECONNECT

PANEL

MAIN

NEGATIVE

TRANSFORMER

TERMINAL


Section TOC

Master TOC

CONTROL BOARD, GUN TRIGGER AND WIRE DRIVE MOTOR

Return to

Return to

When the control board receives an activation command from the trigger circuit the control board supplies 12VDC which activates the gas solenoid and output contactor. It also supplies 2 to 29 VDC (depending on the wire speed setting) to the wire drive motor. The control board monitors 0-5VDC signal from the wire speed potentiometer and adjusts the motor speed accordingly. The proper armature voltage is then applied to the wire drive motor. The drive motor speed is thus controlled which in turn regulates the electrode wire feed speed through the gun.

Two self re-setting thermostats are included in the trigger circuitry. If either of these thermostats would “open” due to excessive heat, the trigger circuit would be interrupted and the machine’s output and the wire feed would be disabled. The board also contains overload protection circuitry which protects the drive motor from excessive current draw.

Return to Section TOC

Return to Master TOC

NOTE: Unshaded areas of block logic diagrams are the subject of discussion.

POWER MIG® 215

Image 34
Contents Power MIG Safety Depends on YouSafety California Proposition 65 WarningsElectric Shock can kill ARC Rays can burn Can be dangerousCylinder may explode if damaged Welding and Cutting Sparks can cause fire or explosionIii Précautions DE Sûreté Sûreté Pour Soudage a L’ArcMaster Table of Contents for ALL Sections Table of Contents Installation SECTION Installation Technical Specifications Power MIGInstallation Safety PrecautionsUncrating the Power MIG LocationOutput Polarity Connections Shielding GAS GUN and Cable InstallationAUXILIARY POWER RECEPTACLES Cylinder may explode if damagedPower MIG Operation SECTION  OPERATIONB-2 Wear eye, ear and body protec- tionOperation Wire Reel Loading READI-REELS, Spools or Coils Procedure for Changing Drive AND IDLE Roll SetsTo Start the Welder Idle Roll Pressure Setting Feeding Wire ElectrodeWire Drive Configuration Making a Weld Figure B.2bFAN Control Avoiding Wire Feeding ProblemsWire Feed Overload Protection Input Line Voltage VariationsPower MIG Accessories SECTION  Accessories Making a Weld with the Spool GUN 3ACCESSORIESC-3Installed Adapter KIT and Spool GUNPower MIG Maintenance SECTION  Maintenance Liner Removal and Replace Ment Table D.1GUN Handle Disassembly English Metric Description SizeFigure D.2 Major Component Locations Power MIG Line Switch Theory of Operation SECTION Figure E.2 Input Power Circuit Theory of OperationOutput Rectification Contactor and Control Board Figure E.3 Control CircuitsControl BOARD, GUN Trigger and Wire Drive Motor Figure E.4 Optional CircuitsProtective Devices and Circuits Wirefeed Overload ProtectionThermal and Overload Protection Power MIG TROUBLESHOOTING AND REPAIR SECTION  Troubleshooting and Repair How To Use Troubleshooting GuidePC Board Troubleshooting Procedures Perform the Main Transformer Perform the Output Contactor Avoid contact with any portion These capacitors is toxicYour body Function Problems Wire Speed Potentiometer Test Welding Problems Weld bead is narrow or ropy Make sure the welding proce Test Description Main Transformer TestMaterials Needed ON/OFF Power Switch will be hot during these tests Test ProcedureMain Transformer Test X10 Table F.1. Test Points Input Voltage Test PointsWire Drive Motor and Wire Speed Potentiometer Test Black White1109 a Test for Feedback Voltage to Control BoardVDC Power MIG Output Bridge Rectifier Test Negative Lead Output Bridge Rectifier TestContactor Test Contactor Test Figure F.7. Contactor Terminals and LeadsVolts 10.0 Typical Output Voltage Waveform Machine Loaded MAX TAP GVolts 20.0 Normal Open Circuit Voltage Waveform MAX TAP GMachine Loaded to 180 Amps AT 16 VDC Scope Settings Volts 20.0 Control Board Replacement DescriptionControl Board Replacement ProcedureWire Drive Motor Assembly Replacement Wire Drive Wire Drive Motor Assembly ReplacementBolt Gas Hose TOC Output Diode Bridge Rectifier Replacement Output Diode Bridge Rectifier Mounting Bracket Mounting Bolts Rectifier Power MIG Output Capacitors Replacement Output Capacitors Replacement Figure F.14. Capacitor Bank LocationLead Mounting Bolts Nuts Lock washers 3 places Power MIG 41TROUBLESHOOTING and Repair F-41 Main Transformer ReplacementMain Transformer Replacement See Figure F.17Replacement Figure F.17. Leads X9, X10, 104B,104C, & H1BX2 X3 X4 X5 X6 X7 Lead Power MIG FAN BLADE/MOTOR Replacement FAN BLADE/MOTOR Replacement Perform the Output Capacitor Bank Removal ProcedureOutput Contactor Replacement Output Contactor Replacement Figure F.24Mounting Bolts Retest After Repair Electrical Diagrams Table of Contents Electrical Diagrams SectionPower MIG 215 208/220/230V POWEr miGPower MIG 215 208/220/230V for Codes 11099 SchEmaTic cOmplETE machiNE cODE 11247 l12308 pG1 L12308SchEmaTic cOmplETE machiNE cODE 11247 l12308 pG2 ElEcTrical DiaGramS ElEcTrical DiaGramS ElEcTrical DiaGramS ElEcTrical DiaGramS ElEcTrical DiaGramS ElEcTrical DiaGramS