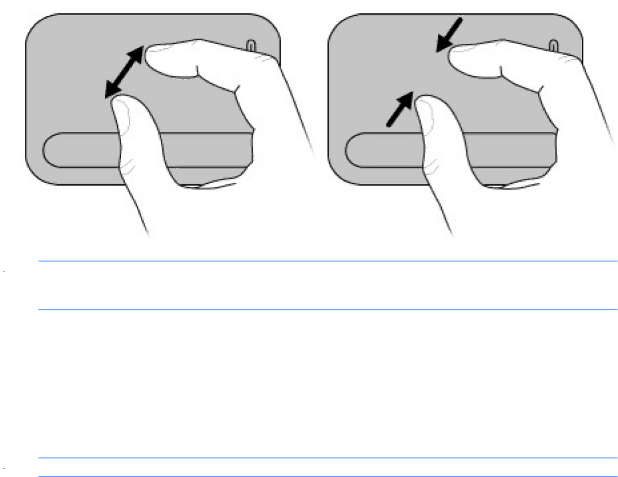
HP CQ35-337TX, CQ35-304TU, CQ36-108TX, CQ36-109TX, CQ36-106TX, CQ36-104TX, CQ35-406TX Using hotkeys

Page 42

To pinch:

Zoom out by holding two fingers apart on the TouchPad, and then pull the fingers together to decrease an object's size.

Zoom in by holding two fingers together on the TouchPad, and then pull the fingers apart to increase an object's size.

NOTE: Your computer also supports additional TouchPad features. To enable these features, select Start > Devices and Printers. Then, right-click the device representing your computer, and select Mouse settings.

Using hotkeys

Hotkeys are combinations of the fn key (1) and either the esc key (2), and one of the function keys

(3).

The icons on the f1 through f12 keys and the spacebar represent the hotkey functions. Hotkey functions and procedures are discussed in the following sections.

NOTE: Your computer may look slightly different from the illustration in this section.

32 Chapter 3 Pointing devices and keyboard

Image 42
Contents User Guide Product notice Safety warning notice Iv Safety warning notice Table of contents Pointing devices and keyboard Power management Drives External media cards 120 Identifying the hardware Top componentsTouchPad Lights Buttons and fingerprint reader select models only Panel System and Security Power Options Front components KeysRight-side components Left-side components Bottom components Wireless antennas Display componentsAdditional hardware components Identifying the labels Page Wireless and local area network Using wireless devices Identifying wireless and network status iconsUsing the wireless controls Using the wireless buttonUsing Wireless Assistant software select models only Using operating system controls Using a Wlan Setting up a WlanProtecting your Wlan Connecting to a Wlan Use a wireless transmitter with built-in securityRoaming to another network Using HP Mobile Broadband select models only Inserting a SIMPage Page Removing a SIM Page Using Bluetooth wireless devices select models only Bluetooth and Internet Connection Sharing ICSTroubleshooting wireless connection problems Cannot connect to a WlanCannot connect to a preferred Wlan network Network icon is not displayedCurrent Wlan network security codes are unavailable Cannot connect to the wireless router Wlan connection is very weakConnecting to a local area network LAN Using the TouchPad Using pointing devicesSetting pointing device preferences Pointing devices and keyboardRotating select models only Pinching select models onlyUsing hotkeys Function Hotkey Description Fn+f5 Using keypads Fn+f9Using the embedded numeric keypad Enabling and disabling the embedded numeric keypadCleaning the TouchPad and keyboard Using an optional external numeric keypadSwitching key functions on the embedded numeric keypad Multimedia features MultimediaIdentifying your multimedia components Multimedia features Adjusting the volume Using the media activity functions Using the media activity hotkeysUsing multimedia software Installing multimedia software from a discMultimedia software Connecting external audio devices AudioChecking your audio functions Page Connecting an external monitor or projector Connecting an Hdmi deviceVideo Configuring audio for Hdmi select models only Adjusting webcam properties WebcamTroubleshooting Disc tray does not open for removal of a discComputer does not detect the optical drive Disc does not play Disc does not play automatically Movie stops, skips, or plays erraticallyMovie is not visible on an external display Obtaining the latest HP device drivers Obtaining the latest Windows device drivers Using power-saving states Power managementSetting power options Initiating and exiting SleepUsing the battery meter Initiating and exiting HibernationViewing the current power plan Using power plansSetting password protection on wakeup Selecting a different power planUsing external AC power Connecting the AC adapterUsing battery power Testing an AC adapterDisplaying the remaining battery charge Finding battery information in Help and SupportUsing Battery Check Identifying batteriesInserting or removing the battery Charging a battery Identifying low battery levels Maximizing battery discharge timeManaging low battery levels Resolving a low battery levelCalibrating a battery Fully charge the batteryDisable Hibernation and Sleep Discharge the batteryConserving battery power Fully recharge the batteryReenable Hibernation and Sleep Replacing the battery Storing a batteryDisposing of a used battery Shutting down the computerClick Shut down Identifying installed drives DrivesHandling drives Using an optical drive Identifying the installed optical driveUsing optical discs Selecting the right disc CDs, DVDs, and BDsDVD±R discs CD-R discsCD-RW discs DVD±RW discsConfiguring AutoPlay Playing a CD, DVD, or BDChanging DVD region settings Observing the copyright warningCopying a CD or DVD Creating burning a CD or DVDUsing Disk Defragmenter Improving hard drive performanceRemoving an optical disc CD, DVD, or BD Using HP ProtectSmart Hard Drive Protection Using Disk CleanupIdentifying HP ProtectSmart Hard Drive Protection status Using HP ProtectSmart Hard Drive Protection software Replacing the hard drivePage Page Close the cover Tighten the 3 hard drive cover screws Drives External devices Using a USB deviceConnecting a USB device Removing a USB devicePage Using an eSATA device Connecting an eSATA deviceRemoving an eSATA device External media cards Using Digital Media Slot cards Inserting a digital cardRemoving a digital card Using ExpressCards Configuring an ExpressCardInserting an ExpressCard Removing an ExpressCard Using ExpressCards Memory modules Adding or replacing memory modules Page Page Upgrading a memory module in the primary memory module slot Page Page Security Computer risk Security feature Protecting the computerUsing passwords Setting passwords in WindowsSetting passwords in Setup Utility Administrator passwordPower-on password Managing an administrator passwordManaging a power-on password Using antivirus software Using firewall software Installing critical security updates Installing an optional security cable Using the fingerprint reader select models onlyLocating the fingerprint reader Registering fingerprintsUsing your registered fingerprint to log on to Windows Setup Utility Starting Setup Utility Using Setup Utility Changing the language of Setup UtilityNavigating and selecting in Setup Utility Restoring default settings in Setup Utility Exiting Setup UtilityDisplaying system information Page Main menu Setup Utility MenusSystem Configuration menu Security menuDiagnostics menu Primary Hard Disk Self TestSoftware updates Updating the Bios Determining the Bios versionDownloading a Bios update Page Updating programs and drivers Symbols/Numerics IndexDVD SIM SIM
Related manuals
Manual 8 pages 26.72 Kb Manual 154 pages 32.77 Kb