HP VLI 8 manual Audio Connector Optional

Page 20

2How to Install and Replace Components In Your Desktop PC Upgrading and Installing Mass Storage Devices

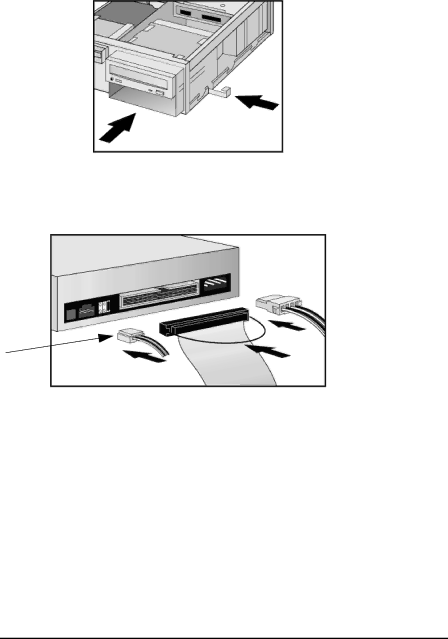
5Slide the drive bay back into the PC (ensuring the bottom catches engage properly) and replace the sliding latch.

6Attach all data and power connectors. If you are installing a CD-ROM or DVD drive, connect the audio cable too.

Audio

Connector

(optional)

7Replace the cover (described in this chapter).

8Verify the new configuration by checking the HP Summary Screen. To access the HP Summary Screen, press Esc when the Vectra logo appears during startup.

62

Image 20
Contents Product Hard Video Std Multi-media Number Drive ControllerModels with Intel Pentium II Processor D7941A/TProduct Hard Number Drive Video Controller Std D7961A/TD7962A/T D7963A/TInput Devices Video DisplaysMass Storage MultimediaProcessor Pentium System BoardMain Memory Switch Function Default Reserved Do Not Use Clears User and Administrator passwordsSystem Frequency1 Switch 2332 MHzPart Numbers Parts List for HP Vectra VLi 8 PC Description Repl Exchange Part NumberMain memory modules Description Repl Exchange Part Number System boardProcessors SECC2 package Removing and Replacing the Cover Removing the CoverReplacing the Cover Label Inside Your PC Disk driveUpgrading the Main Memory Supported HP accessories, connect to the web siteFeature is not used by this PC Upgrading and Installing Mass Storage Devices Drive ConnectorsBefore Installing an IDE Hard Disk Components How to do thisUpgrading the Hard Disk Drive Appears during startup Installing a Second Hard Disk Drive Appears during startup Installing Removable Media Devices Audio Connector Optional Configuring an IDE Device After Installation Replacing the Floppy Drive Installing Accessory Boards Accessory Board SlotsPC has four accessory board slots InchesInstalling an Accessory Board Remove the retaining bracketPage Advanced menu of the Setup program to Disabled Accessory boardTo enter the Setup program, press F2 during startup Configuring Accessory Boards with Plug and Play Accessory boardsInformation about installing accessory boards AvailableConfiguring non-Plug and Play ISA Accessory Boards Replacing the Processor Replacing the System Board Page Replacing the Power Supply Remove all internal power supply connectorsPage Changing the Battery Installing a Security Cable