Lennox Hearth LMDV-40 Series, LMDVT-3328-CPM, LMDVT-3328-CNM Vertical Vent FIGURES/TABLES, Pitch

Page 14

14

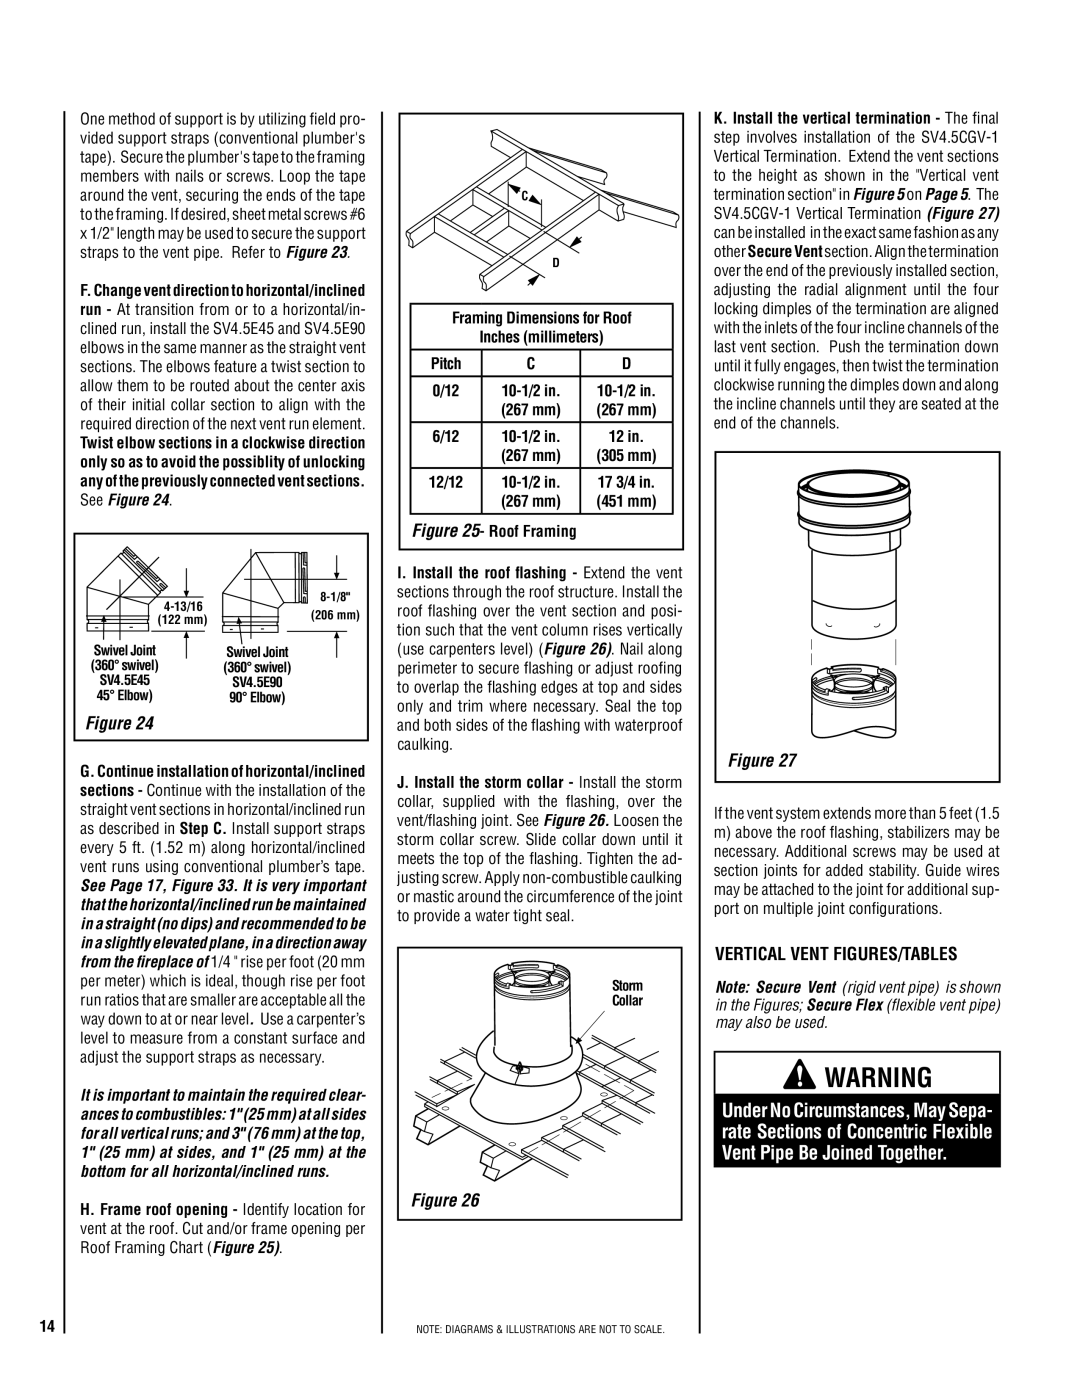
One method of support is by utilizing field pro- vided support straps (conventional plumber's tape). Secure the plumber's tape to the framing members with nails or screws. Loop the tape around the vent, securing the ends of the tape to the framing. If desired, sheet metal screws #6 x 1/2" length may be used to secure the support straps to the vent pipe. Refer to Figure 23.

F. Change vent direction to horizontal/inclined run - At transition from or to a horizontal/in- clined run, install the SV4.5E45 and SV4.5E90 elbows in the same manner as the straight vent sections. The elbows feature a twist section to allow them to be routed about the center axis of their initial collar section to align with the required direction of the next vent run element.

Twist elbow sections in a clockwise direction only so as to avoid the possiblity of unlocking any of the previously connected vent sections. See Figure 24.

4-13/16

8-1/8"

(206 mm)

(122 mm)


Swivel Joint

Swivel Joint

(360° swivel)

(360° swivel)

SV4.5E45

SV4.5E90

45° Elbow)

90° Elbow)

Figure 24


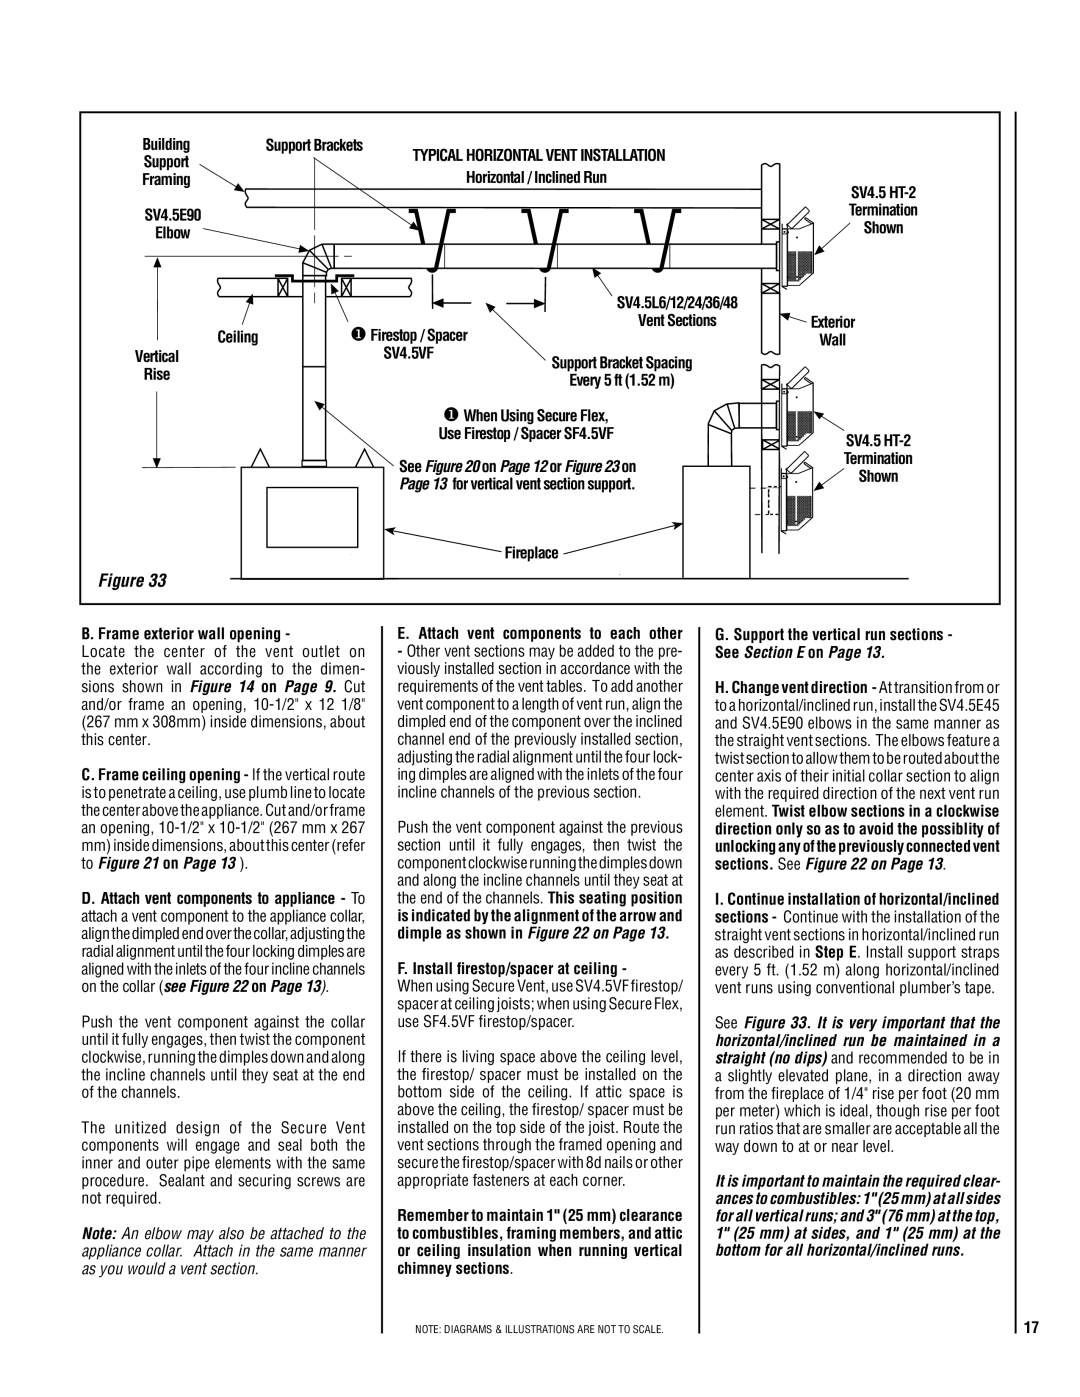
G. Continue installation of horizontal/inclined sections - Continue with the installation of the straight vent sections in horizontal/inclined run as described in Step C. Install support straps every 5 ft. (1.52 m) along horizontal/inclined vent runs using conventional plumber’s tape.

See Page 17, Figure 33. It is very important that the horizontal/inclined run be maintained in a straight (no dips) and recommended to be in a slightly elevated plane, in a direction away from the fireplace of 1/4 " rise per foot (20 mm per meter) which is ideal, though rise per foot run ratios that are smaller are acceptable all the way down to at or near level. Use a carpenter’s level to measure from a constant surface and adjust the support straps as necessary.

It is important to maintain the required clear- ances to combustibles: 1" (25 mm) at all sides for all vertical runs; and 3" (76 mm) at the top, 1" (25 mm) at sides, and 1" (25 mm) at the bottom for all horizontal/inclined runs.

H. Frame roof opening - Identify location for vent at the roof. Cut and/or frame opening per Roof Framing Chart (Figure 25).


C


D


Framing Dimensions for Roof


Inches (millimeters)

Pitch

C

D

0/12

10-1/2 in.

10-1/2 in.


(267 mm)

(267 mm)

6/12

10-1/2 in.

12 in.


(267 mm)

(305 mm)

12/12

10-1/2 in.

17 3/4 in.


(267 mm)

(451 mm)

Figure 25- Roof Framing


I. Install the roof flashing - Extend the vent sections through the roof structure. Install the roof flashing over the vent section and posi- tion such that the vent column rises vertically (use carpenters level) (Figure 26). Nail along perimeter to secure flashing or adjust roofing to overlap the flashing edges at top and sides only and trim where necessary. Seal the top and both sides of the flashing with waterproof caulking.

J. Install the storm collar - Install the storm collar, supplied with the flashing, over the vent/flashing joint. See Figure 26. Loosen the storm collar screw. Slide collar down until it meets the top of the flashing. Tighten the ad- justing screw. Apply non-combustible caulking or mastic around the circumference of the joint to provide a water tight seal.

Storm

Collar

Figure 26

NOTE: DIAGRAMS & ILLUSTRATIONS ARE NOT TO SCALE.

K. Install the vertical termination - The final step involves installation of the SV4.5CGV-1 Vertical Termination. Extend the vent sections to the height as shown in the "Vertical vent termination section" in Figure 5 on Page 5. The SV4.5CGV-1 Vertical Termination (Figure 27) can be installed in the exact same fashion as any other Secure Vent section. Align the termination over the end of the previously installed section, adjusting the radial alignment until the four locking dimples of the termination are aligned with the inlets of the four incline channels of the last vent section. Push the termination down until it fully engages, then twist the termination clockwise running the dimples down and along the incline channels until they are seated at the end of the channels.
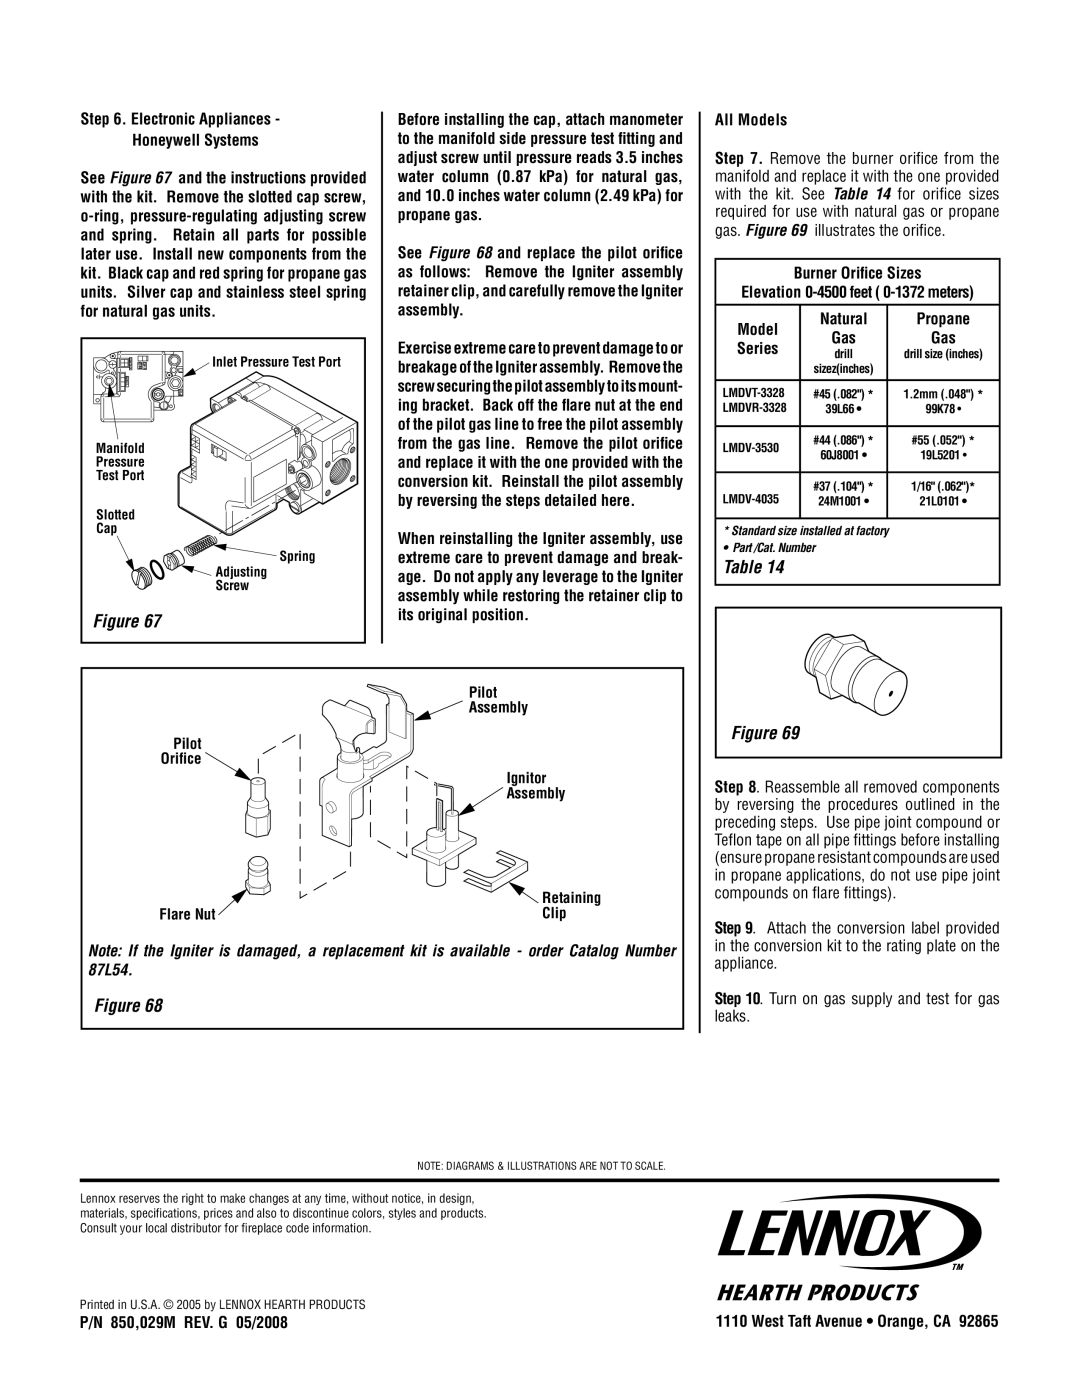
Figure 27

If the vent system extends more than 5 feet (1.5

m)above the roof flashing, stabilizers may be necessary. Additional screws may be used at section joints for added stability. Guide wires may be attached to the joint for additional sup- port on multiple joint configurations.

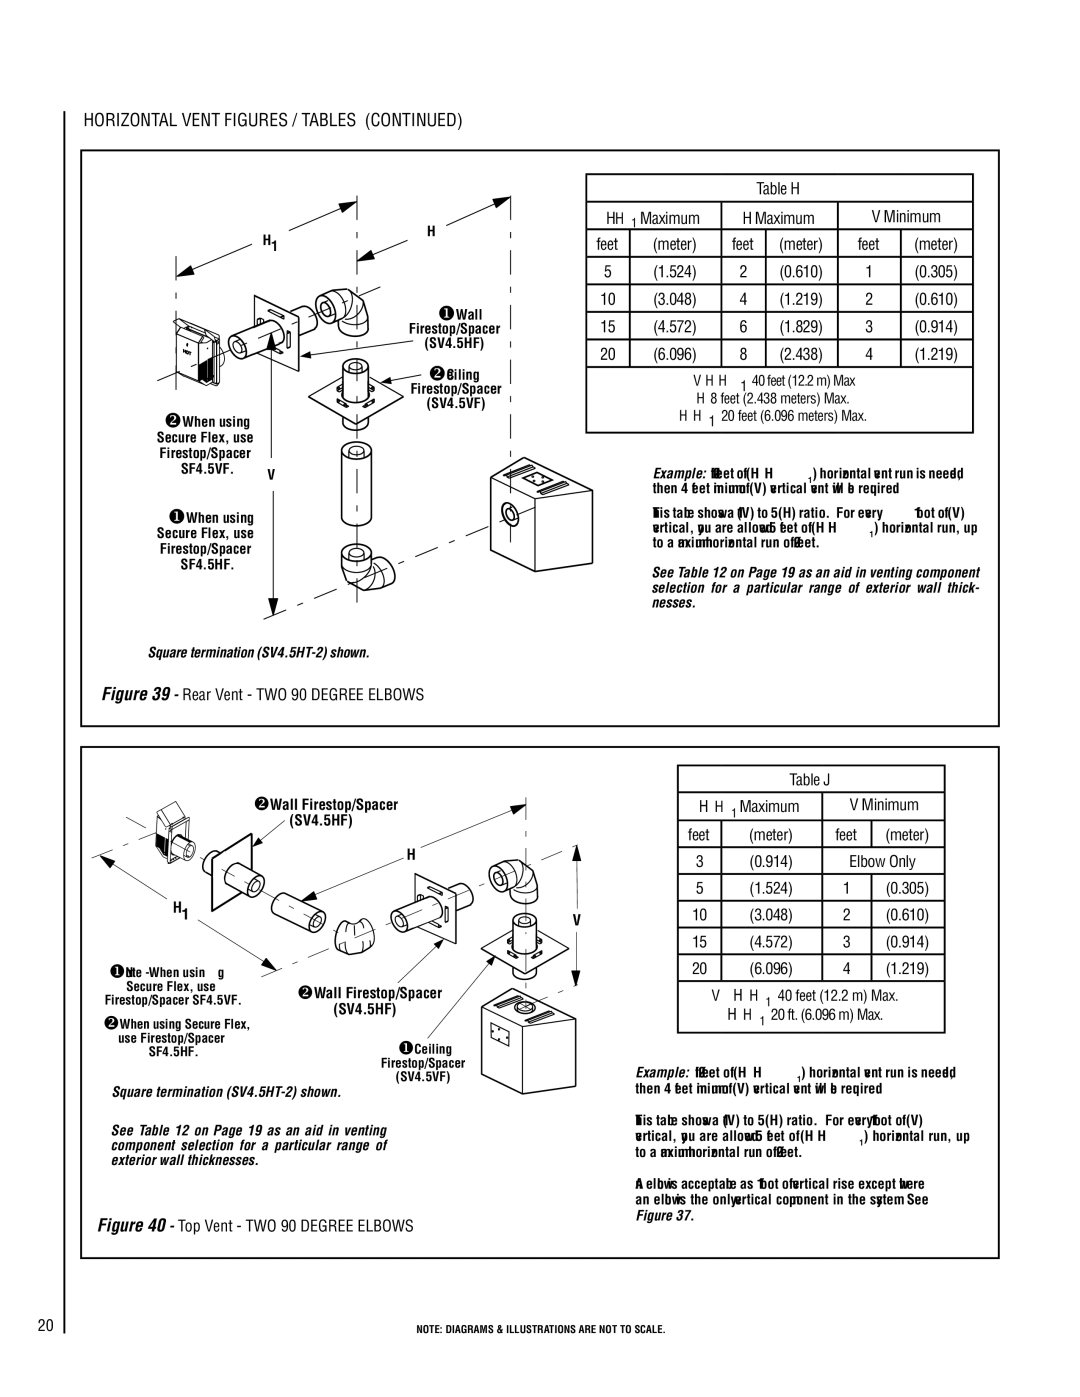
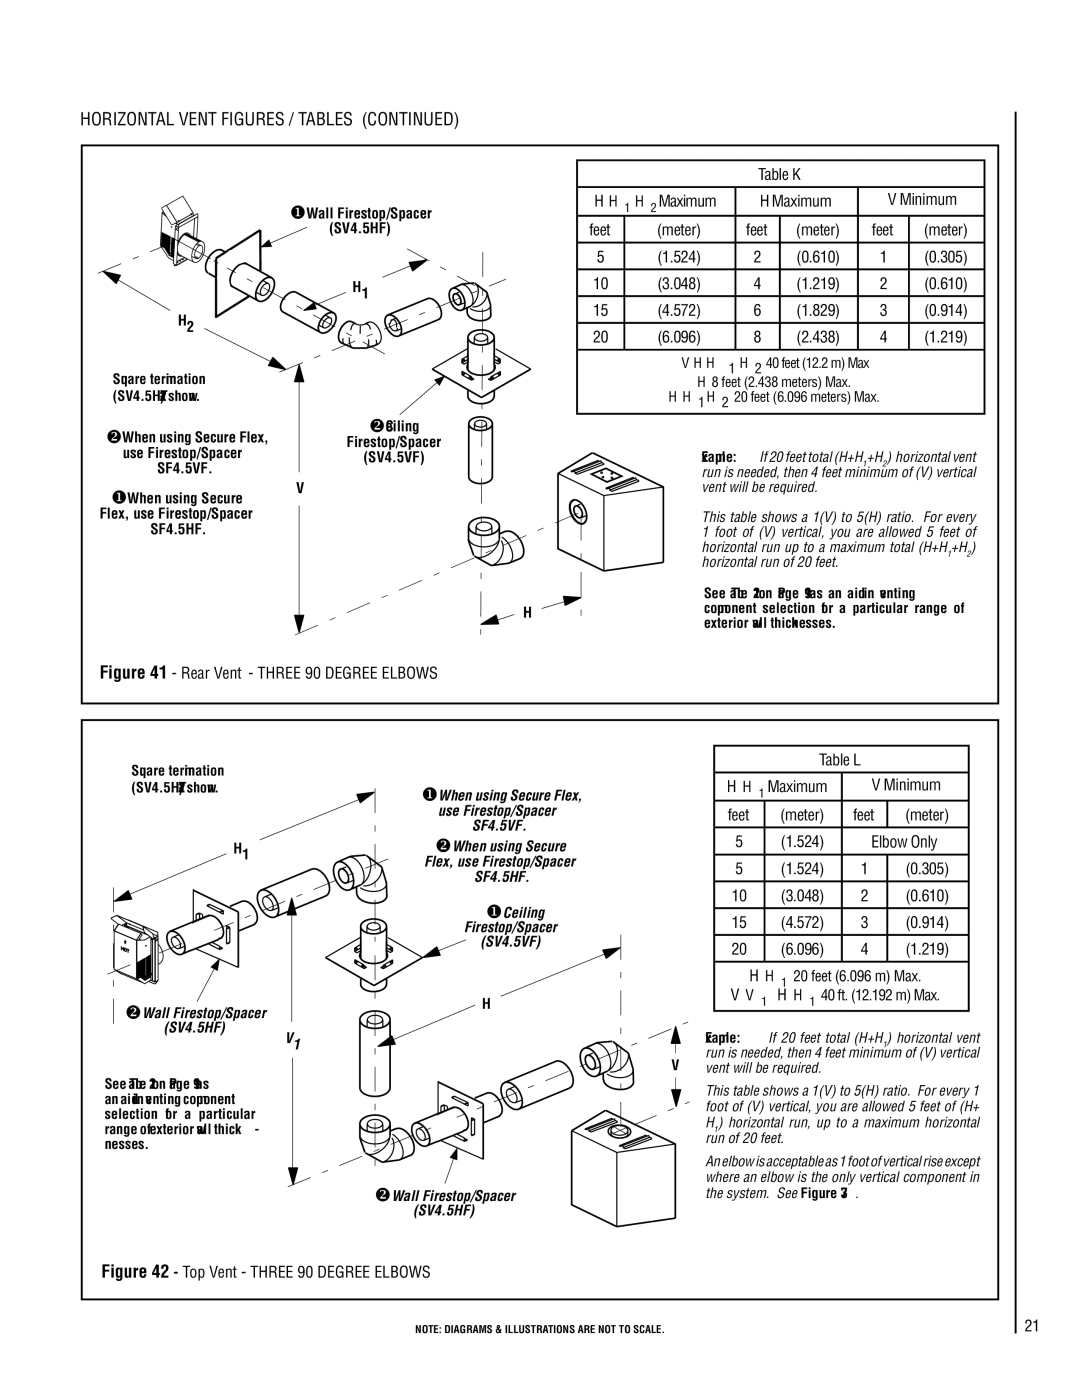
VERTICAL VENT FIGURES/TABLES

Note: Secure Vent (rigid vent pipe) is shown in the Figures; Secure Flex (flexible vent pipe) may also be used.

WARNING

Under No Circumstances, May Sepa- rate Sections of Concentric Flexible Vent Pipe Be Joined Together.

Image 14
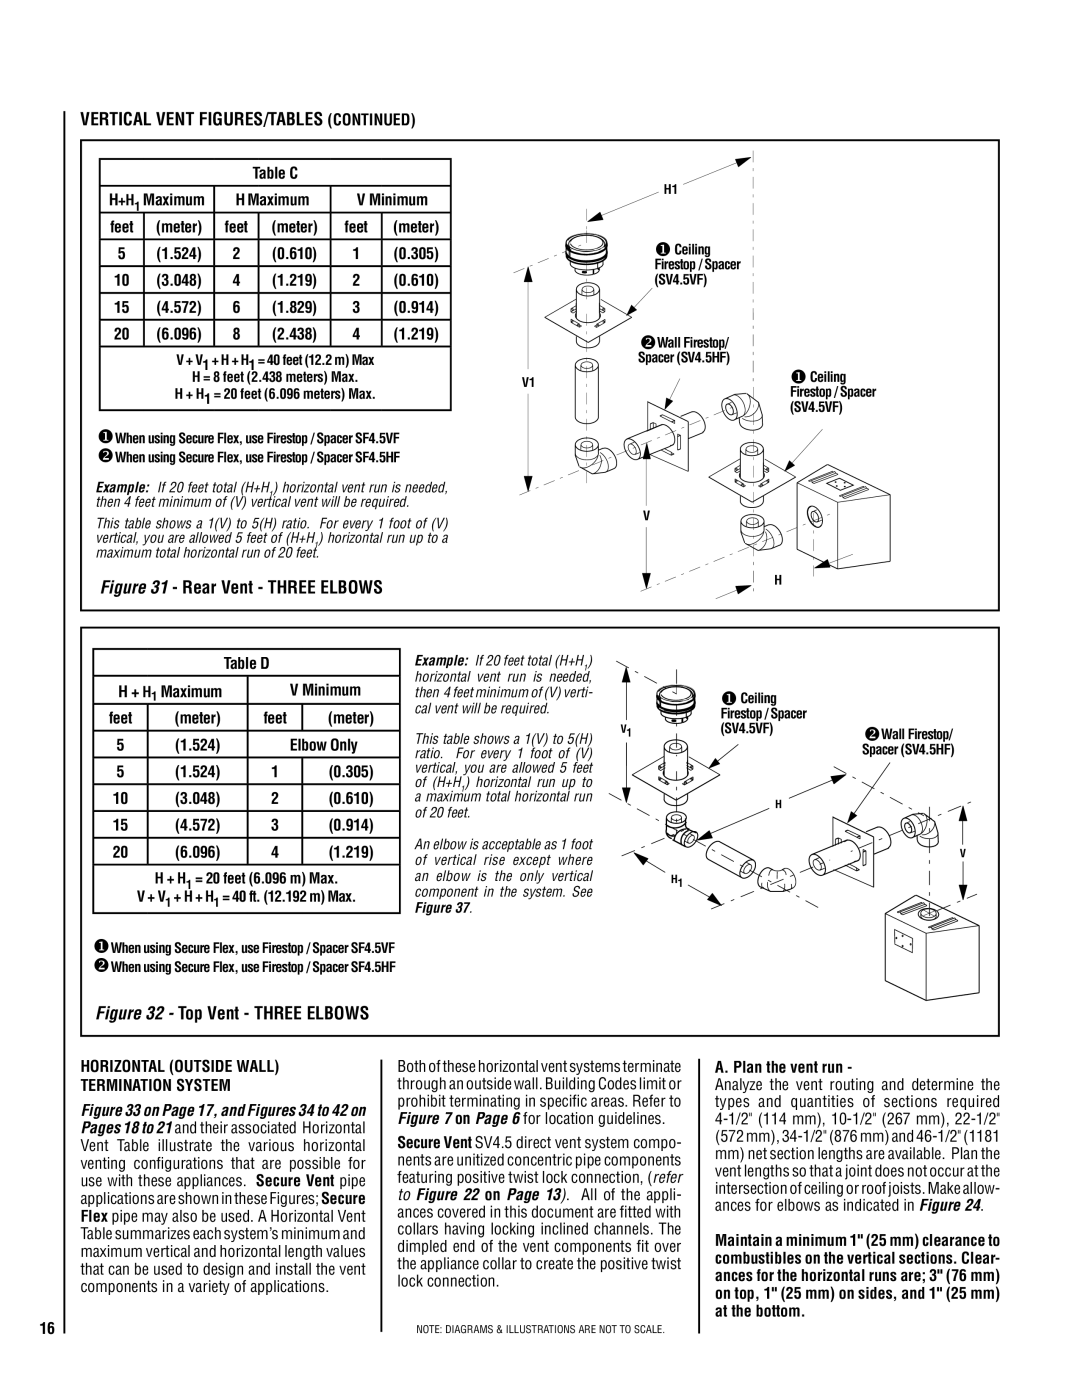
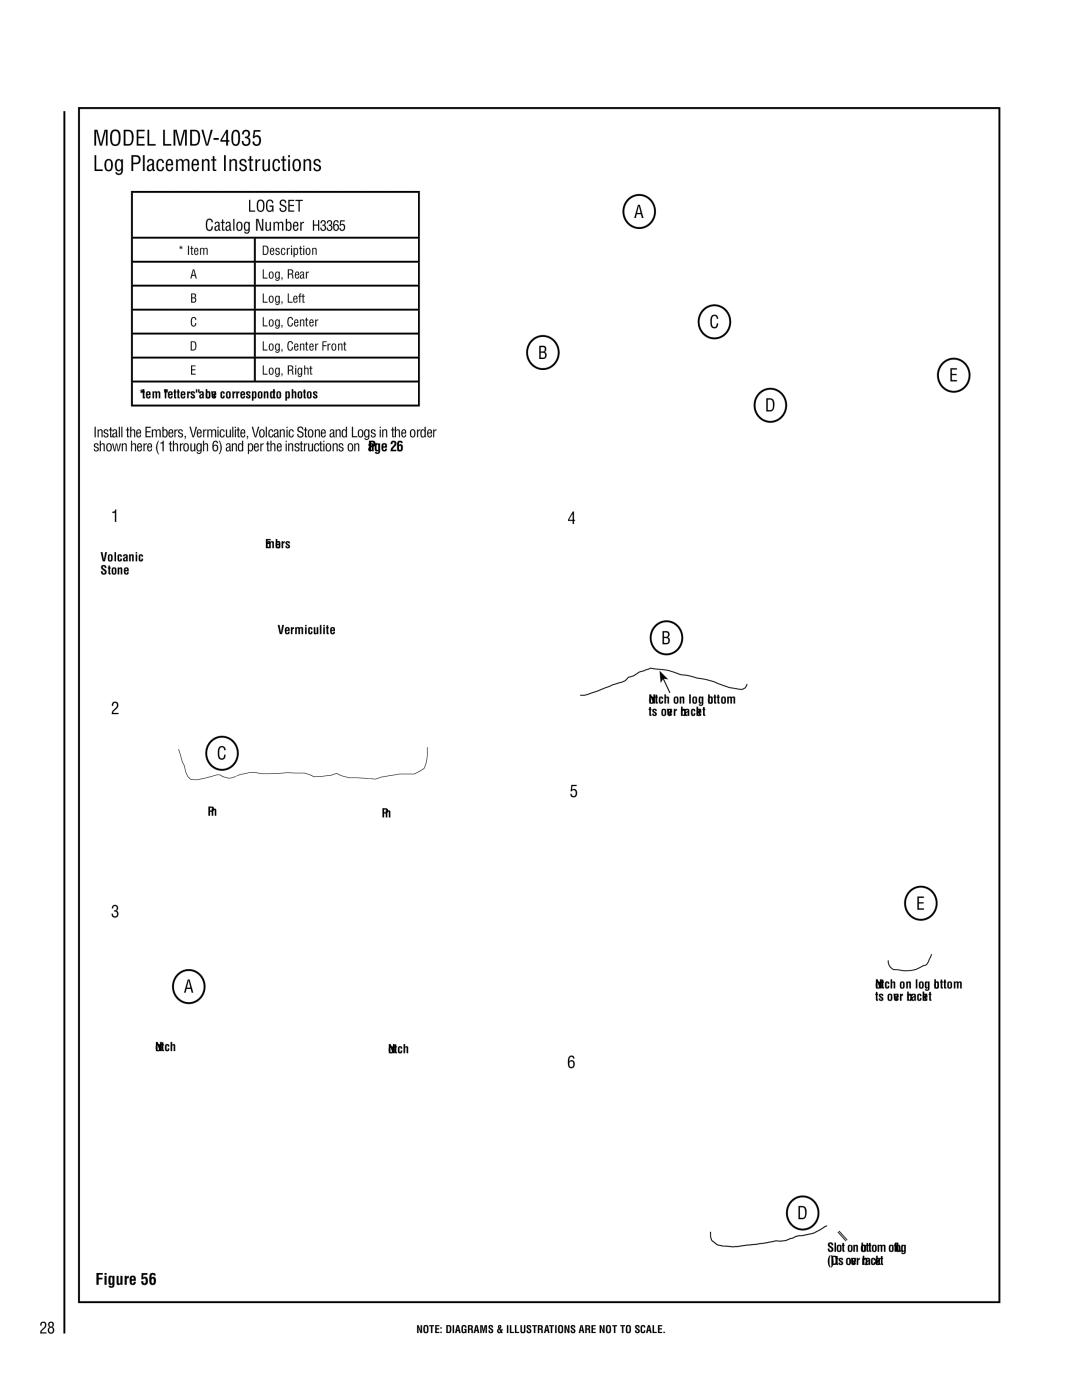
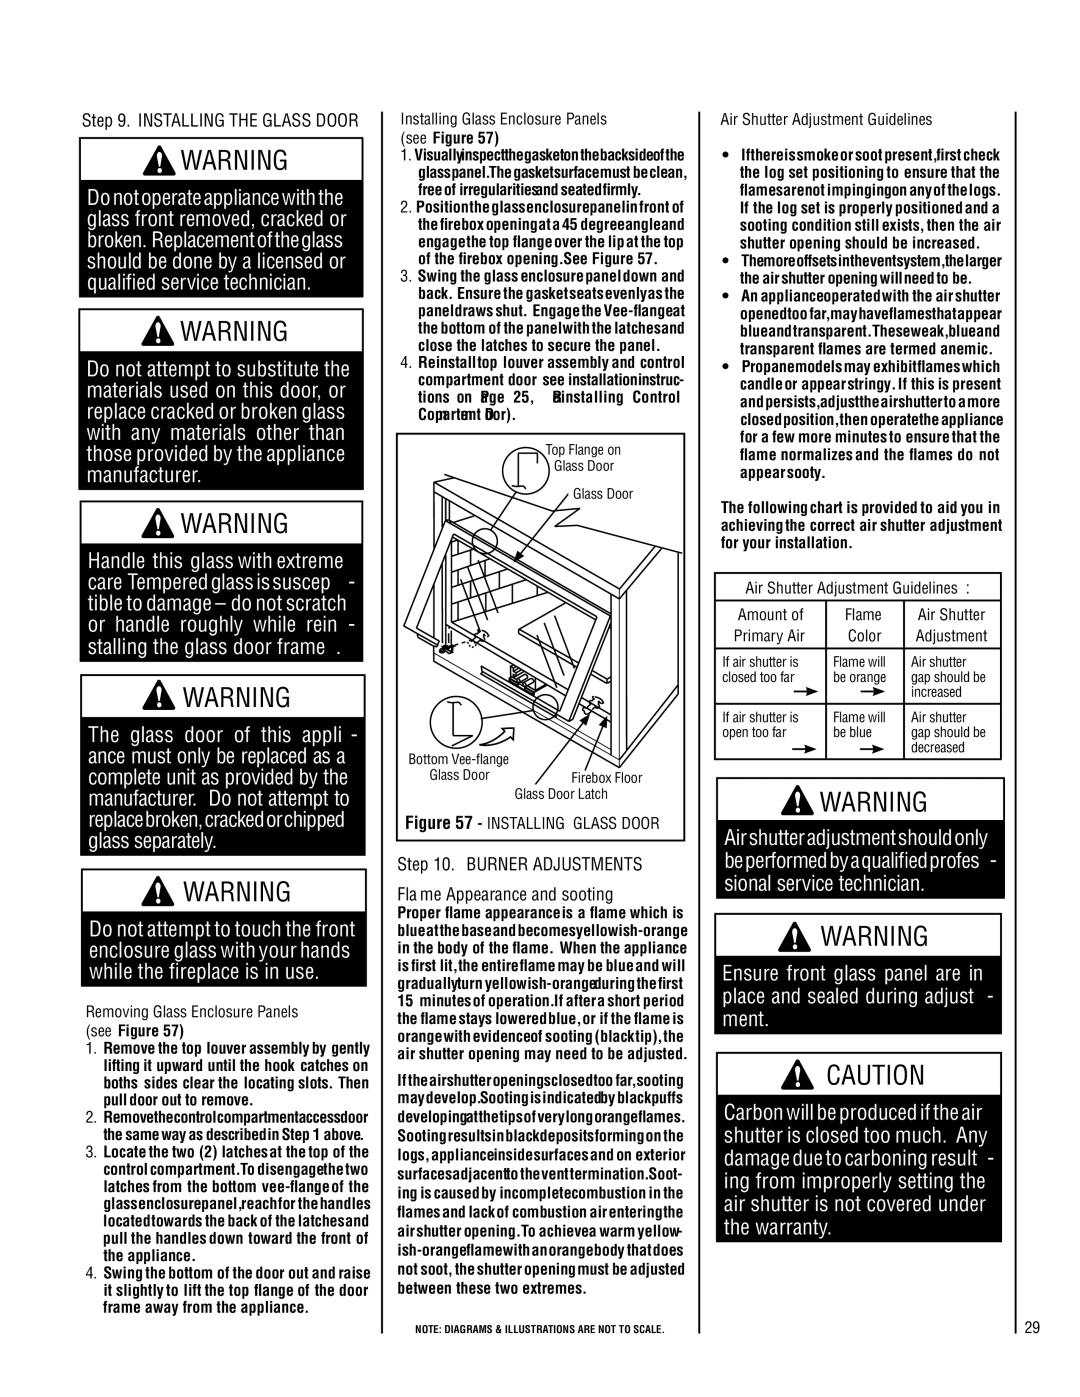
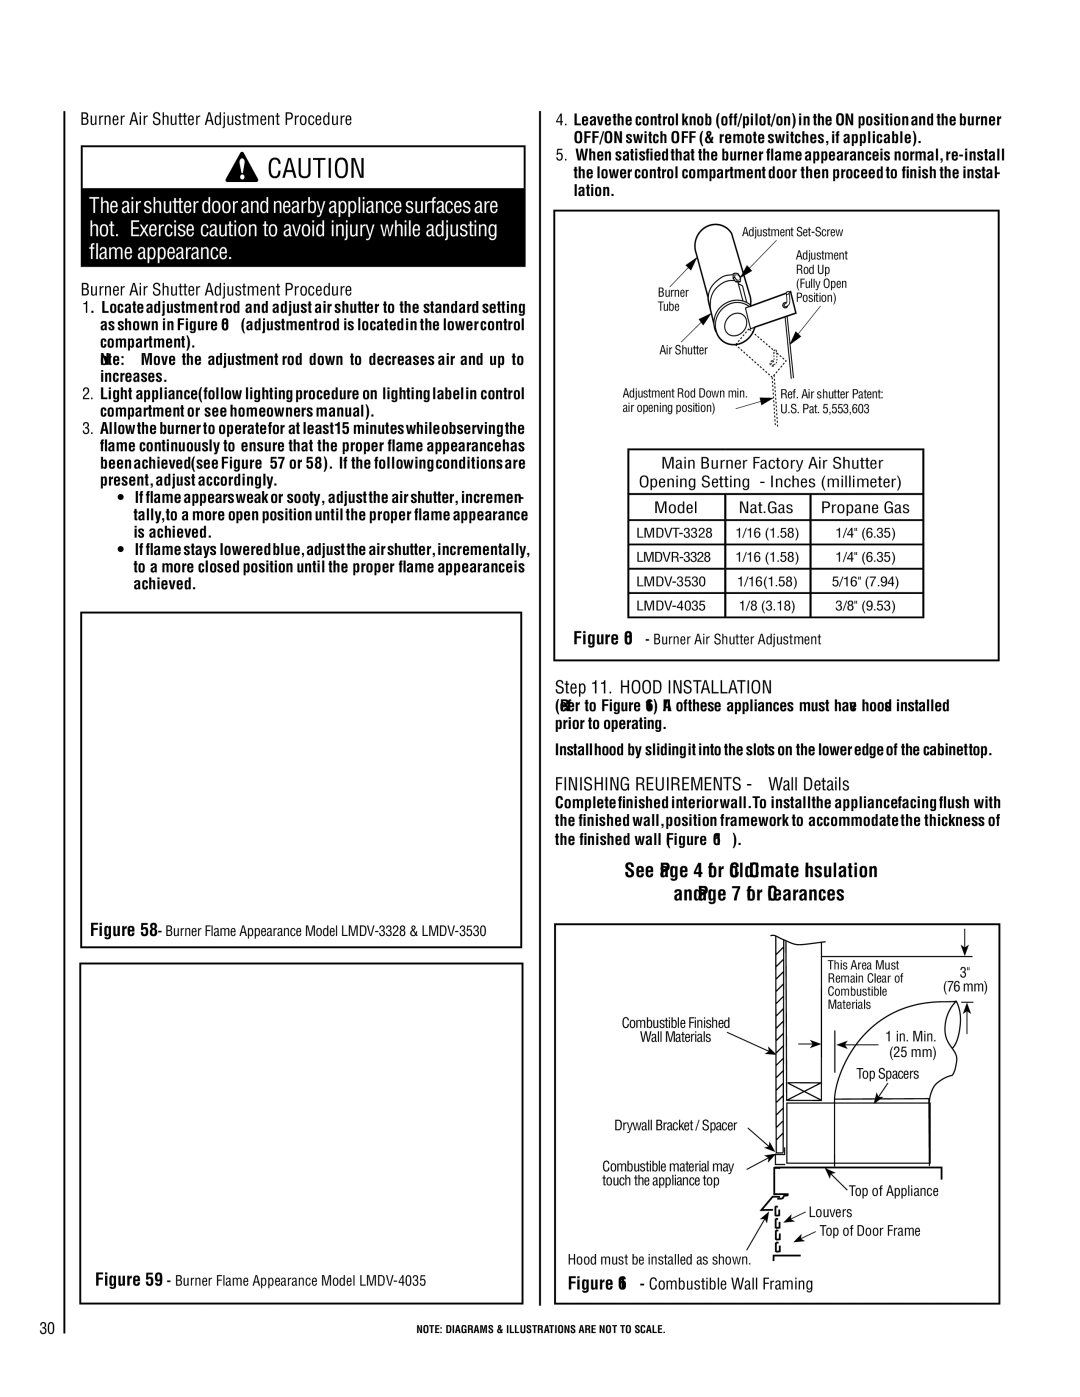
Contents OTL Report No -F-31-5 Vented GAS Fireplace Heaters Direct Vent Models850,029M REV. G 05/2008 Table of Contents SIT Millivolt Honeywell MillivoltMassachusetts And New York City, NY Re- quirements Cold Climate InsulationLocation MassachusettsHorizontal Vent Termination Clearances Manufactured Home RequirementsVertical Vent Termination Clearances Vent Termination Clearances= Clearance to service regulator vent outlet Feet 91cm Canadian Installation US InstallationMeter/regulator assembly Inches 30cmPanel or louvers Minimum Clearances to CombustiblesAppliance and Vent Clearances Adjacent to itFraming Detailed Installation StepsTypical Installation Sequence Routing Gas LineThis center mark see Figure Fireplace specificationsFrom Vent Size Vertical Venting Through the CeilingNatural Fireplace Framing specificationsSchedule Black Iron Pipe Inside Diameter Inches PropaneCross Section Install the Vent System General InformationThese fireplaces must be vented directly to the outside Vertical Termination Systems Roof Vertical Straight InstallationVent Section Length Chart Effective Vent LengthVertical Offset Installation Attach vent components to each otherIf the vent system extends more than 5 feet Vertical Vent FIGURES/TABLESPitch 524 Elbow Only 305 048 610 572 914 096 219 610 305 219 829 914 438Table B Maximum Minimum Feet Meter Ratio V to H ratio is524 610 305 048 219 572 829 914 096 438 Table CMaximum Minimum Feet Meter Table D + H1 Maximum MinimumTypical Horizontal Vent Installation See on Page 12 or onSee on Page 9 for Min Install Firestop/Spacer at exterior wallSame manner as any SV4.5 vent component refer to Step E Feet Meter Horizontal Vent FIGURES/TABLESTable F Maximum 914Horizontal Vent Figures / Tables 524 305 Minimum524 Elbow Only 048 610 572 914Attach Flex Vent to Termination Install the Outer Flex PipeFlexible Vent Section See Figure Field WiringWiring Optional Forced Air Blower Kit Connecting Gas Line Schematic Representation OnlyChecking Appliance Opera- tion Control Compartment AccessLouver Panel Instructions Ref SIT and Honeywell Millivolt Appliance CheckoutCanic STONE, Glowing Embers and Logs Install VERMICULITE, VOLElectronic Appliance Checkout Shown here 1 through 6 and per the instructions on LOG SETCatalog Number H3366 Model LMDV-4035 Catalog Number H3365Burner Adjustments Flame Appearance and sooting Installing the Glass DoorInstalling Glass Enclosure Panels Air Shutter Adjustment GuidelinesFinishing Requirements Wall Details Burner Air Shutter Adjustment ProcedureHood Installation Drywall Bracket / Spacer12C Cat. No Model Description12B Cat. No Open Top, Chase Top ShroudDescription Listed Secure Flex ComponentsLMDV-3328 & LMDV-3530 Models Only All compressed flex vents can be expanded up to two timesH2013 H2009H2011 H2010SIT Millivolt Gas Valve Adjusting KnobMillivolt Appliances SIT Systems Pilot for SIT Millivolt Gas ValveSeries Pilot Orifice Ignitor AssemblyElectronic Appliances Honeywell Systems 850,029M REV. G 05/2008 West Taft Avenue Orange, CA

LMDV-3530-CNM, LMDV-35 Series, LMDVR-3328-CNE, LMDV-4035-CNE, LMDV-4035-CPM specifications

Lennox Hearth products are renowned for their quality, efficiency, and innovative technologies that optimize the home heating experience. Among the standout offerings in their lineup are the LMDV-3530-CPM, LMDVR-3328-CPM, LMDV-3530-CNE, LMDVT-3328-CPM, and LMDVR-3328-CNM models. Each of these products embodies the brand's commitment to performance and design, making them a popular choice for modern homeowners.

The LMDV-3530-CPM gas fireplace boasts a contemporary aesthetic combined with powerful heating capabilities. It features a clean face design that enhances the viewing experience while maximizing warmth in the room. The unit is equipped with advanced technology that includes multi-speed blowers for efficient air circulation, allowing users to enjoy consistent heat throughout the space. Its variable flame and heat control options ensure that homeowners can customize their ambience and comfort levels according to their preferences.

Similarly, the LMDVR-3328-CPM model is designed for versatility and efficiency. Its modern fireplace insert converts existing masonry fireplaces into high-efficiency heating systems. Featuring a sleek design, this insert incorporates innovative venting technologies that enable it to operate in diverse installation configurations, enhancing both aesthetic appeal and functionality. Homeowners can appreciate the adjustable flame and fan speed settings, which provide tailored heating solutions.

The LMDV-3530-CNE model distinguishes itself through eco-friendly features. It employs advanced combustion technology that reduces emissions without sacrificing heat output. This model stands out as an environmentally responsible option, suitable for conscious consumers who wish to reduce their carbon footprint. Its easy-to-use controls and stylish design make it a favored choice among discerning homeowners.

The LMDVT-3328-CPM continues the trend of performance and versatility. This model combines traditional charm with modern efficiency, featuring a large viewing area that allows for an inviting flame display. The unit’s heat exchanger is designed for maximum heat transfer, ensuring that warmth is efficiently distributed throughout the room.

Lastly, the LMDVR-3328-CNM model is perfect for those seeking an efficient upgrade for their traditional fireplace. With its stunning design and advanced features, including optional remote control and programmable settings, this model takes convenience to new heights.

Overall, Lennox Hearth’s suite of models combines elegance, efficiency, and innovation, ensuring that homeowners can find the perfect heating solution to complement their living spaces. Each product is engineered with state-of-the-art technologies that reflect Lennox’s dedication to quality and customer satisfaction.