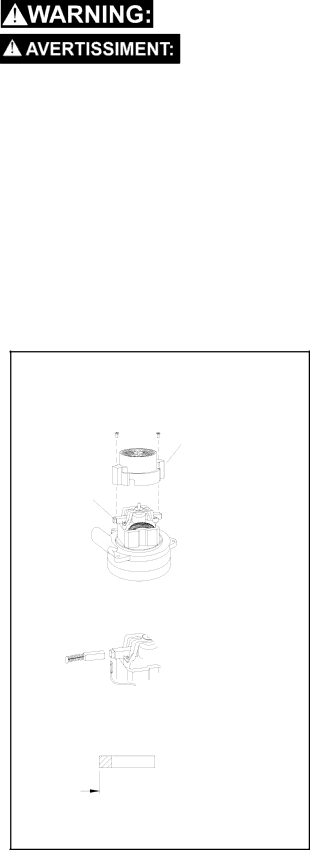
Windsor ADM8 10080170 manual Vacuum Motor Replacement, 38 9.5 mm

Page 22

MAINTENANCE

Only qualified maintenance personnel are to perform the following repairs.

Seul le personnel d'entretien qualifié peut effectuer des réparations.

VACUUM MOTOR REPLACEMENT

1.Turn off all switches and unplug machine.

2.Remove recovery tank.

3.Remove the (2) screws that fasten the solution tank to the frame, and tilt tank back to expose the inside of the frame.

4.Locate the vacuum motor wires and disconnect at the connector. Close the solution tank.

5.Remove the (6) screws holding the vacuum motor cover (p/n 27809) to the solution tank.

6.Remove the vacuum motor.

7.Reverse process to install vacuum motor.

WARNING: The green ground wire must be attached for safe operation. See wiring diagram. AVERTISSEMENT: Le fil à la terre vert doit être attaché pour un fonctionnement en toute sécurité. voir le schéma de câblage.

End Cap

Carbon

Brushes

If armature commutator is grooved, extremely pitted or not concentric, the motor will need to be replaced or sent to a qualified service center.

Important:

These brushes wear quicker as the length shortens due to increased heat. Spring inside brush housing will damage motor if brushes are allowed to wear away completely.

38 [9.5 mm]

Periodically check the length of the carbon brushes. Replace both carbon brushes when either is less than 3/8" (9.5mm) long.

4-3

ADMIRAL 86038230

Image 22
Contents Carpet Extractor Warranty Registration Machine Data LOG/OVERVIEWTable of Contents HOW to USE this Manual Safety Instructions Read ALL Instructions Before Using this MachineImportantes Mesures DE Sécurité Hazard Intensity Level Hazard Intensity LevelDegrés DE Risques EN CAS DE Danger Degrés DE Risques EN CAS DE DangerThis Product is for Commercial USE only Electrical Proper GroundingGrounding Instructions Technical Specifications Power TypeCONTROLS/COMPONENT Locations CONTROLS/COMPONENT Locations CONTROLS/COMPONENT Locations Filling Operations StepOperations Adjust handle to comfortable operating Solution Intake Cover Vacuum Step Cleaning ProcedureOFF Step Recovery Drain Solution Accessory Tool Usage Solution Brush Vacuum Inton OFFMaintenance Service SchedulePeriodic Maintenance Daily / Regular MaintenanceVacuum Motor Replacement 38 9.5 mmBelt Replacement Pump Replacement Parts for Flojet 100 PSI Prior to Serial # Wiring Diagram Troubleshooting Chart Problem Cause SolutionAdmiral Frame Assembly HUBCAP, 5/8 Shaft PRV no QTY Description Serial no From OpenFRAME, CLP Family HARNESS, MAIN, CLP/ADMBrush Assembly PLATE, Brush Housing RH HOUSING, BrushLEVER, Height Adjustment PLATE, Brush Housing LHPump Assembly COUPLING, 1/4 Anchor W/1 HEX CONNECTOR, 1/8FPT X 1/4 TubeqcPRV no QTY Description Serial no From ELBOW, SWIVEL, 1/4MPTX1/4TUBEVacuum Shoe Assembly PRV no QTY Description COVER, Accessory PortGASKET, Accessory Port ARM, VAC Shoe ParallelControl Panel Assembly TRIGGER, Switch BOOT, 3/8 Circuit BreakerSWITCH, Spst 2-POSITION Rocker CLIP, Power CordSolution Tank Assembly Brush SET, 120V VAC, Windsor Service Only HOUSING, VAC MotorService TANK, ADM SolutionRecovery Tank Assembly CLAMP, 2.0 Nylon Ratchet TANK, ADM RecoveryBRKT, Recovery Hose MTG TETJER, Drain PlugSuggested Spare Parts