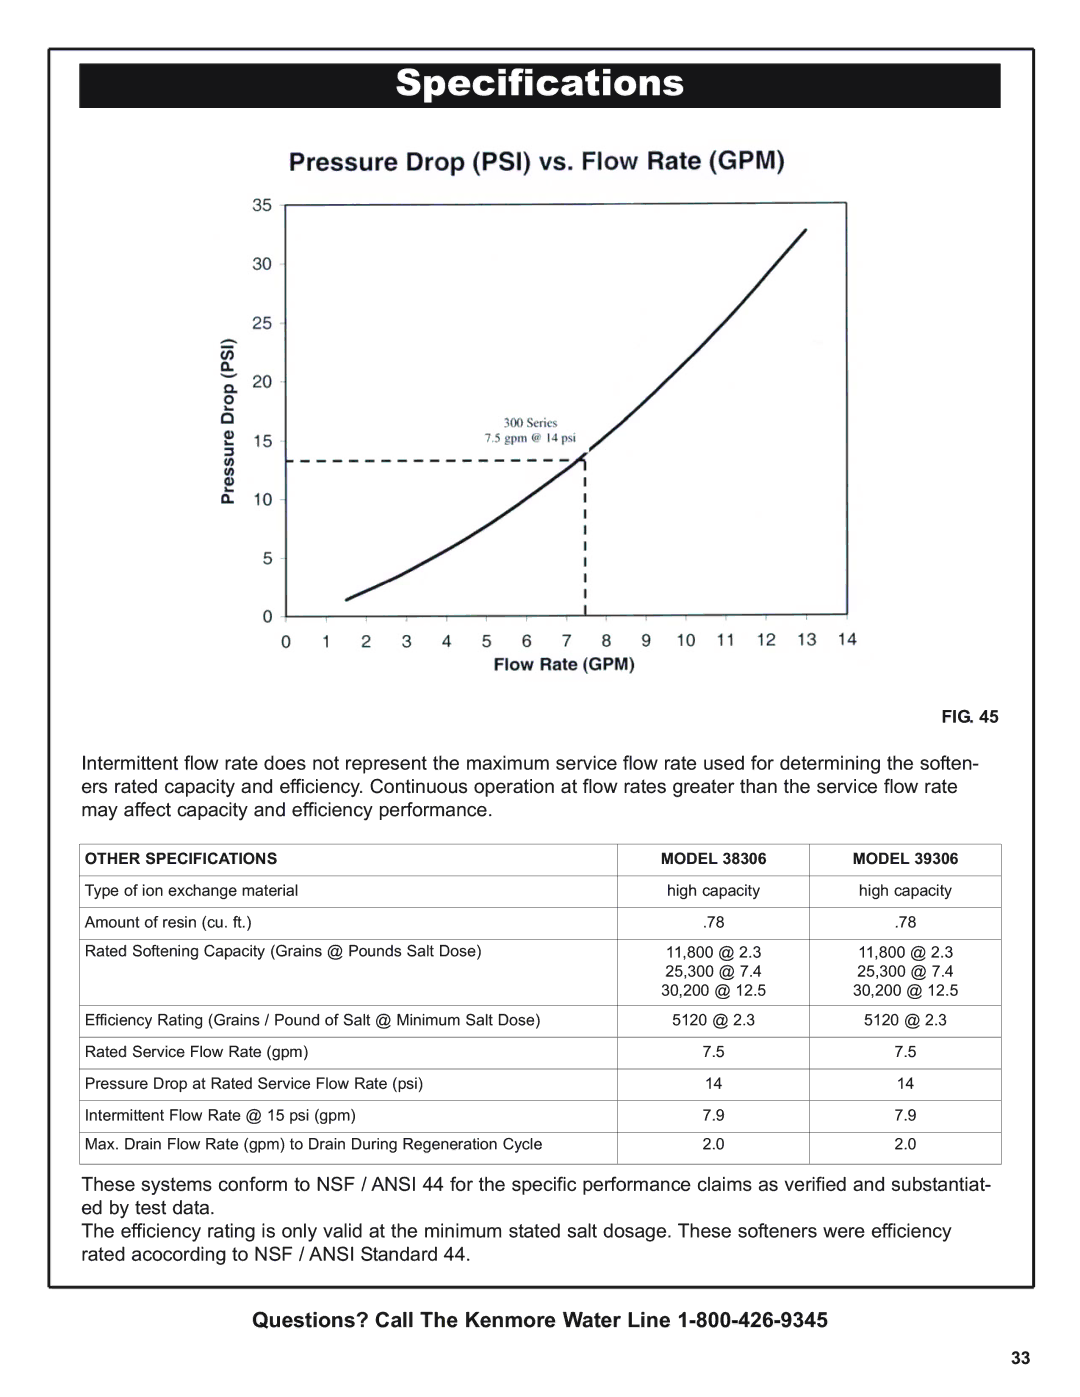
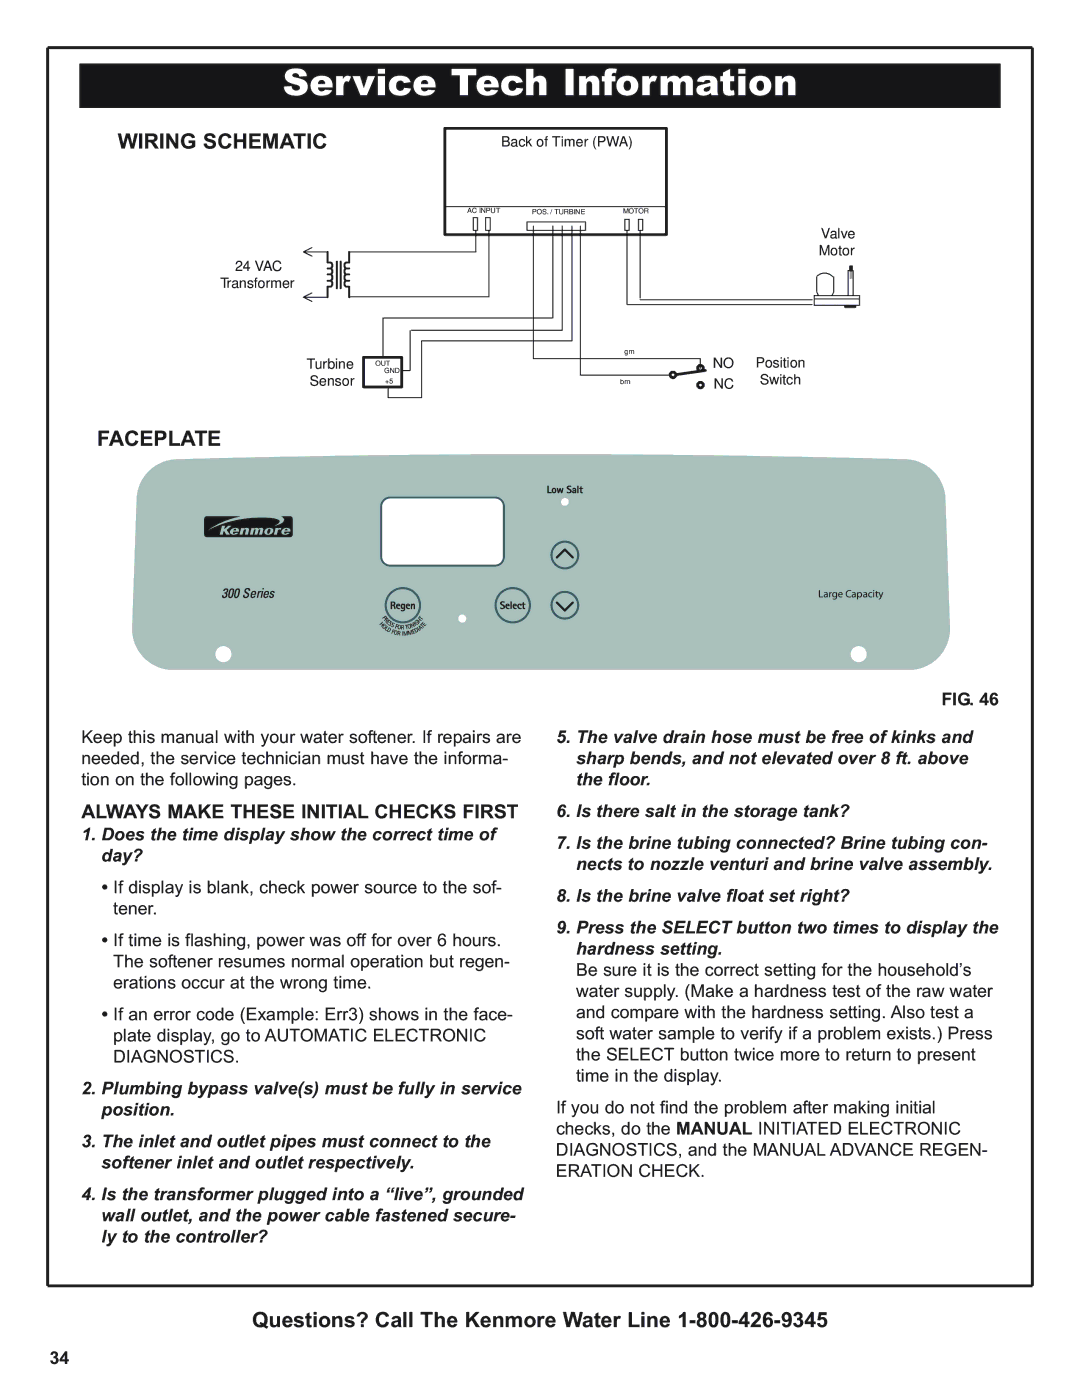
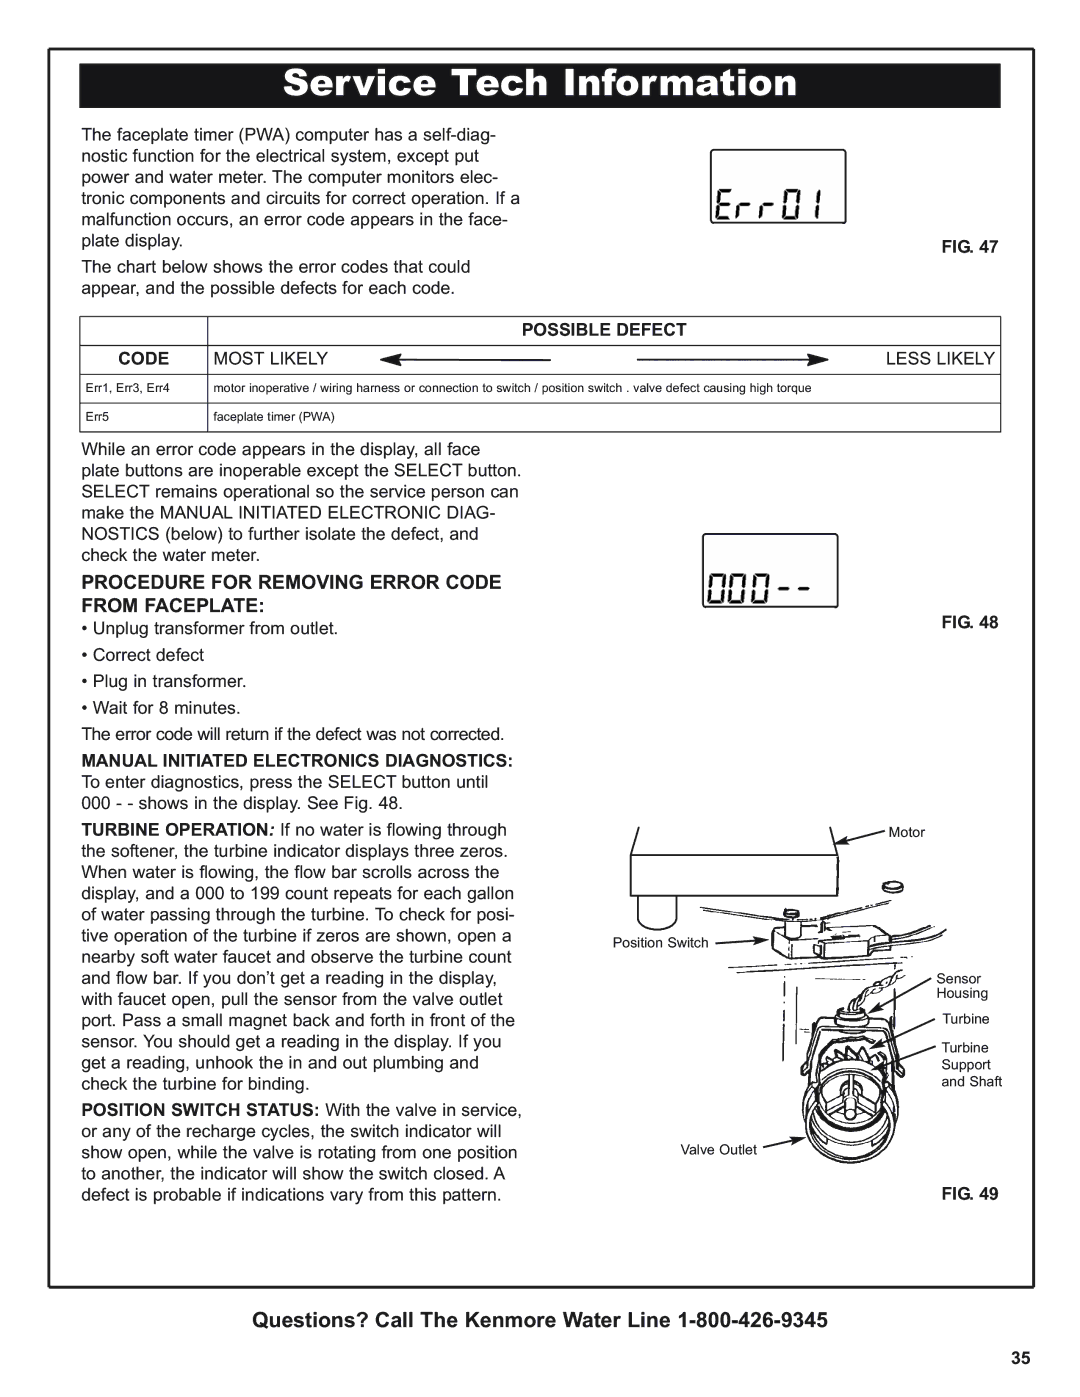
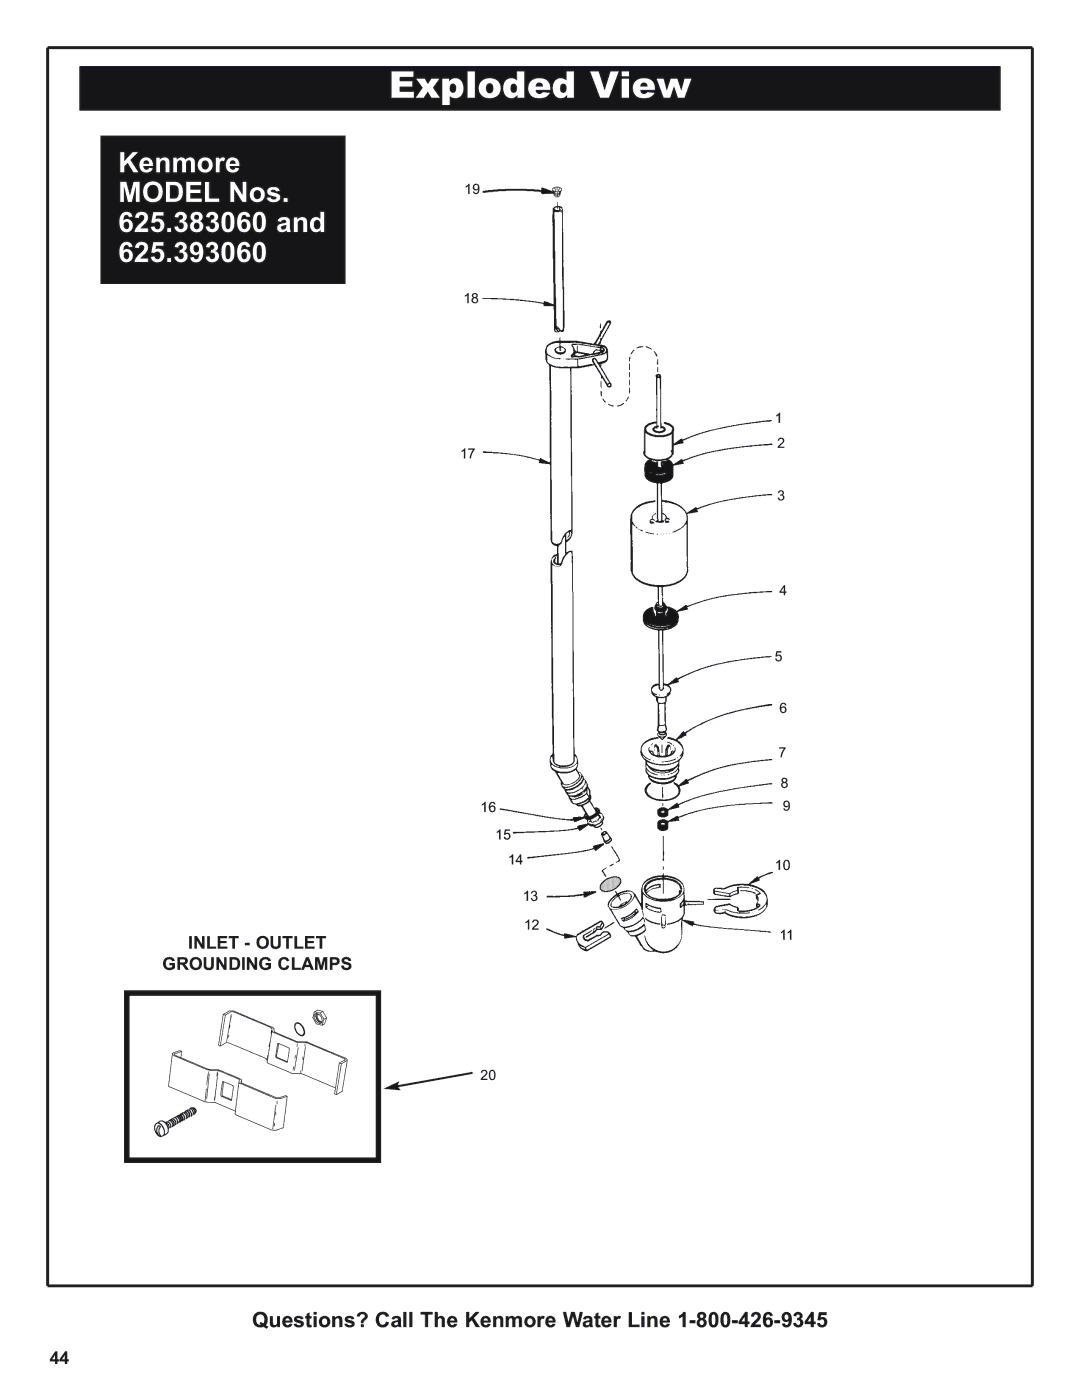
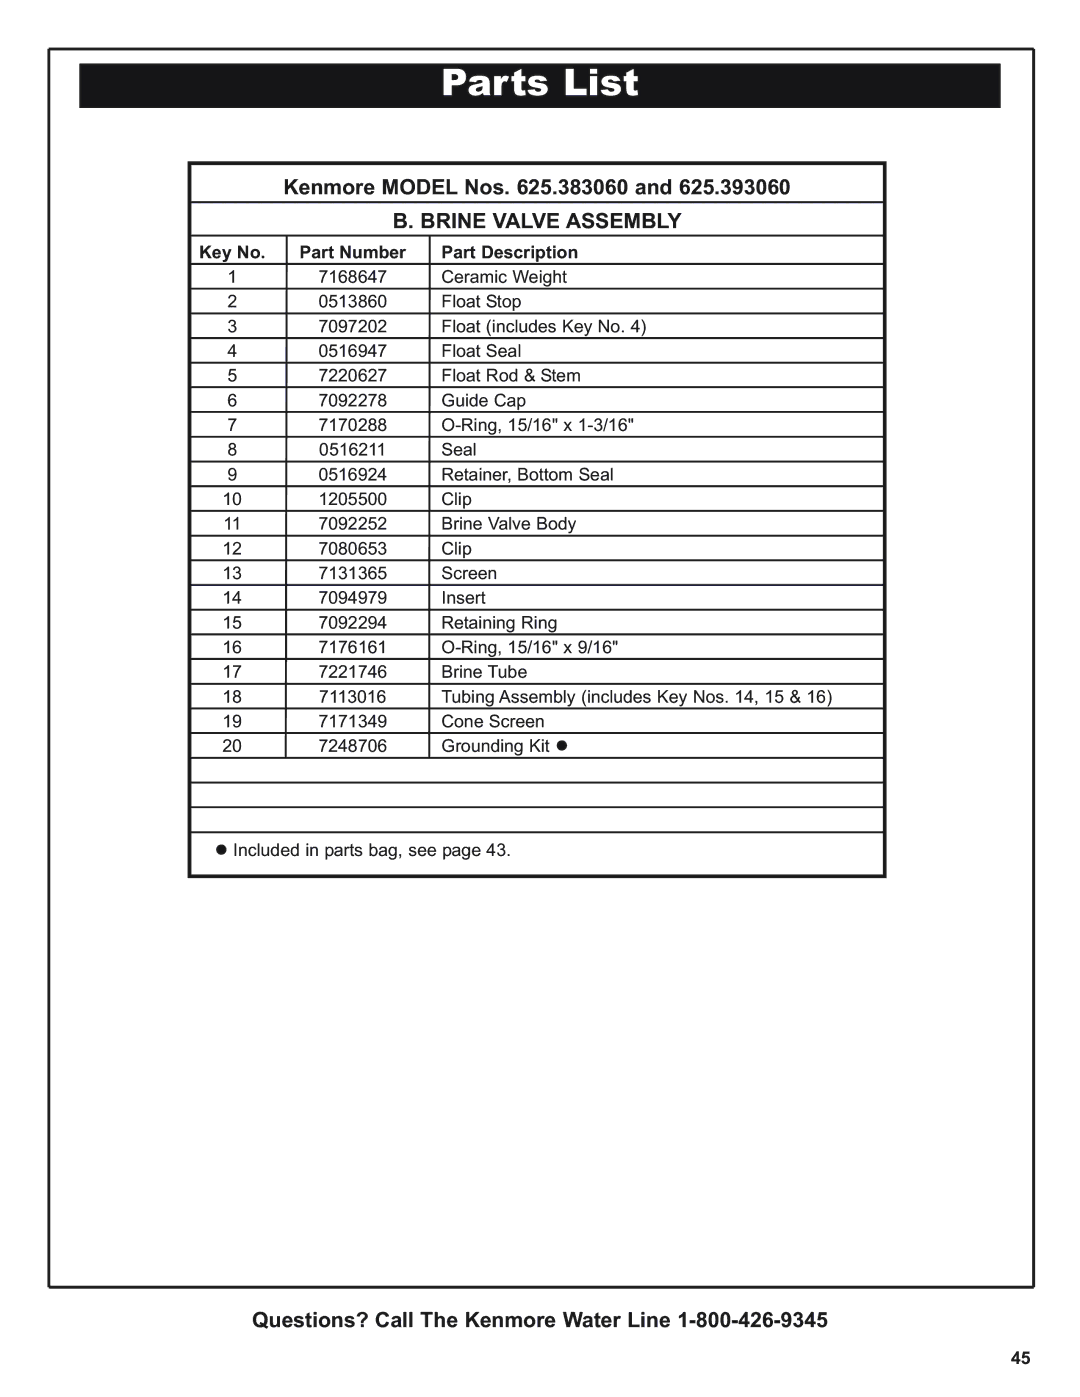
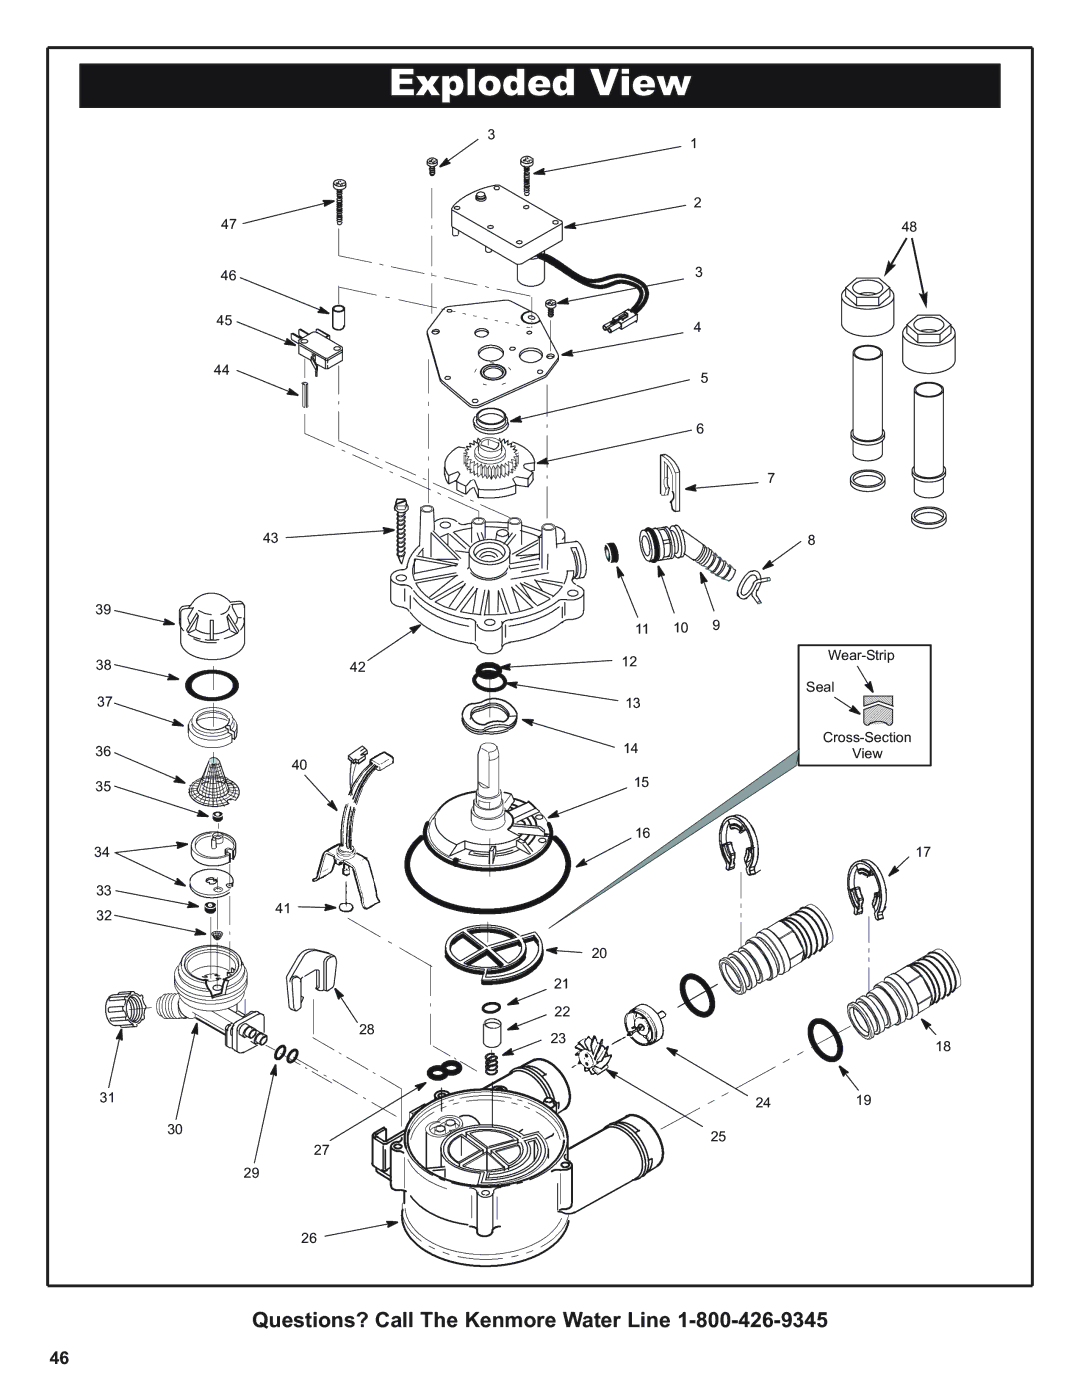
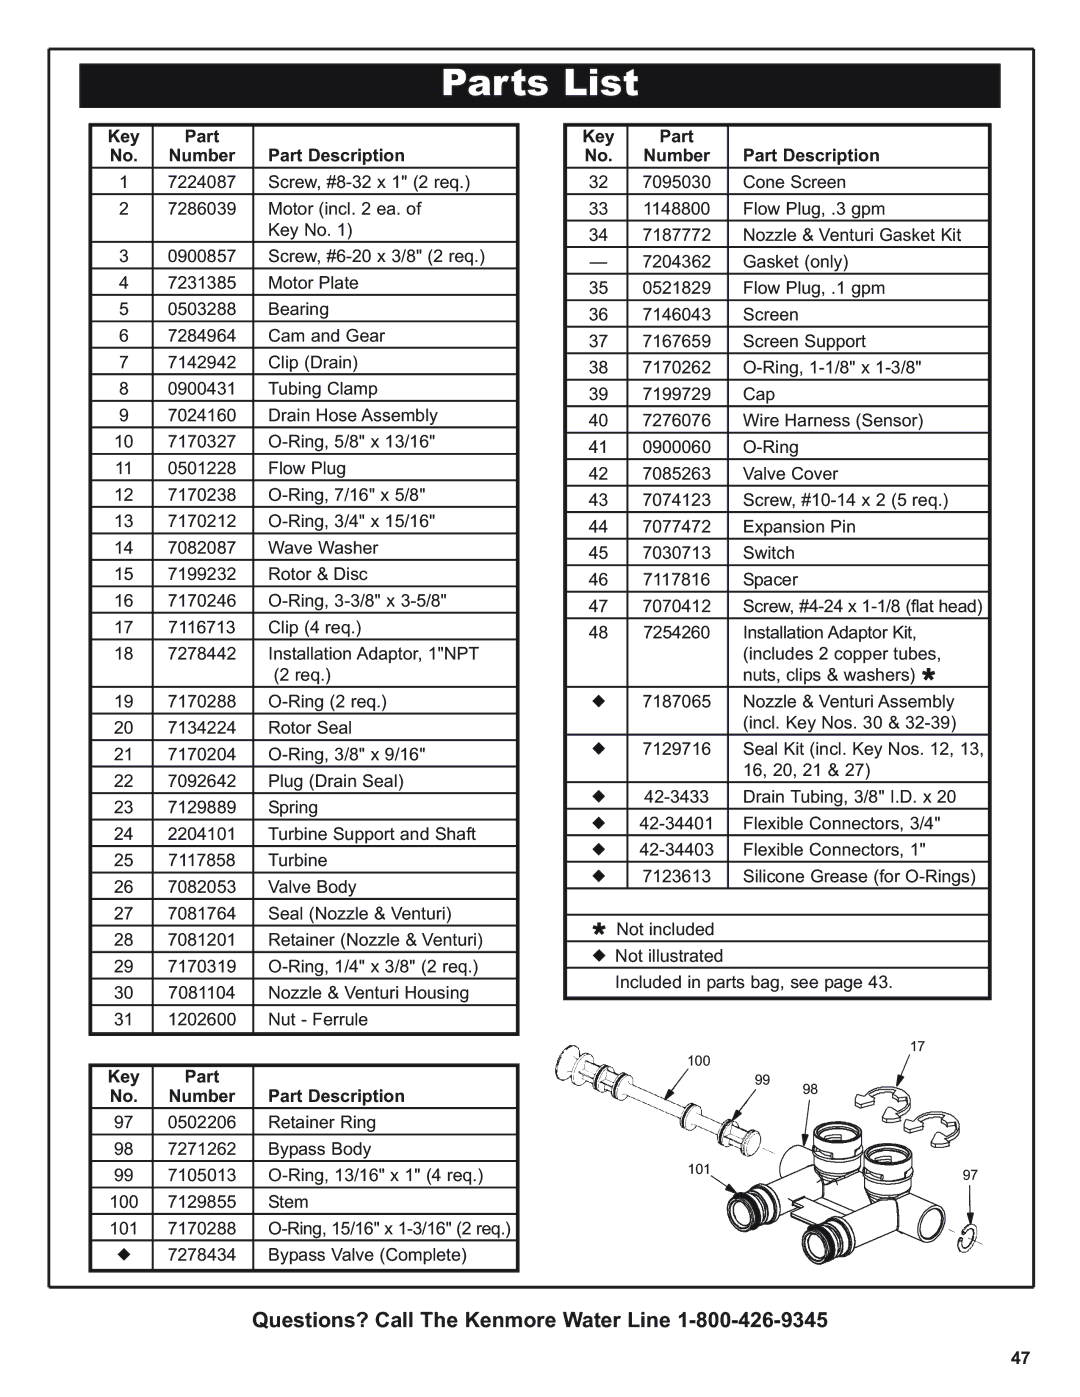
Kenmore 300 Series, 300 Series warranty Specifications, Bypass Valves, Inches

Page 32

Specifications

F

B

A


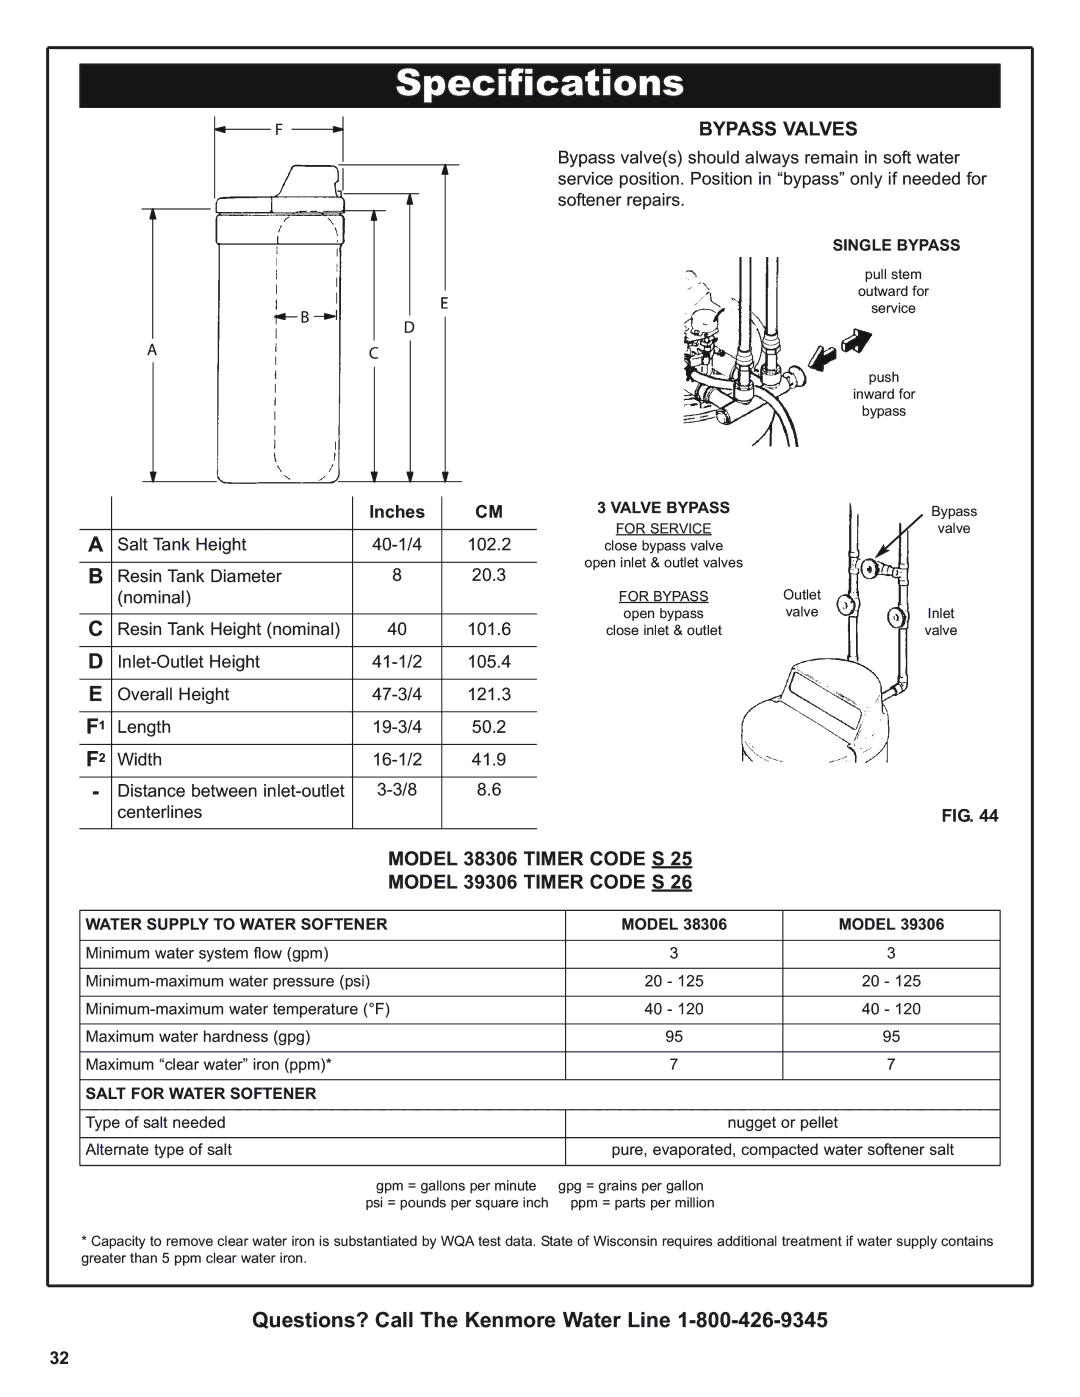
BYPASS VALVES


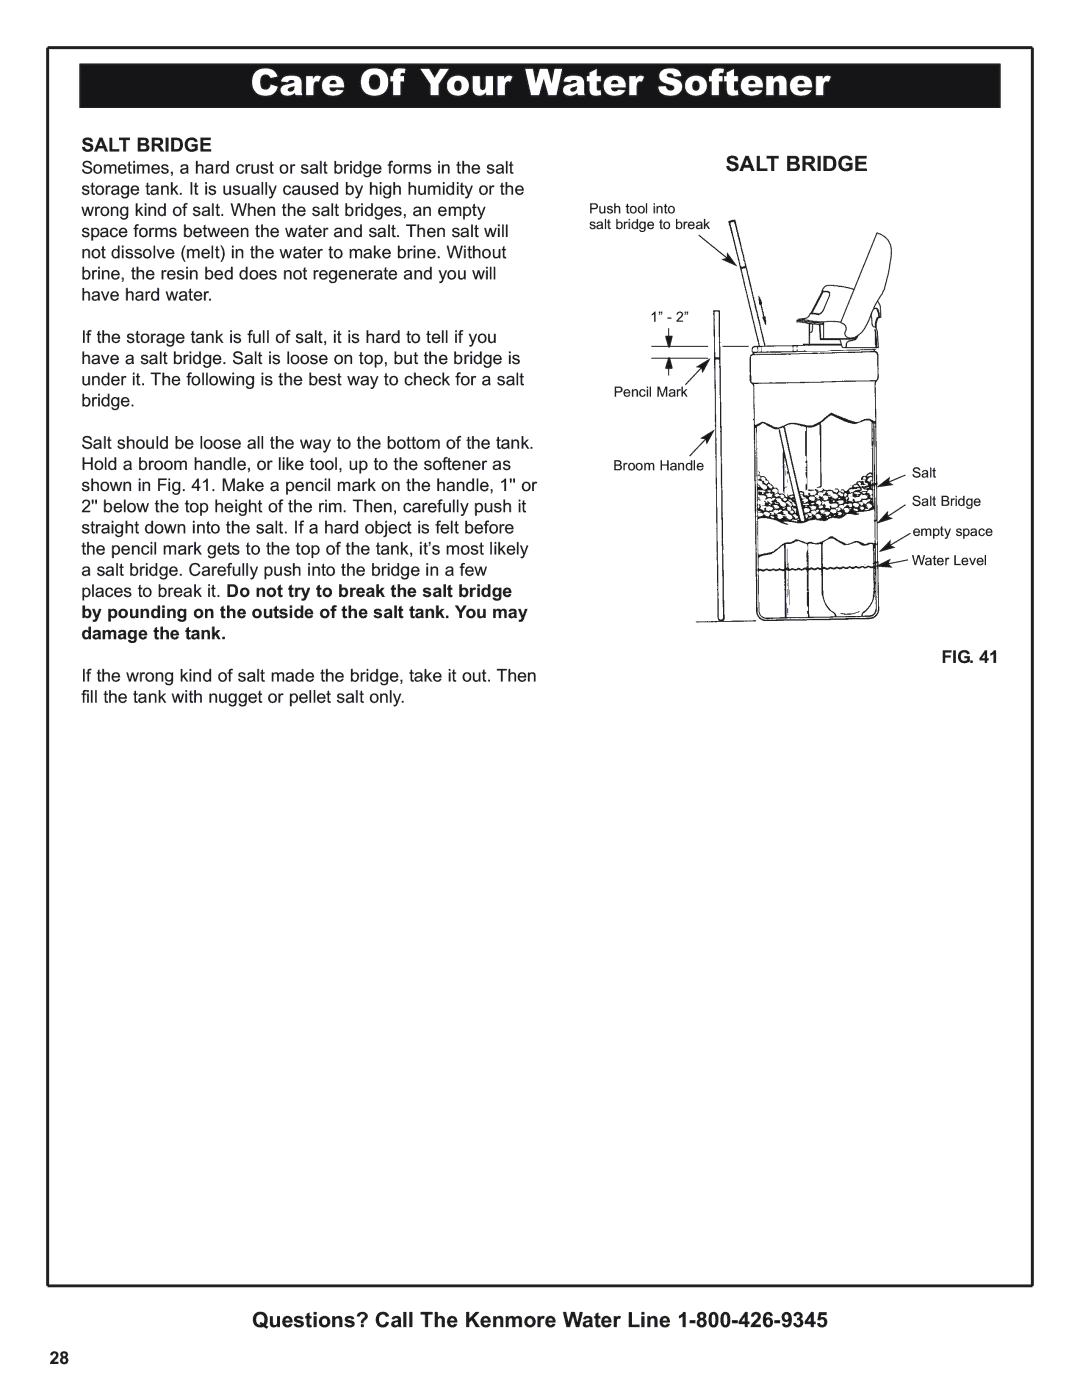
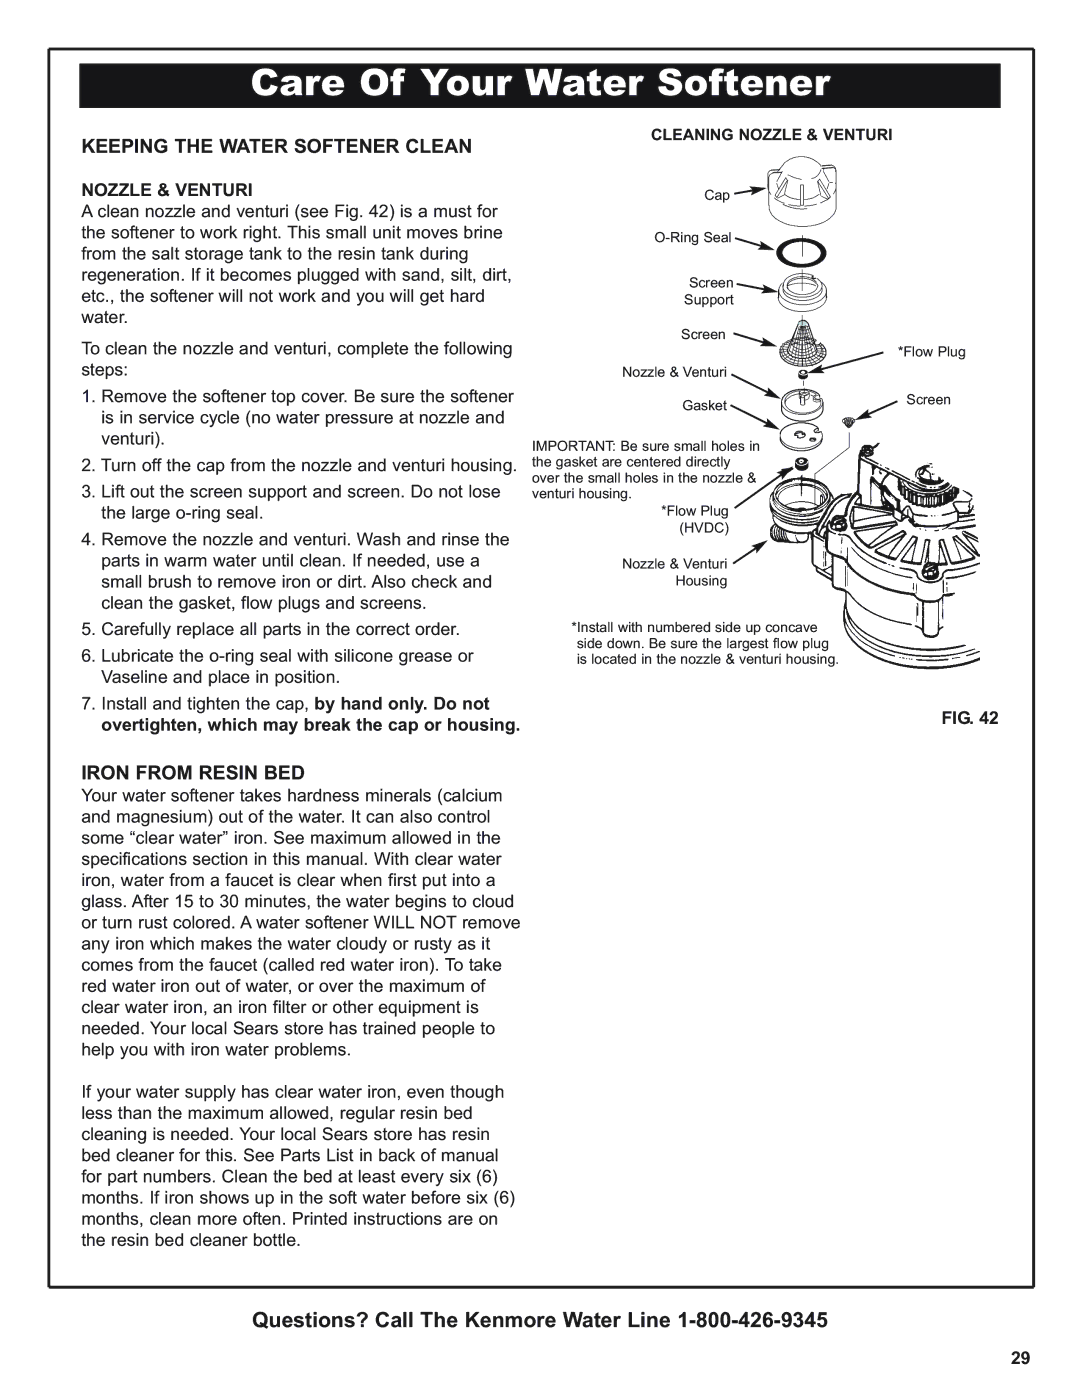
Bypass valve(s) should always remain in soft water


service position. Position in “bypass” only if needed for


softener repairs.


SINGLE BYPASS


pull stem

E

outward for

service

D


C


push


inward for


bypass


Inches

CM

3 VALVE BYPASS


Bypass


FOR SERVICE


valve

A

Salt Tank Height

40-1/4

102.2


close bypass valve


open inlet & outlet valves


B

Resin Tank Diameter

8

20.3


(nominal)


FOR BYPASS

Outlet


open bypass

valve

Inlet

C

Resin Tank Height (nominal)

40

101.6

close inlet & outlet


valve


D

Inlet-Outlet Height

41-1/2

105.4


E

Overall Height

47-3/4

121.3


F1

Length

19-3/4

50.2


F2

Width

16-1/2

41.9


-

Distance between inlet-outlet

3-3/8

8.6


centerlines


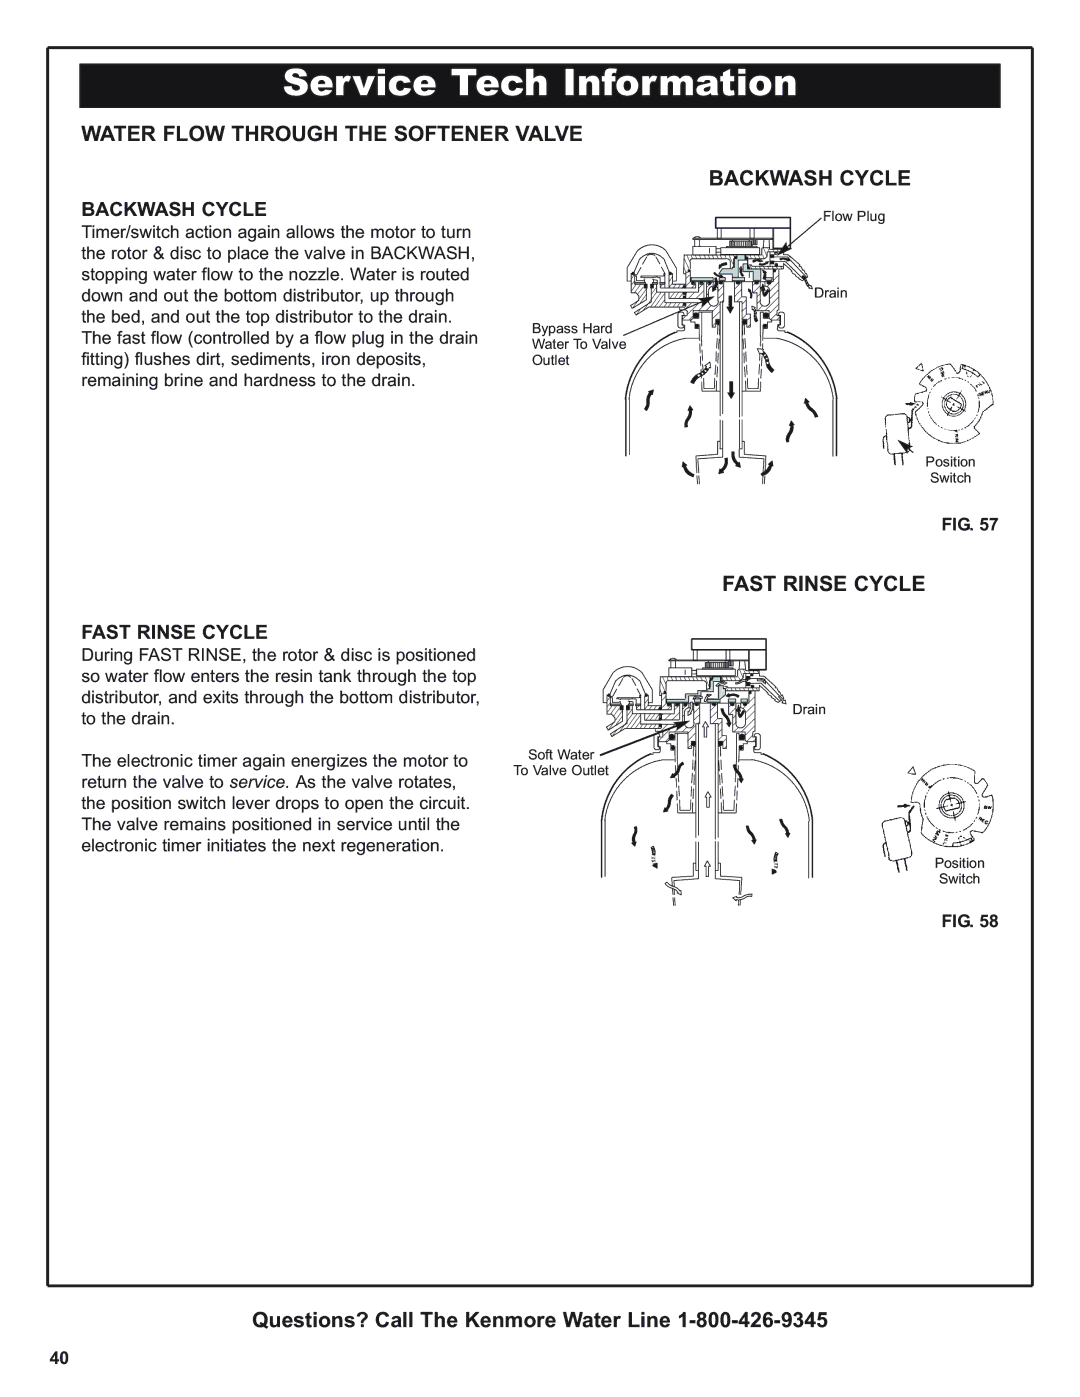
FIG. 44


MODEL 38306 TIMER CODE S 25

MODEL 39306 TIMER CODE S 26

WATER SUPPLY TO WATER SOFTENER

MODEL 38306


MODEL 39306


Minimum water system flow (gpm)

3


3


Minimum-maximum water pressure (psi)

20 - 125


20 - 125


Minimum-maximum water temperature (°F)

40 - 120


40 - 120


Maximum water hardness (gpg)

95


95


Maximum “clear water” iron (ppm)*

7


7


SALT FOR WATER SOFTENER


Type of salt needed


nugget or pellet


Alternate type of salt

pure, evaporated, compacted water softener salt


gpm = gallons per minute psi = pounds per square inch

gpg = grains per gallon ppm = parts per million

*Capacity to remove clear water iron is substantiated by WQA test data. State of Wisconsin requires additional treatment if water supply contains greater than 5 ppm clear water iron.

Questions? Call The Kenmore Water Line 1-800-426-9345

32

Image 32
Contents Repair or Parts ? Call toll free Save this ManualDisclaimer of implied warranties limitation of remedies ONE Year Limited Warranty on Water SoftenerTEN Year Limited Warranty Against Leaks Table of Contents Facts and Figures to KeepSafety Guides Unpack and Check Your Carton Parts DescriptionsSmall Parts Inspect ShipmentPlan Your Installation Proper Order to Install Water Treating EquipmentPlan Your Installation Tools NeededTypical Installation Where to Install the Water SoftenerSuggested Slab Foundation Installation Draw in Your Pipes and FittingsOUT PIPE, FITTINGS, Other Materials NeededRead Before Beginning Installation Before Installing Checks & TestsBypass Valve Install Plastic Bypass ValveAssemble Inlet Outlet ADAPTORS, or Plastic Bypass Valve Install 3-Valve Bypass Installing Holding ClipsInstalling 3 Valve Bypass and Pipes Valve BypassLocate Water Softener and Connect Pipes Move Softener Into PlaceTypical Soldering Connections Position Softener Into PlaceConnect Salt Tank Overflow Tubing Connect Valve and Salt Tank DrainsConnect the Valve Drain Hose Leak Test House Main Water Shutoff ValvesSingle Bypass Leak TestWater Meter Jumper Wire Connecting TransformerElectrical Requirements Cold Water Pipe GroundingInstall Covers and Restart Water Heater Install CoversInstall Covers Restart the Water HeaterSET Present Time of DAY Program The TimerProgram the Timer SET Salt Level SET Water Hardness NumberSET Regeneration Time Sanitize Your Water Softener AS Follows Sanitize The Water SoftenerSanitize the Water Softener Water Softening Salt with Iron Removing Additives Adding Salt To The Storage TankAdding Salt to the Storage Tank Check List of STEP-BY-STEP Guides to Install Check ListFaceplate Timer Features Extra RechargeRecharge NOW Recharge TonightEfficiency Mode Error CodeTo turn this setting on Program MemoryWater Flow Through Softener in Service Soft Water Service and RegenerationHow Your Water Softener Works Water Flow Through Softener in FillWater Flow Through Softener Brining and Brine Rinse Water Flow Through Softener in BackwashElectronics Water Flow Through Softener Fast RinseAutomatic Bypass Salt Bridge Care Of Your Water SoftenerSalt Bridge Nozzle & Venturi Keeping the Water Softener CleanIron from Resin BED Drain ALL Water from Softener Protect the Water Softener from FreezingProblem Cause Correction Checklist to Help YOU Save MoneySpecifications Model 38306 Timer Code S Model 39306 Timer Code SBypass Valves InchesOther Specifications Service Tech Information Wiring SchematicFaceplate Always Make These Initial Checks FirstProcedure for Removing Error Code from Faceplate Possible Defect CodeTroubleshooting Valve Position Indicators Timer PWA ReplacementOther Information ModelCycle Flow Rates Gallons PER MIN Brine Valve Float SettingManual Advance Regeneration Check Rotary Valve Service DisassemblyAssembly To Relieve PressureBrining and Brine Rinse Cycle Water Flow Through the Softener Valve Service CycleFill Cycle Water Flow Through the Softener Valve Backwash Cycle Fast Rinse CycleBackwash Cycle Fast Rinse CycleQuestions? Call The Kenmore Water Line Exploded View Part Number Part Description Parts ListWater Softener Complete Inlet Outlet Grounding Clamps Brine Valve Assembly Seal Key Part Number Part Description Get it fixed, at your home or ours